Spotting the artistic value of old photographs
Using Photoshop touch-up tools
Creating sepia tones in historic photos
Climb into a time machine by going up into your attic and pulling down those dusty old photos. There's gold up in them thar attics. What you can do in Photoshop with the old photos you find — tweak them for color, repair them, make them sepia tone, and so on — is nothing less than putting your relative's (or someone else's unknown relative's) past into the present and making it crystal clear. In this chapter, I cover auto and manual tweaks as well as adjustments to black-and-white (B&W) and color photos.
Taking an old photo and scanning and repairing it saves its life and can extend its life far into the future. Paper and film fade and are fragile. Conserving old photos helps ensure that these histories and precious images are around for generations to come.

Retro-based art — including photographs — is a saleable commodity because lots of folks want some piece of the past. Although recycling formal portraits is good, snapshots are just fine, especially if they contain nostalgic elements.
After you pull out your old photos and scan them, you can use the following Auto commands in Photoshop to try to refresh them and make them more clear and colorful. You can find these tools via Image
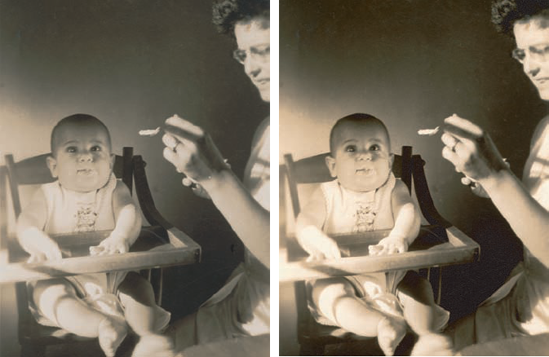
Auto Contrast: Use this option when you want to adjust contrast only — that is, make dark pixels darker and light pixels lighter. It does nothing with the color of your image but can really liven up a B&W shot. Figure 12-1 shows the improvement you can get with some images using the Auto Contrast option.
Auto Levels: Use this option to cut away some of the pure white and pure black that your photo might have from under- or overexposure. After that, it readjusts the blackest black and whitest white of your photo to even out the contrast. The best part of this command is that it also works on color photos, working especially well with those that have good uniformity of color (lots of shades) so that Photoshop can find the shades to make each shade distinguishable from the other. (See the upcoming example of using Auto Levels.)
Auto Color: Use this command when you want to neutralize your midtones. Say you have a red cast over your entire print: Using Auto Color removes the excess red. Use the Auto Color correction to specify shadows and highlights that you want to reduce.
For more about color tweaking with this tool, see "Using Manual Adjustments for Fine-Tuning."
You can also have Auto Color find dark and light colors as well as keep what you set as a default mode.
Over the years, age can flatten colors in a print. You've undoubtedly seen the yellowing effect that really happens fast with newspaper. With photos, it happens slower (the paper is better), but the deterioration still results in a yellow midtone. Photoshop can sense the plethora of yellows and fix this imbalance by adding blues via the Auto Color command. Mind you, I'm not talking about repairing damage here (later sections deal with that) but rather fading and color shift.
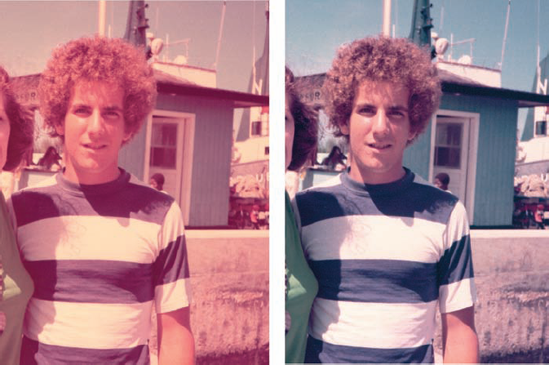
See the improvement after using the Auto Levels adjustment on this vintage photo, as shown before (left) and after (right) in Figure 12-2. It looks great now because the yellow is gone and there's more contrast in the midtones. (Take a look at the browns in the hair in both pictures, and you'll see more shades of brown and more detail).
Note
If you don't like the results of your tweaking, choose Edit
You can also tweak parts of your picture manually to fine-tune specific areas of an image. To the rescue come Photoshop's Dodge and Burn tools. Use these tools to lighten, darken, and refine details in an image. Photoshop also has filters that you can use, such as Despeckle (Filter
Use the Dodge tool of the Tools palette to lighten something dark in a photo. You can choose to lighten midtones, highlights, or shadows. Too, you can choose the exposure you want by typing in a value in the Exposure box at the top of the Photoshop window. (It appears after you click the Dodge tool of the Tools palette.)
Tip
When you click and hold down the Dodge tool, a drop-down menu presents you with a couple of other tools: the Burn tool and the Sponge tool. Read about them in upcoming sections.
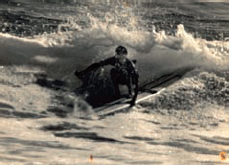
Finding an old B&W surfing photo from the '60s is a jewel from the sea, but tweaking it carefully using all aspects of the Dodge tool is indeed a surfing safari. I do that in these steps, to show you what you can achieve with this handy tool that makes dark areas lighter:
Choose a picture to tweak and study it, pinpointing the areas where you want to see more highlights.
For example, look for areas with too much black shadow, like that under and around the surfer's body in Figure 12-3.
On the Options bar, select a brush tip size that's appropriate for the shadow area you need to lighten.
For this example, I use a master diameter of about 75 px (pixels).
Create a duplicate layer by choosing Layer

Creating a new layer keeps your original from getting messed up, which enables you to go back to the original image layer, should your corrections go horribly wrong. For more about layers, see Chapter 14.
To begin, choose Shadows for Range and an exposure of about 20% if your photo is too dark.
Brush over the dark spots of the picture. Rub (click and drag) around the dark spots until you see more distinction among the shades.
If you see a little too much white, don't worry because you'll correct that in a later step. Or if you go way overboard, fade what you did by using the Edit
Tip
Feel free to change the brush size and switch back and forth from shadows to highlights to midtones in the Range drop-down menu. And use different exposures by typing in different values in the Exposure Value box next to the Range options.
Open your Layers palette by choosing Window
Slide the Opacity tool until you get an image you like (one with more highlights to cancel out the dark shadows and increase the distinction among shades, or contrast).
The results in Figure 12-4 are easy to see because I chose a photo that had many areas of darker tones that needed slight lightening.

Note
In Photoshop, some command names (in a menu) are followed by ellipsis points. This just means that when you select one of these, a dialog box opens requesting that you choose some manual options. But just over a dozen of Photoshop's filters do not have ellipsis points after their names in the Filter menu. Photo-shop automatically applies those filters to your image with preset values.
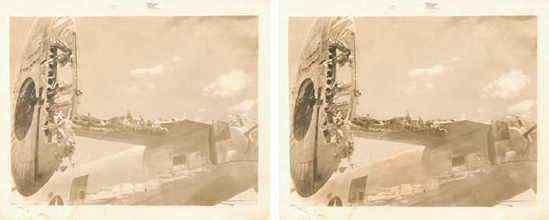
The opposite of the Dodge tool, the Burn tool darkens. With the Burn tool, which is also found in the Tools palette, you can darken highlights, midtones, and shadows and also change the exposure of the tool while you work. All these options are located on the Options bar and appear after clicking the Burn tool from the Tools palette.
On the left in Figure 12-5 is a faded image of a plane, faded especially where the plane has been damaged (see image on the left). By using the Burn tool, I can darken the damaged parts of the plane so that they have better contrast among the tones (see image on the right).
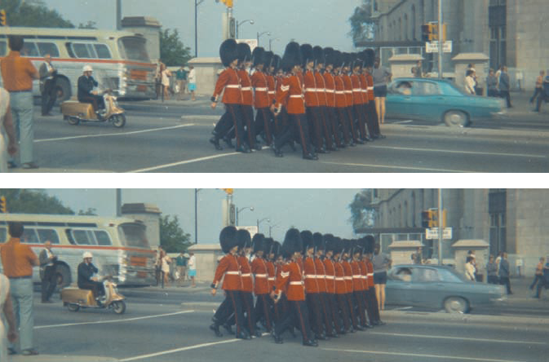
The Sponge tool (located on the Tools palette) changes an area of your photo's color saturation. You can saturate the color or desaturate by any percentage (called the flow in the menu bar).
Figure 12-6 shows marching cadets in red (and leaves a viewer nostalgic for old Kodachrome film). The picture, scanned from a positive, was taken in the '60s. The only part of the picture I want to change is the bright blue car in the background (image on the top), which I can do with the Sponge tool. Wiping the car with the Sponge tool desaturates it so that it blends in better with the gray tones of the building in the background (image on the bottom). Using the Sponge tool provides the perfect tweak for an interesting picture — not too much so as to destroy its integrity and period-feel, yet enough so that the car doesn't distract as much from the marching cadets.
Choose Filter
The Blur tool is located to the left of the Dodge/Burn/Sponge tools. The Blur tool, um, blurs. By that, I mean that the Blur tool is great when you want to smooth out an edge in a picture that contains a copied and pasted element or an area that has received a bit too many tweaks that you want to smooth out. You can blur with any size brush or strength when the normal mode is selected. I use it most often to smooth out where one object meets another in a picture — areas that can look unnatural after tweaks with other Photoshop tools.
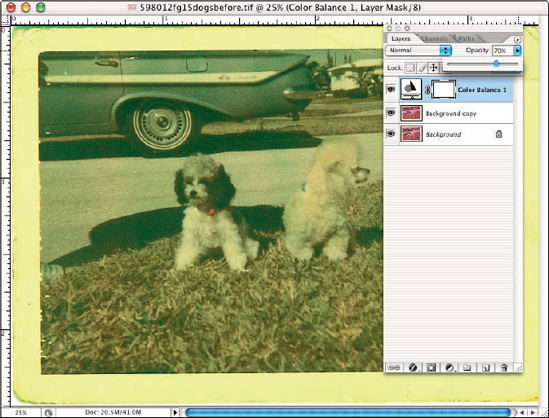
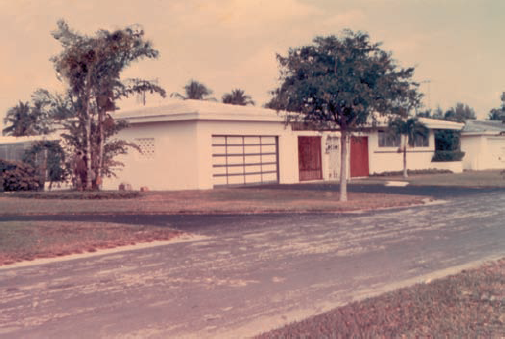
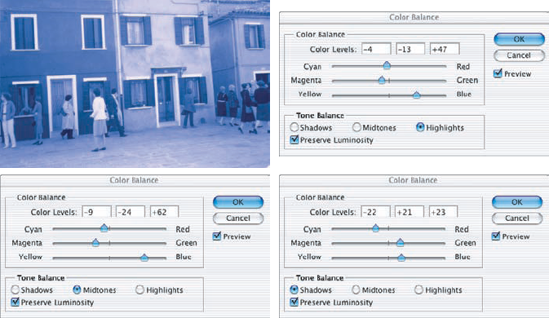
The next feature I use is the Color Balance adjustment (Image
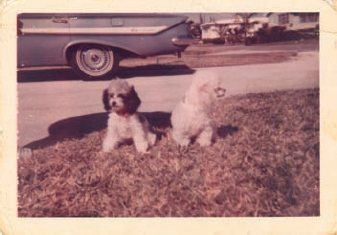
Figure 12-9 shows my color balance values — for shadows, midtones, and highlights — to color the dogs' world. I'm looking to get some green grass here, as well as some color in the old car in the background.
To merge the changes to the existing photo — to make them more subtle — I set the opacity in the Layers palette to 70%, as shown in Figure 12-10.
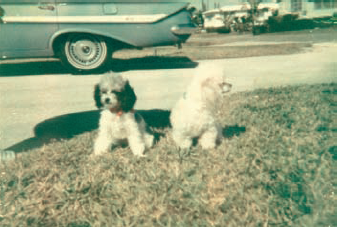
The picture shown in Figure 12-11 shows an improvement in color over the before picture (Figure 12-10). The color balance only goes so far in adjusting color, however.
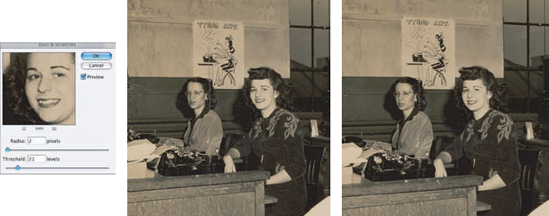
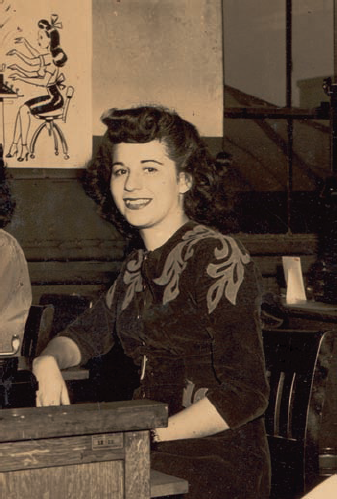
When you need to remove a horrible shadow — like that seen to the left of the secretary in Figure 12-7 — use the Magnetic Lasso tool and then the Clone Stamp tool to replace a dark blotch made with a crude flash. (See more on this in the section "Healing Damaged Photos.") The Clone Stamp tool copies pixels from one area (the source point) to another (the area that needs repair). Notice the bevels in the wooden wall behind the secretary: They're fairly even. To start, I click the Clone Stamp tool and select a source point by Option+clicking (on a Mac; in Windows, you Alt+click to define the source point) in a clean place on the wall at the meeting point of bevel and flat wall; I then drag to the right (that's the area I'm painting over). In doing so, I am able to carry the bevel evenly all the way to the secretary's shoulder where the horrible shadow once was. Figure 12-12 shows the shadow removed from the area to the left of the secretary.
Tip
When you use the Clone Stamp tool, you can click and drag while holding the Shift key and moving the tool. When you do, you get a straight horizontal line if you move your mouse horizontally (and a vertical line if you click and drag up or down).
Time takes its toll on all things, and old photos and negatives can suffer a lot of damage from water (mold or mildew), pests (mice and silverfish), and storage problems that cause damage (like when photos stacked in a box stick to each other). Many of the bigger challenges facing you come in the form of scratches, tears, and bends. Figure 12-13 shows just such a print. This print can be fixed with trusty old Photoshop.
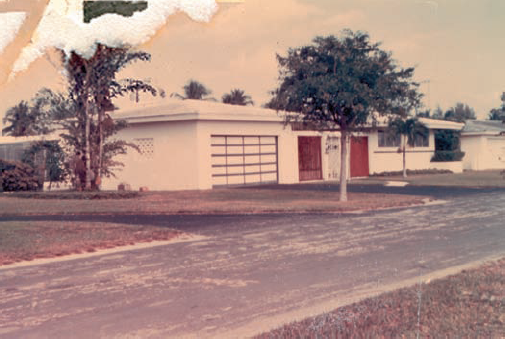
Using this photo as a model in the "Making the Corrections" section, I show you how to touch it up so that it's ready for printing. I scanned it first to have a digital image to work with. Note: Achieving good resolution from the very beginning — when you scan — can't be overstated. Resolution is important because the more information (that is, the higher the resolution) you have in an image, the better the detail; the better the detail you start with, the better the quality you have to work with. Think of it like bed sheets: The higher the thread count, the better and softer the sheet. Lower is thinner ... and not as good.
Cropping before you fix
Sometimes a photo needs a little more help than just color adjustment. If your print has an area on its edge (not in the middle) that's damaged, as the image on the left does (see the lower-left corner), you can either cut out the damage with the Crop tool, as I do here in the following steps, or fix it by following the steps in "Making the Corrections."
Open the image you want to crop.
Select the Crop tool from the Toolbox.
With the Crop tool, select the area to cut out, and then click the Crop tool icon on the toolbar to initiate the crop.
If you want to save what you have at this point, just click Save. The image on the right in the figure shows the cropping in progress.
Note
I use a Hewlett-Packard (HP) Scanjet type of scanner. It comes with a negative/positive reader that is merely a long light table upon which you slide your negative/positive into and then set the mechanism into the scanner bed. That might be different from yours, although the basic steps are similar. If you come across something weird, consult the documentation that came with your scanner software or consult a copy of Scanners For Dummies, Second Edition, by Mark L. Chambers (Wiley).
Open the scanned image that needs a little love and cosmetic aid. Then use the tools in Photoshop to help correct whatever problem is at hand — a tear, a scratch, a bend. In this example, part of the emulsion of the print is gone, leaving the white stock of the print paper showing through. Not good. To correct this issue, I use the Clone Stamp and Healing Brush tools. Remember: You can find these tools in the Toolbox.
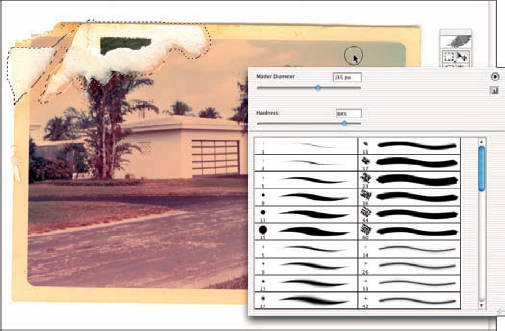
Using the Lasso tool or another selection tool, click and drag around the area that you want to fix, as shown in Figure 12-14.
Selecting an area can be tricky. If you aren't familiar with using the selection tools, I recommend practicing doing so before trying this exercise or consulting Photoshop CS2 All-in-One Desk Reference For Dummies, by Barbara Obermeier (Wiley).
With the Clone Stamp tool, click inside the drop-down list in the Photoshop Options bar to pick a brush size for your cleanup.
You can also get the same window to appear by right-clicking (if you have a two-button mouse) or Control+clicking (for you one-button mouse users).
Figure 12-15 shows some of the brush types you can select from and the slider bars to change the brush's diameter and hardness.
You use the Clone Stamp tool to take pixels from an undamaged area in the photograph and replicate them in the damaged area you identify. You have to determine what brush size will cover the area you want to clone. If the damaged area is small — say, for example, a long sliver of an area along one edge of the photo — choose a smallish size (such as 20 px) to maintain detail. If a large portion of the photo is damaged, like part of the sky in Figure 12-14, less detail is needed, so a larger size (such as 80 px) is appropriate.
Still using the Clone Stamp tool, find an undamaged area that's similar in color and texture to the area that you're repairing and Option+click (Mac) or Alt+click (Windows) to set the point (Photoshop calls it a source point) from which you'll copy (clone); then move your mouse over the area you want to fix.
You now have the good pixels with which you can repair the damage.
Carefully color in the area, making sure that you copy only the area that you want to fix.
If you accidentally pick up some of another object, reset your clone point by pressing Option/Alt and clicking your mouse over an area that includes what you're cloning.
Repeat Steps 2–4 with the Clone Stamp tool until you repair the entire area that needs fixing.
The whole process is a series of pick-up-what-you-need actions you achieve by constantly repeating Steps 3 and 4.
Deselect the area that you had been fixing by pressing

Select another area (or the same area again if you were adding a background, such as sky, and if you want something to go over part of that background, like a tree).
Clean up the edges of the old selection area with the Healing Brush or the Spot Healing Brush tool (Photoshop CS2).
Repeat Steps 2–7 to repair any other damaged areas in the photo.
Note
Use an appropriate part of the undamaged area to serve as the new source area for the Clone Stamp tool!
Crop the picture.
The finished product is shown in Figure 12-16. In this step, you can choose to take away borders or insignias, names of places, and other specific details that old photos sometimes contain.
Tip
Old photos scanned at higher resolutions will print almost perfectly, even if enlarged several times. Find more about enlarging your photos in Photoshop for printing in Chapter 17.
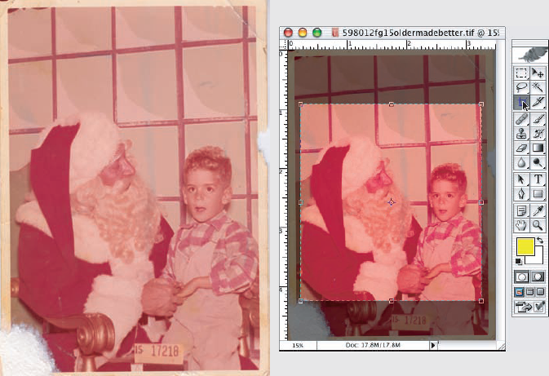
In this section, I show you how to take an old picture and make its color even better by using Color Balance tools. Figure 12-17 was taken in the late 1950s, although most of the color in the picture has remained (fortunately); that means that the tweaks should be minor for an ideal picture (that is, if you want to make them at all). Although some people like old pictures just as they are — faded and yellowed (a nostalgia thing) — you might have to eliminate creases and folds, which you can take out with the Clone Stamp and Healing Brush tools, as shown in the earlier section, "Healing Damaged Photos."
To tweak the color in the image shown in the "Cropping before you fix" sidebar, follow these steps:
To adjust the color, choose Image
To adjust the color more, choose Edit
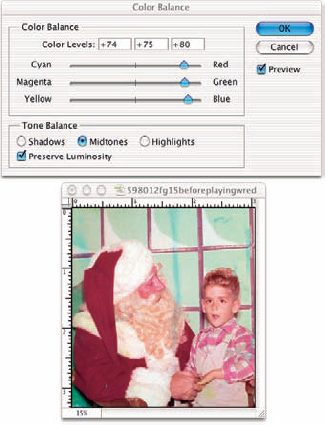
I want to play with the reds at this point, deepening them a little.
To adjust a particular color, choose Image
Figure 12-17 shows the Color Balance sliders I set to get deep Christmas reds in the outfits of both Santa and the boy.
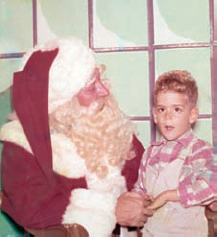
After you finish with color balancing, you can finesse the rest of the image with the Clone Stamp and the Healing Brush tools.
The steps in the section "Making the Corrections" show you how to use these tools.
The final picture after edits with the Clone Stamp and the Healing Brush tools is shown in Figure 12-18.
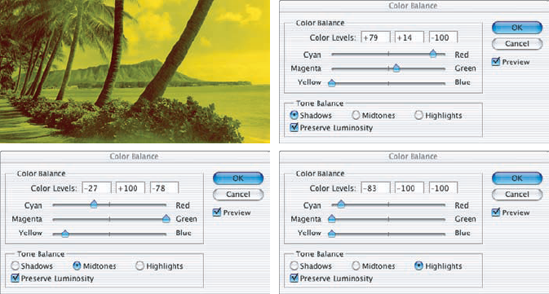
A photograph with a sepia tone is a black-and-white photograph that has tones of brown in it. Photographers can control the sepia toning with film in the darkroom, and you can, too, with your computer.
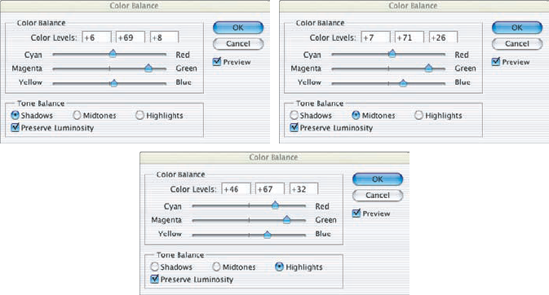
Figure 12-19 is a B&W photo that I manipulate to give it a sepia tone. To do this, I use the same tools using the Images
Here's what happens: I can make out some of the tree branches in the background, making the picture have more depth as I move the values of the sliders to those shown in Figure 12-20.

For the top slider bar, I shift toward Red and away from Cyan (a mixture of blue and green).
The red tones brighten up the picture a bit.
For the middle slider bar, I shift a bit toward Magenta.
This gives more detail.
For the bottom slider bar, I play with Yellow and Blue and then decide to not change this (by clicking and dragging the slider bar to a 0 reading).
The slight red in the highlights gives a subtle brown tone, resulting in a nice sepia effect, as shown in Figure 12-21. The sliders in Photoshop's Color Balance dialog box can make any tone that affects the entire picture, turning it to shades of red, cyan, magenta, blue (see Figure 12-22), yellow (see Figure 12-23), or any combination of these.
There's nothing like taking a picture of a friend and finding it 30 years later in a box. It's a picture that says wow with color, especially if it's on a negative that you thought you'd never use. Even more exciting than snapping the picture today is finding an image that you snapped when you were a kid, and not just any image, but one on old Kodak 126 color negative film that scans onto your computer like it was shot yesterday. Figure 12-24 shows an image that was shot in the late 1960s on some very tough film.

Although this picture is pretty good as is because its color and contrast stayed in tact for over 40 years, you can get it to print with hues of orange that will soak the paper on which it will be cast. Here's how to set this up for a print out of paradise.
To enhance shadow, highlights, hue, and saturation in a photograph, take any photo with good exposure and follow these steps. (You need to experiment a little, though, with the values that you choose in each step.)
In Photoshop, open the photograph and decide what repairs you want to make.
Choose the Clone Stamp tool, Option-click on a clean spot nearby, and then clean up specks of dust.
In Photoshop CS2, you can use the Spot Healing Brush tool of the Tools palette (looks like a Tootsie Roll with a dashed ring around the end of it). Photoshop calculates the surrounding colors and washes away the spot.
For the Clone Stamp tool, I recommend a small brush setting to maintain detail. To do this, slide the master diameter bar to get the brush size you want. Because your brush size is going to be small, as are the areas you're correcting, you won't need to use the Healing Brush tool.
Choose Image
I recommend using the Curves dialog box here — instead of Auto Levels — because of the sweeping manipulations you can make simultaneously.
There's more to this dialog box than meets the eye. You can adjust each curve channel by channel. Add a point on the curve by clicking in the work area. Take away a point by clicking and dragging it off the work area and using the Eyedropper tool to reset your black, gray, and/or white points. (Say, if you click the picture with the black point Eyedropper in an area lighter than black, you get a very dark picture because you added lighter tones to the value from which Photoshop calculates pure black.) Last, as you click your picture, you'll see the values of the input and output changing. Those values are actually the tonal ranges as they're read from the curve. Yes, they're algebraic x and y coordinates, that in effect associate the tonal value from a point on the line to a point in your picture.
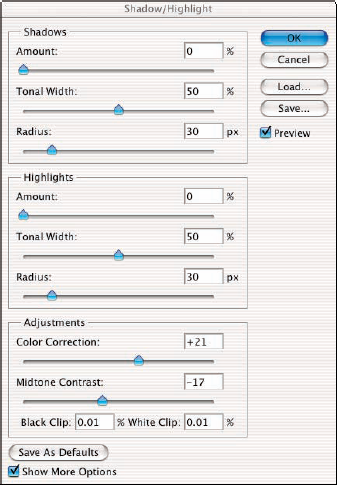
Choose Image
This tool has to be one of Photoshop's most effective, lightening dark images and darkening light ones. The sliders in the dialog box work best on images where you have strong backlighting. Use them also to brighten shadows. To correct your lighting, move the Amount slider back and forth until you get what you like. Watch out for the hazy white that is created when you overdo it. The Tonal Width slider determines what values are included in "shadows" or "highlights" as you adjust. The Radius slider controls how large or small an area of shadow or highlight must be before it's adjusted.
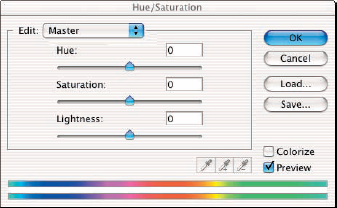
Choose Image
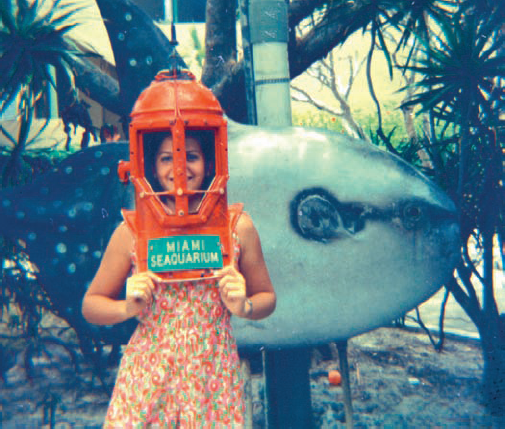
This dialog box — which you use to make adjustments to color — features sliders and also an Edit drop-down menu that shows the different colors that you can adjust: red, yellow, green, blue, cyan, and magenta. I make most of the values for each color in the positive range because the original picture lost color and became dark — so I give it color and make the colors lighter using these tools. I take away a tad of red to make the helmet bright orange. I up the saturation a little bit because during printing, I want more red and yellow ink to go to the helmet (and to the pattern in the girl's dress). That's all I want to tweak because the dark background of the fish and plants is appropriate for what the picture was intended to do — make the subject look like she's underwater.
Tip
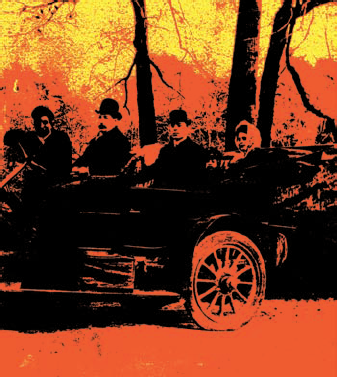
Figure 12-27 shows the image after the tweaks. No more changes to this image are necessary in preparation for printing for some printers, such as a HP Photosmart (a printer series in which the colors are decided by the printer itself so that the range of colors you choose in Photoshop has only a nominal effect). The image might need more tweaks if it's printed on different printers. See Chapter 17 for more about printing.