
12. Working with Regions
Once upon a time, recording engineers performed edits by cutting and splicing back together analog tape. Cutting tape with a razor blade is a destructive process: The original audio recording is altered permanently. In Pro Tools, however, editing is non-destructive: Edits are performed on audio regions that visually represent your audio files. Your original audio files remain untouched on disk. Editing audio regions non-destructively makes it easy to clean up rough spots on tracks, and it frees you to experiment with different arrangements and generate new musical ideas.
This chapter covers the fundamentals of editing audio regions. Using the techniques for selecting audio regions presented in the previous chapter, you’ll learn how to create new regions by capturing portions of larger regions. You’ll learn various methods of sliding regions within tracks and between tracks, and how to place regions, align regions, and trim regions, too.
We conclude with a look at ways to manage regions including how to rename, hide, and delete them from a session. You’ll also learn how to create region groups, which let you handle multiple regions represented by a single region group file.
Creating New Regions
Pro Tools provides several commands for creating new regions from selected portions of regions. When you create a new region, it’s displayed in the track’s playlist and in the Regions list.
Capturing regions
The Capture Region command lets you define a selection as a new region and automatically adds it to the Regions list. You can then drag the new region from the list to any track.
To capture a new region
1. Select the portion of the existing region you want to capture with the Selector tool.
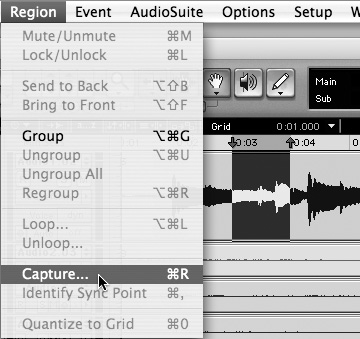
2. Choose Region > Capture (Figure 12.1).
Figure 12.1. To capture a new region, choose Region > Capture.
3. Enter a name for the new region and click OK.
The new region appears in the Regions list. The selected portion of the region remains selected.
• To set Pro Tools to automatically name new regions, select a newly created region in the Regions list. In the pop-up menu, choose Auto Rename Selected (Figure 12.2). Enter the desired auto-name parameters in the Auto Rename dialog box.
Figure 12.2. Choose Auto Rename in the Regions list pop-up menu.

Separating regions
The Separate Region command lets you define a selection as a new region and separate it from adjacent audio data. You can separate edit selections made within a single region, across adjacent regions in the same track, or across multiple tracks.
In Pro Tools 7 the Separate Region command includes new options for separating regions quickly into many smaller regions.
• At Selection: At Selection creates one new separate region at the exact start and end points of your region selection.
• On Grid: On Grid creates separate new regions between each grid line within your edit selection, according to the current grid value.
• At Transients: At Transients creates separate new regions between each transient peak (audio level spike) contained within your edit selection.
If no selection is made, the region is split at the edit cursor’s insertion point.
To separate a region
1. Select the portion of the existing region you want to separate.
or
Click with the Selector at the point where you want to split the region.
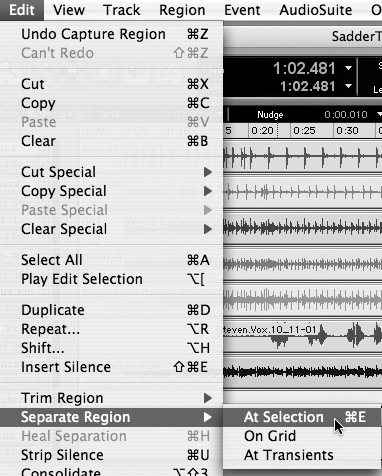
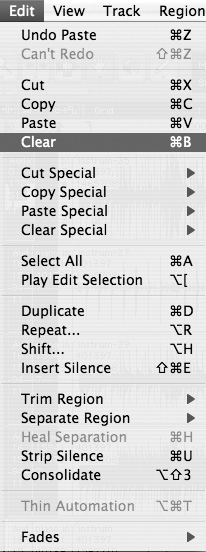
2. Choose Edit > Separate Region > At Selection (or select On Grid or At Transients to create the desired number of smaller separate regions) (Figure 12.3).
Figure 12.3. To separate a selected region, choose Edit > Separate Region > At Selection.
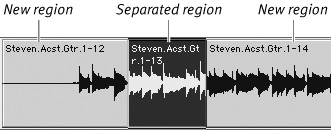
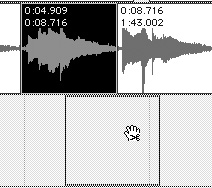
A new, separate region is created and appears in the Regions list. New regions with new start and end times are created on either side of the separated region (Figure 12.4).
Figure 12.4. New regions with new start and end times are created on either side of a separated region.
To separate a region using the Separation Grabber
1. With the Selector, select the region you want to separate.
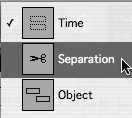
2. Choose the Separation Grabber from the Grabber pop-up menu (Figure 12.5).
Figure 12.5. Click and hold the Grabber tool and choose the Separation Grabber from the Grabber pop-up menu.
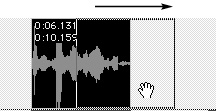
3. Drag the separated region to the desired location on any track (Figure 12.6).
Figure 12.6. You can drag a separated region to a new location on any track.
A new, separate region is created and appears at the desired location. New regions with new start and end times are automatically created on either side of the separated region.
To separate a selection without altering the original region
1. Select the region you want to separate.
2. Choose the Separation Grabber from the Grabber pop-up menu.
3. Hold down Option (Macintosh) or Alt (Windows), and drag the selection to the desired location on any track.
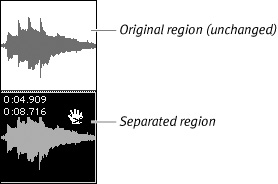
A new, separate region is created and placed at the desired location. The original region remains intact (Figure 12.7).
Figure 12.7. To separate a selected region without altering the original region, choose the Separation Grabber. Then, while pressing Option (Macintosh) or Alt (Windows), drag the selection to a new location on any track.
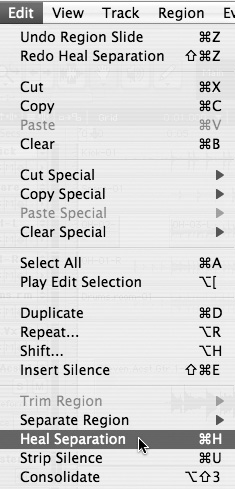
• You can restore a separated region with the Heal Separation command: Select part of the first region, the entire separation between the regions, and part of the second region. Choose Edit > Heal Separation (Figure 12.8). (Regions must remain adjacent, with start and end points unchanged, for the Heal Separation command to work.)
Figure 12.8. To restore separated regions, choose Edit > Heal Separation.
Placing Regions in Tracks
Once you’ve created a new region, you can place it in a track by dragging it within the same track, dragging it from another track, or dragging it from the Regions list. The exact placement of a region in a track is affected by the current Edit mode (Figure 12.9) as follows:
Shuffle mode: In this mode, adjacent regions automatically snap together and cannot overlap. When you place a new region at the start point of an existing region, the existing region is pushed to the right and snaps to the end of the new region.
Spot mode: In this mode, you can move a region to an exact time location on a track. Spotting is useful when working with film and video, or whenever you need to move a region to a precise time location. When you place a new region while in Spot mode, the Spot dialog box prompts you to enter a time location.
Grid mode: In this mode, the dragged region snaps to the nearest Grid boundary. You can choose a Grid value in the Grid Value pop-up menu in the upper right of the Edit window.
Slip mode: In this mode, you can move and place regions anywhere in a track. Slip mode is useful for moving regions quickly within and between tracks.
For more information on Edit modes, see Sliding Regions, later in this chapter; or see Chapter 10: Editing Basics.
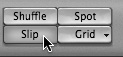
Figure 12.9. The Edit mode buttons: Shuffle mode, Spot mode, Grid mode, and Slip mode. Edit modes give you different ways to place regions on tracks.

1. Select a region in the Regions list.
2. Drag the selected region to the desired track location (Figure 12.10).
Figure 12.10. You can place regions on tracks by dragging them from the Regions list.
The region is placed in the track at the desired location, as determined by the current Edit mode.
To place the start of a region at the edit insertion point
1. Use the Selector to click in the track at the desired insertion point.
2. Hold down Control (Macintosh) or Start (Windows) and drag the region from a track, the Regions list, or a DigiBase browser to the destination track.
or
If the region is already in the track, Control-click (Macintosh) or Start-click (Windows) the region with the Grabber.
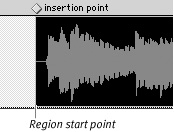
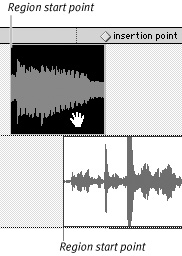
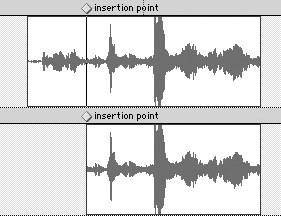
The region appears in the track with its start at the edit insertion point (Figure 12.11).
Figure 12.11. To place the start of a region in the same track at the edit insertion point, Control-click (Macintosh) or Start-click (Windows) with the Grabber.
To place the end of a region at the edit insertion point
1. Use the Selector to click in the track at the desired time location.
2. Hold down Command-Control (Macintosh) or Control-Start (Windows) and drag the region from either another track or from the Regions list to the destination track.
or
If the region is already in the track, Command-Control-click (Macintosh) or Control-Start-click (Windows) the region with the Grabber.
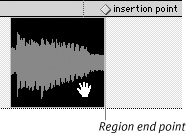
The region appears in the track with its end at the edit insertion point (Figure 12.12).
Figure 12.12. To place the start of a region in the same track at the edit insertion point, Control-click (Macintosh) or Start-click (Windows) with the Grabber.
Sliding Regions
You can slide regions (or groups of regions) within a track or between tracks using the Edit window’s Grabber tool. Sliding is a useful and intuitive way to move audio regions: You can slide regions into rough arrangements quickly by eye; or you can move them to precise time locations.
Pro Tools offers a number of sliding methods, which depend on the current Edit mode.
Slipping regions
In Slip mode, you can move regions freely with the Grabber tool within a track or between tracks. You can slip a region between other regions, or you can slip a region so that it overlaps or completely covers another region.
To slip regions
1. In the Edit window, set the Edit mode to Slip (Figure 12.13).
Figure 12.13. Click Slip to set the Slip Edit mode.
2. Click the Grabber tool (Figure 12.14).
Figure 12.14. The Grabber tool in the Edit window.
![]()
3. With the Grabber, drag the region you want to slip.
The region moves freely to any location on any track.
Shuffling regions
In Shuffle mode, adjacent regions automatically snap together and cannot overlap. When you place a new region at the start point of an existing region, the existing region is pushed to the right and snaps to the end of the new region.
To shuffle regions
1. In the Edit window, set the Edit mode to Shuffle (Figure 12.15).
Figure 12.15. Set the Edit mode to Shuffle.
![]()
2. With the Grabber tool, drag a region to the start point of another region.
The dragged region appears at the existing region’s start point. The existing region is shuffled to the right and snaps to the end of the newly placed region (Figure 12.16).
Figure 12.16. Drag a region to the start point of another region. The dragged region snaps to the start point of the other region. The other region is shuffled to the right and snaps to the end point of the dragged region.

or
With the Grabber tool, drag a region between two existing regions (Figure 12.17).
Figure 12.17. Drag a region between two other regions.
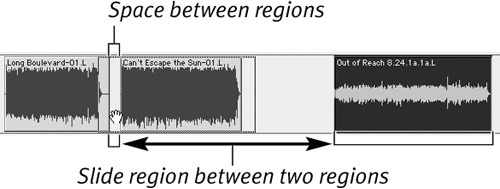
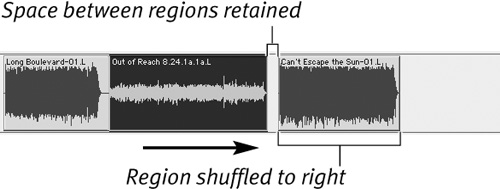
The dragged region snaps to the end of the existing region on the left. Any regions to the right are displaced to the right by the length of the newly placed region (Figure 12.18).
Figure 12.18. The dragged region snaps to the end of the existing region on the left. The region to the right is displaced to the right by the length of the dragged region. The space between the two regions is retained.
Spotting regions
In Spot mode, you can place regions at exact time locations in a track. Spotting is useful for accurately placing regions dragged from the Regions list. It’s also useful for fixing timing problems between tracks of music and for accurately synchronizing dialog or sound effects during video post-production.
To spot a region
1. In the Edit window, set the Edit mode to Spot (Figure 12.19).
Figure 12.19. Click Spot to set the Edit mode.
![]()
2. Drag a region from the Regions list to an existing track.
or
Click a region already in a track with the Grabber tool.
The Spot dialog box appears (Figure 12.20).
Figure 12.20. The Spot dialog box.
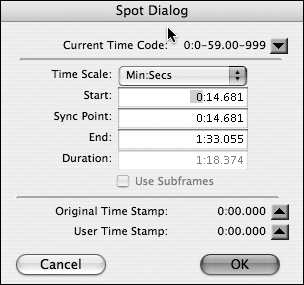
3. In the Spot dialog, select the desired time format from the Time Scale pop-up menu (Figure 12.21).
Figure 12.21. Select a time format from the Time Scale pop-up menu.

4. Click in the field for Start, Sync Point, or End and type in a new time location.
or
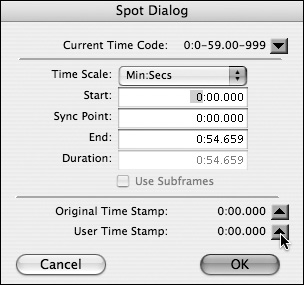
Click the Up arrow next to Original Time Stamp or User Time Stamp to enter those values into the currently selected field (Figure 12.22). For more information on time stamps, see Chapter 10: Editing Basics, or see the Pro Tools Reference Guide.
Figure 12.22. Click the Up arrow next to the Original Time Stamp or User Time Stamp to enter those values in the currently selected field.
The region is moved to the new location specified for its start or sync point. (If a region does not have a sync point defined, the Sync Point field in the Spot Dialog functions the same as the Start field.)
Using Grid modes
In Grid mode, a dragged region snaps to the nearest Grid boundary. You can choose a Grid value in the Grid Value pop-up menu, to the right of the Grid Value indicator (Figure 12.23).
Figure 12.23. The Grid Value pop-up menu.

Pro Tools provides two different Grid modes, as follows:
Absolute Grid mode: In Absolute Grid mode, moving any region snaps the region to the nearest Grid boundary.
Relative Grid mode: In Relative Grid mode, you can move regions by the amount of the current Grid value, retaining the region’s relative position.
To select Absolute or Relative Grid mode
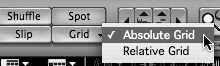
• In the Edit window, click Grid mode and choose Absolute or Relative from the pop-up menu (Figure 12.24).
Figure 12.24. Click the Grid mode button, and then choose Absolute or Relative from the pop-up menu.
To place or move a region while in Grid mode
1. In the Edit window, select a Grid value from the Grid Value pop-up menu.
2. Drag a region from the Regions list to an existing track.
or
With the Grabber, drag an existing region within a track to a new location.
In Absolute Grid mode, the region snaps to the nearest Grid boundary (Figure 12.25). In Relative Grid mode, the region moves by the amount of the current Grid value (Figure 12.26).
Figure 12.25. In Absolute Grid mode, regions snap to grid boundaries only.
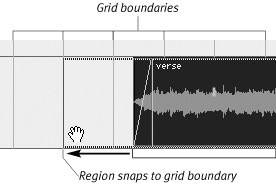
Figure 12.26. In Relative Grid mode, regions move by the amount of the current Grid value from their current location.

For more information on Grid mode, see Chapter 10: Editing Basics, or see the Pro Tools Reference Guide.
Aligning Regions
You can align a region to the start, end, or sync point of another region on a different track. This is useful for bringing regions on different tracks into alignment for playback.
To align the start points of regions on different tracks
1. Use the Grabber to select the region you want to align to (Figure 12.27).
Figure 12.27. To align the start point of regions on different tracks, click with the Grabber on the region you want to align to. Control-click (Macintosh) or Start-click (Windows) on the region you want to align.
2. Control-click (Macintosh) or Start-click (Windows) with the Grabber on the region you want to align.
or
Control-drag (Macintosh) or Start-drag (Windows) a region from the Regions list to another track.
The start point of the second region aligns to the start point of the first region (Figure 12.28).
Figure 12.28. The start point of the second region aligns to the start point of the first region.
To align the end point of a region to the start point of another region on a different track
1. Use the Grabber to select the region you want to align to (Figure 12.29).
Figure 12.29. To align the end point of a region to the start point of a region on another track, click with the Grabber on the region you want to align to. Command-Control-click (Macintosh) or Control-Start-click (Windows) on the region you want to move.
2. Command-Control-click (Macintosh) or Control-Start-click (Windows) with the Grabber on the region you want to move.
or
Command-Control-drag (Macintosh) or Control-Start-drag (Windows) a region from the Regions list to another track.
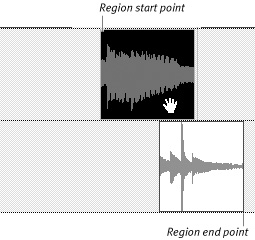
The end point of the second region aligns to the start point of the first region (Figure 12.30).
Figure 12.30. The end point of the second region aligns to the start point of the first region.
Identifying Sync Points
When you identify a region sync point, you define a specific point within a region. You can then align the sync point with an exact time location in a session.
Sync points are particularly useful in film and video work, where sound effects must occur at an exact moment. For instance, a video of a car crash might call for a sound effect consisting of a screech and a crash. By placing a sync point at the peak volume of the crash, you can easily spot the sound effect to the precise instant of the crash.
To create a sync point in a region
1. Click the Slip Edit mode button in the top left of the Edit window.
2. Click with the Selector on the location at which you want to place the sync point.
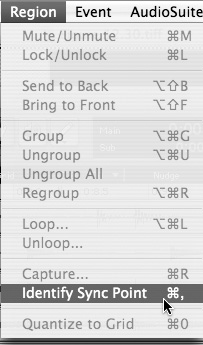
3. Choose Region > Identify Sync Point (Figure 12.31).
Figure 12.31. To identify a region sync point, choose Region > Identify Sync Point.
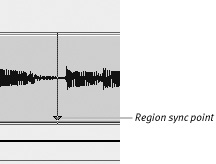
An arrow appears in the region indicating the sync point’s location (Figure 12.32).
Figure 12.32. An arrow appears in the region at the sync point.
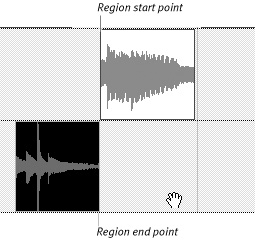
To place the sync point of a region at the edit insertion point
1. Click with the Selector in the track to define an edit insertion point.
2. Hold down Shift-Control (Macintosh) or Shift-Start (Windows) and drag the region from either the Regions list or from another track to the destination track.
or
If the region is already in the track, Shift-Control-click (Macintosh) or Shift-Start-click (Windows) on the region with the Grabber.
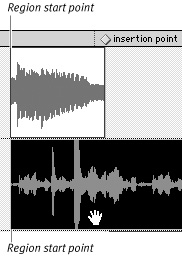
The region appears in the track with its sync point at the edit insertion point (Figure 12.33).
Figure 12.33. A region with its sync point at the edit insertion point.

To align the sync point of a region to the start point of another region on a different track
1. Click with the Grabber to select the region you want to align to.
2. Shift-Control-click (Macintosh) or Shift-Start-click (Windows) with the Grabber on the region you want to move.
or
Shift-Control-drag (Macintosh) or Shift-Start-drag (Windows) a region from the Regions list to another track.
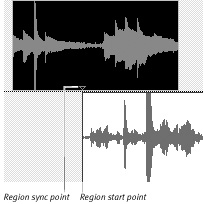
The sync point of the second region aligns to the start point of the first region (Figure 12.34).
Figure 12.34. The sync point of one region aligns to the start point of another region on a different track.
Trimming Regions
Trimming is a quick way to condense or expand regions. Pro Tools gives you a number of trimming options, including a versatile Trim tool and a set of Trim commands.
Using the Trimmer tool
The Edit window’s Trim tool includes the following modes:
Standard Trim tool: The Standard Trim tool lets you move region boundaries without moving the region. This is useful for hiding unwanted audio segments or for revealing currently hidden audio segments. (Think of the Standard Trim tool as opening and closing a curtain of invisibility over audio region boundaries—the trimmed part of the region does not disappear, it is merely rendered invisible and inactive).
The Standard Trim tool lets you shorten regions or lengthen them up to the full length of the original audio file on disk.
Time Compression/Expansion (or TCE) Trim tool: The TCE Trim tool lets you compress or expand the duration of audio regions. Unlike the Standard Trim tool, which lets you change region boundaries only, the TCE Trim toolstretches or shrinks the actual audio currently displayed within a region. The TCE Trim tool processes the audio with the Time Compression/Expansion (AudioSuite) plug-in, which creates a new file.
The TCE Trim tool is useful for correcting audio segments that are too short or too long. It’s also useful for matching the length of audio segments on separate tracks. For example, when you record harmonies or multiple vocal tracks, out-of-sync phrasing is common. With the TCE Trim tool, you can compress or expand a region to match the phrasing of the other vocal parts.
A word of caution: The TCE Trim tool can alter the sonic character of an audio region—as always, trust your ears. For more information on trimming regions, see the Pro Tools Reference Guide.
To trim a region with the Standard Trim tool
1. Click the Standard Trim tool in the Edit window (Figure 12.35).
Figure 12.35. The Trimmer tool.
![]()
2. Move the cursor near the start or end of the region until the Standard Trim cursor appears.
3. Drag the Standard Trim cursor to the left or right to shorten or lengthen the region, respectively (Figure 12.36).
Figure 12.36. Drag with the Trimmer to shorten or lengthen a region.

The region boundaries move, and the region is shortened or lengthened by the desired amount. If you’re trimming a stereo region, both channels are trimmed.
To compress or expand a region with the Time Compression/Expansion (TCE) Trim Tool
1. Select the TCE Trim toolin the Edit window (Figure 12.37).
Figure 12.37. Click the Trimmer tool and choose the Time Trimmer from the pop-up menu. The Time Trimmer is labeled “TCE” for Time Compression/Expansion.
2. Move the cursor near the start or end of the region until the Time Trimmer cursor appears (Figure 12.38).
Figure 12.38. Move the cursor near the start or end of a region until the Time Trimmer cursor appears.
3. Drag the Time Trimmer cursor to the left or right to compress or expand the region, respectively (Figure 12.39).
The Time Compression/Expansion (AudioSuite) plug-in processes the audio, and the region is compressed or expanded by the desired amount. A new audio file is created, which appears in the Regions list.
Figure 12.39. To compress or expand a region’s time length, drag the Time Trimmer to the left or right of the region.

• In Grid mode, the Time Trimmer cursorlets you compress or expand regions by precise grid increments. In Spot mode, the Time Trimmer cursor lets you compress or expand regions to a specified time location.
• To reverse the direction of the Time Trimmer cursor, press Option (Macintosh) or Alt (Windows).
Using the Trim command
The Edit window’s Trim command offers the following options for trimming selections:
Trim to Selection: This removes all audio in a region except the selected portion. It’s useful if you want to create a new region and clear the remaining unused part of the region from a track.
Trim Start to Insertion: This removes all audio in a region from the start point to the edit insertion point. It’s useful for quickly clearing audio at the beginning of a take.
Trim End to Insertion: This removes all audio in a region from the end point to the edit insertion point. It’s useful for quickly clearing audio at the end of a take.
Trim Start to Fill Selection: This command is designed to fill gaps between regions by trimming (expanding) from the start of one region toward the end of another region. Regions not filling the entire gap will be revealed to their original start point.
Trim End to Fill Selection: This command is designed to fill gaps between regions by trimming from the end point of one region toward the start point of another region. Regions not filling the entire gape will be revealed to their original end point.
To Fill Selection: This command is designed to fill gaps between regions by trimming (expanding) from the start point of one region and trimming (expanding) from the end point of the other region.
To trim a selection
1. Select a portion of a region.
2. Choose Edit > Trim Region > To Selection (Figure 12.40).
Figure 12.40. To trim a selection, choose Edit > Trim Region > To Selection.

The selected portion of a region becomes a new region, and the unselected portion is removed from the track (Figure 12.41).
Figure 12.41. The selected portion of the region becomes a new region, and the unselected portion is removed from the track.
To trim a region from the start point to the insertion point
1. Click in the track with the Selector to designate an edit insertion point.
2. Choose Edit > Trim Region > Start To Insertion (Figure 12.42).
Figure 12.42. To trim a region from the start point to the edit insertion point, choose Edit > Trim Region > Start To Insertion.

The edit insertion point becomes the region’s new start point (Figure 12.43).
Figure 12.43. The edit insertion point becomes the region’s new start point.
To trim a region from the end point to the insertion point
1. Click in the track with the Selector to designate an edit insertion point.
2. Choose Edit > Trim Region > End To Insertion (Figure 12.44).
Figure 12.44. To trim a region from the end point to the insertion point, choose Edit > Trim Region > End To Insertion.
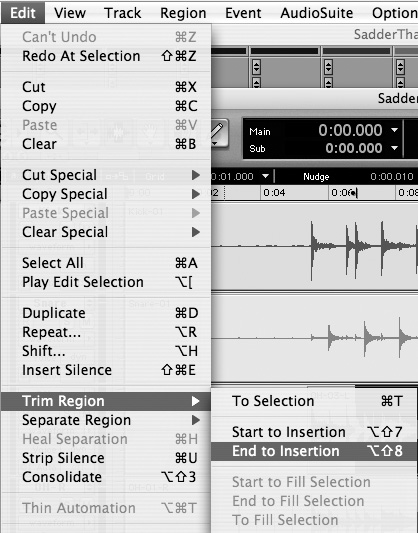
The edit insertion point becomes the region’s new end point.
To fill gaps between regions using Trim to Fill
1. With the Selector tool, select across the gap between to regions (Figure 12.45).
Figure 12.45. With the Selector tool, select across the gap between to regions.

2. Choose Edit > Trim Region and then select from the three Trim to Fill command options (discussed previously) (Figure 12.46).
Figure 12.46. To fill the gap between two regions, choose Edit > Trim Region > Start to Fill Selection.
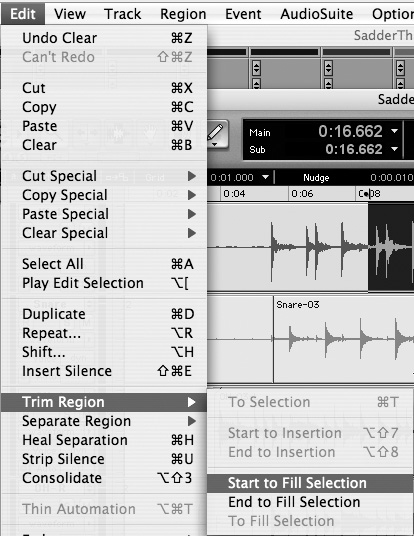
The selected regions are trimmed (expanded) to fill the gap between the regions.
• You can trim the start and end point of a region by nudging: Define a Nudge value in the upper right of the Edit window. Then use the Grabber to select the region you want to trim.
• To trim a region’s start point, hold down Option (Macintosh) or Alt (Windows) and press Plus or Minus on the numeric keypad. To trim a region’s end point, hold down Command (Macintosh) or Control (Windows) and press Plus or Minus on the numeric keypad.
Displaying Region Boundary Overlap/Underlap
Pro Tools makes it easy to perform edit-intensive tasks, such as creating composite performances (creating one good performance on a single track from pieces of multiple performances on different tracks). It’s easy to copy and paste audio regions from multiple tracks onto a single “comp” track.
When you place separate audio regions tightly together on a track, the boundaries of adjacent regions overlap or underlap. It’s important to keep tabs on region overlap, because it is easy to inadvertently click-on an underlapping region, bringing it forward to overlap neighboring regions.
If the previously underlapping region has been edited, had its tempo changed, or had its length altered with time-compression/expansion effects, bringing it forward into overlap position could disrupt the seamless flow of composite regions and produce unwanted, jarring noise at region transitions.
To display the region overlap indicator
• Choose View > Region > Overlap.
A thin diagonal line (or “dog-ear) appears at the corner of regions currently overlapping the boundaries of adjacent regions (Figure 12.47).
Figure 12.47. Choose View > Region > Overlap. Regions overlapping adjacent regions display a “dog-ear” corner.
To change region overlap or underlap
1. Select the reason you want to change.
2. Choose Region > Bring to Front.
The selected region changes to overlap neighboring regions.
or
Choose Region > Send to Back.
The selcted region changes underlap neighboring regions.
Nudging Regions
You can nudge selected regions by precise increments using the numeric keypad’s Plus and Minus keys. Nudging is very helpful for fine-tuning the placement of a region.
To set the Nudge value
1. In the Nudge Value pop-up menu, choose a time scale for the Nudge value (Figure 12.48).
Figure 12.48. The Nudge Value pop-up menu.
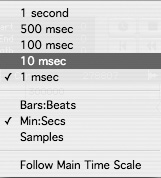
2. Select a Nudge value from the pop-up menu.
or
Type a number into the Nudge Value field (Figure 12.49).
Figure 12.49. The Nudge Value field.
![]()
To nudge a region
1. Set the Nudge value, following the preceding instructions.
2. Select the region you want to nudge using the Grabber or Selector.
3. Press the Plus key on the numeric keypad to move the selection forward by the Nudge value. Press the Minus key to move the selection back by the Nudge value.
Nudging a region’s contents
You can nudge a region’s contents without changing its start or end point. This is useful if a region is placed at the correct location (such as a precise time location), but the material within the region is situated too early or late.
To nudge a region’s contents without changing its start or end points
1. Set the Nudge value, following the instructions in the To set the Nudge value section.
2. With the Grabber, select the region whose contents you want to nudge.
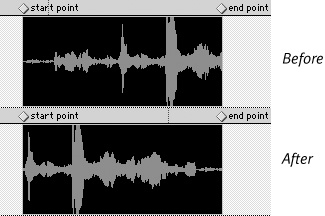
3. Hold down Control (Macintosh) or Start (Windows) and press Plus or Minus on the numeric keypad to move the audio waveform by the Nudge value.
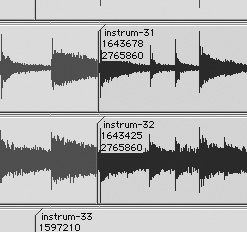
The region’s contents are moved by the Nudge value. The region’s start and end times remain unchanged (Figure 12.50).
Figure 12.50. Press and hold Control (Macintosh) or Start (Windows), and then press Plus or Minus on the numeric keypad to nudge the contents of a selected region without changing its start or end points.
Using Edit Commands
You can use these standard Edit menu commands to manipulate audio regions in Pro Tools:
Copy: The Copy command duplicates the selected region and places it on the clipboard.
Cut: The Cut command places a selection on the clipboard and removes it from a track.
Paste: The Paste command places a cut or copied region from the clipboard onto a track at the edit insertion point. Pasted regions will overwrite preexisting audio regions on the track.
Clear: The Clear command removes a region from a track without placing it on the clipboard.
When you cut or copy a selection, the current track view determines what is placed on the clipboard. For example, in Waveform view, cutting or copying a selected region places any volume, pan, mute, send, or plug-in automation on the clipboard, along with audio region data.
If a track displays automation data (such as in Volume, Mute, or Pan view), cutting or copying places only the automation data on the clipboard. For more information on editing automation, see Chapter 16: Automating a Mix.
To cut or copy a selected region
1. Set the track view for the tracks you want to edit (Figure 12.51).
Figure 12.51. Click the Track View selector to set the track view.

2. Select the audio material you want to cut or copy.
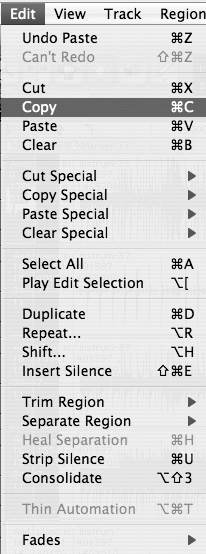
3. Choose Edit > Copy to place the selection on the clipboard without removing it from the track (Figure 12.52).
Figure 12.52. To place a copy of a selection on the clipboard, choose Edit > Copy.
or
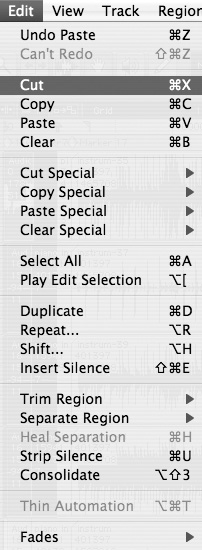
Choose Edit > Cut to place the selection on the clipboard and remove it from the track (Figure 12.53).
Figure 12.53. To place a selection on the clipboard and remove it from the track, choose Edit > Cut.
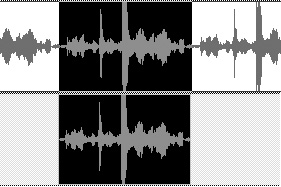
If the selected region was cut or copied, the selection appears as a new region in the Regions list. If the selected region was cut, new regions are automatically created on either side of the selection (Figure 12.54).
Figure 12.54. New regions are automatically created on either side of cut regions.

To paste a selected region
1. Click in the track with the Selector to set an edit insertion point.
Press Tab to move the insertion point to the end of a region. Press Option-Tab (Macintosh) or Control-Tab (Windows) to move the insertion point to the start of a region.
or
Select a region with the Grabber or Selector.
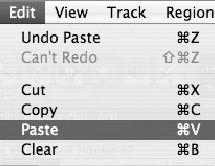
2. Choose Edit > Paste (Figure 12.55).
Figure 12.55. To place a region from the clipboard onto a track at the edit insertion point, choose Edit > Paste.
The cut or copied selection appears in the track at the edit insertion point.
1. Set the track view for the tracks you want to edit.
2. Select the audio material you want to clear.
or
Use the Grabber to select one or more regions.
3. Choose Edit > Clear (Figure 12.56).
Figure 12.56. To remove a selected region from a track, choose Edit > Clear.
The selected region is removed from the track. If a portion of a region was cleared, new regions are automatically created on either side of the selection.
• You can quickly slide a copy of a region to another location by pressing Option (Macintosh) or Alt (Windows) while dragging the region (Figure 12.57). The original region remains unchanged.
Figure 12.57. To slide a copy of a region from one location to another without changing the original region, press Option (Macintosh) or Alt (Windows) while dragging the region.
• You can retain the timeline location of a dragged region by pressing Control (Macintosh) or Start (Windows) while dragging the region.
Using Special Edit Commands
Special Edit commands are identical to regular Edit commands except they act only upon the automation data (volume, pan, mute, and plug-in automation) on audio, auxiliary input, master fader, and instrument tracks. You can also use Special Edit commands to edit MIDI controller data.
Each Special Edit command includes a submenu containing options for applying the command as follows:
Copy Special
• All Automation: Copies all automation data, shown or not.
• Pan Automation: Copies only pan automation data or MIDI pan data, shown or not.
• Plug–in Automation: Copies only plug-in automation data that is shown.
Cut Special
• All Automation: Cuts all automation data or MIDI data, shown or not.
• Pan Automation: Cuts only pan automation data or MIDI pan data, shown or not.
• Plug–in Automation: Cuts only plug-in automation data that is shown.
Paste Special
• Merge: Pastes MIDI note data in the clipboard to a selected destination and merges it with preexisting MIDI note data.
• Repeat to Fill Selection: Pastes unlimited copies of audio and MIDI regions, automation data, or MIDI controller data from the clipboard to fill a selected location.
• To Current Automation Type: Pastes automation or MIDI controller data from the clipboard to a selected destination as the “current” automation type. This lets you use automation data interchangeably between all types of automation; you can use MIDI data interchangeably between all MIDI functions.
Clear Special
• All Automation: Clears all automation and MIDI controller data, shown or not.
• Pan Automation: Clears only pan automation data or MIDI pan data, shown or not.
• Plug–in Automation: Clears only plug-in automation data that is shown.
To copy automation data from one track to another track using Copy Special
1. Click the Track View selector to view track automation (volume, pan, mute).
2. Using the Selector tool, select the track playlist (or portion of a track’s playlist whose automation you want to copy) (Figure 12.58).
Figure 12.58. Set Track View to the desired automation type. Then, in the track’s playlist, select the portion of automation you want to copy.

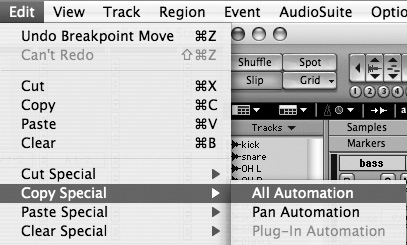
3. Choose Edit > Copy Special > All Automation (Figure 12.59).
Figure 12.59. To copy selected automation, choose Edit > Copy Special > All Automation.
All automation data in the playlist selection is copied to the clipboard.
4. Choose Edit > Paste Special > Repeat to Fill Selection.
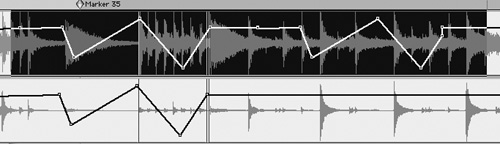
All automation in the clipboard is pasted to the selected track. If your track selection exceeds the length of the inserted automation, the automation is repeated (multiple times if necessary) to fill the entire selection (Figure 12.60).
Figure 12.60. Choose Edit > Paste Special > Repeat to Fill Selection; Pasted automation repeats until the entire length of the selection is filled.
For additional information on Special Edit commands, see the Pro Tools Reference Guide.
Duplicating and Repeating Regions
The Duplicate command copies a selected region and places the copy at the end of the region. Duplicating is useful for quickly making back-to-back copies of a region. For example, you might want to duplicate a measure or two of drums to create a drum loop. Duplicate is similar to the Copy and Paste commands, only faster and more convenient.
The Repeat command is similar to Duplicate except the Repeat dialog box prompts you to specify the exact number of copies to create.
To duplicate a selected region
1. With the Selector, select the region you want to duplicate.
or
Click in the track and enter the start and end points for the selection in the Event Edit area (Figure 12.61).
Figure 12.61. The Event Edit area (at top of Edit window). Enter start and end time to make a selection.

2. Choose Edit > Duplicate (Figure 12.62).
Figure 12.62. To duplicate a region, choose Edit > Duplicate.
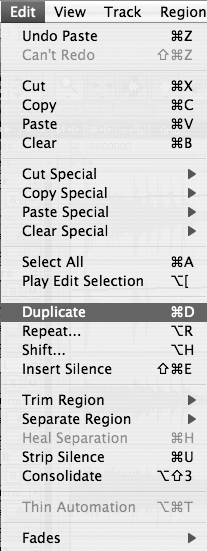
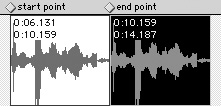
The selected region is placed immediately after the selection’s end point (Figure 12.63).
Figure 12.63. A duplicated region is placed immediately after the selection’s end point.
1. With the Selector, select the region you want to repeat (Figure 12.64).
Figure 12.64. To repeat a region, select a region to repeat, and then choose Edit > Repeat.

or
Click in the track and enter the start and end points for the selection in the Event Edit area.
2. Choose Edit > Repeat.
The Repeat dialog box appears.
3. Enter the number of times you want to repeat the selected region (Figure 12.65).
Figure 12.65. The Repeat dialog box. Enter the number of times you want to repeat the selected region.
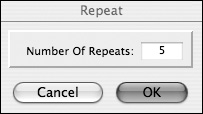
4. Click OK.
The selected region is placed immediately after the selection’s end point and duplicated the specified number of times (Figure 12.66).
Figure 12.66. The selected region repeats the specified number of times.

Shifting Regions
The Shift command lets you move a selected region backward or forward in a track by a specified amount. Shifting is useful for moving regions by precise distances in a track.
To shift a selected region
1. With the Selector or Grabber, select the region you want to shift.
2. Choose Edit > Shift (Figure 12.67).
Figure 12.67. To shift a selected region, choose Edit > Shift.
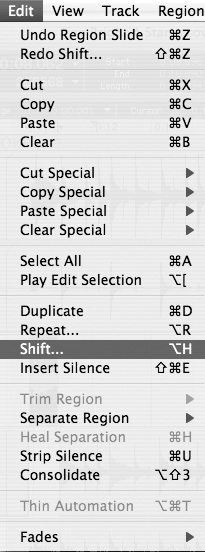
The Shift dialog box appears.
3. Click the Earlier or Later radio button.
4. Type a value in one of the Timebase fields to specify the amount by which the selection will be shifted (Figure 12.68).
Figure 12.68. The Shift Dialog box. Enter the shift amount in a Timebase field.
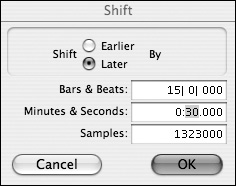
5. Click OK.
The selected region is shifted backward or forward in time by the specified amount.
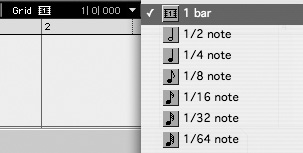
Quantizing Regions
The Quantize Regions command aligns the start points (or sync points) of selected audio and MIDI regions to the nearest grid boundary. Quantizing is useful for adjusting the rhythmic timing of regions in a session. You can simultaneously quantize selected regions on multiple tracks. Keep in mind, however, that a region cannot be quantized unless the entire region is selected.
To quantize regions
1. Define a Grid value in the upper right of the Edit window (Figure 12.69).
Figure 12.69. Define a Grid value for quantizing regions in the Grid Value pop-up menu.
2. Select the regions you want to quantize (Figure 12.70).
Figure 12.70. Select a region to quantize.
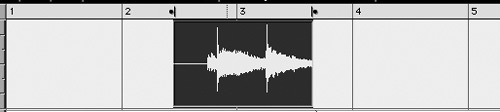
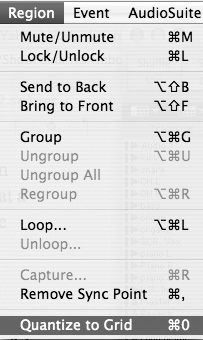
3. Chose Region > Quantize to Grid (Figure 12.71).
Figure 12.71. To quantize regions, choose Edit > Quantize to Grid.
The selected region is moved so its start point aligns with the nearest grid line (Figure 12.72).
Figure 12.72. A quantized region: The start point moves to align with nearest grid line.

Locking Regions
Locking a region anchors it to its current location. This is a good way to ensure that carefully spotted regions are not accidentally moved in a session.
To lock a region
1. With the Grabber, select the regions you want to lock.
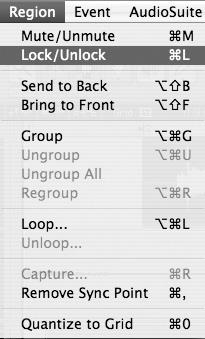
2. Choose Region > Lock/Unlock (Figure 12.73).
Figure 12.73. To lock or unlock regions, choose Region > Lock/Unlock.
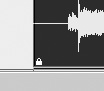
A small lock icon appears in the region, indicating that it has been locked (Figure 12.74).
Figure 12.74. A locked region displays a small lock icon.
Muting/Unmuting Regions
The Region menu’s Mute/Unmute command lets you mute playback of a selected region. You can mute regions simultaneously on multiple tracks. Muted regions appear dimmed in track playlists.
To mute regions
1. With the Grabber, select the regions you want to mute.
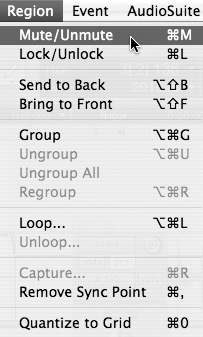
2. Choose Region > Mute/Unmute (Figure 12.75).
Figure 12.75. To mute or unmute regions, choose Region > Mute/Unmute.
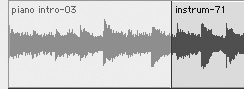
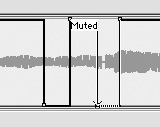
The selected regions are muted and dimmed in the track playlist (Figure 12.76). Selected regions that were previously muted become unmuted.
Figure 12.76. Muted regions are dimmed in the track playlist.
• You can mute a single region (or any portion of a track by recording Mute automation. You can record Mute automation (as well as volume, pan, and plug-in automation) in two ways:
In Mute, Volume, Pan, and Send (to DSP plug-ins) Track view, you can graph parameter changes over a track’s waveform (Figure 12.77).
Figure 12.77. Mute or unmute any portion of a track by graphing mute automation settings in Mute Track view.
Or, you can “write” mute, volume, pan, and Send automation in real-time during playback using the mute button (or volume fader, pan slider, and Sends Output window). Pro Tools “reads” (automatically performs) your recorded track control manipulations during playback.
For more information on “Automation” Pro Tools, see Chapter 16: Automating a Mix or see the Pro Tools Reference Guide.
Managing Regions
Anytime you cut, separate, or otherwise break an audio region into two or more segments, Pro Tools auto-creates new regions from the remaining segments. As a result, the number of regions in a session can multiply like rabbits. This multitude of regions tends to crowd the Regions list and makes it difficult to find the regions you want.
Fortunately, Pro Tools provides the following features to help you manage regions and to help you keep the number of regions in a session to a minimum.
Renaming regions
Renaming regions with more descriptive or memorable names can make them easier to identify. Pro Tools lets you rename regions by double-clicking on them with the Grabber tool, or by selecting a region, and then choosing the Rename command in the Regions list’s pop-up menu.
To rename a region using the Grabber tool
1. In the Edit window, select the Grabber tool.
2. With the Grabber, double-click on the region you want to rename.
The Name dialog box appears (Figure 12.78).
Figure 12.78. The Name (region) dialog box.

3. Enter the new name of the region. If you selected a whole audio file, specify whether to rename just the region or both the region and the audio file on disk.
4. Click OK.
The region is renamed.
To rename one or more regions in the Regions list
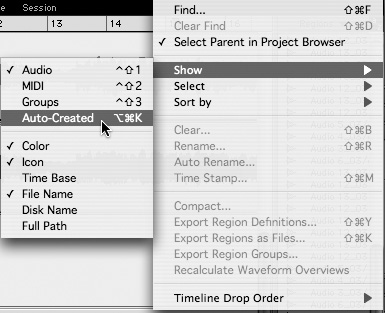
1. Select Show > Auto-Created from the Regions list pop-up menu (Figure 12.79).
Figure 12.79. In the Regions list pop-up menu, select Show > Auto-Created.
This displays all auto-created regions in the Regions list.
2. In the Regions list, select one or more regions to rename.
or
With the Editing preference for “Region List Selection Follows Track Selection” enabled, select a region in a track.
3. Choose Rename from the Regions list pop-up menu (Figure 12.80).
Figure 12.80. To rename a region, choose Rename in the Regions list pop-up menu.

or
Double-click on a region name in the Regions list.
The Name dialog box appears.
4. In the Name dialog box, enter a new name for the region. If you selected a whole audio file, specify whether to rename just the region or both the region and the audio file on disk.
5. Click OK.
The selected region is renamed. If you’re renaming more than one region, the Name dialog box prompts you for each successive region.
Setting auto-name parameters
When new regions are auto-created during editing, Pro Tools also auto-names these new regions. By default, Pro Tools names these new regions numerically in sequential order. This can lead to a lengthy Regions list full of numbered regions that are difficult to identify.
To help you better differentiate regions (and avoid a mind-boggling list of numbered regions), Pro Tools lets you create a naming scheme for auto-created regions.
To set auto-name parameters for a region
1. Select a region in the Regions list.
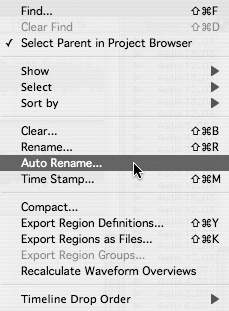
2. Choose Auto Rename from the Regions list pop-up menu (Figure 12.81).
Figure 12.81. To set auto-name parameters, choose Auto Rename in the Regions list pop-up menu.
The Rename Selected Regions dialog box appears (Figure 12.82).
Figure 12.82. The Rename Selected Regions dialog box.

3. In the Rename Selected Regions dialog, enter the text you want used when naming new regions created from the selected region. You can input the following auto-name parameters:
Name: This parameter determines the root name for the auto-created region.
Starting Number: This parameter sets the start number for the sequentially numbered new regions.
Number of Places: This parameter determines the number of zeros that occur before the auto numbers.
Suffix: This parameter specifies the text to be appended to the end of the name, following the auto-numbering.
4. Click OK.
Regions created from the selected region will be auto-named according to the set parameters.
Hiding auto-created regions
Pro Tools lets you hide auto-created regions in the Regions list while user-defined regions continue to be displayed. This can help you keep the Regions list down to a manageable length.
To hide auto-created regions
• Deselect Show > Auto-Created (Figure 12.83).
Figure 12.83. To hide auto-created regions in the Regions list, deselect Show > Auto-Created.

Auto-created regions are removed from the Regions list. User-defined regions remain visible in the Regions list. User-defined regions include the following:
• Whole-file audio regions
• Regions created during recording
• Imported regions
• Renamed regions
• Regions created during AudioSuite plug-in processing
• New regions created with Capture Regions and Separate Region commands
• Regions created by trimming whole-file audio regions
Removing unused regions
Removing unused regions, when possible, can help you keep the number of regions in your session from getting out of hand. You can locate and remove unused regions in a session with the Clear Selected command.
To find and remove unused audio regions
1. In the Regions list pop-up menu, under Select, choose one of the following (Figure 12.84):
• All
• Unused
• Unused Audio Except Whole Files
• Offline
Figure 12.84. To select unused regions, in the Regions list pop-up menu, choose Select > Unused Regions.

The desired unused regions are selected.
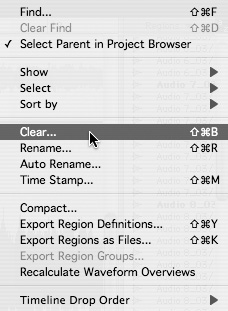
2. Choose Clear from the Regions list pop-up menu (Figure 12.85).
Figure 12.85. To remove unused regions, choose Clear from the Regions list pop-up menu.
The Clear Regions dialog box appears (Figure 12.86).
Figure 12.86. The Clear Regions dialog box.
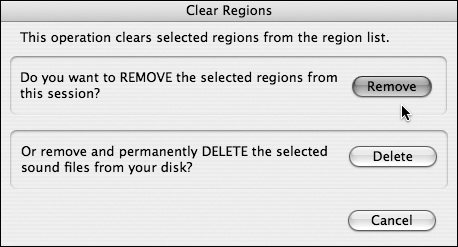
3. Click Remove.
The unused regions are removed from the session.
or
If you’re clearing a whole-file audio region and you want to permanently remove the audio file from your hard drive, click Delete.
Be certain before you click Delete: The audio file is permanently erased from your hard drive.
For more information on managing regions, see Chapter 13: Advanced Editing or see the Pro Tools Reference Guide and the DigiBase Guide.