
20. Pro Tools for Digital Video
Pro Tools has become the digital audio workstation of choice for most film and television sound editors working today worldwide. Just as Pro Tools has led the way to high-end, low-cost audio production, we’ve seen an explosive growth of desktop video production.
The field of sound for video draws on all aspects of sound technique. Soundtracks today feature the human voice and naturalistic use of sound effects to create realism, as well as music and theatrical sound designed to underscore character, drama, pacing, and emotion.
In this chapter we’ll give you a quick tour of the basics of setting up and using Pro Tools to edit and mix sound for video using a video deck or QuickTime digital video. We hope you’ll find the information here helps you get started on your first soundtrack, and that some of the tips save you time and headaches on the way.
Preparing to Edit Sound for Video
Since you’ll be working with at least one other piece of technology—the picture editing system—and usually at least one other person—the picture editor—it’s critical to coordinate your technical setup and your work approach with them in mind.
The picture editor edits sound along with the visuals, and often will incorporate location dialog recordings, voice over, music, and sound effects. The principal goal in this phase of post production is to tell the story well with final decisions for all the picture edits in the project. These editing decisions made by the picture editor form the basic structure of the soundtrack, but a huge amount of work is left for the sound editor, such as smoothing dialog transitions, tweaking music edits, and selecting sound effects.
The technical process of working on the sound for video begins at the location. Location sound recordists work with a wide range of analog and digital tape and disk recorders. Or they may record the sound directly to the videotape. The technical specifications of the location recordings typically determine the sample rate and bit depth for your work in Pro Tools.
To obtain the best quality sound from your location recordings, you’ll want to make a direct digital transfer from DAT (or other digital sources) into Pro Tools. Analog audio should be recorded into Pro Tools at the highest possible sample rate and bit depth. If the picture editor has taken care to digitize the location sound in the best possible way, then getting the audio via the OMF or AAF interchange formats (discussed later in this chapter) is the obvious answer.
Choosing a Sample Rate and Bit Depth for Your New Project
You need to select a sample rate and bit depth to work with your production sound. If you are working with OMF, your session’s sample rate and bit depth will come from the picture editor’s exported production sound.
When you load the digital audio that you recorded on location into Pro Tools, the session sample rate and bit depth must match the sample rate and bit depth of the recording. Recordings that do not match the session’s parameters must be converted when imported into Pro Tools. For more information on importing and converting audio, see Chapter 8: File Management Basics.
If the location recordings are analog, you can select the session parameters that are most convenient for your project.
For more information on choosing sample rate and bit depth in a new session, see Chapter 4: Starting a New Session.
Using Time Code or Feet.Frames Counter and Ruler (DV Toolkit 2 Only)
Installing DV Toolkit 2 adds two more counter modes and Timebase rulers to Pro Tools LE:
• Time Code
• Feet.Frames
These counter modes can be used for location indicators, in the Event Edit area, and for grid and nudge increments (Figure 20.1).
Figure 20.1. The top of the Edit Window shows the two post-production-related options unlocked by DV Toolkit 2 for rulers and counters, grids and nudges.

Like the standard Minutes:Seconds and Samples rulers, both of these new rulers count from the Session Start and share other general ruler properties. For more information on rulers, see Chapter 10: Editing Basics.
The Time Code ruler counts from the Session Start time set in the Session Setup window.
The Feet.Frames ruler counts from 0 at the Session Start time.
Since video frames are uniquely identified by a time code value, referring to video requires a time code counter. Time code numbers have four character fields: hours, minutes, seconds, and frames.
When working on sound for film, the picture is typically a video transfer from the film. The preferred counter for 35mm film work is feet and frames, with 24 frames per second and 16 frames per foot. Pro Tools lets you display 35mm feet and frames counting from zero. The Session Start time is defined as zero feet and frames plus the offset defined in the Setups > Feet.Frames menu.
To select the Feet.Frames start frame
1. Press Return (Mac) or Enter (Windows) to locate to the beginning of the session.
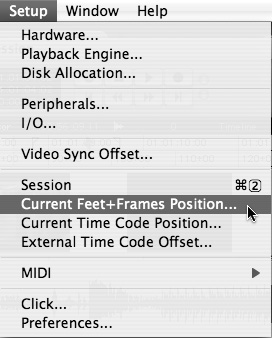
2. Choose Setup > Current Feet + Frames Position (Figure 20.2).
Figure 20.2. To offset the footage counter, Choose Setups > Feet.Frames.
3. Enter the number you would like to use as the Feet.Frames of the Session Start (Figure 20.3).
Figure 20.3. Enter a footage (positive only) for the Session Start time.
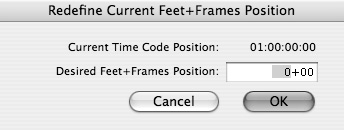
Zero is the default. Negative numbers are not permitted.
• To perform calculations with the time code or Feet.Frames counters in the location indicator or Event Edit area, select the time field you want to work on, Press + (plus sign) or - (minus sign) on the keyboard, and the time you want add or subtract. Press . (period) to change fields while entering your time. When done entering the number, press Enter to have the result appear in the field. Pressing Enter again will accept the new value. Escape will undo the calculation.
Working with a Video Deck
The following sections introduce concepts and issues to keep in mind when you work with a video deck.
Synchronizing to time code from external videotape (or audiotape) players
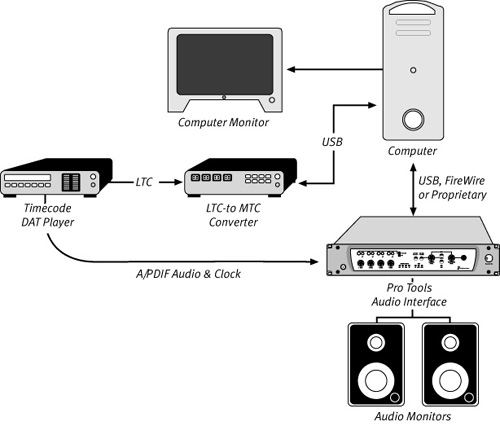
Pro Tools LE can be easily slaved to an external time code stream (also known as LTC or Linear or Longitudinal Time Code). The LTC must be converted to MIDI Time Code (or MTC). MTC is transmitted along with other MIDI data into the computer through a MIDI converter, typically into the computer’s USB port. Several third-party USB MIDI converters will accept LTC and pass it to the computer.
The source of the LTC could be a videotape deck or a DAT machine or any other LTC (or MTC) source.
Some clocking options
In order to maintain sync over time, it is necessary to have a common clock for your tape deck and your Pro Tools hardware.
The only way to clock a professional video deck to an external source is with a video sync generator. Home video players cannot be clocked to an external source.
With an Mbox 2 Pro, you can generate Word clock or slave to other Word clock-capable devices with Pro Tools LE.
With an Mbox, Mbox 2, or 002/002 Rack, you can only slave to digital audio word clock on the S/PDIF (or ADAT) input with Pro Tools LE.
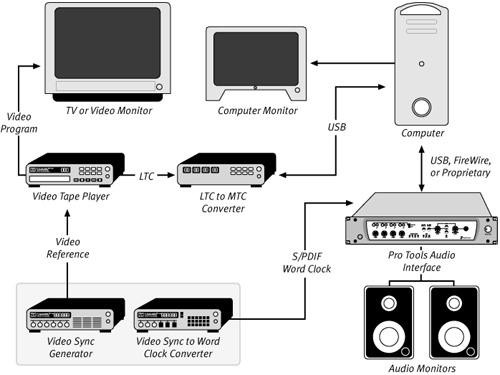
The traditional and most stable system for clocking a video and audio system is to have a video sync generator feeding all the devices in the system (Figure 20.4). There are several devices that can do this while producing a synchronous Word clock for Pro Tools LE to follow.
Figure 20.4. A setup for work in sync to a video tape deck with Pro Tools LE. The video sync generator and video sync-to-Word clock generator can be the same device.
If you have a DAT recorder with a video sync input, it can be used to clock Pro Tools LE. Other professional digital tape recorders could be used in this manner, too.
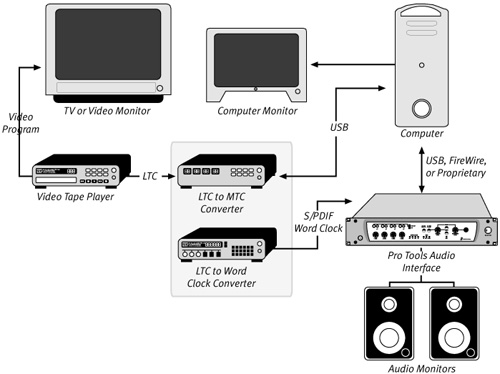
If you have a video sync generator you can clock the video deck and a video sync-to-Word clock generator to create a synchronous word clock for Pro Tools (Figure 20.5). This is the most inexpensive and flexible way to sync to any deck.
Figure 20.5. The setup for work to sync Pro Tools LE to a video tape deck by deriving word clock from LTC. The LTC-to-MTC converter and the LTC-to-word clock converter can be the same device.
Setting up your MTC converter
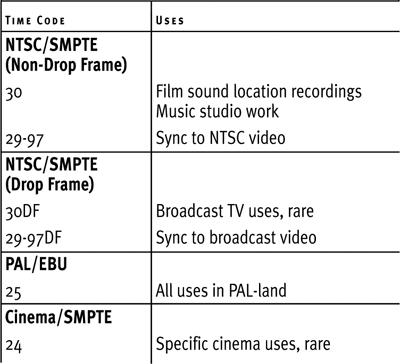
Follow the instructions supplied by the manufacturer to configure your LTC to MTC converter. You’ll need to know the format of the time code on your tape. Configure the computer to receive the MIDI according to the manufacturer’s setup instructions. Table 20.1 lists time code format uses.
Table 20.1. Time Code Format Uses
Setting up your system clock
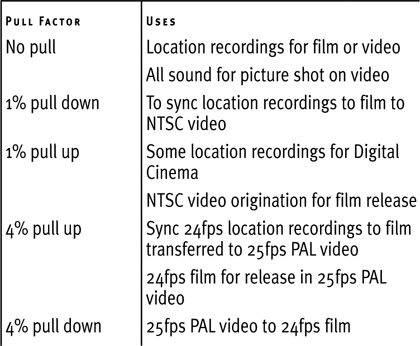
The word clock input to Pro Tools needs to be set for the correct sample rate. Bit depth is not relevant for clocking. Set the clock speed to the session’s sample rate. Adjusting the clock for pull down (or pull up) can be done at the word clock generator, if you need to pull your audio down or up in Pro Tools. Adjusting the pull factor of your word clock on the word clock generator is the only way to actually adjust pull down or up in Pro Tools LE. Table 20.2 lists scenarios for when to pull up or down.
Table 20.2. When to Pull Down or Pull Up
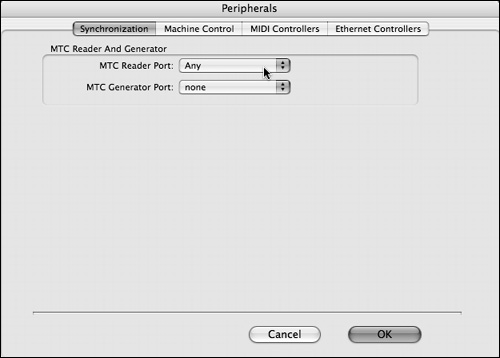
To set up Pro Tools peripherals synchronization
1. Choose Setup > Peripherals.
2. Click the Synchronization tab.
3. Select Any from the MTC Reader Port pop-up menu (Figure 20.6).
Figure 20.6. A Port selection of Any will work with a USB MIDI interface.
Session Setup for Accurate Synchronizing
There are two ways to select the digital word clock input when you want to clock to an external source. There are also two ways to set the Session Start time.
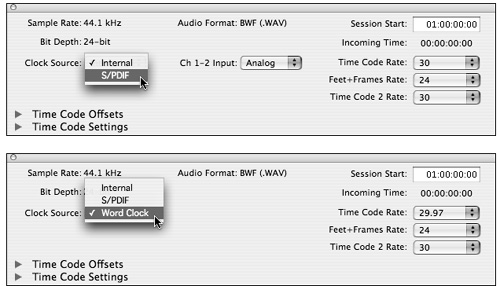
To set the clock source in the Session Setup window
1. Choose Setup > Session.
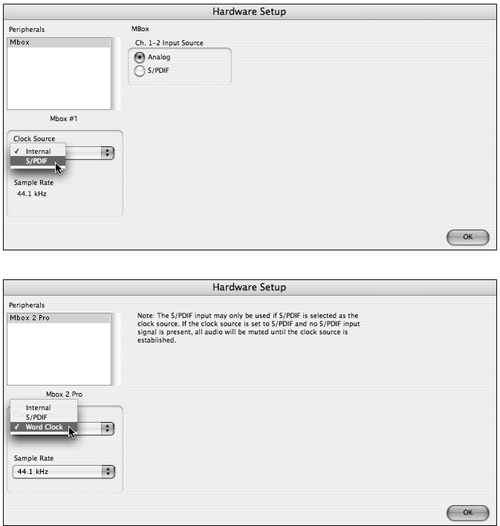
2. If you have an Mbox 2 Pro, select Word clock from the Clock Source pop-up menu. (Figure 20.7a)
or
If you have an Mbox, Mbox2, or 002/002 Rack, select S/PDIF (or ADAT) from the Clock Source pop-up menu (Figure 20.7b).
Figure 20.7a and 20.7b. The type of external Clock source available in Pro Tools LE depends on the type of interface you are using.
To set the clock source in the Hardware Setup window
1. Choose Setup > Hardware.
2. If you have an Mbox 2 Pro, select Word clock from the Clock Source pop-up menu. (Figure 20.8a)
or
If you have an Mbox, Mbox 2, or 002/002 Rack, select S/PDIF (or ADAT) from the Clock Source pop-up menu (Figure 20.8b).
Figure 20.8a and 20.8b. The Hardware Setup window is an alternate place to change the Clock Source.
• While switching between analog and digital inputs for recording, Pro Tools automatically switches the clock source from Internal to the appropriate digital clock and back. However, this feature can work against our desire to clock to the Word clock source while playing and editing. Be careful to leave the clock source to the correct digital input for your word clock source when playing and editing in sync to your tape deck.
To select Session Start time code value
1. Choose Setup > Session.
2. Enter the appropriate time code value into the Session Start field.
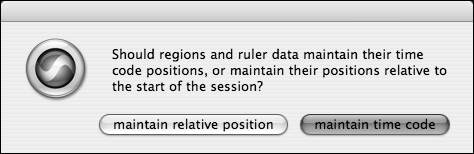
3. If the new Session Start time is earlier than the first region or automation data in any track (whether hidden or not) you will be given the option to maintain time code or maintain relative position. Typically when working with sync sound, you’ll want to maintain time code (Figure 20.9).
Figure 20.9. Making the Session Start time earlier in a session you’ve begun working on will require you to make a choice.
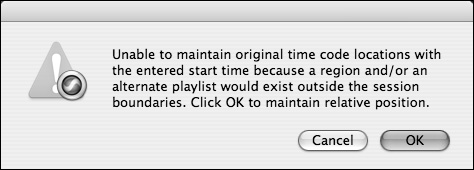
4. If the new Session Start time is later than the first region in any track, you will be given the option to maintain relative position or to cancel the change in Session Start time (Figure 20.10).
Figure 20.10. Moving the Session Start time later also requires a choice.
5. If there are no data in the tracks, the change in Session Start time goes ahead immediately.
To change Session Start time code value by redefining the current time code position
1. Select a position in a track that corresponds to a known time code location (such as a sync beep).
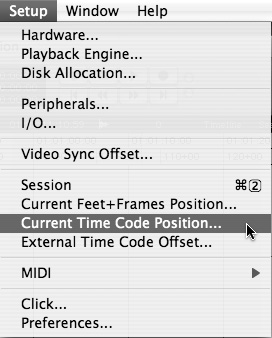
2. Choose Setup > Current Time Code Position (Figure 20.11).
Figure 20.11. Choose Setup > Current Time Code Position for an alternate method of changing the Session Start time.
3. Enter the appropriate time code value into the Desired Time field.
If the new Session Start time is later than the first region in any track, you will be given the option to maintain relative position or to cancel the change in Session Start time.
4. Otherwise, the change in Session Start time goes ahead immediately.
• Set the Session Start time to a whole number of hours or minutes. This makes it easier to change and then return to various times, if needed.
• There can be no audio before the Session Start time. This may seem obvious, but it means that any test tones or sync beeps that precede the program must be allowed for when selecting a Session Start time.
• When working in Feet+Frames the Session Start time is equivalent to zero. That means that in Pro Tools your sync beep cannot be before zero feet and frames. The custom in film sound in America is to have the zero feet (and the Session Start time) at an even time code hour, a sync beep at nine feet (or six seconds) and the first frame of action (and sound) at 12 feet (eight seconds).
To check that the time code rate is right for your session
1. Choose Setup > Session.
2. Select the appropriate time code format and rate from the Time Code Rate pop-up menu (Figure 20.12).
Figure 20.12. Usually, when working to NTSC video, you’ll want to select 29.97 fps non-drop, or sometimes drop. For PAL video, select 25 fps. Select 30 fps when working with time code from location recordings in NTSC land. There are exceptions to these general rules.
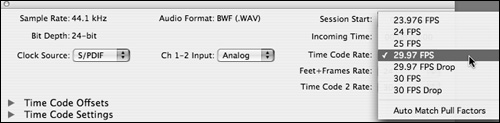
The time code rate should match the time code being received by the MTC converter.
To set Pull Up/Down for your session (DV Toolkit 2 only)
1. Choose Setup > Session.
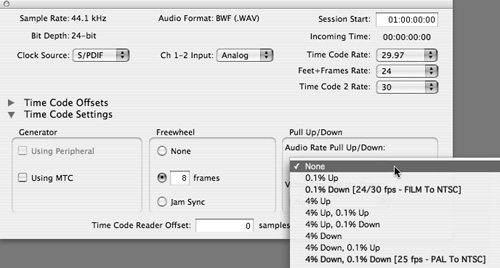
2. Click the triangle control to the left of Time Code Settings (in the lower left of the Session Setup window) to reveal the Time Code Settings panel.
3. In the Pull Up/Down section, select the appropriate pull amount from the Audio Rate Pull Up/Down pop-up menu (Figure 20.13). Note that this setting does not and cannot actually pull the audio up or down. Only the word clock generator setting can do this. This pop-up menu only adjusts the ruler and counters to reflect the speed varying caused by the word clock settings.
Figure 20.13. You only need to worry about pull down if your video image was originally shot on film. Changing the Pull Up/Down setting in the Session Setup window does not change the pull factor of the audio in the session; it only adjusts the ruler to compensate for clocking to a pulled word clock.
• If you need to pull Pro Tools LE up or down, but don’t have the DV Toolkit 2 option, remember that the only thing the Audio Rate Pull Up/Down menu actually adjusts is the ruler and counter settings. The audio actually follows the word clock settings, whatever version of Pro Tools you have. Since a typical use of audio pull down is working with film sound to NTSC video picture, a workaround is to set the frame rate to 30, instead of the actual 29.97. This results in the same pulled down ruler you’d get with a setting of 29.97 with pull down.
• When working with time code, one inevitably encounters dropouts. Having a freewheel in the system helps to play over these hiccups. In the Session Setup window, Time Code Settings, Freewheel section you can choose whether to have Freewheel off or on, how many frames of freewheel, up to forever (Jam Sync). The longer the freewheel, the longer Pro Tools will play on after the incoming time code has stopped. The default eight frames is a good starting point.
Using the video player as the time code master, with Pro Tools as the slave
Having completed all the setups described above, you should now be ready to play your videotape in the deck, with Pro Tools online, have it lock to the incoming time code and play in sync with the video. In this case the video player is the master, and Pro Tools is the slave. Whenever you play the video forward at play speed, Pro Tools will lock on and follow in sync.
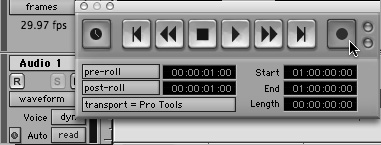
To put Pro Tools online with the Transport control
1. Choose Window > Transport.
2. To toggle the online status of Pro Tools, click the Online (clock) button to put Pro Tools online.
Pro Tools will play at the incoming time code location for as long as time code is present.
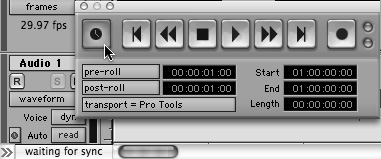
The status indicator at the bottom left of the Edit window shows that Pro Tools is waiting for time code (Figure 20.14).
Figure 20.14. The Transport window does not need to show since the status indicator tells you whether Pro Tools is waiting, locking, or locked to external time code. You don’t need to take Pro Tools offline to play normally.
To put Pro Tools online with the keyboard
• To toggle the online status of Pro Tools, press Command-J (Mac) or Ctrl-J (Windows), or press Option-spacebar (Mac) or Alt-spacebar (Windows).
To put Pro Tools online with a menu selection
• To toggle the online status of Pro Tools, choose Options > Transport Online.
To move the insertion point to the current incoming time code position
1. Press = (equals sign) on the numeric keypad once to select the Main Time Scale in the location indicator.
2. Press = again to place the incoming time code value into the indicator.
3. Press Enter to move to the new location.
To move the selection to the current incoming time code position
1. Press the Down Arrow key to move the selection start to the current time code location.
2. Press the Up Arrow key to move the selection end to the current time code location.
3. While Pro Tools is playing online, pressing the down and up keys will create a selection.
Digitizing Your Guide Track from the Videotape
In order to test the sync accuracy of your setup, and to have a reference guide track for your editing work, it is necessary to digitize the guide track from the videotape. The true test of the sync capability of your system is if it can maintain sync during playback of a guide track recorded online from the video. The process of recording online is explained here.
Online recording from the videotape
All the components of your time code and clock system must be on and correctly configured for online recording to work properly.
The audio outputs from the deck should be plugged into the appropriate inputs of the Pro Tools system. If the video has analog audio outputs and there are level reference tones on the videotape, you should adjust the input gain so the tones are at –20 dBFS (typically).
For more information on recording in Pro Tools, see Chapter 6: Getting Ready to Record, and Chapter 7: Recording and Playing Back Audio.
To define online record options
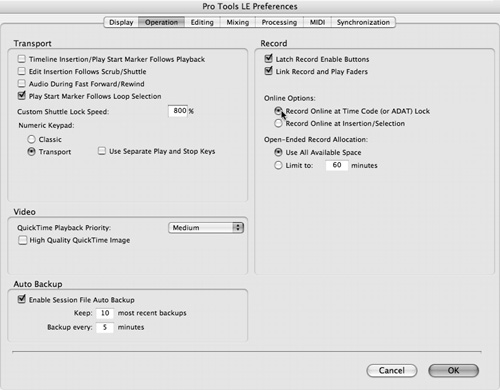
1. Choose Setup > Preferences.
2. Click on the Operation tab.
3. In the Record, Online Options section, select Record Online At Time Code (or ADAT) Lock (Figure 20.15).
Figure 20.15. For most applications, you want Pro Tools to lock as soon as it sees running time code.
• If you select the Record Online at Insertion/Selection option, Pro Tools will only record from the insertion point onward, or into the selected area. This can be useful when recording specific sounds while locked to picture, such as ADR or Foley from an external source, or layered or processed sounds or sound design from within your session.
1. Cue the videotape to a location several seconds before the first desired sound, which may be the sync beep.
2. Set the tracks to the appropriate inputs for the video deck outputs.
3. Name the tracks so that the recorded files will have meaningful names.
4. Record enable the tracks.
5. To put Pro Tools into online record ready mode, click the Online button in the Transport window, then click the Record button in the Transport window (Figure 20.16).
Figure 20.16. You’ll need to enable record after each time you roll. Press Option-Command-spacebar (Mac) or Alt-Ctrl-spacebar (Windows) to quickly put Pro Tools back into online record ready mode.
6. Press Play on the video deck.
Pro Tools should go into record as it locks and stay there until you stop the video deck. After the tail sync beep has gone by, stop the video deck.
7. When the recording is complete, immediately name the recorded sound file.
8. Take the track out of record.
• To check whether time code is being generated by the deck, plug the LTC out into your monitor somehow. Time code has a distinctive square wave whine.
• Make sure the signal is being seen and sent by the LTC to MTC converter. A front panel indicator will alert you to proper time code being received by the unit.
• Make sure the Pro Tools Clock Source is set to the correct input, and that a word clock signal (or digital audio signal) is actually present at the input.
• If Pro Tools will record, but the results lock up out of sync when played from the middle or end of the program, instead of the beginning, your clock is running at the wrong speed. If you record a bit of the guide track onto another track just at the end of the program (the tail beep, for example), you can calculate the percent of error, which may lead you to the correct setting.
Checking Sync Accuracy
Once the guide track is recorded, it is useful to compare the recording to the picture and audio tracks on the videotape to ensure they are correctly in sync.
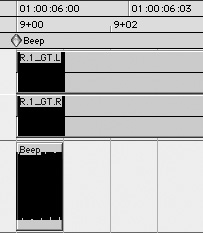
To check sync by eye
1. First check that the head beep is in sync with the correct time code. Typically this is 01:00:06:00, or 9+00 feet and frames (Figure 20.17).
Figure 20.17. It is impossible to check sync without an accurate sync beep at a known frame at both the head and tail of your program.
2. Play the video while listening to Pro Tools.
Is the head beep in sync with the visual mark in the leader?
Is the dialog in sync with the lips?
Is the tail beep in sync with the leader?
To check sync by listening for phasing
• Play the video while listening to an equal mix of the recorded guide track and the track coming from the tape.
The head beep should sound as one, not doubling.
The dialog and other sounds from the program should be so closely in sync with each other that the higher frequencies cancel out, creating a distinctive phasing sound. The sound should not be drifting in or out of sync at any time, but rather stay in the exact sync relationship indefinitely.
The tail beeps should also play as one, whether the program has been played from the beginning, or if the beeps are played from nearby.
• If there is a clock error, checking sync by playing from the beginning of the program will not reveal it. The clocks in modern video and audio equipment are quite stable, so the same timing errors will be reproduced during playback. A timing error can be revealed most clearly by checking lock and sync late in the program.
• Because the clocks are so stable, it is often workable to have both the video deck and Pro Tools running on internal clocks. This is possible only when pull down or pull up is not required. This method is not reliable or repeatable enough to be recommended for professional applications.
Editing with the video deck as master
Working with a video deck is only for those who already own the requisite parts. If you don’t already own the gear, it is more expensive to purchase, and it is less productive to use to edit to picture. However, it works.
Since there is no direct coupling between a video deck and Pro Tools except at play speed, it is difficult to place sounds at the correct picture hit points without a time code or feet and frames ruler. Thus DV Toolkit 2 becomes an essential part of a system involving an external video deck. Equally important is the visible time code burn in on the videotape.
To sync a sound to picture with a video deck with DV Toolkit 2 involves a several step procedure.
To put sounds in sync to videotape
1. Using the jog/shuttle wheel on your video deck, locate a picture hit point.
2. Press = (equals sign) to select the main counter. Press = again to grab the incoming time code to the main counter.
3. Press the Enter key to move the insertion point to the time code location. This usually is close to the current location, but is likely to be several frames off, since LTC can’t be read at slow jog speeds.
4. Using the plus (+) and minus (–) keys on the numeric keypad, nudge the insertion point until its time code location matches the visible time code on the video screen.
5. Record this location by pressing the Enter key to create a Marker. Name the marker so you can find the place again quickly.
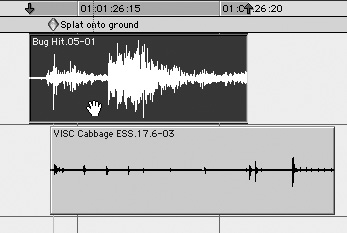
6. Once the location is marked, it is easy to place a sound in sync with the hit point (Figure 20.18).
Figure 20.18. After marking your hit point, line up your sounds. Markers allow you to easily return to your hit points.
7. Roll the video deck back and press Play on the video transport.
Pro Tools will lock to the time code and play across the edited sound. Check the sync relationship, and nudge the sound earlier or later as needed.
• If you have a VITC (Vertical Interval Time Code) reader, you can grab the time code from the videotape even when it is stopped. The VITC code is embedded in the first few scan lines at the top of the video frame, outside of the viewing area. A VITC reader makes a video deck quite useable.
Using Digital Video To Sync Pro Tools To Picture
The more elegant way to sync Pro Tools to the picture is by using digital video. Importing a QuickTime digital video track into your Pro Tools session allows accurate and instantaneous sync between the picture and your tracks. There’s no question that this is the easiest way to work with sync picture in Pro Tools.
The QuickTime video file can be obtained in many ways. It can originate as an export from Avid (using Apple DV codec), Final Cut Pro, or iMovie. Or you can digitize your file from a DV camera through FireWire, or from a DV to analog video converter. If you digitize your own QuickTime files, you’ll need appropriate video digitizing software.
Importing the digital video with sync audio
Pro Tools will import and play any QuickTime movie at any size or frame rate. For sync to video use, QuickTime movies should be digitized at the same frame rate as the NTSC or PAL videotapes they come from. Imported movies play along in sync with the timeline. Pro Tools can also import the sound from the QuickTime movie at the same time. If you have DV Toolkit 2, you can have more than one video track, and each video track can contain more than one QuickTime movie file.
To import a movie
1. Choose File > Import > Video (Figure 20.19).
Figure 20.19. Choose File > Import > Video.
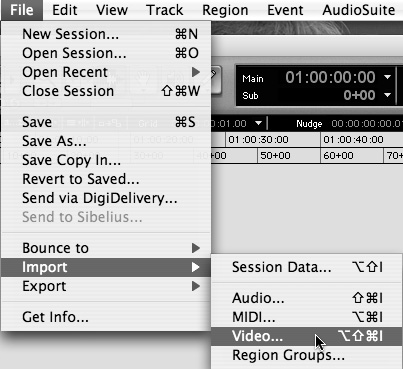
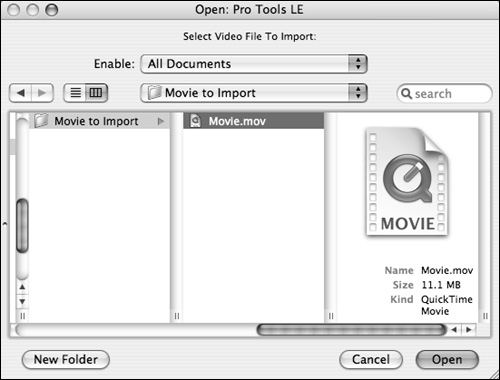
2. Select a QuickTime movie file to import from the Open File dialog and click Open (Figure 20.20).
Figure 20.20. Select the QuickTime movie file you want to work with.
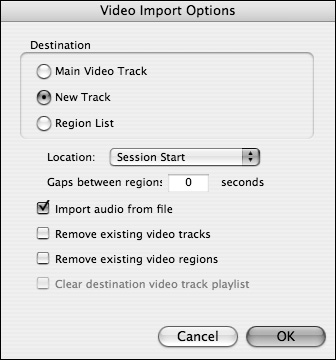
In the Video Import Options dialog, select New Track, set the location for the movie, and select Import Audio from File (Figure 20.21).
Figure 20.21. Place the imported movie in a new video track and set its location in the Video Import Options dialog.
• Spotting the movie to a particular time code location is easiest with visible time code in the picture and with DV Toolkit 2 installed. You can spot the picture to the time code location of the first frame of the file.
• Without visible time code or DV Toolkit 2 installed you can still sync your 29.97 video to the correct session time code. Make sure your session start time is set to an even hour (zero minutes, seconds or frames). Place a sync mark in the video track at the leading edge of the 2 frame in the countdown leader. Spot the Sync Point of the movie to 0:06.006 (0.1% later than 6 seconds from the start of the session). Even though the Minutes:Seconds time counter will drift slowly out of sync, the time code is correctly handled by Pro Tools. You can see this for yourself by synching to external code, or examining the time stamping of a file recorded in your session.
• If you zoom in to the Video track in frames mode, with a small track height, so that just a one or two frames are visible with a large gap between them, the left edge of the frame you see on the screen is the leading edge of that frame.
Viewing digital video
Once your movie is in place you should hide the video track since it takes up space in the edit window. Also, if the video track is showing, and its display mode is frames, extra CPU power is consumed drawing the frames in the Edit window. On an LE system, available CPU power is directly related to audio track and plug-in count. For more information on optimizing performance, see Chapter 21: Optimizing Performance.
After importing a QuickTime movie, there are several options for viewing it.
• View the Video window on single computer monitor along with Pro Tools.
When working with only one computer screen (unless it’s huge) you’ll find the Video window is always in the way. To temporarily hide the window, use the Command-9 (Mac) or Ctrl-9 (Windows) (on the numeric keypad only) to toggle the visibility of the Video window.
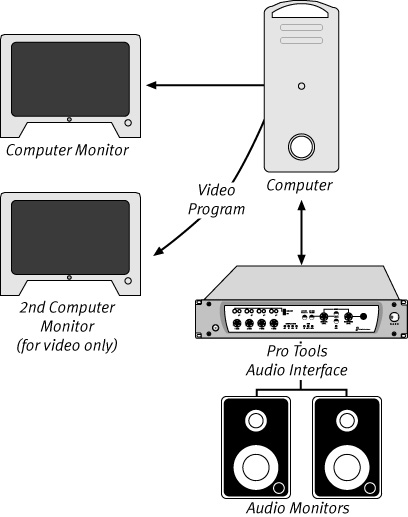
• View the Video window on a second monitor.
If you have a second monitor, you can probably find a place for the Video window so it isn’t always in the way. The mixer and plug-in windows may also find a good home there (Figure 20.22).
Figure 20.22. Working with your video image on a second computer monitor may be the simplest way to work, but it requires a fast computer.
• View the Video window on a second monitor with pixel doubling.
If you have a second computer monitor that you can run in 640 x 480 VGA resolution, you can use pixel doubling to fill the screen with a 320 x 240 QuickTime image. This provides a very workable environment, and many modern computers come with dual monitor capability built in.
• Play the Movie out of the FireWire port, convert to analog video, and view on TV or video monitor.
If the Options > Video out FireWire command is selected, the picture will not be shown in the Video window, but rather will be routed out the FireWire port in sync with the timeline, at any speed (Figure 20.23).
Figure 20.23. Using a FireWire DV-to-analog video converter gives excellent picture quality but causes a noticeable delay in the image output, which must be compensated for.
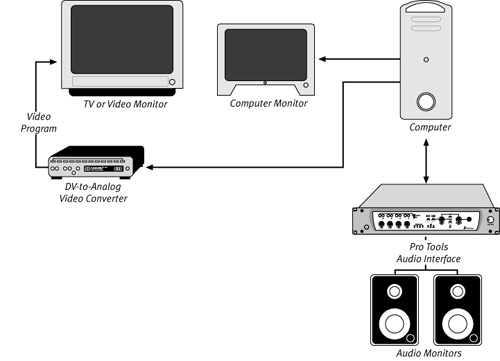
You need a FireWire-to-analog video converter to pass the signal on to a video monitor or TV. As D-to-A converters take a fraction of a second to do their conversion, you will need to advance the Video track to compensate for this. This can be done with the Setup > Video Sync Offset command. There you can type in the amount of picture delay introduced by the converter in quarter frames.
By offloading the display of the DV data onto a FireWire-to-analog video converter, the computer’s CPU is actually required to do much less work, so Pro Tools LE feels zippier, and audio performance is increased.
Getting Sync Audio from the Picture Editor
The picture editor can provide the following:
• Audio from production sound, sequence information from EDL or Assemble List
• Audio from NLE, sequence information from OMF or AAF interchange files
• Audio (and sequence) from edited audio tracks from videotape or exported audio track files
Getting audio from the picture editor using OMF or AAF (DV Toolkit 2 only)
Open Media Framework (OMF) and Advanced Authoring Format (AAF) are accepted formats for interchanging files containing edit decisions and other sequence data between editors using systems from different manufacturers. OMF Interchange (OMFI) and AAF files are like an EDL, only they contain descriptions of many more aspects of an editor’s work than just cut or dissolve points (Figure 20.24). For a sound editor, OMFI and AAF deliver a sample-accurate duplicate of the sound regions from the picture editor, complete with fades and certain types of automation. The OMFI or AAF file can optionally contain embedded media files, or it can refer to sound files you’ve copied from the picture editor’s system onto your hard drive.
Figure 20.24. The same icon is shared by Avid OMF and AAF interchange files. Even though the icon is labeled with the word “Media,” the icon shown here is from a composition or sequence file and contains no media.
Guidelines for exporting OMF and AAF
The specific methods of exporting OMF or AAF files from a NLE are beyond the scope of this book. Generally, try to use the most compatible interchange format, referring to files in the most compatible form for your hardware, operating system, NLE, and Pro Tools version.
• If the picture is completely finished, an OMFI or AAF file with embedded media is a single file to export/import, and can save some file management hassles.
However, if the picture may be changed and you anticipate needing another export from the video workstation, you should use OMFI or AAF with external file references. Later, when the picture and sound have been updated, instead of requiring a new embedded audio export, your new interchange file will refer to the audio you already have. The extra audio file management work you’ll need to do will pay off. Do not consolidate the media at any time in the NLE or in Pro Tools, or this technique will not work.
Using DigiTranslator to import an OMF or AAF sequence into Pro Tools (DV Toolkit 2 only)
After installing DV Toolkit 2, DigiTranslator 2 is incorporated directly into Pro Tools LE. Its functions are seamlessly integrated into Pro Tools’ normal operations. DigiTranslator allows Pro Tools to import audio, video and edited sequences from other AAF or OMF compatible applications. It also allows Pro Tools to export audio files and audio tracks to other compatible systems.
Whether you use external or embedded media, you’ll need to have the files on a valid audio drive. You’ll also need the OMF or AAF interchange file with the sequence data in it.
The benefits of OMF and AAF are lost if the sound in the NLE was not recorded in well. If the sound was recorded on DAT or other digital audiotape format, or if it was recorded on a hard disk recorder, the chances are that the sound files in the NLE are identical clones of the original recordings. However, if the sound in the NLE has been degraded due to poor load in procedures, the efficiencies of sequence interchange are offset by permanent sound quality loss if OMF/AAF techniques are used. In this case audio should be reloaded into Pro Tools from the original recordings.
To open an interchange file
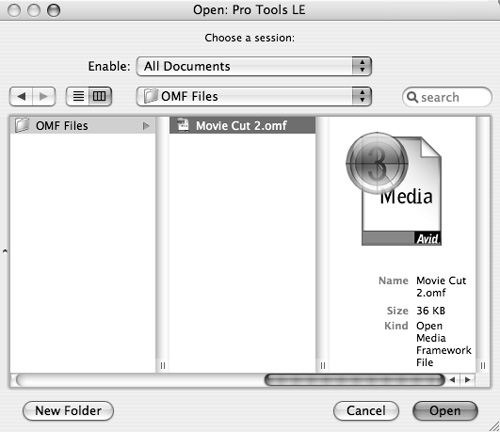
1. Choose File > Open Session.
2. Select your OMF or AAF document and click OK (Figure 20.25).
Figure 20.25. Select the OMF or AAF file using the standard File Open dialog.
3. Choose a name and a location for the session file that will be created from the interchange document (Figure 20.26).
Figure 20.26. Enter a name for your new session file. If you don’t change the Session Parameters, the original audio file settings will be used.
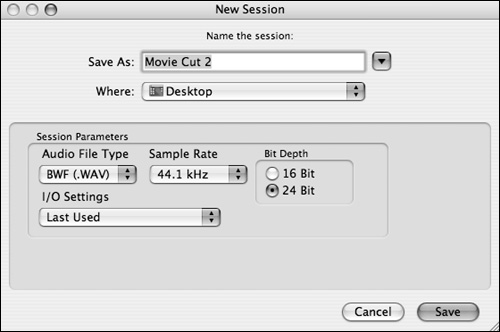
The selections in the Session Parameters section of the dialog reflect the settings in the OMFI or AAF document. You may change the Audio File Type, Sample Rate and Bit Depth. If you do change any of these parameters, Pro Tools will convert all the referenced audio files to the newly selected format. This happens as a background task as the session is opened.
4. Set the session parameters and click Save.
5. In the Import Session Data dialog that appears you will see what’s in the interchange file. You can adjust many parameters here, but typically you’ll want to refer to source media, maintain absolute time code, and convert clip-based gain to automation.
6. Select the tracks you want to import. Shift-click on a track name, and drag through to select all tracks. Option-click (Alt-click in Windows) on a pop-up menu to select Import As New Track for all tracks (Figure 20.27).
Figure 20.27. Select which tracks you want to import, and many other session parameters in the Import Session Data window.

7. Click the OK button.
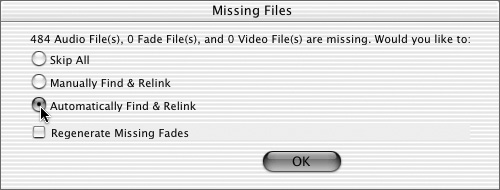
8. Since the audio files may not be where Pro Tools expects them to be, you may get a Missing Files dialog. Select Automatically Find & Relink and click OK to let Pro Tools try to find the audio for you. This happens as a background task (Figure 20.28).
Figure 20.28. Pro Tools can quickly and automatically find and relink audio files on any valid audio drive.
9. When the various background processes are complete, save the session.
Importing Tracks into Pro Tools with DigiTranslator (DV Toolkit 2 only)
Since the extra functionality of DigiTranslator is built right into Pro Tools, many of the standard Pro Tools commands for opening or importing file and tracks work with OMF and AAF files, including the following:
• Double-click an AAF or OMF file in the Finder (Mac) or Explorer (Windows) to open it into a new session.
• Choose File > Import Session Data and select an interchange file and import tracks from it into an open session.
• Double-click an OMF or AAF file in the DigiBase Workspace browser to either open it into a new session, to import tracks from the selected file into the current session.
• Drag and drop an interchange file from the DigiBase Browser window onto an open Edit window to import tracks.
Reloading from the original recordings
If the production sound was recorded on DAT or other digital audiotape format, it is an easy setup to get a digital clone of the sound into Pro Tools. Loading directly from the digital output of a DAT machine into the S/PDIF input of Pro Tools will give you an identical copy (clone) of the original recording, and you can’t get better quality than that.
In order to proceed with the loading, you’ll need a list of all the sound takes required. The key to efficient tape handling is to go through each tape only once, and load the needed takes in the order in which they appear on the tape. Even if the portion of a take used in a sequence is quite small, you should consider loading the entire take. The editing process is much smoother if you don’t have to go back into the tapes looking for extra bits of sound.
The recent introduction of location hard disk recorders have made direct copying from the location recorder into Pro Tools possible. If these recordings were available to the picture editor, the audio files exported from the NLE should be perfect. Otherwise you can just import the audio directly from the location recorder’s disk(s), bypassing the chore of real time load in from tape.
Recording from DAT with time code sync
The setup required for recording with time code from a digital source is essentially the same as recording the guide track from a videotape, described earlier in this chapter. The only difference is that Pro Tools maintains sync while clocked directly to the digital audio stream itself, rather than needing an external clock for the system.
Getting time code from the audio deck requires an LTC-to-MTC converter and a time code tape player (Figure 20.29).
Figure 20.29. The standard setup for digitizing from a time code DAT deck into Pro Tools with time stamping.
Create a new session for loading with Session Parameters that match the format of your production sound. In the Session Setup window, make sure the various parameters are correctly configured (Figure 20.30).
Figure 20.30. Select your digital input, making sure the Input and Clock Source settings are matching.

• Clock Source = S/PDIF
• Ch 1-2 Input = Digital
• Time code frame rate matches the time code on the DATs
• Under Time Code Settings, a few frames of Freewheel is good, but don’t use Jam Sync.
Once you have configured your setup, you should be able to cue up your tape to the first take to be loaded. In order to hear the tape as you cue it, the track you will be recording into must be in record ready, and the session should not be playing. It is helpful to retain the voice ID (at the head of most takes) in the portion of the take that you load. This makes finding correct takes (and troubleshooting) easier.
If the take was recorded onto two channels with different sound on each, load it into a stereo track. This allows naming both tracks at the same time, which is faster and more consistent. However, if the take was recorded onto one track, or with one microphone onto two identical tracks, it is easier to edit if you record that one channel only into a mono track. Editing and mixing is much easier if there aren’t redundant copies of your audio involved.
1. Cue the audio tape to a location after the beginning of the take you want to record, but enough before the section where you want the recording to begin to allow Pro Tools to lock to the incoming time code when it begins playing.
2. Set the track to the appropriate S/PDIF inputs.
3. Name the track so that the recorded files will have meaningful names.
4. Record-enable the track.
5. To put Pro Tools into online record ready mode, press Option-Command-spacebar (Mac) or Alt-Ctrl-spacebar (Windows). Or, click the Online button in the Transport window, then click the Record button in the Transport window.
6. Press play on the DAT deck.
Pro Tools should jump to the location matching the time code from the take, go into record and stay there until you stop the DAT machine, or when there is a break in the time code.
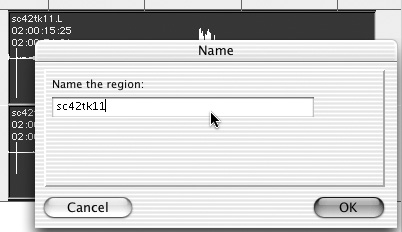
7. When the recording is complete, immediately name the recorded sound file (Figure 20.31).
Figure 20.31. Name your digitized files immediately. It’s too easy to forget which take is which after you have a few unnamed files to deal with.
Synchronizing takes to the guide track
In order to reconstruct the picture editor’s work in Pro Tools from the newly digitized takes, you need to know what portions of which takes have been used to make up each part of the guide track. Guided by an EDL from the picture editor, it is possible to piece together the audio to match the editor’s track. This can be done quickly and easily if you have an auto-conforming program, an EDL, and were able to load from a time code DAT player.
Use the sound from the guide track as your source for sound editing
Getting a series of guide tracks or bounced files from the picture editor is a good workaround for having no OMF/AAF. If the picture editor can provide you with exported audio or QuickTime files of the various tracks in the picture system, you will be able to have perfect sync effortlessly. And if the sound was properly loaded into the system, you will have master quality audio as well.
You’ll probably want to get the audio tracks twice from the editor. Once as they were cut, and once with each track split out or checkerboarded, and with its handles pulled out as far as possible. The original track becomes the guide, and the second set of tracks has the head and tail extensions you’ll need to smooth out the production sound.
Editing Dialog (Production Sound)
At the heart of sound editing for video is the cleaning up of the sound from the shoot. This sound often has technical problems that can be repaired in editing or mixing, though some sounds are technically impossible to fix and must be replaced.
The goals of the dialog track
The goals of the dialog track are fairly straightforward, but sometimes difficult to achieve.
• The entire dialog should be clear and intelligible.
• The voices should sound natural and pleasant.
• Separate takes edited together within the same scene should sound smooth and continuous.
• The lines of dialog should play at a consistent level.
• Some sounds will need special treatment, such as reverberation, or editing to sound as though heard through a telephone or public address system.
It’s impossible to stress enough the importance of clean location sound recordings. Excess environmental noise, distant or off-axis miking, or distortion caused by poor level control ruin the quality of production recordings. These problems can be modestly improved in editing and mixing, but cannot be eliminated. The old adage, “we’ll fix it in post,” often is true only if you can afford to replace all the sound with new ADR and Foley recordings, and this is not possible in many situations.
In dialog editing, all the sounds are put in the right places and smoothly overlapped, and any new sounds are added to fill unwanted gaps in the track. Momentary clicks, pops and bumps are removed. Alternate takes can be searched for cleaner and clearer renditions of lines, words, or even syllables, which can be used to replace poor sections of sync sound.
Laying out the tracks for dialog editing
Before editing begins you have to have obtained the sync sound from the picture editor. Your next task is to duplicate these tracks. Lock all the regions in the duplicate tracks and make the tracks inactive so they are accessible, but don’t use any CPU resources. Now hide them. They’ll be available to refer to if needed.
Create enough new tracks to do all your dialog editing. You might need eight to sixteen new tracks. Several will be used for splitting the principal dialog. A couple may be used for alternate takes. Two or four tracks may be enough for fill, or air and movement tracks. If preparing for an alternate language version, extra tracks can be created to hold non-language sounds, or production effects. Create a couple of work tracks that will only be used as a temporary work space, but never to hold finished cut material.
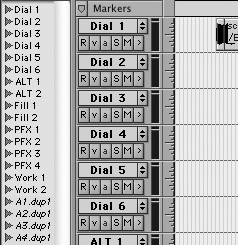
Once you’ve created the tracks, name them according to their use. Appropriate names might be Dial 1 through 6, Alt 1 & 2, Fill 1 through 4, PFX 1 through 4, Work 1 & 2 (Figure 20.32).
Figure 20.32. An example of a simple dialog editing track layout. Notice the inactive duplicate original OMF tracks: A1.dup1 through A4.dup1.
Basic dialog editing tasks
Once you have all the sounds in sync, the three basic dialog editing tasks are splitting, smoothing and filling. This is the basic requirement for delivery tracks to the mix.
When a source take’s qualities are very different from the preceding take, it should be split to another track. This allows the mixer to more easily apply a different set of plug-ins or tools, or different settings to the various tracks and not have to change them at every region boundary, which may be difficult to accomplish on a conventional mixing console, and saves time.
On the other hand, if a take’s sound qualities match those of the preceding sound, both should be placed on the same track if possible. The mixer should not have to copy the same settings from one track to another in order to match takes on different tracks.
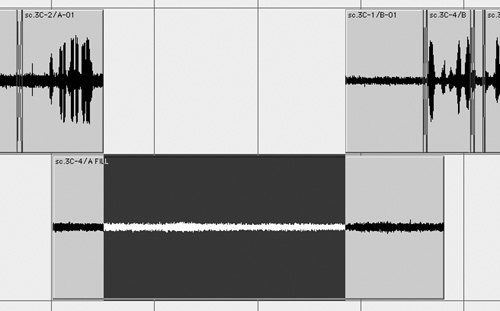
Splitting tracks is the first step in dialog editing. The next steps can only properly occur after the splitting decisions have been made. After splitting, the tracks are smoothed out to obscure the transitions between takes. This involves trimming out the ends of the takes for as far as possible, and then creating long fades in and out over the length of the head and tail extensions of the takes.
Filling holes is the process of coming up with air or room tone and movement sounds from the location recordings to fill out a scene that has used picture-only takes.
It is also necessary to fill the track when the sync sound has been eliminated by the picture editor for having the wrong content. There are many reasons for the holes that occur in a dialog track, but the best solution is always to look at the picture for clues and listen to the surrounding sound takes for the most likely candidates for fill.
1. Listen carefully to dialog and background qualities while playing along through the conformed production sound.
2. When you play across an edit and the sound qualities seem to match, leave the takes together on the same track, even if the edit itself is bad. If the takes will require the same treatment in the mix, they should remain on the same track. The bad edit can be repaired now, or after the splitting is complete.
3. If the takes do not match qualitatively, they should be split. With the grabber tool, select the region to be split to another track.
4. Hold down the Shift and Option keys together (Shift-Alt in Windows), and press the Return key to select from the currently selected region to the end of the track.
5. In Command Focus mode, press X to cut the audio from the original track.
6. Press P or ; to move up or down to the desired track.
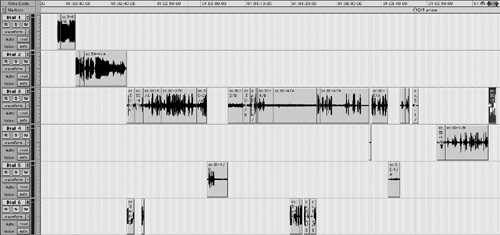
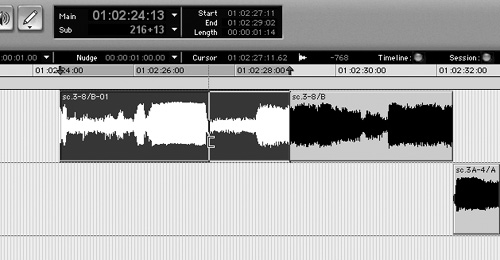
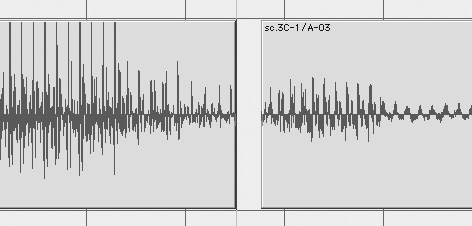
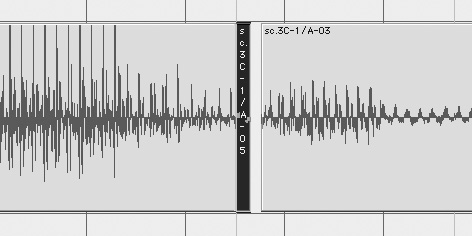
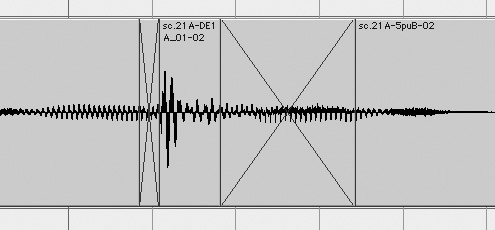
7. Press V to paste the audio, in sync, to the new track. You have now split the track (Figure 20.33).
Figure 20.33. After splitting, these dialog tracks are ready to be smoothed out.
• If you’d rather, after selecting the audio to split, you can Control-click (Mac) or on the selection and drag it with the Grabber to the desired track.
To smooth out transitions between dialog tracks
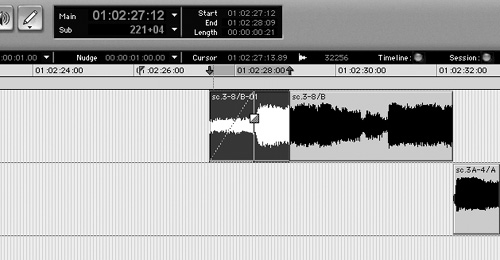
1. To smoothly fade into the head of a block of regions, use the trim tool to drag the head out a couple seconds (Figure 20.34). (These descriptions work the same way for the tail extension.)
Figure 20.34. Drag the “handle,” or end of a region, out a ways to see whether there’s any air there.

2. Looking at the waveform, you can usually see at a glance where unusable sounds occur. Common unusable sounds are dialog or distinctive unwanted sounds, such as doors or other effects.
3. Trim the extension back to the apparently useable section of sound (Figure 20.35).
Figure 20.35. Trim the handle back to the beginning of the air. Often these visual approaches works well, but always check your work by listening carefully to the results.
4. Listen carefully to the extension and make sure it’s innocent of any offensive material.
5. Create a fade up through the extension to the first frame of the original clip (Figure 20.36).
Figure 20.36. Create a fade over the length of the handle. You may need more or less handle than is immediately available. Change the fade shape if needed to make a smooth segue with the adjacent audio. Always use your ears.
6. Listen to the transition through the fade out from the outgoing region and the fade in to the incoming region.
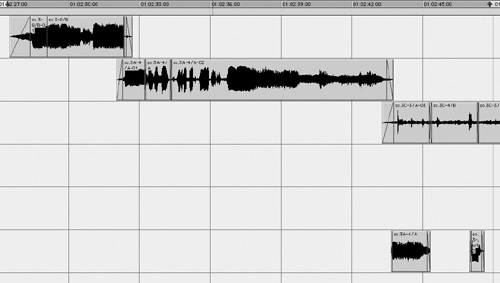
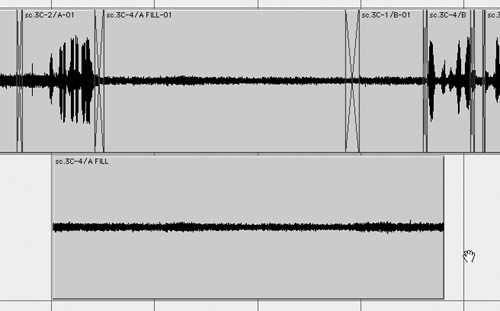
7. If necessary, adjust the shapes and lengths of the fades to make the transition as smooth as possible. Typically, noisier backgrounds will need to be introduced or withdrawn more gradually and over longer times than quieter backgrounds (Figure 20.37).
Figure 20.37. These tracks play smoothly now.
• You may find that pulling out the end of the region doesn’t give you enough of an extension to make a smooth transition. This is a common problem. Look into the filling holes section below for steps to obtain more of the needed sound than is immediately to hand.
To smooth cuts from region to region
1. To smoothly cut from region to region within a block of regions, you can use a combination of two basic techniques: move the edit earlier or later, or cross-fade between the regions.
2. If the offensive sound is at the end of the outgoing region, use the trim tool to drag the head of the incoming region earlier to cover the distracting sound.
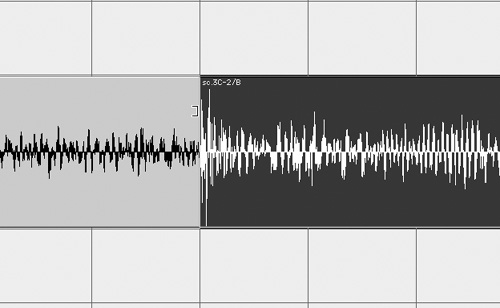
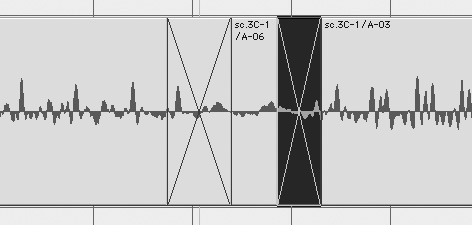
3. If the problem is at the start of the incoming sound, drag the tail of the outgoing sound later to cover the problem (Figure 20.38).
Figure 20.38. The incoming air will bump at the cut, so trim the outgoing air longer to smooth the cut.
4. Once the edit point is in the best place, a short crossfade will usually smooth the cut further (Figure 20.39).
Figure 20.39. The cut has been moved slightly later and a crossfade completes the smoothing of the internal edit.
• When cutting from region to region in a track, make sure to listen carefully for subtle sounds which may be interrupted or upcut. Use a high quality, comfortable set of headphones to eliminate room noise. You’ll be surprised how much more you’ll hear.
• Putting the edit immediately before an incoming transient will usually mask the cut.
1. To find air in a take, lay the take out in a work track. Using visual clues, find a quiet passage in the take, starting at the beginning. Listen to confirm the absence of dialog or distracting sounds. Select the useful portion, staying clear of distinctive sounds at the edges of the selection, and cut it.
2. Paste the section into the other work track.
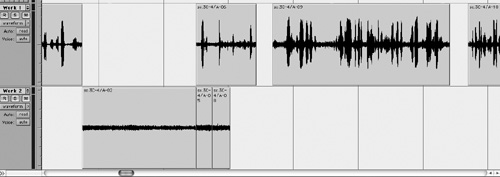
3. Repeat steps one and two, pasting the air at the end of the previously assembled bits until you have found and assembled all the useful air from the take (Figure 20.40).
Figure 20.40. Track Work 2 contains the regions of useful air from the take in Work 1.
4. Play through the assembled pieces, listening through the mostly bad edits for the best selections. Discard any clips that don’t work well with the others.
5. Crossfades may help smooth out the assembled clips.
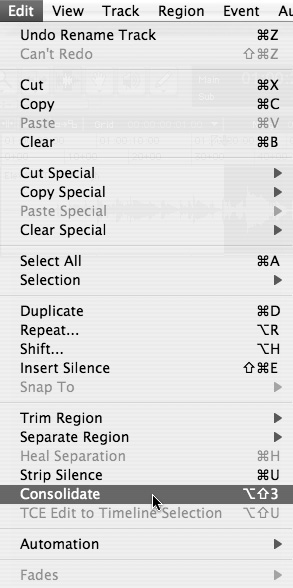
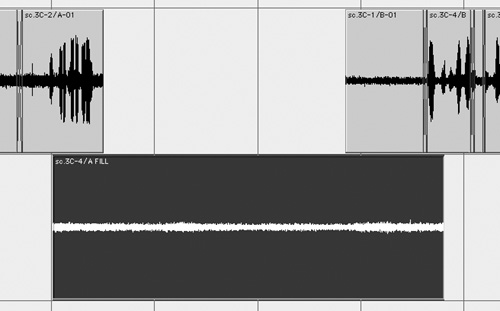
6. Once you’ve created a useful assembly of clips it’s easier to handle if you consolidate it. Choose Edit > Consolidate (Figure 20.41). After the new air file has been rendered, immediately name it with the take name and the word “Fill” or “Air” or “Mvmnt” or similar description. As always, be consistent with your naming.
Figure 20.41. Select the smoothed assemblage of regions of air and Choose Edit > Consolidate to save your work as a convenient file. Remember to name the new file immediately.
• If there is an evolving sound, like a long jet by, through the take, it may be impossible to edit pieces from different parts of the take together.
• A piece of air can be doubled in length by duplicating it and reversing it. This results in one iteration of a “backwards/forwards” loop. Backwards/forwards loops are always smooth since the head and tail always match. However, you can’t make an unobtrusive b/f loop from sounds with transients that can’t be transparently reversed.
• You may have to search through any number of nearby takes looking for better candidates for useful air.
• Often the best air is after sound has rolled, but before “action” is called, or after the action is over, but before “cut” is called.
• Don’t hesitate to use sections of air with light movement in them, but don’t repeat short bits of movement or breaths, as the ear picks up the loopiness of it very quickly.
• You can randomize the order of short clips when repeating them in order to minimize loopiness.
• You can stretch the chunk of air you’ve created using the TCE Trim tool to get a longer piece.
• Look for wild sound recordings of “Room Tone” for the location. When available, this is always the easiest place to look for a long section of clean air. The problem here is that the air is often too “dead.” With the camera off, and no movement from the actors, the air may not match the background in the actual takes from the same location.
1. Once you’ve got a chunk of air in a work track, select and cut it. Paste the air into a work track alongside the area where it is needed (Figure 20.42).
Figure 20.42. A piece of fill standing by below the hole that needs filling.
2. Select the area you want to fill.
3. Transfer the selection to the work track by pressing P or ; (in Command Focus mode) (Figure 20.43).
Figure 20.43. The fill is selected and ready to copy.
4. Copy the required amount of the fill.
5. Move the selection back to the track to be filled with P or ; and paste the fill into the selection. This works for a hole of certain length within a take or for a head or tail extension.
6. Crossfading in and out of your fill may smooth out a bumpy cut (Figure 20.44).
Figure 20.44. The fill has been pasted into the hole and the ends have been crossfaded to smooth the joins.
7. To create a long fill loop to smooth out a rough scene, or to fill for MOS shots, you may need to duplicate the chunk of air many times.
• You can paste a small fragment of your air into a space, and then trim the end(s) out to fill your hole.
• If you need to fill a series of holes, don’t always use the beginning of your piece of air. Use other sections of a longer piece of air to avoid repetition.
• When filling a long section, it is advisable to use more than one fill loop. Use a two or three different fill loops on different fill tracks and let the mixer move the faders up and down to vary the sound.
Dialog microsurgery
Once the basics of splitting, smoothing and filling have been taken care of, there are the small clicks and bumps to remove. These sounds are often artifacts of the recording process: mic bumps, electrical crackles, digital glitches. Sometimes they are undesirable sounds recorded on set, like the distracting snap of a piece of gravel underfoot during a close-up of a face. Occasionally a click is actually a desired sync sound, so watch the picture to be sure the click you are about to attack is actually a suitable target. Let’s divide these sounds into three categories and describe how to remove them.
Clicks are so short they can be removed without creating a dropout. After removing a longer click, which we’ll call a pop, you’ll need to fill the resulting hole. To remove low frequency bumps without losing the dialog or other important sound, use an AudioSuite EQ plug-in to attenuate the bump.
To remove clicks
1. Locate the click precisely. Tab to transient will find many, but not all, of the audible clicks you might want to remove. Scrub to find the click if Tab to transient can’t find it.
2. Once located, zoom in to the click until you can clearly see the cycles in the waveform.
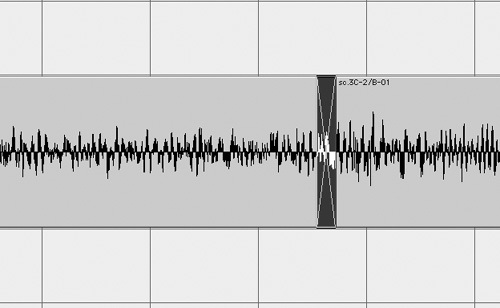
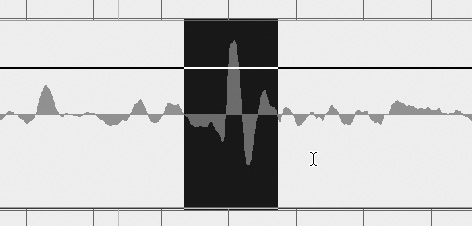
3. Select the noise impulse. The selection start and end should be at zero crossing points. You may need to zoom in vertically to clearly see the points where the waveform samples cross the zero line (Figure 20.45).
Figure 20.45. Clicks like this extremely short glitch are usually from some sort of digital source. The selected area is ready to delete.
4. If the selection is less than about 200 samples, it is usually safe to delete it without worrying about needing to fill it. Press the delete key to remove the click.
5. Play across the deletion to be sure that there is no audible drop-out.
• This technique is fast, but only works when the click is very short.
• Create a zoom preset for microsurgery and use it to instantly get to the working view after finding the click.
To remove pops by editing
1. Locate the pop as above.
2. Select the pop (Figure 20.46) and delete it (Figure 20.47).
Figure 20.46. The pop is selected.
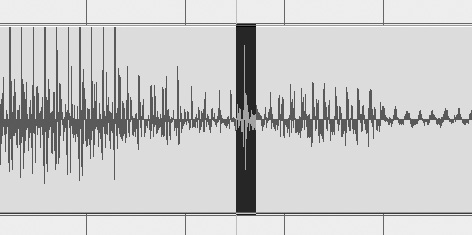
Figure 20.47. The pop is deleted.
3. Find a small piece of fill from nearby in the take that will match the sound quality surrounding the deletion.
4. Select a portion of the sound that is slightly shorter than the length of the deletion. Copy the selection.
5. Select the start of the deletion and paste the fill from the clipboard (Figure 20.48).
Figure 20.48. A piece of fill shorter than the hole has been pasted at the start of the hole, ready to be trimmed out to fill the hole.
6. Now trim the fill out until it fills the hole.
7. Listen to the repair.
8. If necessary, make tiny crossfades to smooth out the in and out of the fill (Figure 20.49).
Figure 20.49. Very short crossfades have been made to eliminate the possibility of clicks at the edits.
1. Locate the pop as above.
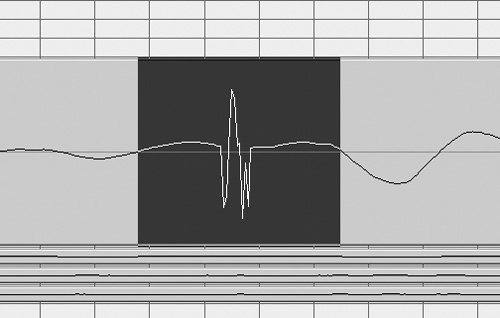
2. Select the pop and switch to volume automation view by pressing the minus (-) key in Command Focus mode (Figure 20.50).
Figure 20.50. This pop is selected and in volume automation mode, ready to be turned down.
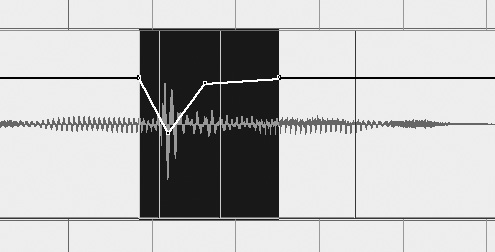
3. Pull the volume level down around the pop. Use trial and error to find the correct attenuation. Try different shapes for the volume graph (Figure 20.51).
Figure 20.51. The center of the pop has been attenuated. The amount and shape of the attenuation is based on trial and error and listening.

4. Play through the repair. If the pop is not too long, the attenuated pop makes good fill for itself. This works particularly well within words.
To remove bumps with EQ
1. Locate the bump by listening and looking at the waveform.
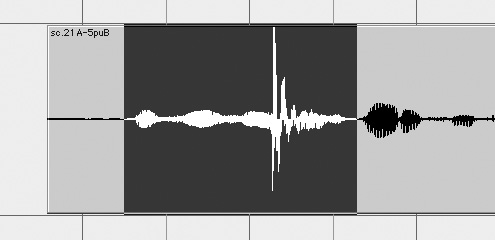
2. Select the bump and perhaps as much as half a second on either side of the bump (Figure 20.52).
Figure 20.52. A phrase of dialog containing a large low frequency bump is selected.
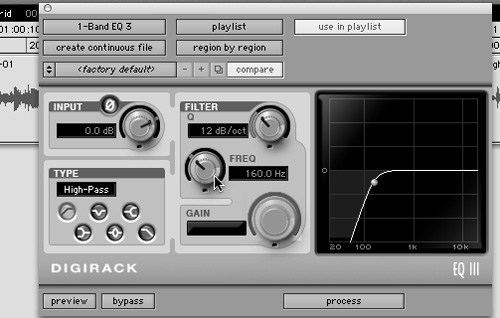
3. Choose AudioSuite > 1-Band EQ III.
4. Select the High Pass EQ Type and set the frequency to something like 100 to 250 Hz (Figure 20.53).
Figure 20.53. Use an AudioSuite EQ plug-in to roll off the lower frequencies.
5. Process the selection (Figure 20.54).
Figure 20.54. After processing, the bump is much reduced, but the surrounding dialog has been affected by the EQ.
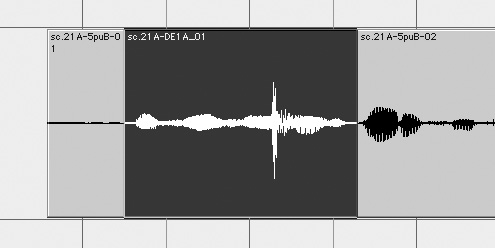
6. Listen to the processed audio, the bump will be attenuated, but the dialog will sound thin.
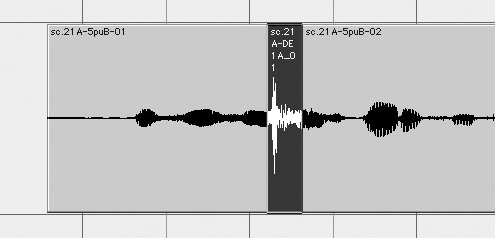
7. Trim the unprocessed audio back to almost cover the peak of the bump on both sides of the bump (Figure 20.55).
Figure 20.55. Trim the original dialog in towards the bump.
8. Create short crossfades into and out of the EQed section (Figure 20.56).
Figure 20.56. Use crossfades to help smooth the EQed section into the take.
9. Listen. Be sure not to go too high with the high pass frequency, or let the EQed section play any longer than necessary. Use trial and error to find the best balance of no bump and full voice.
10. If the higher frequencies remaining in the bump are annoying, use a volume graph to attenuate the bump further (Figure 20.57).
Figure 20.57. The mid- and high-range frequencies are still present in the bump, so a little attenuation helps minimize the flaw. Don’t go too far or you’ll have a dropout instead of a bump.
Working with Sound Effects
Adding sound effects can bring the world around the action of the video to life. Atmospheric background can create an offscreen world that can help set and tell the story of the video. Background tracks can mask problems in the dialog recordings and help smooth out bumps in the production sound. Specific sound effects that work in sync with the picture can add presence and character to objects and actions on the screen. The attention of the audience can be focused on a particular thing on the screen by placing a sound effect that syncs with the object of interest.
In addition to sound effects recorded on location during the shoot, sound editors often draw on the many excellent commercially available libraries of professionally recorded sound effects. Whenever feasible, however, it is advisable to record your own custom sound effects which are likely to fit the action and character of your video better than canned effects. Recording Foley sound effects in a studio to picture can help fill out the many detailed sync sounds of movements, small and large, which are nearly impossible to record or edit in any other way. Special sound effects and atmospheres are created by sound designers, who use a variety of techniques and equipment to bend sound recordings to the needs of the video. Sound designers create sounds for monsters and space ships, but they also create sounds to use as an almost musical underscore that has a subliminal and evocative effect on the audience.
Editing sound effects
Whatever the source of your sound effects, there are some basic ways they can be cut in to your sound track.
Backgrounds need to be laid out so they start and stop at the picture cuts that define the scene edges. Spot effects need to line up with the action on the screen. Most sound effects benefit from layering. Balancing the levels of sound effects while editing helps judge their impact while editing, and helps during the mix.
Finding sync and editing sounds to picture, as sound effects editors do, is much easier with digital video than with videotape. Working with videotape requires a lot of playing the tape, rewinding and jogging to find a particular frame you need to spot to establish sync. With digital video, wherever you click, there you are. The picture plays along with the session, and the picture will also scrub with the audio. This makes identifying sync points as easy as possible. Essentially, when you are editing sound to video you have to locate the hit point and then make a sync mark in Pro Tools, often by nudging with trial and error, or typing numbers into the Spot Dialog. Because time code numbers are so important when working this way, DV Toolkit 2 is nearly essential for sound effects editing to videotape. Due to space limitations we’ll focus on the processes of sound effects synching using digital video, covering the basic principles most succinctly. You will be able to work out the process of synching sound effects to videotape for yourself with these guidelines.
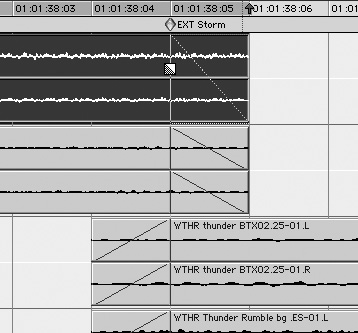
To play and scrub to find a scene boundary (without DV Toolkit 2)
1. To edit backgrounds, you must identify the scene boundaries. Play your video to the scene change point. When you get close, stop.
2. Using the scrubber tool, scrub forward or back as needed to locate the leading edge of the first picture frame in the new scene.
3. Place a marker at this location by pressing the enter key.
4. Select Marker from Time Properties, and name the Marker with a short, meaningful name. An example of a name is “EXT courtyard.” Click the OK button.
5. Proceed through the video to the end, placing a named marker at each change in location, time or perspective requiring a change of background.
• If you don’t have DV Toolkit 2, you can make your own frame line grid of sorts. By careful sample accurate selection between the leading edge of the first two fames, you can then use Edit > Identify Beat to set up a custom bars and beats grid which is aligned to the picture frames. Call the Start Location 1|1|000 and the End Location 1|2|000. Define a 30/32 time signature for NTSC (25/32 for PAL) so that a 32nd note grid will match the rhythm of the frames, and the bar numbers will count seconds of time code from the first defined frame. It is quicker to locate scene boundaries with DV Toolkit 2.
To play and nudge to find scene boundaries (with DV Toolkit 2)
1. Set the ruler to time code.
2. Set the edit mode to grid mode.
3. Set the grid to 1 frame.
4. Play to the beginning of a new scene and stop.
5. Click near where you stopped playing. In grid mode, the insertion point is forced to a frame boundary.
6. Use the plus and minus keys on the numeric keypad to nudge forward or back as many frames as needed to arrive at the very first frame of the scene. This is the leading edge of the frame, and thus the scene.
7. Place a marker at this location and name it, as above.
8. Proceed through the video as above.
• If there is a fade to black or fade up from black or a dissolve between scenes, you can mark the start and end of the visual effect as a guide to the fades you should make in your background tracks.
To play and scrub to find a hit point
1. To locate a hit point in the action, such as a door close, scrub the picture, or nudge in frame grid mode, until you have identified the leading edge of the moment of impact of the door against the door frame.
2. Once you have identified a hit point, you can use it immediately, or store it by placing a named marker at the point.
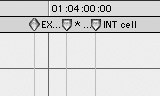
• Adding a distinctive first character to the Marker name, such as an asterisk, helps to quickly see the difference between a hit point and a scene boundary (Figure 20.58).
Figure 20.58. Marker text gets hidden; sometimes you can only see the first character of the marker name.
Laying out your effects tracks
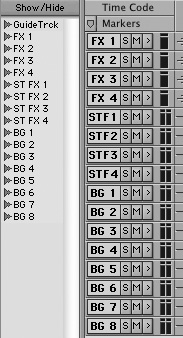
Before actually editing sound effects, you’ll need to create tracks to hold them. It’s best to use mostly stereo backgrounds, and mostly mono effects for video sound tracks. You’ll probably want at least two, and maybe three or four, stereo backgrounds for each location. You should checkerboard the sounds from location to location, for the same reasons we split tracks in dialog editing: the mixer needs to be able to adjust levels, EQ and other parameters at each distinct new sound or scene. Checkerboarding is the alternating of track usage, switching the edited sounds for each scene back and forth between two (or more) sets of tracks (Figure 20.59). You’ll also need several mono and several stereo sound effects tracks. These tracks tend to be sparsely populated for most videos (Figure 20.60).
Figure 20.59. Checkerboard backgrounds to give the mixer easier control of the tracks. Marking the scene boundaries makes cutting backgrounds much easier.
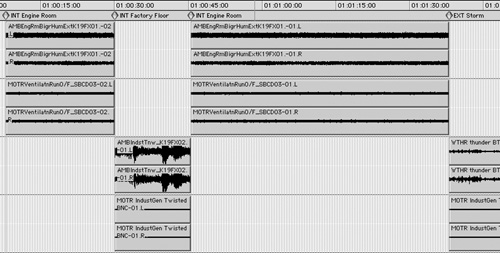
Figure 20.60. Mono and stereo sound effects and background tracks for a typical Pro Tools LE sound effects session.
Placing, looping, and trimming backgrounds
Once you’ve marked up your session to identify where the scene boundaries lie, you can fairly quickly lay up your background tracks. If the sound files are long enough and the sounds have no internal problems, you can quickly lay them over the markers, and trim off the ends. The process is a bit more time consuming if the sounds are not long enough to cover the scenes.
A field recording typically has mic handling, voice slates, starts and stops, and other unwanted interruptions. Internal flaws in the sounds can take a while to fix or remove. It can be helpful for your future work to take care of these fixes early on, and then bounce the fixed regions to a single, new, cleaned-up file.
Once the regions are trimmed, they need to be smoothed. The smoothing step is the most tedious part of the process. Many sound recordings contain low frequency sounds that can click if they cut off abruptly, so the region ends need to be trimmed out and faded. Other sound anomalies can often occur at edit points and result in annoying bumps or “ffftt” sounds. Like all sounds, each region needs to be auditioned in its entirety, paying special attention to the ends. Problems can be corrected quickly.
To lay out and trim the background sounds
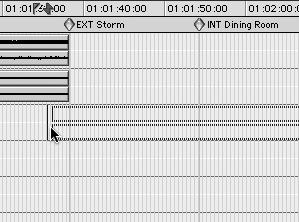
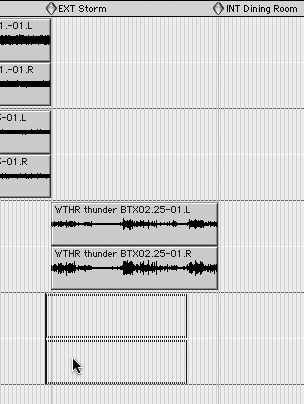
1. Grab a background sound file and drag it to the first available BG track, placing it so that it overlaps the markers defining the in and out of the scene (Figure 20.61).
Figure 20.61. Drag the background sound file into a free track so that the head of the file can be cut off at the scene marker.
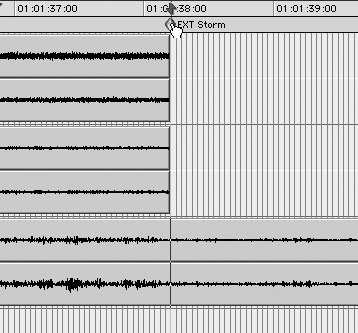
2. Click the marker identifying the in time of the scene to move the insertion point to the head of the scene (Figure 20.62).
Figure 20.62. Click on the marker to put the insertion point at the scene boundary.
3. Trim the head of the sound by pressing the A key in Command Focus mode.
4. Click the marker identifying the end time of the scene to move the insertion point to the tail of the scene.
5. Trim the tail of the sound by pressing the S key in Command Focus mode.
• Drag two or more sounds at once from the Region list to lay them up together.
• If you have already cut sounds that come up later in the track you want to place a new untrimmed sound into, you should drag the new sound to a work track and trim it there before dragging it up to the destination track.
To smooth the edges of background sounds
1. Set the edit mode to grid mode and the grid amount to 1 frame, or 10 milliseconds. This makes it easier to make a consistent small adjustment.
2. Set the tool to Smart Tool for faster operation.
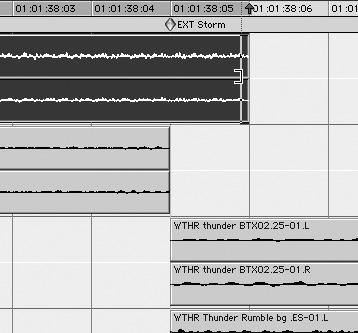
3. Trim the ends of the regions out by a frame (about 40 ms) to give an overlap to fade with. Do this to all the background regions that start or stop at that picture cut (Figure 20.63).
Figure 20.63. Zoom in and trim the background regions out by a frame before fading in or out. If you don’t overlap the regions at the boundary, there will be a drop out at the scene change after you apply the fades.
4. Apply a one-frame fade into the head of each incoming sound and a one frame fade out to the tail of each outgoing sound (Figure 20.64).
Figure 20.64. The background regions all have a one-frame fade.
• While you are pulling the background regions in and trimming them to length, you can nudge the insertion point over a frame and trim the sounds so they have an overlap built in from the start. Then they’ll be ready to fade.
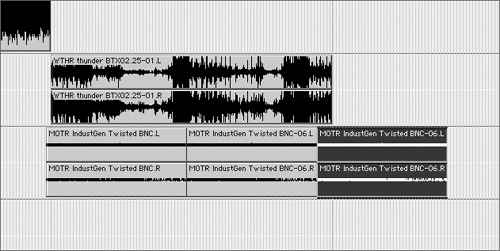
To loop background sounds to fill out the scene
1. When you pull a sound in from the region list, it’s likely to be too short to fill the entire scene. Place it so that it covers the start marker for the scene (Figure 20.65).
Figure 20.65. The region being dragged from the Region list is shorter than the scene.
2. We will now loop the sound, so listen to the tail of the region and make sure that it ends while in the midst of the sound. If it doesn’t, trim it shorter until it seems like it will be able to be looped.
3. Now find the earliest part of the sound that can be looped with the end of the sound. Select from this point to the end of the region.
4. Choose Edit > Duplicate to duplicate the region and repeat as many times as necessary to fill the scene with the background sound (Figure 20.66).
Figure 20.66. Duplicate the loopable section to make the sound long enough for the scene.
5. Listen to the sound as edited, paying attention to the loop points. If the sound jumps, it may be possible to change the edit points of the start and end to make a smoother loop. Undo and repeat steps 2, 3 and 4 until you get the optimal loop.
6. If the loop point bumps, apply a crossfade to all the loop points to smooth the joins. Select the entire assembly of regions and choose Edit > Fades > Create Fades.
This will bring up the Batch Fades dialog (Figure 20.67).
Figure 20.67. Apply a one-frame crossfade to all the edits in a looped region to remove clicks. Longer crossfades may be needed to smooth out a changing background.
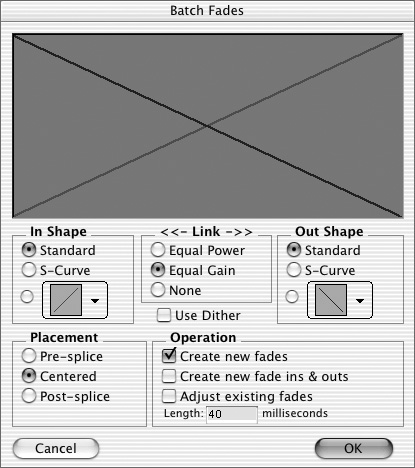
7. Select the appropriate fade length and shape settings to smooth out your sound. Don’t bother with dither. Then select Create new fades and click OK.
8. Your sound is now longer than the scene and you can trim it to length and smooth it out as described earlier.
• One of the reasons it is useful to have more than one background track running is that backgrounds frequently need to be looped to get enough length, and different files looping with different lengths sound much less loopy together than alone.
• Backwards/Forwards loops can work with evolving backgrounds that haven’t got any transient sounds within to tip off the audience, such as wind that is steadily getting faster.
To internally clean up sound effects
1. To remove unwanted interruptions in a background sound file, play through it from the beginning, selecting the problem areas as you go. While playing, hold down the down arrow key. When you hear a problem, release it and start holding down the up arrow key. When you hear the problem area end, release the up arrow. Now the problem area is selected. Adjust the selection if necessary.
2. Press the Delete key.
The problem is deleted.
3. Hold down Control (Mac) or Start (Windows) and click on the next region of the sound file to snap it to the end of the first region.
4. Now play on in the sound file, as you did in step one, repeating the steps as necessary until you reach the end.
You should now have a series of regions that may be able to be played together as a single file, or they may need to be used as separate regions, depending on how different the regions are to each other.
• It is likely that the edits you have made will need to be tweaked and crossfaded to make them work.
• When you have finished, it can be a real time saver to either bounce the new assembly of regions to disk (which preserves automation), or choose Edit > Consolidate Selection to duplicate the regions into one file, which you must rename immediately.
• Spending the time to clean up and organize your sound effects as they enter your library ensure that you’ll never have to do the same job again with the same sounds.
A few methods for editing sound effects
Much of the creativity of sound for picture work is in selecting and assembling sound effects to bring an action or an object to life. Starting with a rich library of sounds is helpful, and recording the required sounds for each project you are involved with is the single best way to build this library. Selecting the perfect sound is an art we will leave to the reader to explore.
When pulling together sound effects for a sequence of shots, it’s important to try to create a consistency of sound quality. Also, the recordings should be from an appropriate point of view that matches the picture.
Convincing sound effects must have tight sync to picture. If the sound seems to be in perfect sync with the picture, the viewer will be convinced it actually emanates from the picture. Sound effects must also be in sync with the production sound and with each other. When the production sound contains useful sounds, it is easy to sync your sound effects to the waveform of the guide track. Typically this is done to sweeten the PFX, and create a more consistent sound.
Tying sounds from disparate recordings together is a common problem for effects editors. You may have production sound effects, original effects recordings made in the field and library sounds of various sources. The sound qualities of these recordings are bound to vary, and steps must be taken to blend them together. This often involves long crossfades between sounds, as we’ve seen in dialog editing. Another useful technique is layering of different sonic textures to create a “fatter” sound, which helps tie everything together.
To add depth and variety to your sounds, cut a second or third layer of sound with more detail or complementary sound qualities.
1. If you’ve already marked up your session with the picture hit points, select one. Otherwise, locate a hit point.
2. Hold down Shift-Control (Mac) or Shift-Start (Windows) and drag a sound onto a sound effects track from the Region list. The beginning of the sound will line up with the hit point. (For more information on the other sync modes, see Chapter 12: Working with Regions.)
3. Play through the sound to check sync against picture. If the sound is early or late, nudge it into place (Figure 20.68).
Figure 20.68. Line up the sync mark with the hit point.

4. If the sound is too long, trim it to fit.
5. If the sound is too short, build it out by repeating sections as appropriate, or using the TCE trim mode to stretch to fit.
6. Apply fades as necessary (Figure 20.69).
Figure 20.69. Trim the sound and apply fades if necessary to smooth the in and out of the sound.
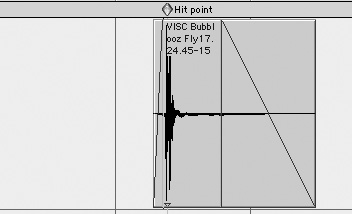
• The steps are simple and familiar. It is the choice of sound, including placement against picture that takes time and much trial and error leading to refinement.
• Sound effects track selection should follow principles similar to dialog tracks. Keep similar sounds on the same tracks, and split different sound qualities to other tracks. Try to keep it consistent to make life easier for the mixer.
1. To find a hit point in the production sound, scrub the guide track and leave the insertion point at the hit point. Often the hit point is easy to spot by looking at the waveform.
2. Place a marker at the hit point.
3. Drag your sound from the Regions list to the appropriate sound effects track.
4. Position the sound’s hit point against the track’s hit point by dragging the hit point to the marker (Figure 20.70).
Figure 20.70. Click on the hit point in the guide track and mark it for later, or just hold Control (Mac) or Start (Windows) and drag a sound to sync with the guide track.
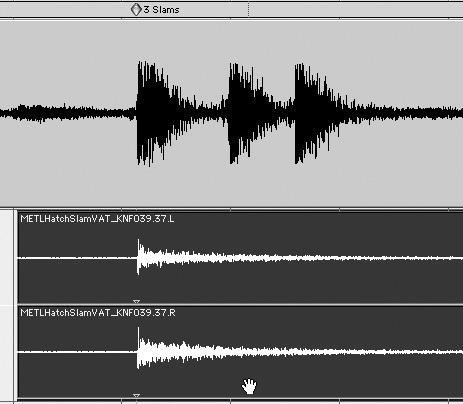
To maintain ongoing sync with picture or track
1. Maintain ongoing sync between the sound effect and the picture or guide track by pulling up the sync of the sound repeatedly. Sync the beginning of the sound effect to the first hit point.
2. Play the sound effect and leave the insertion point where it goes out of sync. If the sound is too long, select through to the next wanted sound (Figure 20.71).
Figure 20.71. Select the space between the hit point in the guide track and the beginning of the desired sound in the uncut sound effect. Delete the space and pull up the later sound to sync with the guide track.
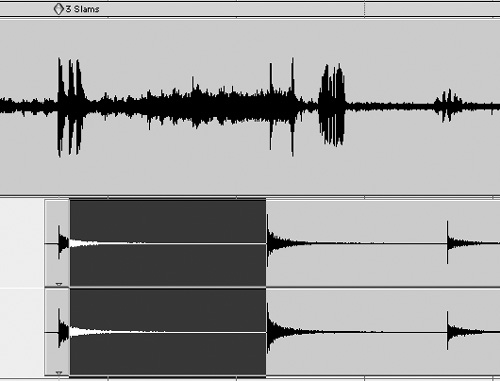
3. Press the B key in Command Focus mode to separate the region, or the delete key to clear out unwanted sound, and then drag the later region into its new sync position. If you create a hole, you may need to fill.
4. Repeat steps two and three to maintain sync as long as desired (Figure 20.72).
Figure 20.72. Keep tightening up or pushing back the sound effect to sync with the guide track. When you are finished you’ll have to fill any holes you made.

To sweeten a sound by adding another simultaneous sound
1. After cutting a layer of sound effects on a track, go back and add another layer of sound on another track.
2. Drag a “sweetener” from the Regions list and line it up with the first sound.
3. Add contrasting sounds as additional layers, for example, add high cracks to low booms to create more powerful explosions. Line up the sounds so the sync is tight and the sounds blend into each other.
4. Alternatively, the second sound can add missing details to the first sound. In this case line the second sound up so the hit points work around the original sound (Figure 20.73).
Figure 20.73. Some complementary sound effects layered to create a complex bug squashing sound.
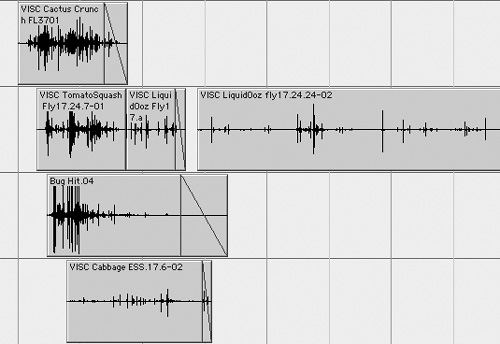
Assembling sound effects from various sources
To blend sound effects from different sources there is a range of useful techniques:
• As in dialog editing, use long overlaps to blend sounds seamlessly.
• Hit hard with a new incoming sound, cutting in on a large transient, so that it overwhelms the outgoing sound, distracting the ear.
• Cut layers of sound effects, where possible, weaving tracks from the different material, so that none of the sounds ever fully disappears. All the layers don’t have to be doing equal work at all times, but can come to the fore as appropriate.
Editing Music for Video
The principles of dialog and sound effects editing also apply when editing music.
Music often enters the project at an early stage, and is used during the picture editing to give a rhythm and tempo to a scene. So the picture is edited to the music.
Just as often, the music is brought to the picture later. In this case the sound editor may be asked to adapt the music to fit the rhythms and hit points of the picture. This is a challenging task, as it calls into play all the tools at the sound editor’s disposal, as well as a musical sensibility. Most professional music editors are musicians themselves, which gives them a depth of understanding of musical forms. However, everyone has some musical sensibility and can learn to edit music in effective ways.
Mixing for Video
Film and video have always been mixed in elaborate facilities with expensive audio, projection, and interlock equipment. The field has been the exclusive domain of highly trained engineers and crafts people. Since Pro Tools has become the dominant tool in the industry for post production sound editing, a few forward thinking sound engineers have been adapting the powerful mixing tools in Pro Tools to the mix to picture field.
The details of mixing for video and film are beyond the scope of this introductory chapter, so we will merely touch on some of the major topics of mixing for video here.
The stages of a mix
The three stages of a mix are
• Premixing
• Final Mixing
• Print Mastering and Versions
A premix is where you focus on getting the details of a particular category of sound just right, without regard to the rest of the tracks.
The dialog premix focuses on getting the dialog clear, clean, smooth and balanced. Reverb and other effects are added as needed to place the dialog into the proper setting. ADR is matched in to the production sound.
The effects pre-mix is where you balance the sounds against each other and against the dialog track. EQ, panning and effects are added. Foley is similarly premixed.
Once the premixes are complete, the final mix begins. In the final mix the dialog, ADR, sound effects, Foley, and music are balanced and final adjustments are made to the EQ and other effects. Since the music is making its first appearance, it often gets most of the attention in the final mix.
During the final mix, the sounds are kept separate by category (dialog, ADR, effects, Foley, and music), using stems, which ease mix fixes and later re-purposing of your mix. Stems are summed together and monitored during the final mix, but are recorded and stored separately as the ultimate master for the sound track. From the stems any number of different versions of the sound track can be produced.
The print master is a copy of the stems tailored for the particular release format required. Any number of different print masters can be made for different release requirements. Examples of different release formats with differing audio requirements include IMAX, 35mm film, 16mm film, DVD, VHS, broadcast television, broadband Internet, dial-up Internet, and even cell phone!
Simple mixes can be effectively done in an editing room with a mouse and keyboard. More complex mixes require video or film projection, surround sound monitoring, one or more Pro Tools TDM systems and control surface(s).
For more information on mixing in Pro Tools, see Part V, Mixing Audio.