Introduction
I first started to use Liquid when I was working in the QA development center for Pinnacle Systems. Initially I wasn’t comfortable with the working environment this “single-track” solution offered. However, I soon came to appreciate the power of unlimited video layers that this method gave me, and I saw immediate advantages to using off-the-Timeline DVD authoring and the real-time preview of filters and transitions—especially because I could access all of these features without expensive or difficult-to-install hardware.
However, although Liquid offers affordable power and an incredible potential for creativity, you should still make sure the video you are producing is clearly and cleanly presented. Otherwise, your carefully nurtured production will look amateurish, the interest of the audience will wane, and you’ll find you’ve wasted your time. The secret to avoiding this painful scenario is simple: You must understand how to get the best from the software you are using—in this case, Avid Liquid 7. Once you have achieved this, you are free to be as creative as you want.
Using This Book
This Visual QuickPro Guide, like others in the series, is a task-based reference book that uses each chapter to focus on a specific area of the application. For this guide, I use plain English to explain each function and accompany each explanation with a series of illustrations that show how each step should work. Where necessary, I use sidebars to illustrate particular topics in more depth.
This task-based approach—as opposed to a project-based one—allows you to use your own media or download the sample files from the publisher’s Web site (see accompanying sidebar) while learning the techniques in this book. You can then choose to follow each chapter in order, or simply dip in and out of the areas you find most difficult to understand.
Going Pro
The “Pro” in the title of this book refers to the capability of the software rather than the aspirations of the reader. Liquid is designed with a high creative ceiling. Users can produce simple, short videos for the Web, or they can make a surround sound DVD movie. The only real limitation of Liquid is the user’s imagination and inspiration.
Remember, all versions of Liquid share a common base program; versions sold with extra hardware simply have advanced output facilities that any Liquid owner with the relevant hardware can access.
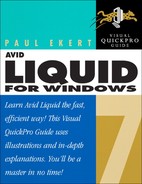
Figure i.1. The Sample Sequence that Avid Liquid installs into your Timeline by default.
Liquid Variations
Avid Liquid 7 is sold as:
• Avid Liquid 7
• Avid Liquid Pro 7
The important thing to remember is that Liquid is Liquid. The name might be slightly different, but the software remains the same in each version, Standard or Pro; the only difference is the hardware included in the packet. Here is the breakdown:
• Avid Liquid 7 is supplied with just the software and in some regional areas, a standard FireWire card—enough for anyone editing using a DV or HDV camera and outputting to DV tape or DVD/SVCD.
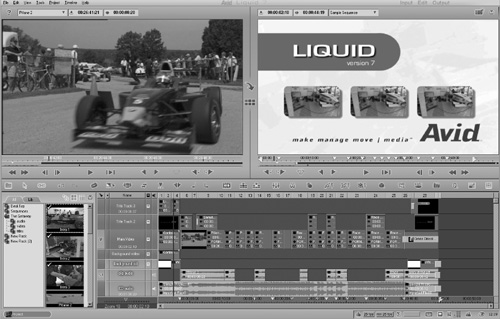
• Avid Liquid Pro is supplied with the software and the Pro BOB USB 2 DV/analog converter (Figure i.2). This has input and output sockets for Analog Composite, Component and S-Video, and 5.1 surround sound. The analog output from this device allows you to monitor real-time previews on an external monitor such as a portable TV and also output the project to non-DV devices.
Figure i.2. The Pro BOB allows access to various analog inputs and outputs.
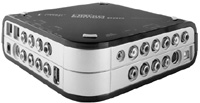
• The MovieBox Deluxe (Figure i.3)—a USB DV/analog converter supplied with Pinnacle Studio—will also give you access to the analog features of Liquid 7 and allow for real-time previews on an external monitor. However, this device does not support the same wide range of input and output ports found on the Pro BOB.
Figure i.3. The MovieBox Deluxe has slightly fewer inputs and outputs, but is still functional with Liquid 7.

To which version does this book apply?
Software programs change their version numbers in gradual increments over their lifetime (from 1.0 to 7.0, for example). Often, the version numbers change in even smaller increments (from 7.0 to 7.1, and even to such strange looking version numbers such as 7.58). These smaller increments often represent service packs (once known as bug fixes) and are released so that users can gain access to recently released hardware, such as advanced DVD burners with dual-layer capability.
Historically, these version increments haven’t significantly changed the operation of the program. Therefore, this book applies to any version of Avid Liquid 7.x, where x is the number you have installed on your computer.
What’s New in Version 7?
Liquid Edition 6.1 added a wealth of new features to the program, including native HDV and mixed codec editing, Multicam editing, 5.1 surround sound, and a host of other features. Version 7 may not offer quite so many new features, but it does offer a significant number of popular applications, modules, and filters that will enhance your projects to no end.
Version 7 has also been designed to ease the learning curve required by earlier versions, allowing users switching from Pinnacle Studio a more relaxing migration period. However, you will be excited to hear that none of the power is missing and that the much-loved Classic interface is still there for those who want it.
Below is a selection of the exciting new features Avid Liquid 7 has to offer:
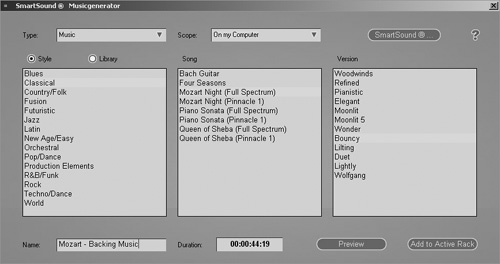
• SmartSound® integration. This has to be the number-one request from the Liquid community. Essentially, it is a way of quickly adding soundtracks directly to the Timeline and to the exact length you need them to be.
If you’ve used SmartSound in other programs, such as Pinnacle Studio, then you will be pleased to know that the integration is also from the Timeline and works without having to leave the Timeline. Better still, you have a large library of 44,000 sound styles and tempos to use in your projects, whereas Studio is limited to 22,000 sound files. For more details on this feature, see Chapter 7, “Working with Audio.” (Figure i.4).
Figure i.4. The new SmartSound® interface is a much-requested feature finally available in version 7.
• New “EZ Capture” tool. EZ Capture is a new way of capturing aimed at users who were frustrated with the complex Logging tool, or who simply wanted to capture a file to a chosen location with a user-specified name (Figure i.5).
Figure i.5. EZ Capture is a new and easier way to capture your films.
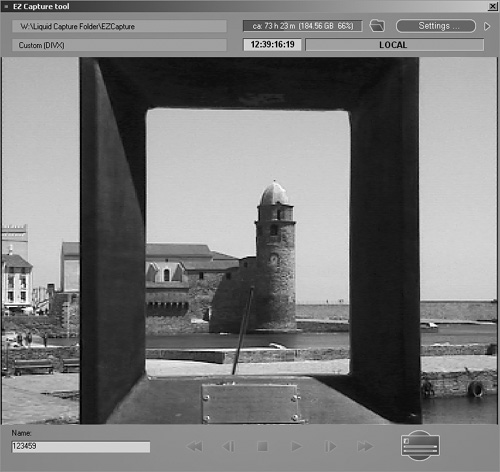
This simplified capture application allows the user to locate the file easily using Windows Explorer. This was not always possible using the Logging tool and the Media Management system.
EZ Capture also allows the user to capture in DivX or MPEG format from an analog source such as the Pro BOB or the MovieBox Deluxe. For more details on this feature, see Chapter 2, “Logging and Digitizing.”
• Realtime Linear Timewarp. Linear Timewarp is now Realtime in version 7 and will play back under a yellow slice. This is a true time saver as it means less rendering time while editing.
Dynamic Timewarp is still Non-Realtime and must be rendered in the background. For more details on this feature, see Chapter 9, “Working with Filters.”
• HDV Preview via the BOB. If you already own a Pro BOB or a MovieBox Deluxe, you will be interested to know that Liquid 7 can now output a “preview” of an HD Timeline via the analog outputs. It achieves this by down-sampling the HD stream to SD in real time.
This is a major step forward for HD users who were unable to use the BOB with Liquid 6.x and HDV Timelines.
• VGA Second Head output. If you don’t own a Pro BOB but you have a second monitor link to your computer, you now have the option of turning the second monitor into a full-screen display. This can be a little tricky to set up, but the advantages are clear (Figure i.6).
Figure i.6. The VGA Second Head output works with SD and HDV. The Timeline is on the left monitor, and the full-screen display is on the right.
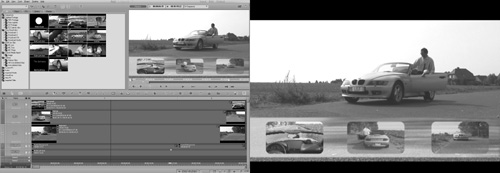
See the appendix for details on getting the VGA Second Head output to work on your system.
• Single monitor UI. Also known as the Studio view, this feature allows for an optimized editing workspace that is perfect for laptops or high-definition LCD displays.
Using an enlarged project browser and a switchable Master/Source inlay, it will allow users of single displays to edit in a more comfortable environment. For more details on this feature, see Chapter 1.
• Quick Access menus. In order for Studio users to feel at home with Liquid 7, Avid also includes a new Quick Access menu system to gain access to the primary functions. For more details on this feature, see Chapter 6, “Fine-Tuning Your Edit.”
• RT FX Commotion plug-in filters. These are filters ported over from Commotion, a compositing program with many “After-Effects–like” features. These filters are mostly Realtime and aimed at the more advanced user, so invest some time reading the Avid Liquid Reference Manual to get the best from them.
• Native editing of Windows Media 9 content. Obviously this allows you to edit existing Windows Media 9 content without rendering, but the advantages are less obvious. These include the ability to edit out those unfortunate moments from a recorded business Web conference!
• Native playback including muxed audio/video. Files imported into version 7 will now allow for support of native playback without the need to demux in advance. This will not only save time on file import but will allow you to natively edit muxed formats such as Windows Media and DivX.
Obviously, this list is just scratching the surface of what’s new in version 7. On the technical side, there have been huge advances in the rendering department and in the overall operation and workflow of the application.
Minimum System Specifications
• Windows XP SP2 (Mac systems aren’t supported by Avid Liquid 7)
• 1.8 GHz CPU
• 512 MB of memory—1 GB RAM or better
• A large second hard drive, either SCSI or EIDE/SATA (EIDE/SATA drives must have a minimum spin speed of 7,200 rpm (revolutions per minute)
• AGP 4X graphics card with 64 MB RAM, DirectX® 9 hardware support, or an AGP 8X graphics card with 128 MB RAM, DirectX 9 hardware support
• A sound card that is DirectX 9–compatible
• An IEEE 1394 PCI card (also known as a FireWire card)
• A DVD driver (to install the program)
• Avid Liquid 7 is supplied only on DVD, so you will need a DVD driver in your computer, or the ability to network to your system.
Recommended System Specifications for SD-DV Editing
Avid Liquid 7 demands a performance level that exceeds most programs available today. While you might be able to use the minimum specification listed in this chapter, you would be more realistic to consider the following specification:
• 3.0 GHz or a dual-processor system using 2 x 2.2 GHz CPU.
• 1,024 MB of fast, reliable RAM.
• A fast graphics card with at least 128 MB on board and DirectX 9.x support.
• A DVD burner. This is essential if you want to author DVDs or create an archived backup of your project.
• A sound card with ASIO 2.0 compatibility. To edit in 5.1 surround sound, you need a sound card that supports this and a speaker system that allows you to accurately monitor the results.
• A certified USB 2.0 interface. This is required if you’re going to use MovieBox and MovieBox Pro. For a list of which USB interfaces are certified, visit the support page for Liquid (www.avid.com).
• If you are planning on using a BOB, you will also need a graphics card that offers DirectX 9 hardware support. Note, this is not the same as DirectX 9–compatible, which doesn’t necessarily have the hardware on board to support advanced features such as Software Shading.
Recommended System Specifications for HDV Editing
High-definition editing is yet another step up the computer performance ladder, mainly because HDV editing sucks the performance out of a computer like no other application. To cope with HDV, you need a really beefy system. However, please note there are two distinct flavors of HDV: 720p and 1080i.
720p is not quite as ferocious when it comes to draining your computer of all its resources, but it is still a high-maintenance friend; 1080i is far more demanding. Below are some sample specifications you’d want to consider for this type of editing. If you have the sort of money for an NLE system, I recommend that you purchase a turn-key system from an Avid dealer.
• CPU for 720p: 2.8 GHz (Hyper-threading enabled)
• CPU for 1080i: 3.0 GHz (Hyper-threading enabled)
• Graphics card for 720p: AGP 8X graphics card with 128 MB RAM, DirectX 9 hardware support
• Graphics card for 1080i: PCI Express graphics card with 256MB RAM or better, DirectX 9 hardware support
Additional Equipment for the Power User
Power users are a kind of super-user of NLE software. Typically, they start out as hobbyists and then progress until they are making money from their hobby by filming events such as weddings or training videos. Some even go on to make it a full-time career. If you are a budding power user, you’ll need a little more equipment:
• A second VGA monitor so you can have a dual-screen layout.
• MovieBox Pro if you want to output 5.1 surround sound.
• A DV deck to transfer your tapes to the computer. Yes, you can use your camera. I do. But there is a price to pay if you do so—double the work means half the shelf life for your camera.
• A quality VHS deck to output your projects onto tape and to capture from analog.
• An EIDE/SATA expansion card. You’ll use this to add more drives to your system, either as separate units or linked together in a RAID, forming one big drive from up to four others.
• A removable drive bay. The alternative to a large hard drive or a RAID is simply to swap out hard drives for every project you work on.