
Chapter 38. Developing Smart Clients
IN THIS CHAPTER
- Practical Web Service Consumption
- Using the New Application Settings System
- Supporting Offline and Online Operation
- Authorizing and Authenticating Users
- Multithreaded Web Service Consumption
- Using the
BackgroundWorkerControl
At last, there is a marked distinction between simple disconnected applications and the new breed of applications made possible by the .NET Framework: smart clients.
The phrase smart client is a broad term that may apply to many different types of applications depending on the person using the phrase. For the purposes of this chapter, the author is referring solely to a specific subset of applications that he considers the only true “smart clients.” These applications have the following characteristics:
- Agile—An agile application is one that can operate properly under varying circumstances. Users should never run the application and end up in an environment where the application fails to work. For connected applications, this means that the application can work in both offline and online modes.
- Distributed client—A distributed client basically means that the ultimate back end of the client is not a simple file on disk, but a web service providing encapsulation for some remote data store.
- Responsive—Responsive applications are fast; users should never encounter a situation where they are sitting idle waiting for the application to finish doing something. This means that smart clients need to make heavy use of multithreading technologies to remain responsive while still operating on large data sets.
- Secure—A secure application knows the identity and privilege level of the user working within the application. These credentials may be stored remotely or may be validated locally. The bottom line is that a smart client will not allow a user to do something that the developers or administrators did not intend, including tampering and other malicious activity.
This chapter provides you with what you need to start building smart clients using Windows Forms 2.0. After you learn how to build these applications, you will learn how to deploy them in Chapter 39, “Application Deployment Using ClickOnce.”
Practical Web Service Consumption
One failing that a lot of Internet and free samples have is that they do very little to convey how to use a technology in a practical, real-world scenario. Unless you happen to be writing an application that does nothing but display the phrase “Hello World” in 30 various and sundry ways, most “quick” samples don’t do you much good.
For example, most web service samples all work against a single fixed URL. This means that when the web reference was added within Visual Studio, the sample never changed the URL of the web references. There aren’t many development situations where the URL of a web service while being developed is the same as the production URL. In addition, there can often be multiple servers hosting the same service—how does the client application know the URL of the web service in these situations?
In previous versions of Windows Forms, the developer would typically place the URL for the web service in the app.config file and then programmatically retrieve that value and set the web service’s Url property accordingly.
Thankfully, that tedious process is no longer required. Using the new application settings system, the URL of the web service is added to the app.config file automatically when you add the web reference.
To see how this works, create a new Windows Forms application and add a web reference to a web service. You will see that the web service’s URL is placed in the app.config file as shown in the following code:
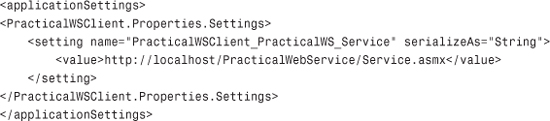
By storing the URL of the web service in a configuration file rather than leaving it hard-coded in the application itself, you can rapidly change the location of the web service and you can even allow end users to change the setting. The new application settings model is covered in the next section.
Obtaining a Web Service URL from UDDI
An alternative to storing the raw URL of the web service in an application configuration file is to retrieve the URL of the web service using Universal Description and Discovery Interface (UDDI). UDDI is itself a web service that exposes a catalog of directory nodes. These nodes can contain information ranging from business information about the service providers to an actual interface containing a URL to access the service.
By using UDDI, companies that produce smart clients can make a single change to a central UDDI record and all clients would then know about the new URL for the web service and adjust accordingly.
In addition to this centrally managed URL, companies can provide multiple URLs for redundancy. If the first URL fails to respond within a specific time period, a smart client can then move to the next URL in the directory and try to establish a connection with that web service.
UDDI information can either be published globally (see uddi.org) or it can be hosted within an organization using the new UDDI services that are a part of Windows Server 2003.
The UDDI SDK and creating and using tModels (the data structures that represent a stored model within a UDDI directory) are both beyond the scope of this chapter. For more information on UDDI see http://www.uddi.org or check out http://www.microsoft.com/windowsserver2003/technologies/idm/uddi/default.mspx for information on the Windows Server 2003 UDDI support.
Using the New Application Settings System
The new application settings system that is an integral part of all .NET Framework 2.0 applications dramatically increases the power of configuration files.
In previous versions of the .NET Framework, application configuration files were used to provide read-only information that could be used to feed data into the application at startup. The new application settings framework provides that same functionality, but also allows the developer to
- Visually create settings using a designer
- Programmatically read settings at User or Application scope
- Save settings to the local file system at User or Application scope
- Bind control properties (read and write) to User or Application scope configuration settings
You have already seen a little bit of the first item when you created a web reference. Right-click your Windows Forms project, select Properties, and then click the Settings tab. You will see the settings designer shown in Figure 38.1.
Figure 38.1 The settings designer.
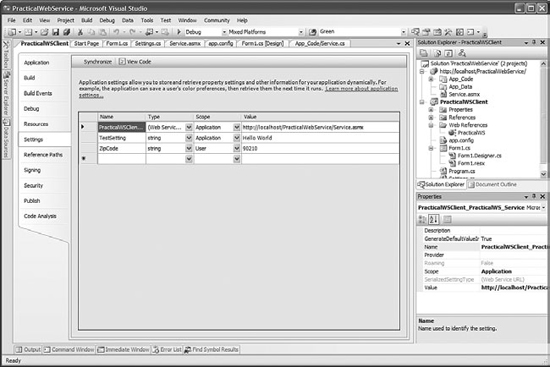
This designer looks very much like the resource editor. To add a new setting, simply provide a name, a data type, and a scope (User or Application). In previous versions of the .NET Framework, the developer had to resort to writing tedious isolated storage code to store and retrieve user-scoped preferences and options.
When your application starts, all applicable settings are automatically loaded. This means that all application-scoped settings are loaded and all user-scoped settings for the current user are loaded. Controls that are bound to configuration file properties will load those properties from the configuration system whenever those values are needed.
The first time you use the Settings Designer class within Visual Studio, a Settings class is created for you. This class provides encapsulation around the settings in the designer, as well as strongly typed member access. Using this class, you can read and write settings and save those settings, as shown in the following code:
MessageBox.Show("Your zip code is " +
Properties.Settings.Default.ZipCode);
Properties.Settings.Default.ZipCode = txtZipCode.Text;
Properties.Settings.Default.Save();
The Default property provides access to an instance of the class created by the designer. If you like, you can write your own C# code and extend this class by modifying the Settings.cs class that has been added to the Visual Studio solution.
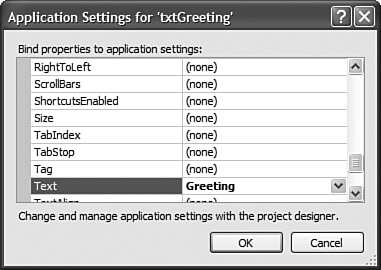
One of the most powerful things you can do with the new application settings system is to bind control properties to configuration properties. To do this, create a new string property called Greeting and make sure it is scoped at the User level. Next, drag a TextBox onto the form and call it txtGreeting. In the txtGreeting properties panel, expand the ApplicationSettings group at the top and click the ellipsis button next to PropertyBinding. You will see a configuration setting property map dialog like the one in Figure 38.2.
Figure 38.2 Configuration setting property map dialog.
This binding only handles reading the data from the configuration system when the application starts up. If the data changes, you have to call Properties.Settings.Default.Save() in your code to persist the change. The really powerful aspect of this new system is that the scoping is dealt with automatically. Without your having to write any additional code, your application can automatically differentiate between preferences set by any of the application’s users as well as maintain application-wide settings.
Supporting Offline and Online Operation
Part of an application’s agility comes from its ability to work properly under any circumstance. In today’s mobile age, someone could be using an application on a laptop in a disconnected environment, bring the laptop to a coffee shop and connect wirelessly, and then bring the laptop home and connect to a wired LAN. A truly agile application needs to be able to work when the network is connected and when it is disconnected.
The first part of working in both connected and disconnected modes is making sure that your application makes a local cache of offline activity that can then be uploaded to the web service after the connection is restored. The format and storage medium of this offline cache will be up to you and will largely depend on the specifics of your application, so that won’t be covered in detail here.
In order for your application to begin uploading data to the web service when a connection is restored, your application needs to know when a connection has been restored.
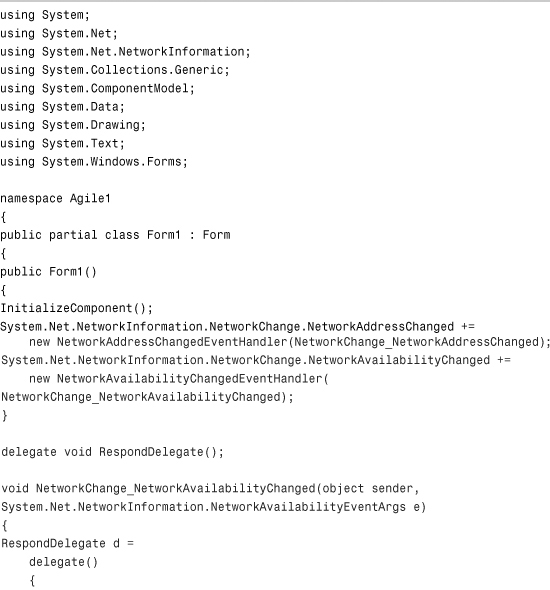
The new System.Net.NetworkInformation namespace provides developers with a handy utility class called NetworkChange. This class hosts events that are used to notify applications when changes in network status occur.
The first event is NetworkAvailabilityChanged. This event reports when there is a change in network availability. The network is considered “Available” when there is at least one network interface device that is considered “Up.” If all network interfaces are down or otherwise having trouble, the network is not available.
This might seem like the ideal way to detect whether your user has network access to the web service. Unfortunately, this isn’t entirely true. Here’s the rub: If the user has multiple network interfaces, such as Wireless (Wi-Fi) access, a LAN card, a 1394 IEEE card (FireWire), or a VPN (Virtual Private Network) interface device, this can complicate things. What happens is that one of these devices will lose access, but other devices may remain “up,” yet none are connected to a “real” network. In this case, the NetworkAvailabilityChanged event arguments will still report that the network is available, yet the client application cannot communicate with the web service.
To provide true connection detection, your code also needs to respond to the NetworkAddressChanged event, which is called whenever a network address is changed. Network addresses change when a device acquires a DHCP address (connect) and when a device disconnects or becomes disabled.
Listing 38.1 shows the source code for a form that sends messages to a list box when addresses change and when network availability changes. With this application running, experiment by turning off Wi-Fi hardware switches, disabling interfaces, enabling interfaces, and plugging and unplugging physical LAN cables. Make note of when the address change event is called compared to when the network availability event is called. For maximum effect, try this on a machine with a wireless card, a LAN card, and another network device like a VPN or a FireWire device.
Listing 38.1 Monitoring Network Status
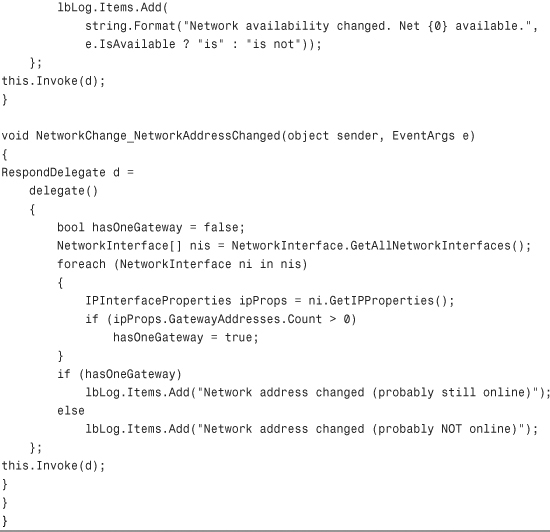
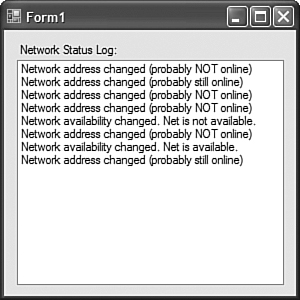
The code in the preceding listing uses the presence of at least one gateway address as a litmus test to guess whether a real network connection is present after the address change. It also makes handy use of anonymous methods to use the Invoke() method to forward the GUI-modifying code to the main UI thread. Figure 38.3 shows what happened when this program ran. The author had turned off his wireless card and then turned it back on, and then disabled every adapter on his machine, which finally produced a network availability event. Then he turned them all back on, which completed the test with a valid gateway.
Figure 38.3 Monitoring network availability and address changed events.
Authorizing and Authenticating Users
When working with ASP.NET applications, the authentication of a user can be extremely easy. Using Forms or Windows authentication, ASP.NET code can identify the current user simply by accessing the User property of a page. It isn’t quite that simple when working with Windows Forms applications, especially smart clients.
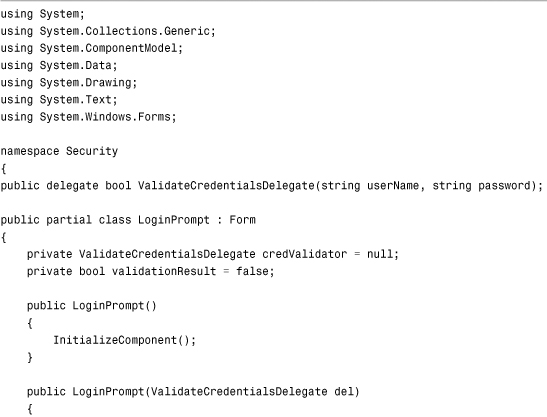
When working with smart clients, many client applications use the back-end web service for user authentication by supplying user credentials over a secure connection to a web service. Users can also be authenticated against a local database or even an XML file. Regardless of the method of validating user credentials, most smart clients need to be able to prompt the user for their credentials, validate those credentials, and then shut the application down if the credential validation fails.
This section shows you how to create a reusable Windows Form that can be used to prompt users for credentials and even validate those credentials without knowledge of the underlying validation scheme or persistence medium.
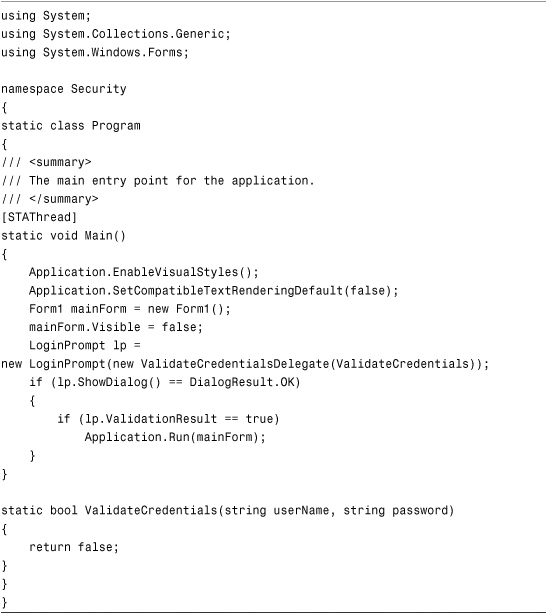
To start, create a new Windows Forms project and add a new form to it called LoginPrompt. It should have a text box for the user name, a text box for the password, and a button labeled Login. The code in Listing 38.2 shows the code in LoginPrompt.cs.
Listing 38.2 A Universal Login Dialog
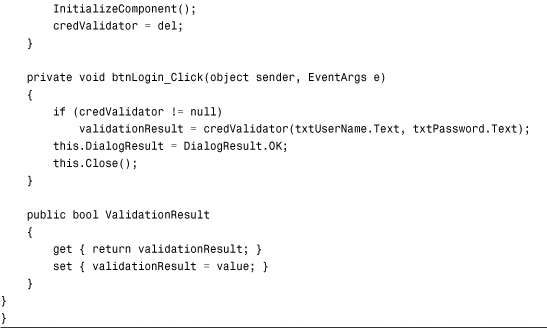
To use this dialog, all you need to do is instantiate the dialog and supply a delegate that will be invoked to validate the user’s name and password. The hardest part about using a login prompt is shutting the application down elegantly when the credential validation fails. To do this properly, you need to modify the Program.cs file that is created when you create your Windows Forms application, as shown in Listing 38.3.
Listing 38.3 Using a Universal Login Dialog
Multithreaded Web Service Consumption
When a client application needs to make calls to a web service for data and other business operations, some of those operations and data retrievals can take a long time. Any number of factors can contribute to a web service call taking a long time to return, including data volume, processing cost on the server, or even server load and slow network connections.
Multithreaded web service consumption has changed slightly since the previous versions of the .NET Framework. In version 2.0 of the framework, you invoke an xxAsynch() method where xx is the name of the server-side method. When the asynchronous method completes, the xxCompleted event will be triggered. All you have to do is handle the xxCompleted event and you will be consuming the web service asynchronously.
To see how to consume a web service in a background thread so that the foreground thread (user interface) can continue uninterrupted, create a new Windows Forms application and add a web reference to any web service of your choice.
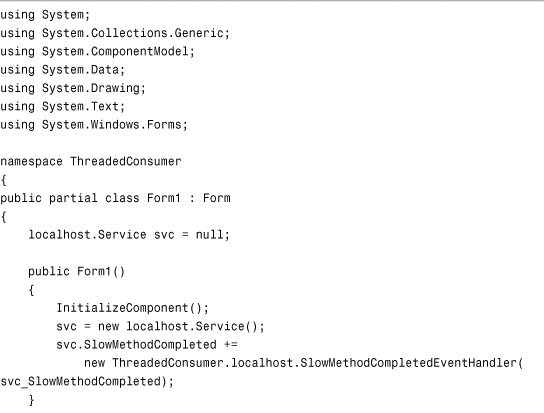
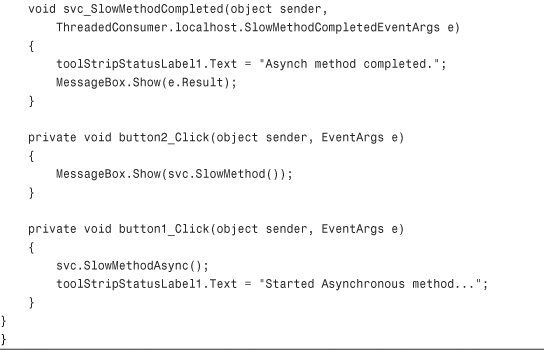
Next, add two buttons to your form: one to consume the service synchronously and one to consume the service asynchronously. The code in Listing 38.4 illustrates how to consume the service synchronously and asynchronously.
Listing 38.4 Synchronous and Asynchronous Web Service Consumption
Using the BackgroundWorker Control
Using asynchronous methods on a web service is just one way in which you can speed up your application and increase your application’s reliability and availability, two key factors in creating a truly agile smart client. However, your application may want to do more than just make multithreaded single calls to a web service. Quite often, smart clients need to perform background tasks and report the status of that task to the user.
The BackgroundWorker component is an extremely handy tool that takes care of a lot of the tedious work that used to go into performing long-running tasks in the background and reporting progress to the foreground thread and user interface. By handling the BackgroundWorker component’s three events, you can write code that executes in a background thread and you don’t have to worry about the complexities of starting the thread or about using the Invoke() method to communicate with the UI thread. These events are
DoWork—This event handler is invoked in a background thread. Whatever method you define for this event handler is the “work” method for the component. Within this method, you check theCancellationPendingproperty to stop execution and call theReportProgressmethod to indicate the percentage of the background task that has been completed.ProgressChanged—Use this event handler to respond to a change in the progress (percent complete) of the background task. This event handler is often used to modify the state of progress bars and other UI elements indicating progress.RunWorkerCompleted—Use this event handler to respond to the condition when the background task has completed.
To see this component in action, create a new Windows Forms application and add a StatusStrip control to the form. Using the interactive designer, you can add a progress bar to the StatusStrip control. Then you’ll need a button to kick off the background process. Drag a BackgroundWorker onto the form. Next, double-click the blank spaces in the event handler boxes for all of the BackgroundWorker component’s events. Listing 38.5 shows the code that makes it all work.
Listing 38.5 Using the BackgroundWorker Component


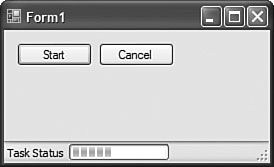
With the task in progress, your form might look something like the one shown in Figure 38.4.
Figure 38.4 Using the BackgroundWorker component.
Summary
Whether we developers like it or not, users are expecting more and more from our applications. When a platform like the .NET Framework comes along, it raises the bar for what users expect professional applications to do and how they should behave. The demand for agile applications that follow the IJW (“It Just Works”) credo is at an all-time high.
To keep users pleased and to produce high-quality applications, developers need to know the techniques involved in building agile, scalable, powerful smart clients. This chapter provided you with samples of how you can create applications that detect the presence of the network, consume web services asynchronously, perform background tasks without interfering with the foreground UI, and present users with a login prompt upon entering the application. These tools and techniques, combined with all of the other information this book provides on Windows Forms programming, should help you create extremely powerful and compelling applications.