
Chapter 9. Creating Basic Calculated Fields with the SAP Query Tool
In this chapter
• Creating a Basic SAP Query for This Chapter 120
• Using a Simple Mathematical Formula to Create a Basic Calculated Field 121
• Using a Simple Condition to Create a Basic Calculated Field 126
• Using an Input Value to Create a Basic Calculated Field 129
In earlier chapters, you used the SAP Query tool to create reports. This chapter teaches you how to create basic calculated fields within those reports by using the SAP Query tool. A regular end user can perform the calculations explained in this chapter by using the SAP Query tool; no special ABAP training or security provisions are required.
As discussed in earlier chapters, you can use the SAP Query tool to create robust reports of your SAP data from any application module within SAP R/3. In addition to creating detailed reports, there may be times when you want to perform calculations on your data. A popular method many users use is to take advantage of the built-in integration with the Microsoft applications. A user can download a SAP R/3 report into Microsoft Excel and perform the calculations there, using Excel’s easy-to-use formula tool. However, a more efficient and easy-to-learn method of performing calculations in reports is to use the SAP Query tool to do basic calculations.
The following are examples of calculations you might want to perform by using the SAP Query tool:
• HR/payroll—You could analyze how much it would cost for an employee on the third shift to work on a holiday by calculating the cost of increasing the hourly rate from straight time to time and a half.
• Finance—You could subtract the invoice date from the current date to determine the number of days that payment is past due.
• Logistics—You could subtract the inventory item count from the on-order item count to assist with determining restocking order amounts.
You can use calculated fields to perform if…then statements. For example, you might want to say that if the order value is greater than $100.00, enter the value $0.00 in the Shipping Cost column. You could also use a field that inserts a fixed value, such as the current date, in a column of your report output.
The ability to perform calculations on SAP data is a remarkable function because it means you are no longer required to extract your data into a third-party application such as Microsoft Excel to perform the calculations. In this chapter you will learn how to create a very basic mathematical calculation within an SAP query. You will also learn how to perform calculations when certain conditions are met (for example, “If X = 100, then multiply Y by 29”). Finally, this chapter shows you how to create a field for output based on real-time, dynamically decided input.
Creating a Basic SAP Query for This Chapter
For the examples in this chapter, you need to follow along in your own SAP system. To do so, you need to create a basic SAP query, using the instructions outlined in Chapter 3, “Creating Basic Reports with the SAP Query Tool,” that contains the fields shown in Table 9.1. For my example, I named my report DLS_QUERY_09, where DLS is my initials.
Table 9.1. Sample SAP Query IDES Report for Use in Chapter 9 Exercises
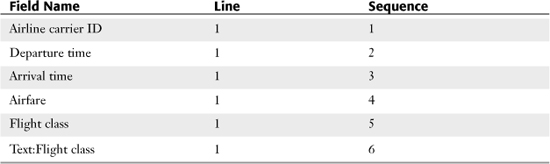
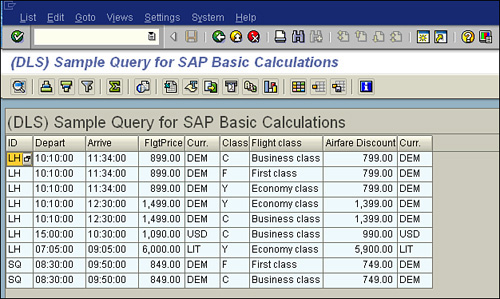
Figure 9.1 shows an example of the report output of this report.
Figure 9.1. Your report output may vary from what is shown here based on your system’s data.
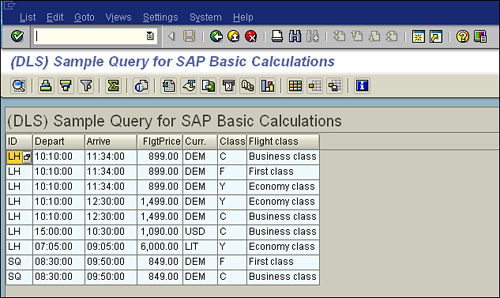
When your SAP query is completed and your report output appears in the same format as the example shown in Figure 9.1, you are ready to insert a basic mathematical formula into the report.
Using a Simple Mathematical Formula to Create a Basic Calculated Field
In this section you will insert a calculated field to perform a basic mathematical equation within the query you created in the preceding section. You will create a calculated field that subtracts 100 from the existing Airfare field and then shows the result as output. There are several real-world applications for this type of calculation, including the following:
• Human capital management—You could perform an analysis for an increase in salaries to assist with budgeting and forecasting.
• Finance—You could monitor the incoming and outgoing cash flows.
• Logistics—You could calculate the number of days a plant maintenance order has been open.
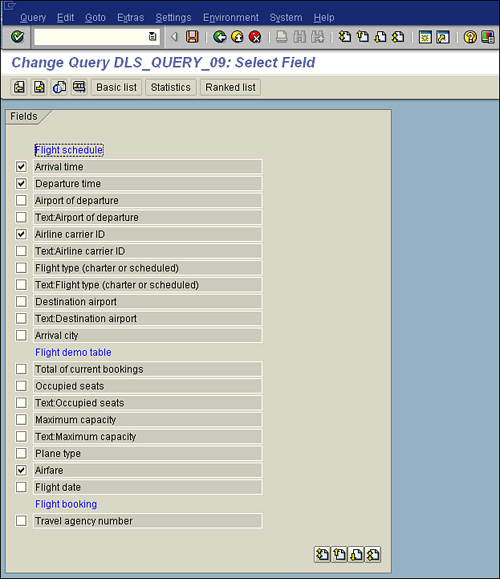
You insert all basic calculations on the Select Field screen of the SAP Query tool. This screen, shown in Figure 9.2, lists the fields selected to be included in your SAP query. To add a basic mathematical calculation to your SAP query, you follow these steps:
Figure 9.2. The Select Field screen lists all the fields available within the InfoSet.
1. Navigate to the main screen of the SAP Query tool by using transaction code SQ01, select the query you want to work with (for example, DLS_QUERY_09), and click the Change button.
2. Navigate to the Select Field screen by clicking the Next Screen button on the Application toolbar twice. The screen should appear similar to the one shown in Figure 9.2.
3. Select Edit, Short Names, Switch On/Off. This allows you to create short names for your existing query fields so that you can easily refer to them in calculations. For example, enter TIXCOST as the short name for the Airfare field (see the background of Figure 9.3).
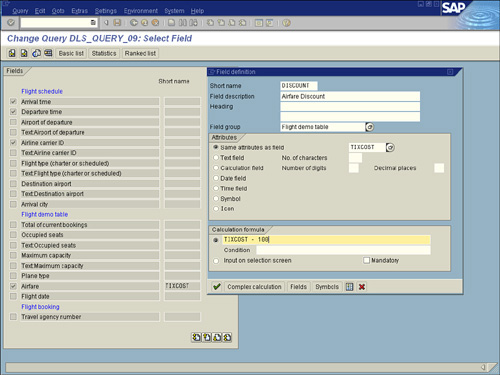
Figure 9.3. The Field Definition dialog box displays all the attributes of your newly created calculated field in the SAP Query tool.
4. Position your cursor in the Airfare field to base your calculated field on it.
5. From the Select Field screen of the SAP Query tool, select Edit, Local Field, Create. Because your cursor was on the Airfare field, your custom-calculated field will be added to its field group (Flight Demo Table).
6. When the Field Definition dialog box appears, input a short name for your newly created local field (DISCOUNT) and input a field description (Airfare Discount), which will be the heading for the column in the report (refer to Figure 9.3).
7. Define what kind of field your newly added custom field will be; the available options are listed in Table 9.2. Select the attributes for the field (refer to Figure 9.3) by indicating that the field is similar to the existing field that you created a short name for. That is, indicate that the field has the same attributes as the TIXCOST field. (Both are currency fields.)
Table 9.2. The Available Field Attributes

8. If it is not already selected, select the option button next to the Calculation Formula box at the bottom of the Field Definition dialog box and then enter your basic mathematical formula into the designated box to the right of it (refer to Figure 9.3). In this case, enter TIXCOST-100, which translates to an output in the Airfare Discount field of the calculation: Airfare minus 100. Several different types of basic mathematical symbols are available, as shown in Table 9.3. Press Enter to proceed.
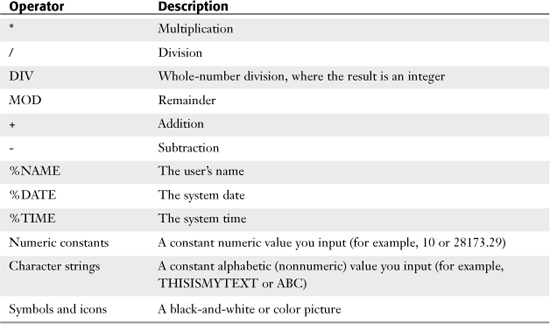
Table 9.3. Valid Operators and Operands for Mathematical Formulas
9. To add the newly created field to your report output, confirm that the field is selected on the Select Fields screen by ensuring that the small box next to the Airfare Discount field at the bottom of the Flight Demo Table field group is selected.
10. Navigate to the Basic List Line Structure screen by clicking the Basic List button on the Application toolbar. You see your newly created field listed there, under the name you gave it in step 6. Add the new local field to your report output on the Basic List screen of the SAP query report by indicating a line and sequence number. (I listed mine as Line 1 and Sequence 7.) Click the Save button.
11. Execute your report by pressing F8. You are presented with the report’s selection screen. Press F8 again to see your updated SAP query, which now contains your newly added calculated field (see Figure 9.4).
Figure 9.4. The newly added column that contains the value of the Airfare field minus 100 is now shown on the report.
Technical Details of SAP Query Calculations
When inserting mathematical formulas into an SAP query report, you structure formulas based on standard math procedures, using operands (values) and operators (operand links), which are described in Table 9.3. In case you are like me and remember nothing from college math classes, I have included some specific clarifications on calculations for your reference:
• The operators + and - can also be one-character operators. In this case, they do not link two operands but refer to subsequent operands.
• The processing sequence follows the usual rules, where the operators + or - take priority over characters *, /, DIV, and MOD, which in turn take priority over the operators + and -. However, you can change the processing sequence to suit your own requirements by using parentheses.
• In some cases, you may need to output the fields used in the calculation sequentially on the Basic List Line Structure screen in order for a detailed calculation to function as it is designed to function. For example, if the calculation formula is A + B and the local field is C, you may need to output A and B prior to C in your report output.
• Table 9.3 lists some operands, including %NAME, %DATE, and %TIME, which are special fields that the system automatically provides. %NAME is a 12-character text field that contains the name of the user entered when logging on to the SAP R/3 system. %DATE is a date field that contains today’s date. %TIME is a time field that contains the current time. If the character ‘ appears within a character string, you must precede it with a ‘ so that it is correctly interpreted. Also, the following special notation is possible for field names and the special fields %NAME, %DATE, and %TIME:
• field[n1:n2]—This field must have its attributes set as a text field. In addition, both n1 and n2 must be whole-number numeric constants (without decimal points), and n1 < n2. field[n1:n2] is the part of the text field that extends from the character at n1 to the character at n2. The first character of a text field appears at Position 1.
• field[YEAR], field[MONTH], field[DAY]—This field must have its attributes set as a date field. The year, the month, and the day can then be provided (in number form).
• field[HOUR], field[MINUTE], field[SECOND]—This field must have its attributes set as a time field. Hours, minutes, and seconds can then be provided.
• Formulas can extend over one or several lines in free format. For example, the individual operands and operators can appear one immediately after the other in a consecutive sequence, or there may be a number of spaces between them. However, there can be no spaces within field names, and field names and character strings cannot extend over more than one line.
• If the fields specified on the screen for the formula and the condition are sufficient to allow full specification of the calculation formula for the local field, you can use these fields for input. Otherwise, you need to use the Complex calculation function, which is covered in Chapter 10, “Creating Advanced Calculated Fields with the SAP Query Tool.” This takes you to an editor where you can enter all the necessary calculations.
Using a Simple Condition to Create a Basic Calculated Field
Now that you have created a basic calculation, you can take it a step further by using a condition to determine a calculation. In some cases, you might want to perform a calculation or output a value only if a certain condition exists. For example, in the SAP query you have been working with in this chapter, you could create a calculated field to specify that the discount field should have the 100 discount only if the passenger is listed as flying in first class. There are several real-world applications for this type of conditional calculation, including the following:
• HR/payroll—You could forecast how much it would cost to increase all associates’ salaries by three percent within a department to assist in salary or budgeting projections.
• Finance—For fixed-asset management, you could determine which purchase requisitions are not assigned to an account.
• Logistics—You could calculate invoice payments based on the delivery dates and down payments.
For this example, you will continue working with the exercise query you created earlier in this chapter. To create a calculated field that is based on a condition, you follow these steps:
1. Navigate to the main screen of the SAP Query tool by using transaction code SQ01, select the query you want to work with (for example, DLS_QUERY_09), and click the Change button.
2. Navigate to the Select Fields screen by clicking the Next Screen button on the Application toolbar twice. If the short names are not already displayed, select Edit, Short Names, Switch On/Off to turn them on. Enter a short name for the Flight Class field (CLASS) in the Flight Booking Field group so that you can easily refer to it in your calculation.
3. Position your cursor in the Flight Class field, which you will base your calculated field on.
4. Select Edit, Local Field, Create. Because your cursor is in the Flight Class field, a custom field is added to its field group (Flight Booking Table).
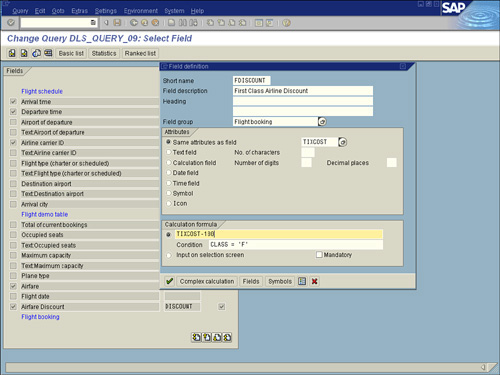
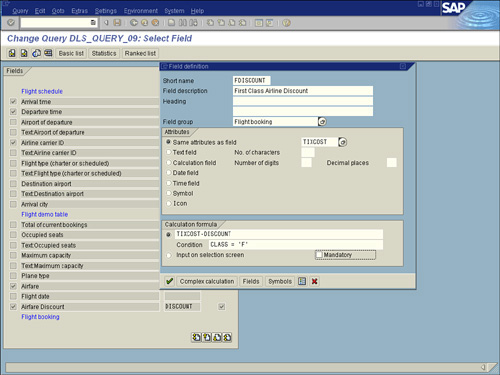
5. When the Field Definition dialog box appears, input a short name for your newly created local field (FDISCOUNT) and input a Field description (First Class Airfare Discount), which will be the heading for the column in the report (see Figure 9.5).
Figure 9.5. For this example, you input a short name and a field description, and you indicate for attributes that you want the field to be in the same format as the TIXCOST field.
Caution
The calculated field you created in the first example for airfare discount had the short description DISCOUNT. The calculated field you are now creating for this example is for first-class airfare discount, with the short name FDISCOUNT. Be sure not to get the two confused.
6. Define the attributes for the field (refer to Table 9.2) by indicating that the field has the same attributes as the TIXCOST field. (Both are currency fields.)
7. If it is not already selected, select the option button next to the Calculation Formula box at the bottom of the Field Definition dialog box and then enter your basic mathematical formula into the designated box to the right of it (refer to Figure 9.5). In this case, enter TIXCOST-100. Because this formula is based on a condition, also input CLASS = ‘F’ into the Condition line under the formula. This translates to an output in the new First Class Airline Discount field of the value of the Airfare field minus 100 only if the flight class is listed as F. Press Enter to proceed.
8. To add the newly created field to your report output, confirm that the field is selected on the Select Fields screen by ensuring that the small box next to the First Class Airline Discount field at the bottom of the Flight Demo Table field group is selected.
9. Navigate to the Basic List Line Structure screen by clicking the Basic List button on the Application toolbar. You see your newly created field listed there, under the name you gave it in step 5. Add the new local field to your report output on the Basic List screen of the SAP query report by indicating a line and sequence number. (I listed mine as Line 1 and Sequence 7.) Click the Save button.
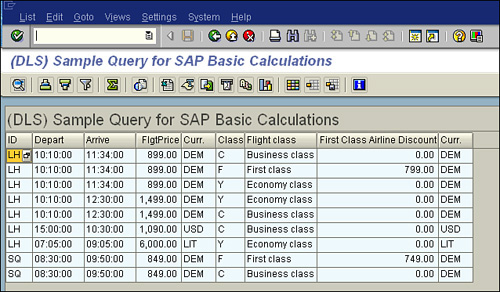
10. Execute your report by pressing F8. You are presented with the report’s selection screen. Press F8 again to see your updated SAP query, which should now contain your newly added calculated field (see Figure 9.6).
Figure 9.6. The report now shows the newly added column that contains the value of the Airfare field minus 100 only if the flight is first class.
Defining Conditions for a Local Field
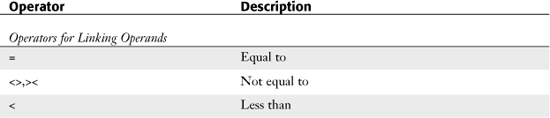
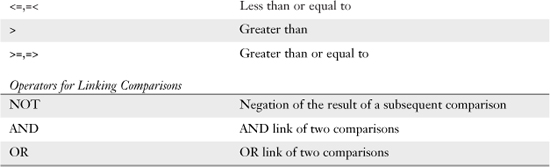
Conditions are special formulas that always evaluate to true (that is, the condition is satisfied) or false (that is, the condition is not satisfied). A condition consists of a single comparison, although it is possible to link comparisons by using logical operators. A comparison consists of two operands linked by a valid operator, as shown in Table 9.4.
Valid operands are used in the SAP Query tool just as they are used in basic math. The processing sequence conforms to the usual rules—that is, negations (NOT operations) take priority over AND operations, which in turn take priority over OR operations. However, you can override this sequence by using parentheses. For more information on SAP calculation conditions, please refer to the SAP online help at http://help.sap.com and then select SAP Library, Cross Application Components, CA - Drilldown Reporting, How to Process Report Lists, Defining Display Conditions.
Table 9.4. Valid Operators for Linking Operands and Comparisons
Using an Input Value to Create a Basic Calculated Field
Now that you have created a basic calculation and a simple conditional calculation, you can try something more dynamic. In some cases, you might want to perform a calculation or output a value based on a value that you may know only at report execution time (that is, a dynamic value). For example, you can use the same SAP query you have worked with throughout this chapter to create a calculated field to specify that the Discount field should subtract 100 or 200 or 500, with the actual numerical amount input at runtime. There are several real-world applications for this type of conditional calculation, including the following:
• HR/payroll—You could analyze how much it would cost for an employee on the third shift to work on a holiday by calculating the cost of increasing the hourly rate by $1, $2, and so on.
• Finance—You could monitor the impacts of accounts payable reports if an invoice were paid in 30 days, 60 days, and so on.
• Logistics—You could calculate the number of days a plant maintenance order has been open as of today, as of next week, and so on.
To create a calculated field that is based on dynamic selection screen input, you follow these steps:
1. Navigate to the main screen of the SAP Query tool by using transaction code SQ01, select the query you want to work with (for example, DLS_QUERY_09), and click the Change button.
2. Navigate to the Select Fields screen by clicking the Next Screen button on the Application toolbar twice. If the short names are not already displayed, select Edit, Short Names, Switch On/Off to turn them on. You will reuse the local field you created in the first example, Airfare Discount, which has the short name DISCOUNT.
3. Position your cursor in the Airfare Discount field and select Edit, Local Field, Change to change your existing calculated field rather than create a new one.
4. When the Field Definition dialog box appears, delete TIXCOST-100 from the Calculation formula box and select the radio button Input on Selection Screen. Doing so includes the Airfare Discount field on the report’s selection screen so that you can input a value at report runtime.
5. Create a calculated field that shows the value of the amount entered in the Airfare field minus the amount entered on the selection screen in the Airfare Discount field. In this case, you can reuse the First Class Airline Discount field that you used in the previous example. To modify this existing field, position your cursor in the First Class Airline Discount field and select Edit, Local Field, Change.
6. When the Field Definition dialog box appears, modify the formula TIXCOST-100 to say TIXCOST-DISCOUNT and leave the Condition line as is (see Figure 9.7). Press Enter to proceed.
Figure 9.7. Instead of subtracting the initial Airfare (TIXCOST) value, you change it to subtract the amount entered on the selection screen in the Airfare Discount field (DISCOUNT).
7. Ensure that the First Class Discount field is selected on the Select Fields screen. Then navigate to the Basic List Line Structure screen by clicking the Basic List button on the Application toolbar. Confirm that it is set to be included in the report output by indicating a line and sequence number. (I listed mine as Line 1 and Sequence 8.) Click the Save button.
8. Execute your report by pressing F8. You are presented with the report’s selection screen, which should contain an entry field labeled Airfare Discount (see Figure 9.8).
Figure 9.8. Any field indicated in the Field Definition dialog box as Input on the selection screen is automatically inserted on your report’s selection screen.
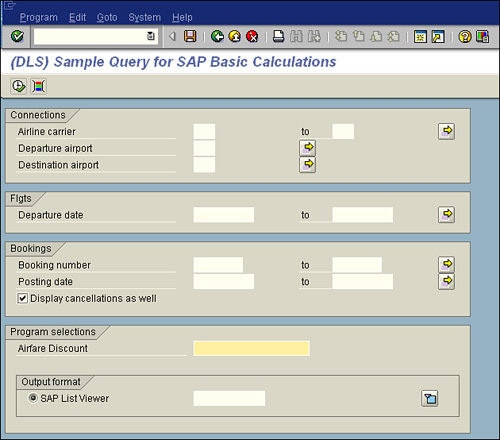
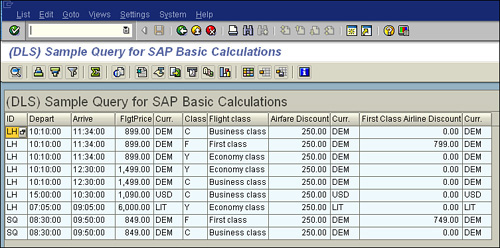
9. Input a numeric value in the Airfare Discount field on the selection screen (for example, 250). Press F8 to see your updated SAP query, which now contains your newly added calculated field labeled First Class Airline Discount (see Figure 9.9).
Figure 9.9. The newly added column that contains the value of the Airfare field minus the value input on the selection screen displays only if the flight is first class.
10. You can return to the selection screen, modify the number inserted into the Airfare Discount field, and reexecute the report to cause a calculation to be performed dynamically each time.
Things to Remember
• You can use the SAP Query tool to perform basic calculations using local fields; no programming skills are required.
• The processing sequence of operands follows the usual precedence rules, where the one-character operators + and - take priority over the point operators *, /, DIV, and MOD, which in turn take priority over the operators + and -. You can change the processing sequence to suit your own requirements by using parentheses.
• Formulas can extend over one or several lines in free format. That is, the individual operands and operators can appear one immediately after the other in a consecutive sequence, or there may be a number of spaces between them. However, there can be no spaces within field names, and field names and character strings cannot extend over more than one line.
• You can automatically insert a system value, such as the current user’s name, into a report by using a local field.
• Dynamic conditional calculations require a value to be input on the SAP Query tool’s selection screen.