Chapter 16. Special Considerations for Configuring HR and Payroll Reporting in the HCM Module
In this chapter
Configuring InfoSets for the HCM Module 200
Special HCM Configuration Maintenance Considerations 206
In Chapter 15, “HR and Payroll Reporting Options in SAP for the HCM Module,” you learned about the various reporting options available in the Human Capital Management (HCM) module. This chapter goes a step further, detailing the important considerations, tricks, and special configurations required for SAP reporting for HR and payroll reporting in the HCM module. If you have no intention of working with the HCM module, you can skip this chapter.
Configuring InfoSets for the HCM Module
The configuration steps outlined in Chapter 2, “One-Time Configuration for Query Tool Use,” describe how easy it is to configure the SAP Query tool for use. As you learned in Chapter 2, you can complete the one-time configuration in four quick and easy steps:
1. Create query groups.
2. Assign users to query groups.
3. Create InfoSets.
4. Assign your InfoSet to your query group.
The basic need for creating query groups and InfoSets (the data sources) for use in SAP HCM reporting is the same for any type of reporting. You need query groups to segregate your users into meaningful working groups such that only the appropriate users access, create, and change reports within their areas of expertise. For example, in a typical large organization, you might have query groups for payroll, benefits, savings, rewards, and so on—basically, a query group for every relevant area within the HR department. There is really only one primary difference between the general configuration steps and the steps specific to the HCM module, and it has to do with InfoSet configuration (step 3). The four steps just listed are covered in great detail in Chapter 2, in the section “Steps in Configuring the Query Tools.” Step 1 (create query groups) and step 2 (assign users to query groups) should be performed according to the instructions outlined in Chapter 2. To create a new InfoSet specific to reporting in the HCM module, you need to follow these steps:
1. Log in to the area of your SAP client where your InfoSets will be maintained. (Best practice dictates that you maintain InfoSets in your development client.)
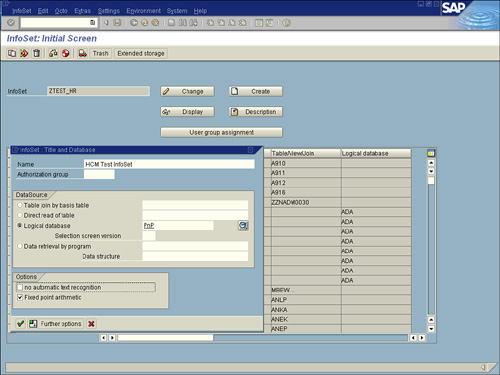
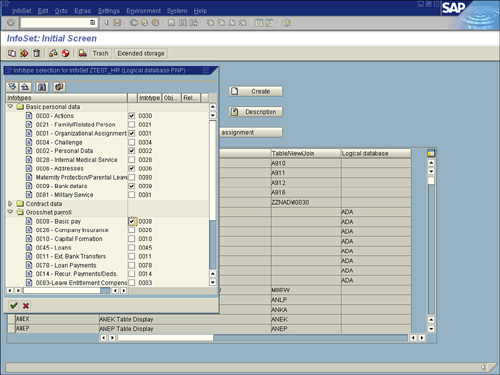
2. Navigate to the screen InfoSet: Initial Screen, shown in Figure 16.1, by using the transaction code /nSQ02.
Figure 16.1. You create and modify InfoSets for all modules in SAP R/3 by using the InfoSet: Initial Screen.
3. Ensure that you are in the appropriate query area by selecting Environment, Query Areas and then selecting Standard Area. (Best practice dictates that you maintain your queries in the standard area.)
4. Type in the InfoSet name you will be creating (for example, ZTEST_HR) and click the Create button. A dialog box labeled InfoSet: Title and Database appears.
5. Type the InfoSet description (for example, HCM Test InfoSet) in the Name field.
6. Select the logical database you want to use as a source. As mentioned earlier, you can create InfoSets by using a variety of sources, the most common of which is the logical database. Three logical databases are available for the HCM module, as detailed in Table 16.1. Select the Logical Database radio button, select or input PnP in the field to its right, and then click the green check mark Continue button. A dialog box like the one shown in Figure 16.2 appears.
Table 16.1. Logical Databases Available for HCM Reporting
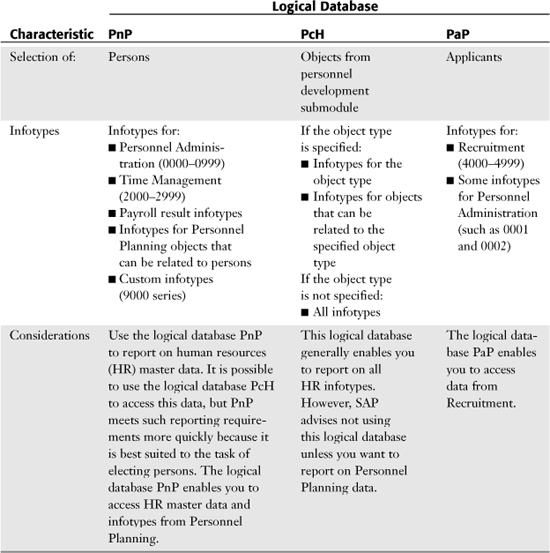
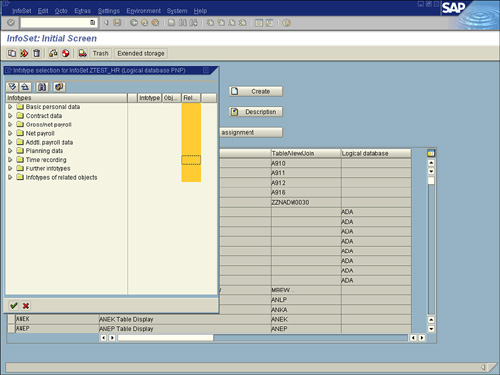
Figure 16.2. The Infotype Selection dialog box lists the primary infotype categories within the Personnel Administration submodule of HCM.
Note
There are no published translations for the three-character logical database names used in SAP. Earlier chapters use the SAP-delivered Training Flight Scheduling logical database, which is called F1S, presumably for Flight Scheduling 1, but there is no documentation to support this. With regard to the HCM logical databases, PnP refers to the Personnel Administration submodule, PcH refers to the Personnel Development submodule, and PaP refers to the Recruitment submodule.
7. In the Infotype Selection dialog, use the small arrows to the left of each infotype category to see a list of all the infotypes included in each. Then select the small box to the right of each infotype that you want to be available within your data source (see Figure 16.3).
Figure 16.3. You should indicate only the infotypes that you currently use because you will always be able to return to the Infotype Selection dialog to add more.
8. Click the green check mark Continue button. A Change InfoSet screen similar to the one shown in Figure 16.4 appears, listing all the infotypes you previously indicated that you wanted to include in your InfoSet. The Change InfoSet screen is divided into three sections:
• The top-left section of the Change InfoSet screen displays a list of all previously selected infotypes, with two indicators under each. The first is a small blue box indicating the table that stores this infotype’s fields. The second is related additional fields for that infotype.
• The top-right section of the screen, labeled Field Groups, lists all the necessary field groups, already created for you. These infotypes (field groups) are what the end user sees when creating reports using the SAP Query tools.
• The bottom-right section of the screen is populated with options and information only when a field from a table is selected on the left (see Figure 16.5).
Figure 16.4. The Change InfoSet screen is divided into three sections.
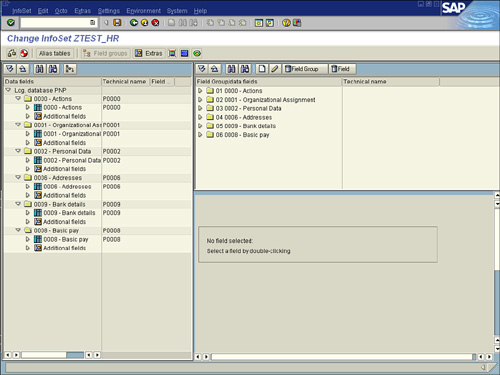
Figure 16.5. You see some fields listed that you do not recognize because the Change InfoSet screen displays every available field for the infotype, regardless of whether it is one used by your organization.
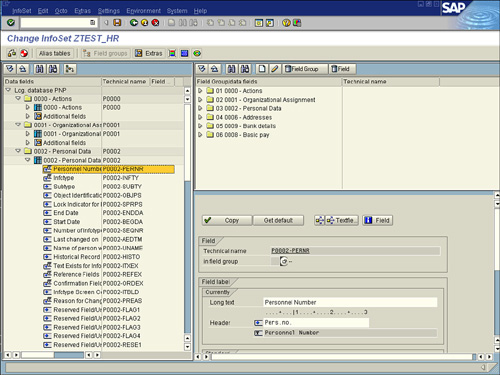
9. To view the fields in each of the infotypes, click the expand subtree button next to each table name. The table expands and displays the fields under it, as shown in Figure 16.5.
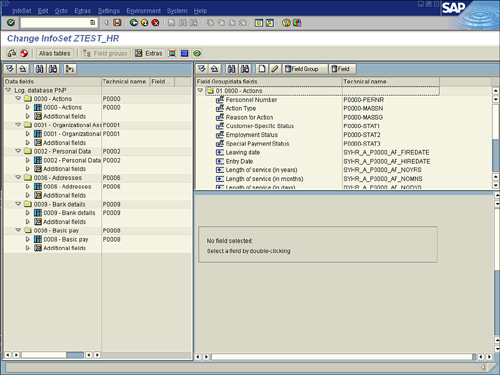
10. View the fields in each of the field groups on the top right of the screen by clicking the expand subtree button next to each field group. The field group expands, displaying the fields under it. These field groups will display in your query tools while reporting; only the fields that you include in your field groups will be available for field selection in your query reporting tools that use this InfoSet as their data source. By default, these field groups will be prepopulated for you, by default containing the most commonly used fields from each of the infotypes (see Figure 16.6).
Figure 16.6. The most commonly used fields for each infotype are already included in its respective field group.
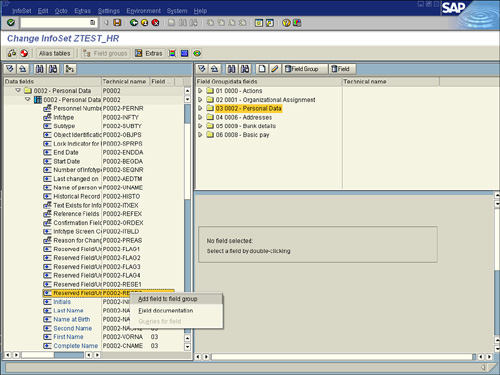
11. If you determine that some fields are missing from your field groups that you want to include, you can add them by placing your cursor on the appropriate infotype (field group) on the top-right side of your screen and double-clicking to make that infotype (for example, 0002: Personal Data) the selected infotype (field group); it will appear highlighted. Next, select fields from the left side of the screen in the appropriate table from Infotype 0002: Personal Data and then add them to the appropriate infotype (field group) at the top-right of the screen. You do this by placing your cursor on a field on the left side of the screen, right-clicking, and selecting the option Add Field to Field Group (see Figure 16.7).
Figure 16.7. You should only add a field to its corresponding infotype’s field group (for example, fields from Infotype 0002 to field group Infotype 0002: Personal Data).
The field you just added to the indicated infotype (field group) now appears at the top right of the screen. You can continue to add fields using the same procedure. Be sure to add fields to the appropriate field group. For example, fields from Infotype 0001 should only be added to the field group for Infotype 0001: Organizational Assignment.
12. When each field group contains the fields you want, click the Save button on the toolbar. A message appears in the status bar, saying that your InfoSet was saved.
13. Generate the InfoSet by clicking the Generate (red beach ball) button on the Application toolbar. A message appears in the status bar, saying that your InfoSet was generated.
Note
When you generate an InfoSet, SAP checks to see if any errors are present in the logic of the InfoSet’s configuration.
14. Exit the InfoSet by clicking the green Back button.
Of the four steps mentioned at the start of this section, step 1 (create query groups) and step 2 (assign users to query groups) should have been performed before you began this exercise. Now that the special configuration of the InfoSet for the HCM module is complete, you simply need to perform step 4 (assign your InfoSet to your query group), which is covered in great detail in Chapter 2, in the section “Steps in Configuring the Query Tools.”
You can also easily remove fields from infotype field groups that you are not using. For example, if your organization does not use some of the fields that are listed in a field group by default, you can remove them from the field group to reduce confusion. Removing fields from field groups involves virtually the same process as just described: You simply place your cursor on a field on the left side of the screen, right-click, and select the option Delete Field from Field Group.
Special HCM Configuration Maintenance Considerations
Because the HCM module is designed differently than many of the other SAP modules, there are some things you need to be aware of regarding your configuration. It is important to note a couple cautions related to configuring an InfoSet in the HCM module:
• It is important to create as few InfoSets as possible to eliminate redundancy. You should create a master InfoSet specific to each logical database that you will use. For example, many organizations have three main InfoSets for HCM reporting: one for each logical database depicted in Table 16.1. Each time you make a change to an InfoSet, you have to propagate the changes to all others. Having a master source for each is ideal.
• Just because you can add tables to an existing InfoSet based on a logical database does not mean you should do so. For example, Chapter 17, “Special Considerations for HR and Payroll Reporting in the HCM Module,” discusses data sources and how you can add extra tables. Unless you are trained in programming ABAP within the HCM module and have a firmly established understanding of the hierarchy of relational data within the HCM database, plus a distinct understanding of the effective dating relationships, you should not add tables to an existing InfoSet.
• You should not place fields in field groups other than those for their infotypes. For example, as mentioned earlier in this chapter, field groups are already created for HCM reporting, with fields already in them. You should not move the fields into other field groups. For example, you should not move the Last Name field from Field Group 0002: Personal Data to Field Group 0008: Basic Pay, because doing so would confuse the indexing of the database engine that is annexing the report data for retrieval and presentation.
Adding Infotypes to an InfoSet
After you create an InfoSet, you can return to it at any time to add infotypes. To do so, you follow these steps:
1. Log in to the area of your SAP client where your InfoSets are maintained.
2. Navigate to the InfoSet: Initial screen by using the transaction code /nSQ02.
3. Ensure that you are in the appropriate query area by selecting Environment, Query Areas and selecting Standard Area. (Best practice dictates that you maintain query areas in the standard area.)
4. Type in the InfoSet name you will be creating (for example, ZTEST_HR) and click the Change button. Your InfoSet should look similar to the one shown earlier, in Figure 16.4.
5. Select Edit, Change Infotype Selection. A dialog box like the one shown during the InfoSet creation process (refer to Figure 16.3) appears, listing all the infotypes.
6. In the Infotype Selection dialog, use the small arrows to the left of each infotype category to see a list of all the infotypes included in each. Then select the small box to the right of each infotype that you want to be available within your data source.
7. Click the green check mark Continue button to return to the main screen of the InfoSet, which should now include your added infotype(s) in the Field Group list on the top-right side of the screen.
8. By default, these field groups are prepopulated with the most popular fields from each of the infotypes. Ensure that the fields you want are included in the new field groups on the top-right side of the screen. Keep in mind that only the fields you include in your field groups will be available for field selection in your query reporting tools that use this InfoSet as their data source.
9. Click the Save button on the toolbar. A message appears in the status bar, saying that the InfoSet was saved.
10. Generate the InfoSet by clicking the Generate (red beach ball) button on the Application toolbar. A message appears in the status bar, saying that the InfoSet was generated.
Adding Custom Infotypes to an InfoSet
As just mentioned, after an InfoSet is created, you may return to it at any time to add infotypes. SAP provides infotypes that can be activated for custom company-specific use. These Personnel Administration infotypes are in the 9000 namespace. Adding these infotypes to an existing InfoSet based on a logical database is easy. You add them by using the process just detailed, although the infotypes will likely be listed at the bottom of the group in the dialog box labeled Further Infotypes.
Reporting on Data from Two Modules in the Same Query
To report based on any data from the Personnel Development module, you must perform evaluations according to your company’s organizational structure. In other words, the Personnel Development submodule of the SAP HCM module evaluates objects in a hierarchy. So, unlike with basic reporting using the PnP Personnel Administration submodule logical database, you need to define a report based on a hierarchical structure. To be able to create an SAP query that contains data from infotypes within SAP’s Personnel Administration submodule plus data from the Personnel Development submodule, you need to evaluate persons, not objects. You need to be able to include only data that functionally can be reported along a hierarchical line. Being able to report on data from the Personnel Development and Personnel Administration submodules within a single query-based report is one of the most popular challenges for users creating reports in the SAP HCM module, regardless of the tool used. With regard to query-based reporting, SAP describes two possible solutions, as described in the following sections.
Using an InfoSet Based on the PnP Logical Database
The logical database PnP enables you to access HR master data infotypes from the Personnel Administration submodule of HCM. Specifically, it includes infotypes 0000–0999 and 2000–2999, payroll result and custom 9000-series infotypes, and infotypes for personnel planning objects that can be related to persons. In other words, you can report on data from the Personnel Development submodule of HCM that is traditionally stored in the PcH logical database within your InfoSet based on the PnP logical database only if that data is related to a person. From a technical perspective, this means you can use the logical database PnP to report on all the infotypes that exist for objects (Infotype 1000) that have a direct relationship (Infotype 1001) with the Person object.
For example, if you wanted to use an InfoSet based on logical database PnP to include Personnel Development data such as a list of organizational units and the default cost centers associated with each, you couldn’t, because none of the fields mentioned (organizational unit or cost center) includes the Person object. They do not tie back to a person, so trying to use an InfoSet based on PnP with additional fields from PcH for this scenario would be unsuccessful.
However, you could create an InfoSet using PnP and include fields from PcH if you were running a report to evaluate the costs, number of attendees booked, and instructor for a business event on which an employee is booked. In this scenario, you have data that is related to a person, so it would work.
You activate the Personnel Development infotypes from within an InfoSet based on logical database PnP by using the same method outlined earlier in this chapter, in the section “Adding Infotypes to an InfoSet.” The Personnel Development infotypes are listed at the very bottom of the list of infotypes in the Infotype Selection dialog box (refer to Figure 16.2).
Using an InfoSet Based on the PcH Logical Database
The preceding section discussed creating an InfoSet based on logical database PnP from the Personnel Administration submodule of HCM and then adding to it fields from the PcH logical database to include fields from the Personnel Development submodule of HCM. Now let’s think about the opposite: creating an InfoSet based on logical database PcH and then adding fields from the PnP logical database.
The inclusion of the Personnel Administration infotypes in the PcH logical database was not in place until SAP version 4.0. You activate the Personnel Administration infotypes from within an InfoSet based on logical database PcH by using the same method outlined in the section “Adding Infotypes to an InfoSet.” The Personnel Administration infotypes are listed at the very bottom of the list of infotypes in the Infotype Selection dialog box.
Now here is the difficult part: When you create a report that is based on an InfoSet that was built using logical database PcH but that includes fields from the Personnel Administration submodule, you are presented with a traditional Personnel Development-based selection screen. Traditional Personnel Development selection screens work differently than almost all other selection screens in that they are object-based. They require you to specify an object type (because Personnel Development is based on objects such as organizational units, positions, and so on) and enter an evaluation path to execute a report. An evaluation path represents the hierarchical relationship between objects (for example, path O-S-P represents the relationships between organizational units, positions, and persons). When you select persons and infotype records, the conditions of the underlying logical database apply. The time period selection refers only to the validity period of the infotype records. If the beginning or end of the validity period falls within the selected period, the length of the validity period is given when you output the data. Otherwise, the time interval of the selection is displayed.
In other words, you have to be savvy about what you are trying to report. In Personnel Development object-based reporting, you are evaluating an object, such as an organizational unit. You can run a report of all associates and their race and gender based on the organizational units. The report will list each organizational unit and then the Personnel Administration information under each.
You can find step-by-step instructions on how to use evaluation paths in SAP Personnel Development reporting at http://sap.help.com, in the library under Evaluations According to a Company’s Organizational Structure.
Things to Remember
• The configuration of the SAP R/3 Query tools specific to the HCM module is not significantly different from the configuration for other SAP modules.
• Three logical databases are designed for reporting in the HCM module: PnP, PcH, and PaP. PnP is the most common; it includes all infotypes from the Personnel Administration submodule.
• You should create as few InfoSets as possible to eliminate redundancy. You should create one master InfoSet for each logical database.
• The ability to access infotypes from the Personnel Administration submodule by using the logical database PnP is a special feature made available in SAP version 4.0.
• When reporting based on Personnel Administration and Personnel Development data within the same SAP query, on the selection screen, you specify an object type and enter an evaluation path.