
Chapter 17. Special Considerations for HR and Payroll Reporting in the HCM Module
In this chapter
Payroll Result Reporting with the SAP Query Tool 212
Eliminating Duplicate-Line Reporting in the HCM Module 213
Understanding Selection Period Fields on the Selection Screens of HCM Reports 217
Configuring HR Actions/Events to Improve Reporting Capabilities 220
Chapter 16, “Special Considerations for Configuring HR and Payroll Reporting in the HCM Module,” provided a good deal of information on the special considerations required in the one-time configuration of the SAP Query tool for reporting in the Human Capital Management (HCM) module. This chapter provides tips and tricks on how best to design and execute human resources (HR) and payroll reports within the HCM module to maximize your success. If you are not using the HCM module of SAP, you can skip this chapter.
Payroll Result Reporting with the SAP Query Tool
The data that is reported when you use the SAP Query tool is primarily stored/displayed in infotypes. The traditional challenge with reporting on payroll results is that they are not stored in infotypes; rather, they are stored in payroll clusters. However, SAP recognizes this challenge and makes it possible for you to report on payroll results by using the SAP Query tool. You do so by having the data from the payroll clusters update infotypes that are designed to store the payroll results such that you can simply pick and choose the infotypes and fields you want to include in your reports to easily evaluate payroll results.
SAP R/3 provides a handful of predefined infotypes for this purpose. The wage types required for the evaluation can be entered in the infotypes listed in Table 17.1.
Table 17.1. Payroll Results Infotypes
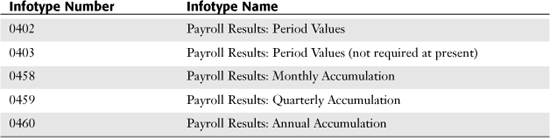
You can either activate these predefined infotypes via the Implementation Guide or create your own infotypes by using the same structures. You can enhance these infotypes by using additional wage types and then activating the infotypes. Turning on these infotypes for use makes the necessary data from the payroll result clusters available in the Personnel Administration submodule PnP logical database for reporting.
Note
A number of tables are used to populate the infotypes used for payroll result reporting. Trained ABAP programmers who will likely be involved in the decision about whether to turn on these payroll results infotypes will be curious about which tables to use. It is safe to say that the decision about what and where to store varies by organization. However, the following notes are can guide trained payroll-specific ABAP programmers through the configuration:
• Infotype 0402 needs the RT data for the current period results.
• Infotypes 0458, 0459, and 0460 need a combination of CRT and TCRT.
• You should use TCRT for any tax-related information (for example, /401, /403–/406 (FICA), and so on).
• You should use CRT for any company-specific wage types, but any wage types that are used for W–2 purposes should be stored in the TCRT table as well.
Eliminating Duplicate-Line Reporting in the HCM Module
Upon execution of virtually any report in SAP, an end user sees a selection screen that provides the opportunity to further clarify selections. (See Chapter 5, “Basics of Using Reporting Selection Screens,” and Chapter 6, “Using Reporting Selection Screens: Advanced Skills,” for more information on selection screens.)
The most common date parameter for reporting in the SAP HCM module on the selection screen is the date selection period Today. Selecting Today ensures that the data you have retrieved from the database is valid as of today. One thing to note here is that if you have any future-dated records (for example, for increases or organizational changes), they will not be included in your report output because technically they do not exist yet. Many users wonder why they sometimes retrieve multiple (or duplicate) line items when selecting Today for an HCM report. This happens only with certain infotypes that have multiple values in a single or table-based storage space. This might sound pretty technical, but basically it means that the database pulls all the records that meet the specified criteria.
Most users complain of duplicate record results when selecting the Other or Person Selection Period date parameters because multiple records may exist for that employee during the date range specified.
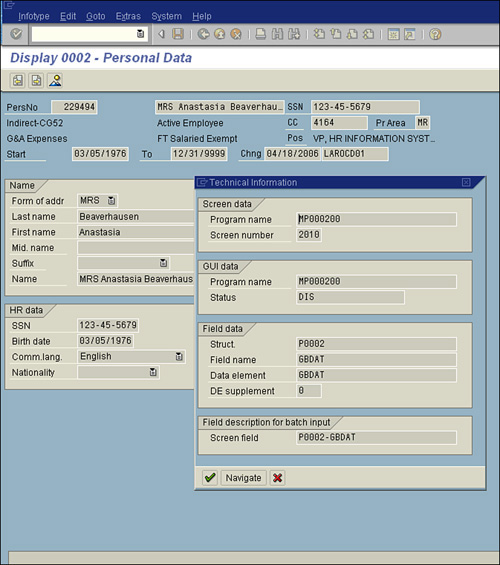
An example of an infotype that does not produce multiple lines in an SAP Query is Infotype 0002: Personal Data. This is because Infotype 0002 stores each piece of information in a single identifiable field; for example, it stores an associate’s first name in the field labeled First Name onscreen. Behind the scenes, the data entered in this field is stored in the SAP database in the P002-VORNA structure, where P002 identifies the infotype number (in this case Infotype 2). P002-VORNA is referred to as the field’s technical details. To view a field’s technical details, you need to place your cursor in a field (for example, the Birth Date field on Infotype 0002) and then press F1. The Performance Assistant dialog box appears (see Figure 17.1), providing a definition of the specified field. The Performance Assistant dialog box provides a Technical Information button that you can click to view the field’s technical details (see Figure 17.1). Figure 17.2 shows the Technical Information dialog box that appears.
Figure 17.1. The Performance Assistant dialog box provides a definition of the selected field and, in some cases, examples of its usage.

Figure 17.2. The Technical Information dialog box displays the behind-the-scenes database information about the selected field.
The associate’s date of birth is the only information that should be stored in the designated Birth Date (P0002-GBDAT) field, because the Birth Date field on Infotype 0002 is designed exclusively for that purpose. In comparison, Figure 17.3 shows Infotype 0041: Date Specifications, which is often known to produce duplicate records when its fields are included in an HCM report.
Figure 17.3. Infotype 0041: Date Specifications allows an organization to save multiple date types for an associate in a single place.
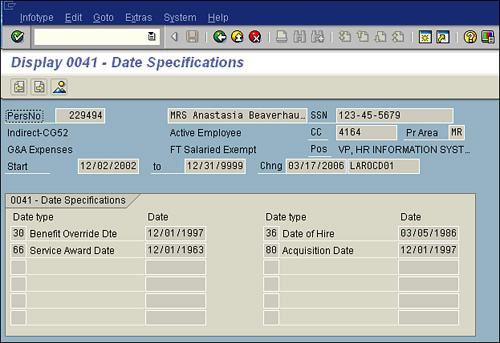
For Infotype 0041, there is not a single field identified for only a single piece of data; rather, the data that can be stored in each field is variable. Infotype 0041 is designed to permit storage of customer-specific dates. During configuration, you determine the date types that you want to use for your organization. For example, in Figure 17.3, the fictional associate has four different date types, stored as Date Types 30, 36, 66, and 80, listed in numeric order. Unlike with Infotype 0002, with Infotype 0041, the fields on this screen can store variable data. If you were to look at the technical details of the Date Type 30 date field (for example, the first date field listed, labeled Benefit Override Dte), you would see the value P0041 - DAT01. If you were to look at the details of the next date field immediately to its right (for example, the field labeled Date of Hire), you would see the value P0041 - DAT02.
In the first example, the value DAT01 is assigned because that date is stored in the first position on that screen. Similarly, in the second example, the value DAT02 is assigned because that date is stored in the second position on that screen. If you added a new date type for the associate (for example, Date Type 23), that would then become assigned to the technical field P0041 - DAT01 because it would then be in the first numeric position (because 23 is numerically before 30). If you created a query-based report, run as of today, to include the First Name and Last Name fields from Infotype 0002, the report output would appear in a single line across the page for each associate. However, if you ran a report and listed the Date Type and Date for Date Type fields in the output, you would display multiple lines in the report for each associate for each date stored on their Infotype 41, which includes the technical fields P0041 - DAT01 through P0041 - DAT12. Using the sample shown in Figure 17.3, you would display four line items for the associate, one for each date type.
There are two possible solutions for single-line reporting based on infotypes, including Infotype 41: a basic solution and an advanced solution.
The Quick-and-Dirty Solution for Single-Line Reporting Based on Infotypes
With the quick-and-dirty, limited solution for single-line reporting based on infotypes, if you wanted to create a basic list query report that would include an associate’s hire date (for example, Date Type 36), you would simply need to include the Date Type field on your report’s selection screen. Using that method, you could, upon report execution, specify that you want only that one date type in the report output, thus ensuring that you get only a single line of data per associate in your report output. This same method works on Infotype 0006: Addresses, where multiple subtypes of addresses are available. This is a limited workaround because of the way a selection screen works. It includes in your report only data that meets the criteria entered on the selection screen. So, for example, if you were to produce a report of everyone and their hire date on a single line, as just mentioned, the single-line report output would include only those associates who have the specified date type. If some folks were missing it, for example, they would be excluded from the report output.
This quick-and-dirty workaround is helpful when you are sure all associates meet the criteria entered on the selection screen (so you get complete output) or when you want your report output to include only those associates. A downside of this method is that you are limited to reporting based on only one item in a single report. So, for example, if you wanted to include hire date (Date Type 30) and service award date (Date Type 66) from the preceding example, you would still get two lines for each associate. The same would be true if you were to run a list of employee addresses from Infotype 0006: Addresses. You would only have the option to specify a particular subtype of address (01 - Mailing, 02 – Permanent Residence, and so on), as specified in the Address Subtype field on the report’s selection screen, or you would display both and have multiple lines per associate.
The Advanced Solution for Single-Line Reporting Based on Infotypes
The second and more technical solution for single-line reporting based on infotypes is designed for ABAP programmers. The premise is that you can insert into the InfoSet (your report’s data source) code that evaluates each of the fields for you and creates fields in the InfoSet that store each specific field. Using the Infotype 41 example, you could add code to your InfoSet that evaluates each of the date types specific to your company’s configuration (for example, Date Types 30, 36, 66, and 80) and creates fields in the InfoSet for each specific date type, allowing you to simply select which dates you want to include in your report output (regardless of the number you want to include), and all will appear on one line.
This advanced solution enables you to simply select which fields you want to include in your report output. Adding code to an InfoSet is a subject geared toward trained ABAP programmers and is beyond the scope of this book. However, because this is one of the most popular challenges for HCM reporting, this section includes some quick notes on it.
Listing 17.1 shows an example of ABAP program code developed by a trained HR ABAP programmer that you can include in a SAP Query tool InfoSet to assist with the challenge of reporting based on an infotype that stores variable data. For example, you can add this code to the InfoSet, to create new fields in your InfoSet that store each Date field from Infotype 0041 in a single designated field. That way, you can include any or all dates in a report from your Infotype 0041 (regardless of whether the associate has values for the date types), all on a single line in the SAP Query tool.
Listing 17.1. Sample Code to Add to InfoSet for Infotype 41 Reporting
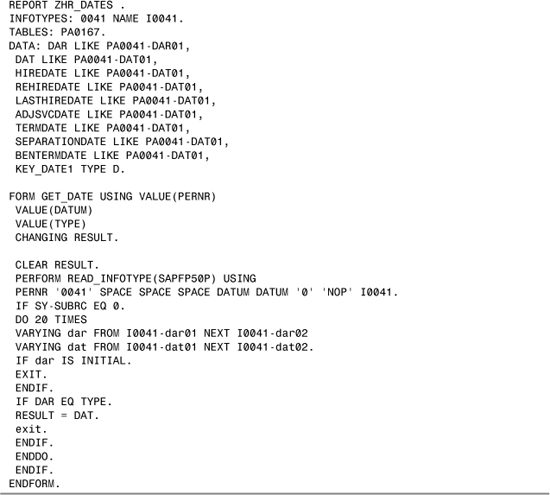
The data types referenced in this code are specific to the way a sample organization has them configured, so you need to substitute for them the names and numbers that you use at your organization. The code reads through all the different table values and assigns each date to a specific field for use in reporting. You can use this code as a helpful reference to set up your own custom fields for reporting on things like date types and wage types.
Understanding Selection Period Fields on the Selection Screens of HCM Reports
Many people have difficulty determining how the period fields function on HCM module report selection screens, as shown in Figure 17.4. As a result, their reports include data they did not intend to include.
Figure 17.4. The top of the selection screen labeled Period has several options.
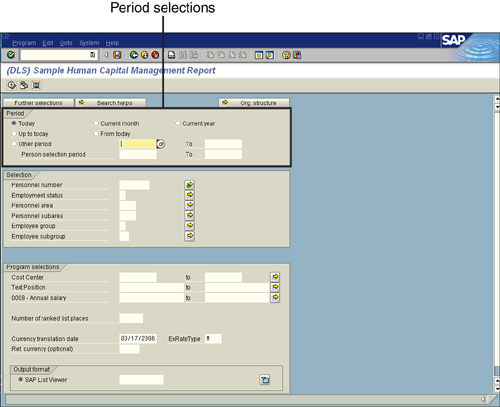
In SAP, whenever a report is executed (that is, based on a logical database, as queries are) and no variant exists for it as a default, the SAP system default is the Period labeled Other. If you leave that Other selection in place, and if you do not enter a specific date range to the right of it, your report will begin to pull every record from the HCM database. Needless to say, this is not a good idea. The following sections describe the various selection period options and how you use each of them.
The Today Option
The Today selection is the most popular and the most commonly used in SAP Query tool reporting. As discussed earlier in this chapter, selecting Today ensures that the data you have retrieved from the database is valid as of today. An important consideration is that if any future-dated records exist (for example, future-dated increases or organizational changes), they will not be included in the report output because, technically, they do not exist yet. If you select the Today period indicator for your report, the system date is used as the key date for the Person selection period.
The Current Month Option
If you select the Current Month option, the first and last days of the current month (as determined by the system date) are used as the start and end dates for the Person selection period.
The Current Year Option
If you select the Current Year option, the first and last days of the current year (as determined by the system date) are used as the start and end dates of the Person selection period.
The Up to Today Option
If you select the Up to Today field, the beginning of time (defined as 01/01/1800) and the system date are used as the start and end dates of the Person selection period. This is the opposite of the From Today selection period.
The From Today Option
If you select the From Today option, the end of time (defined as 12/31/9999) and the current system date are used as the start and end dates of the Person selection period. This is the opposite of the Up to Today selection period.
The Other Period and Person Selection Period Options
Other Period is the system default. As discussed earlier in this chapter, if you select Other Period and leave the dates next to it blank, SAP pulls every record in the database from the beginning of time (defined as 01/01/1800) to the end of time (defined as 12/31/9999). Therefore, if you really want to select Other Period, you need to enter a date range on the screen.
The Person Selection Period enables you to specify the period in which employee data records are read. Only records that overlap with the specified period by at least one day are selected. To define an interval, you enter the start date in the left column and the end date in the right column.
You can select Other Period, enter dates in the range boxes to its right, and input dates in the Person Selection Period fields below it to ensure that the system selects only employees who are members of the company on at least one day in the specified period. These are persons with valid organizational assignment (Infotype 0001) records. You can specify an interval by entering the start and end dates in the left and right columns.
Auditing Query Execution
The HCM module usually has an increased level of security considerations because of the nature of the data (for example, Social Security numbers, annual salary, benefits). Although this task is usually performed by your administration/security/basis team, you can follow these steps to audit when a query report has last been run and by whom:
1. Enter transaction code ST03 (Workload Analysis of SAP System).
2. Select the server you want to analyze.
3. Choose the time frame you want to analyze.
4. Choose Transaction Profile.
5. Sort the list by program/transaction code and look for the query you want to find.
6. Double-click the program/transaction code to see who ran it and when it was run.
7. Repeat steps 2 through 6 for each server you want to audit.
Configuring HR Actions/Events to Improve Reporting Capabilities
You can customize the configuration of personnel actions, such as hiring, terminations, and organizational assignments within your SAP R/3 HCM module. You can customize the SAP R/3-delivered actions, also known as personnel events, to your company’s needs so that you can collect necessary data and assign specific employment statuses. You can then classify the employee data collected during your actions with reason codes to provide better employee groupings for reporting. Before you configure new actions, however, you need to answer three questions:
• What data do I need to collect?
• What statuses do I want to assign?
• What are my reporting goals related to these actions?
The following sections explain why these questions are so important and then show you how to create your own HR actions.
What to Collect
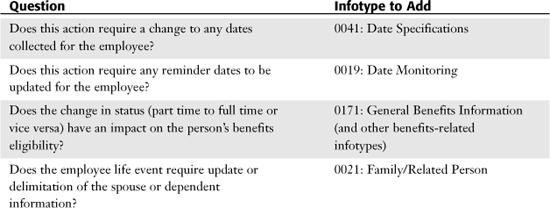
You determine which infotypes to include in each event based on what data you want to collect. Take organizational actions, for example. For a simple promotion, you could start with Infotype 0000 (to record the action and its reason code), Infotype 0001 (to record the organizational change), and Infotype 0008 (to record the change in salary). Those are the basics, but you need to think a step further. For example, do you want to collect any other pertinent information along with the promotion? The following is a sample checklist to stimulate your thought process about what infotypes to include in an action:

After you determine what data you want to collect, you need to determine what statuses to assign.
It is possible to create an action without using Infotype 0000. For example, if you are creating an action to update an address, you can decide whether you want Infotype 0000 to be recorded for the address change. The system already date-delimits the old address, so history is properly preserved. Therefore, based on your company’s administrative guidelines, you may or may not want Infotype 0000 created for every event.
What Statuses to Assign
You can use events to change an employee’s status (for example, new-hire actions make them active, and terminations make them withdrawn). You have three options for the status to assign for each event:
• Basic Employment Status
• Special Payment Status
• Customer Specific Status
You use Basic Employment Status to set the status to which you want the employee to be changed. This appears on Infotype 0000 in the Employment Status field. The standard SAP-delivered options are as follows:
• 0: Employee not with Company (used for termination actions)
• 1: Employee with Company, but Inactive (used for unpaid leaves)
• 2: Employee with Company, but as Retiree (used for retiree actions)
• 3: Employee Active in Company (hire/rehire and non-status change organizational actions)
For the Special Payment Status, three options can update Infotype 000:
• 0: Special Payment: No Entitlement
• 1: Special Payment: Standard Wage Type
• 2: Special Payment: Special Wage Type
Customer Specific Status is optional. You can use Customer Specific Status to determine your own custom statuses to be assigned during the actions. By using Customer Specific Status, you can really maximize your reporting options.
The Reporting Goals Related to Actions
HR actions not only collect information and assign statuses but also provide groupings of employees for reporting purposes. Having reason codes associated with actions is the only way to ensure that you can classify employees into the appropriate groups so that you can obtain the data you need. For example, if you have a termination action without reason codes, you might be able to determine that you had 100 terminations in the past month, but you would have no idea why. Creating reason codes that allow you to distinguish between avoidable (quit for better pay) and unavoidable (death) reasons helps you get a comprehensive look at your workforce.
One action for which a reason code is very important is a pay-change–related action. Employees can have changes in pay for a variety of reasons, the most common being promotions and demotions. Many states require companies to report promotions and demotions. Assigning reason codes to your pay-change–related actions for promotions and demotions is a good way to ensure that you are collecting the appropriate information.
Maximizing the Use of Event Reason Codes
Using reason codes can really make or break you when it is time to evaluate the employees who have undergone events. The termination example mentioned in the preceding section is a good indicator of this. Without a record of why someone was terminated, the actual record of a termination action does not provide much information. A best practice is to determine the reasons you want to track and evaluate your turnover reports to see what your needs really are. After making a list of termination reasons, you can determine whether you want to group them to make them more useful. Table 17.2 provides a list of reason code examples.
Table 17.2. Sample Termination Reason Codes for Termination Event
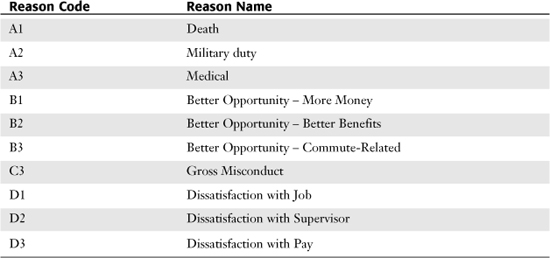
These sample codes would allow you to classify termination reason codes into four categories: Unavoidable Termination (A), Employees Who Took Positions at Another Company (B), Employees Who Were Terminated for Cause (C), and Employees Who Quit Because They Were Dissatisfied with the Company (D). Using codes A, B, C, and D enables you to group the codes as needed and simplifies reporting later.
You can also maximize the use of the reason codes for pay-change–related actions. An employee’s pay could change for at least a dozen reasons. Only by properly grouping these pay changes into categories can you address your reporting needs. For example, distinguishing which employees were promoted and demoted in a certain period of time is a frequent reporting need to satisfy governmental regulatory reporting, such as affirmative action plan reporting. Creating actions specific to promotions or demotions or having multiple specific reason codes for a single pay-change action is a way to meet that requirement.
Creating actions in SAP is an easy task. After you have thought through the three questions presented earlier in this chapter, you can complete the configuration by using the SAP Implementation Guide. The configuration of actions and reason codes is most often performed by the functional person responsible for system configuration. It is important to note that the HR/business side of the organization should dictate what the event and reason codes are. They should not be driven by other departments, such as the Payroll department or the IT organization.
Things to Remember
• You can report on payroll results if you activate infotypes to store the resulting data.
• You can eliminate duplicate line reporting quickly and easily by using the indicator or subtype on your report’s selection screen.
• Understanding the differences between the selection periods on your report’s selection screen ensures that you always retrieve the correct information in your reports.
• You can report based on all Infotype 0041 dates on a single line by adding some custom fields to your InfoSet.
• The manner in which your actions are configured should be based on business decisions to appropriately assign statuses and to maximize reporting options.