Chapter 19. Creating Basic Reports with the InfoSet (Ad Hoc) Query Tool
In this chapter
Creating a Basic Query with the InfoSet (Ad Hoc) Query Tool 232
The Options Available on the InfoSet (Ad Hoc) Query Tool Screen 235
Modifying an InfoSet (Ad Hoc) Query 238
Saving an InfoSet (Ad Hoc) Query 238
Restrictions with the InfoSet (Ad Hoc) Query Tool 239
Security Considerations for Using the InfoSet (Ad Hoc) Query Tool 240
This chapter outlines how to create basic queries by using the InfoSet (Ad Hoc) Query tool. If you are looking to use the InfoSet (Ad Hoc) Query tool for reporting in the Human Capital Management (HCM) module only, you should review Chapter 15, “HR and Payroll Reporting Options in the HCM Module,” before proceeding with this chapter.
Helpful Hint
Although it is recommended that you create SAP query reports live in your production environment, it is important while you are learning and training to practice in your test or quality assurance client so as not to have any impact on production while you are learning.
Unlike the SAP Query tool, covered in earlier chapters, the InfoSet (Ad Hoc) Query tool is a reporting utility that users can use to retrieve simple single-use lists of SAP R/3 data. The InfoSet (Ad Hoc) Query tool is a reporting tool delivered with SAP version 4.6 and above that is based on the functionality of the SAP Query tool and the Ad Hoc Query tool from earlier versions of SAP R/3.
Note
The Ad Hoc Query tool was a simple reporting utility designed for the HCM module in SAP’s earliest versions. The Ad Hoc Query tool was renamed the InfoSet Query tool in version 4.6, and it was expanded for use in all modules (although when it is executed from within the HCM module, it is still referred to as the Ad Hoc Query tool). I refer to the tool throughout as the InfoSet (Ad Hoc) Query tool.
Unlike the SAP Query tool (which has multiple screens), with the InfoSet (Ad Hoc) Query tool, all query information, including the selection criteria for InfoSet (Ad Hoc) Query reporting, is available on a single screen. The InfoSet (Ad Hoc) Query tool is designed so that you can pose questions to the SAP system and receive real-time answers.
Creating a Basic Query with the Infoset (Ad Hoc) Query Tool
To create a basic report with the InfoSet (Ad Hoc) Query tool, follow these steps:
1. Log in to the area of your SAP client where your query reports will be created. (Best practice dictates that you maintain query reports in your live production client.)
2. You can access the InfoSet (Ad Hoc) Query tool in three ways:
• Through an application-specific role, using the Easy Access menu
• Via the SAP Query tool, by using transaction code SQ01 and then clicking the InfoSet Query button
• Via transaction code /nPQAH
When you navigate to the InfoSet (Ad Hoc) Query tool main screen using any of these methods, you see a dialog box that prompts you to select your InfoSet (data source) from the designated environment (QUERY group).
3. Select your InfoSet and then press Enter. The main screen of the InfoSet (Ad Hoc) Query tool appears, as shown in Figure 19.1.
Figure 19.1. The fields listed in the Field Groups section of the selected InfoSet appear on the top left of the InfoSet (Ad Hoc) Query screen.

The main screen of the InfoSet (Ad Hoc) Query tool has three sections:
• The actual InfoSet from which you select and choose your fields (top left)
• A Selections section (top right)
• A sample report display (bottom)
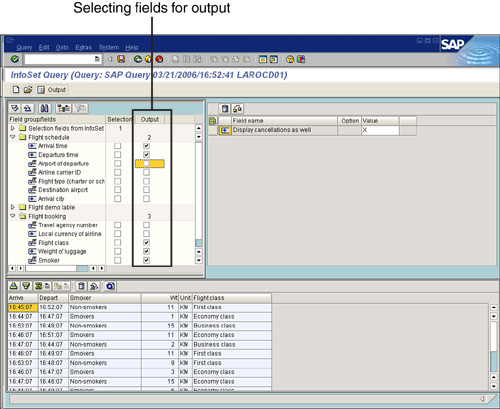
4. To create an InfoSet (Ad Hoc) Query report, select the check box in the Output column next to each field you want to include in the output of your report. For example, Figure 19.2 shows a few fields selected.
Figure 19.2. You will recognize the field groups from those created during configuration of the InfoSet.
5. Notice that any field selected for layout is now displayed at the bottom of the screen (with bogus data) to assist you in seeing what your report will look like.
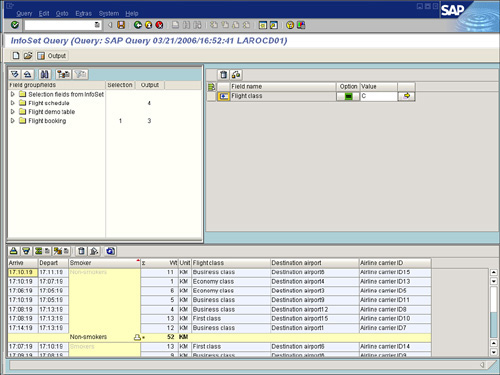
6. Add fields to your Selections section (which functions as the report’s selection screen) by selecting the appropriate check box in the Selection column next to each field you want to be able to select on (that is, specify) when executing your report. For example, Figure 19.3 shows one field selected.
Figure 19.3. The Selections section in InfoSet (Ad Hoc) Query tool reporting appears at the top right of the screen.
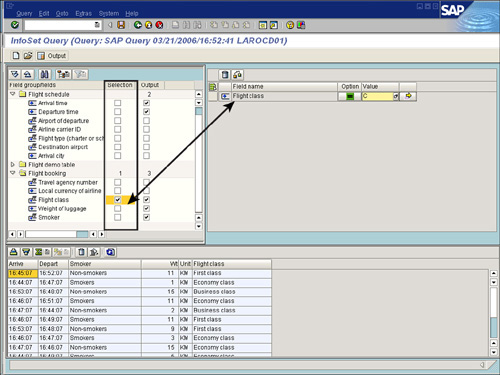
Any field(s) indicated for selection now appear on the top-right side of the screen. The Selections section works just as a standard selection screen works, allowing you to input values before execution to further specify your reporting output. (For example, you could specify to include only business class (Type C) flights in a report.)
7. To proceed to your InfoSet (Ad Hoc) Query report output, click the Start Output button on the Application toolbar (or press the F8 key on your keyboard) to execute the report. By default, your report displays in the SAP List Viewer (previously known as the ABAP List Viewer [ALV]), from which you can easily drag and drop the columns and/or manipulate the look of the output (see Figure 19.4).
Figure 19.4. The SAP List Viewer view of the InfoSet (Ad Hoc) Query report is similar to the default report output shown for SAP Query tool reports.

The Options Available on the InfoSet (Ad Hoc) Query Tool Screen
The following sections describe the options that are available on the InfoSet (Ad Hoc) Query Tool screen.
The Application Toolbar
The Application toolbar on the main screen of the InfoSet (Ad Hoc) Query tool has three buttons:
• Create—This button allows you to create new InfoSet (Ad Hoc) queries.
• Open—This button allows you to open existing InfoSet (Ad Hoc) queries.
• Output List—This button executes a query and displays the report output.
The Field Groups Section Toolbar
The top-left window of the InfoSet (Ad Hoc) Query tool screen is where you select the fields that you want to include in the Selections section and in your report output via the two designated columns labeled Selection and Output. Five buttons are available on the field groups section toolbar:
• Expand and Collapse—These buttons expand or collapse the selected field group.
• Find—This button allows you to search for a field of interest. You click the Find button, type in the appropriate keyword, and then click the check mark Enter button to go directly to the first instance in which that keyword exists within the expanded field groups.
• Field Groups—This button allows you to vary the way in which you view the fields within the data source. The default option is to display them in field groups, as shown in Figure 19.3. However, you can click this button to see options for displaying the data in a logical database structure or in a field catalog structure.
• Fields for a Field Group—This button is available only if you had previously clicked the Field Groups button and the option to view your fields in a field catalog structure. Clicking this button returns your list of fields to be segregated by field group.
The Selections Section Toolbar
Only two buttons exist in the Selections section of the InfoSet (Ad Hoc) Query tool screen:
• Delete—This button allows you to delete any entries entered in the selection fields in the Selections section.
• Check—This button allows you to validate the entries made within the selection fields to check whether they are valid entries. For example, if the Flight Class field is listed in the Selections section, the only appropriate values for that field are C, Y, and F (for Business Class, Economy Class, and First Class, respectively). If another character is entered and the Check button is clicked, you are alerted that an invalid value has been entered.
The Output Sample Section Toolbar
The seven options available at the bottom of the InfoSet (Ad Hoc) Query tool screen are designed to allow you to work with your sample output:
• Ascending Sort and Descending Sort—These buttons allow you to select any column in the sample output and sort it in either ascending or descending order.
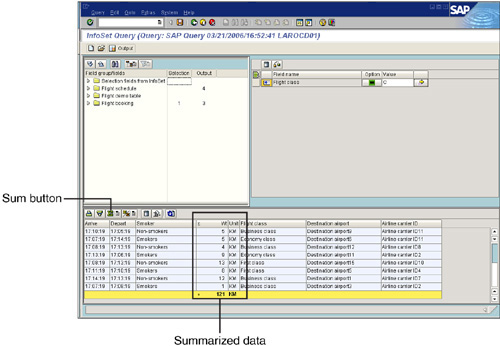
• Sum—This button allows you to select any numeric column within your sample output and request that the data be summarized, as shown in Figure 19.5.
Figure 19.5. The Weight of Luggage field was totaled by selecting the Weight of Luggage column and then clicking the Sum button on the output sample section toolbar.
Attached to the Sum button is a drop-down arrow that provides additional mathematical functions for calculating the mean, minimum, and maximum values for any selected column in the report.
• Subtotals—This button allows you to select any meaningful column within your sample output and request that the data be subtotaled, as shown in Figure 19.6.
Figure 19.6. The report was subtotaled by selecting the Smoker field and then clicking the Subtotals button on the output sample section toolbar.
• Delete—This button allows you to select any column in the sample output section of the InfoSet (Ad Hoc) Query tool screen and prevent that column from being displayed in your report output.
• Initialize Formatting—This button resets any output formatting you inserted to its original state. You can use this function if you no longer need to create subtotals or totals.
• Refresh Data—If you change the output list in such a way that a new selection must take place (when you add a new field, for example), you see the bogus data in the output list again. You need to click the Refresh Data button so that the query is executed again and real data is displayed in the output section of the screen.
Modifying an InfoSet (Ad Hoc) Query
After you create an InfoSet (Ad Hoc) Query, you might want to return to the design screen to make changes and modifications. You can click the green Back button to return to the design screen from the SAP List Viewer display of your report output. In addition, you can change the format of your report from the SAP List Viewer output screen by selecting Settings, Layout, Change.
Saving an InfoSet (Ad Hoc) Query
On the design screen in the InfoSet (Ad Hoc) Query tool, you can click the Save button on the Application toolbar to save a query. After designing an InfoSet (Ad Hoc) query, you can change it as often as you like and execute the updated query.
If and where you can save a query depends on your authorizations and on the reporting you are authorized to carry out. (See Chapter 18, “Security Concepts in SAP R/3 Query-Based Reporting Tools,” for more information.) If you are authorized to save queries (authorization object S_QUERY with the value 02 for the field ACTVT), you can save from either the Application toolbar or the File menu. The way these functions work depends on your previous work with the InfoSet (Ad Hoc) Query tool.
The following sections describe the various options for saving InfoSet (Ad Hoc) queries.
Save (First Usage)
The first time you use the Save function, SAP takes you to a dialog box where you can enter a short name and description for your InfoSet (Ad Hoc) query. This dialog box is a bit confusing. The system proposes a new name if the template you call up is an InfoSet; if it is a query, the system proposes a query name. If you save a query under the same name again (that is, if you overwrite it), the query is locked for other users. That is, other users of the InfoSet (Ad Hoc) Query tool can continue to use the locked query as a template, but they cannot overwrite it.
If you are a member of a query group and your configuration follows the recommendations in Chapter 2, “One-Time Configuration for Query Tool Use,” you can also select from the dialog box a query group to which you want to assign the query to easily group your saved queries as recommended. As with the SAP Query tool, with the InfoSet (Ad Hoc) Query tool you can belong to multiple query groups.
Save (Not First Usage)
If you use the Save function again with a changed query during a session with the InfoSet (Ad Hoc) Query tool, the query you saved before is overwritten. The dialog box is not shown again. Locks that already exist remain valid.
Save As
As with the Microsoft family of products, using the Save As function allows you to save an open item under a new name to distinguish it from the original item. This function primarily exists so that you can copy queries and edit them afterward. With this function, the dialog box is always shown so you can enter the query name and a description. The system proposes the name of the query that you used as template. The query is saved and locked under the name entered. If you have already saved and therefore locked the template, this lock is removed.
If you are configured to be a member of a query group, you can also select from the dialog box a query group to which you want to assign the query. At this point, you can switch between query groups to which you are assigned and that have access to the current InfoSet. Again, as with the SAP Query tool, with the InfoSet (Ad Hoc) Query tool you can belong to multiple query groups. It is important to note that if you select an existing query from the list of available InfoSet (Ad Hoc) queries, that query is overwritten when you confirm.
Note
The query is locked when you save it. In other words, other users can continue working on the query at the same time as you, but they end up using the old (unchanged) version as a template in the current session with the InfoSet (Ad Hoc) Query tool. It is important to note that they can no longer save the query under its original name. This also means that you can save a query under a certain name only if the query is not locked by another user. If you have locked a query by saving it and then you select a new template for your InfoSet (Ad Hoc) Query tool, the lock on the query used before is removed, and another user can save the query in a changed version.
Restrictions with the InfoSet (Ad Hoc) Query Tool
The InfoSet (Ad Hoc) Query tool uses the SAP List Viewer as its default output. Unlike the SAP Query tool, where up to nine ranked lists and up to nine statistics per query are possible, with the InfoSet (Ad Hoc) Query tool, every query can output only one list, and you cannot distribute output fields over several lines. Recall from earlier chapters that advanced functions are available with the SAP Query tool, including the ability to create calculations (local fields) and insert graphics, icons, colors, custom headers and footers, and so on. These functions are not possible with the InfoSet (Ad Hoc) Query tool.
Because the InfoSet (Ad Hoc) Query tool can output only one list and cannot distribute output fields over several lines, you should not process an available query with the InfoSet (Ad Hoc) Query tool if it contains multiple lists, a basic list with line groups, or calculated fields.
If you use a query with one of these properties in the InfoSet (Ad Hoc) Query tool, the parts of the output are shown as follows:
• Multiple lists—Only the first list is displayed.
• A basic list with line groups—Only the first line of each is displayed.
• Calculated fields—Local fields are not displayed.
These properties are lost if you overwrite the query. However, they are not lost as long as you do not save the query, and you can continue to call and execute the query with all properties by using the SAP Query tool via transaction code SQ01 and clicking the SAP Query button.
Security Considerations for Using the InfoSet (Ad Hoc) Query Tool
The information in the following sections is designed for trained SAP security/administration professionals. To call the InfoSet (Ad Hoc) Query tool, your SAP R/3 system provides you with four reports and function modules (of the same name), which implement the InfoSet (Ad Hoc) Query tool call and determine access rights and reporting type for the InfoSet (Ad Hoc) Query tool. The following sections describe the reports/function modules that are available.
The SAP_QUERY_DEVELOPMENT_ROLE Module
You use the SAP_QUERY_DEVELOPMENT_ROLE module for access using role development.
The following are the parameters for this module:
• Role (input necessary)
• InfoSet (optional)
• Query (optional)
A query group from the global area has to be assigned to the role. If you specify an InfoSet, it has to be assigned to the query group. If you specify a query, it has to be assigned to the query group.
The SAP_QUERY_AD_HOC_ROLE Module
You use the SAP_QUERY_AD_HOC_ROLE module for access using role and ad hoc reporting.
The following are the parameters for this module:
• Role (input necessary)
• InfoSet (optional)
• Query (optional)
A query group from either the global or standard area has to be assigned to the role. If you specify an InfoSet, it has to be assigned to the query group. If you specify a query, it has to be assigned to the query group.
The SAP_QUERY_DEVELOPMENT Module
You use the SAP_QUERY_DEVELOPMENT module for access using query group and development.
The following are the parameters for this module:
• Query group (optional)
• InfoSet (optional)
• Query (optional)
The query group has to come from the global application area. If you specify more than one parameter, the parameters must match, meaning that the InfoSet has to be assigned to the query group, and the query must be based on the specified InfoSet.
The SAP_QUERY_AD_HOC Module
You use the SAP_QUERY_AD_HOC module to access using query group and ad hoc reporting.
The following are the parameters for this module:
• Query area (standard setting: Standard area)
• Query group (optional)
• InfoSet (optional)
• Query (optional)
First, you need to decide which query area (standard or global) you want to work in with the InfoSet (Ad Hoc) Query tool. (The standard area is recommended.) To work in the global area, you select the global area indicator. Then you enter the remaining parameters. It is important to note that if you specify more than one parameter, the parameters must match: The InfoSet has to be assigned to the query group, and the query must be based on the specified InfoSet.
The InfoSet (Ad Hoc) Query tool has default values in the specified query area and query group parameters, and only ad hoc–style reporting can take place. In other words, a user who accesses the InfoSet (Ad Hoc) Query tool from the HCM module or menu path either goes straight to the initial screen of the InfoSet (Ad Hoc) Query tool, where the assigned InfoSet is displayed, or can choose between several assigned InfoSets (as described in the step-by-step instructions earlier in this chapter, in the section “Creating a Basic Query with the InfoSet (Ad Hoc) Query Tool”). In this type of call in the HCM module, the InfoSet Query tool is referred to as the Ad Hoc Query tool.
Things to Remember
• Creating a report by using the InfoSet (Ad Hoc) Query tool is very easy.
• The InfoSet Query tool is called the Ad Hoc Query tool when executed from within the HCM module.
• The InfoSet (Ad Hoc) Query tool does not contain the advanced options that the SAP Query tool contains.
• When you use the InfoSet (Ad Hoc) Query tool, each query can output only one list, and you cannot distribute output fields over several lines.
• Understanding how to save queries created with the InfoSet (Ad Hoc) Query tool is critical to ensuring that you do not overwrite other work.