In this chapter
Although you no doubt have collected your own arsenal of workhorse programs to assist you in your daily chores, Windows XP Professional, like past versions of Windows, comes replete with numerous freebie utility programs to handle common, everyday tasks. These utility programs range from the bizarre to the useful—from pinball and solitaire to audio CD and DVD movie players, word processing programs, and a calculator, to name but a few. Whether they are intended for entertainment or as daily helpmates for such tasks as jotting down simple notes or making quick calculations, none of these programs requires a degree in rocket science to figure out. They are fairly self-explanatory, and it's possible you've used them before in their previous versions. Therefore, this chapter covers them only briefly, suggests a few tips, and leaves the rest to you and the Windows Help file.
Because many of the accessory programs fall into discrete categories, such as communications, multimedia entertainment, or system tools, look to relevant sections of this book to find coverage of such tools. This chapter covers the more basic, yet still quite useful, tools that don't fit neatly into a pigeonhole.
TIP
Windows XP comes with a bunch of games (FreeCell, Minesweeper, Pinball, Solitaire, Hearts, Internet Backgammon, Internet Checkers, Internet Hearts, Internet Reversi, Internet Spades, and Spider Solitaire). You can get to these from Start, All Programs, Games. If some of these are missing from your Windows XP installation, you can load them by using Add or Remove Programs in Control Panel. (Control Panel is covered in Chapter 24, “Configuration via Control Panel Applets”). After you select Add or Remove Programs, choose Windows Components (on the left side of the dialog box), and then highlight Accessories and Utilities and click Details. Then click Games and click Details. Then check the games you want.
This book doesn't cover the specifics of each of these games because you can probably figure them out yourself—and you probably ought to be getting some work done at the office (except for lunchtime and breaks). Click Help in each game for game rules and guidance. If you like games, you might check them out.
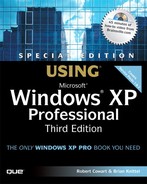
Notepad has been around since Windows 3.0. It's a simple, no-frills text editor that does no fancy formatting (though it does enable you to change the display font) and is popular for composing “clean” ASCII (.TXT) files. I use Notepad for jotting down quick notes. You could say Notepad is a text editor, whereas WordPad (see the “WordPad” section later in this chapter) is a word processor. Unlike WordPad, Notepad cannot view or edit Microsoft Word (.DOC) or Rich Text Format (.RTF) files. It's a perfect tool to call up whenever you need to view a simple README.TXT file or fine-tune some program code (programmers like this tool).
TIP
Here's a quick way to create a Notepad file. Just right-click the desktop or a folder, choose New, Text document. Then type in the name for your document and press Enter. Now press Enter or double-click the icon, and the new Notepad file opens. This is a good technique for taking down a quick memo, making notes about a phone call, or keeping a to-do list on your desktop.
Text-only files contain text characters and nothing else—no character formatting such as italics, bold, underlining, or paragraph formatting information such as line spacing, and definitely no graphics. Sometimes such files are called ASCII files, plain ASCII files, or simply text files. As of Notepad version 5 (included in Windows 2000; the Notepad version in Windows XP is version 5.1), the Save As dialog box allows you to save in several text-only file types listed in the Encoding pull-down menu: ANSI, Unicode, UTF-8, and Unicode big endian. These formats provide you with greater flexibility when you're working with documents that use different character sets. The default is ANSI, and unless you are inserting non-U.S. characters, you should use this format when you save files.
Although they're visually boring and lackluster, text files do have some important advantages over formatted text documents. Most importantly, they are the lowest common denominator for exchanging text between different programs and even between different types of computers. Literally any kind of word processor and many other types of programs, from email tools to databases, can share textual information using simple text files, regardless of computer type or operating system. To be sure your recipients using other kinds of computers can read a text email attachment or a text file on a disk, stick with the simple text files such as the ones Notepad creates.
Source code used to generate computer programs is often stored as text files, too. Because files are clean, without extraneous codes for formatting, program compilers (software that converts the source code into a working program) are not confused. Good examples of simple ASCII program code or configuration file code are found in the WIN.INI, SYS.INI, PROTOCOL.INI, BOOT.INI, CONFIG.SYS, and AUTOEXEC.BAT files. These files, found in many Windows computers, control various aspects of Windows, all of which can be edited with Notepad. HTML code for Web pages is another example. You can safely edit HTML in Notepad.
Windows recognizes any file with a .TXT extension as a text file and opens it in Notepad when you click it. For this reason, README files supplied with programs—even some supplied with Windows—are stored as .TXT files. Take a look around on the Windows XP Professional CD, and you'll find some pithy files about setup, networking, and so on. After you open them in Notepad, turn on the Word Wrap feature (by choosing Format, Word Wrap) to view the document correctly.
Note
→ To learn more about Word Wrap, see “Running Notepad,” p. 159.
As I mentioned previously, Notepad does no formatting. In fact, it doesn't even wrap lines of text to fill the window unless you tell it to. Notepad can't properly render or print formatted documents created with WordPad, Microsoft Word for Windows, WordPerfect, or any other fancy word processor (unless you saved files you create with those programs as ASCII or ANSI text files). You can open these document types, but they look like gibberish. Also, it doesn't have any fancy pagination options, though it does print with headers and footers via the Page Setup dialog box. Although you can change the font in Notepad 5, font information isn't stored in the file. Font choice is a personal preference for viewing and printing, and applies to all files you open in Notepad.
TIP
Be careful about opening formatted text files with Notepad. Typically, this will take a little doing, because when you use the File, Open command, the box defaults to “.txt” files. But you could enter the entire name of a preexisting file that you wanted to examine, such as a mydocument.doc or mydocument.rtf. A formatted file will probably appear as gibberish in Notepad. Nonetheless, if you accidentally save the file, the formatting is stripped out of it, and the file can become useless. I don't recommend using Notepad to view a file unless you have no other software tool suitable for the purpose, because it's hard to read the file and you can easily damage it.
If you want to examine executable files or initialization or control files used by programs, I suggest a file viewer intended for this purpose, such as FVIEW. Many utility programs for this purpose are available on the Web or at software stores. One such program is called QuickView Plus. It's a full version of the quick viewers supplied with Windows 9x. It's available from Avantstar Software (http://www.avantstar.com). QuickView is also useful for viewing the contents of temporary files which may contain a version of a document you were working on when your system locked up.
Notepad files used to be limited in size to about 50KB. That's no longer the case. Even very large files can be loaded into Notepad 5.1.
To run Notepad, click Start, More Programs (or just Programs, depending on how you have your taskbar settings), Accessories, Notepad. Notepad then appears on your screen (see Figure 5.1). When it does, you can just type away.
Of course, you can choose File, New to start a new file at any time. If you've made changes in the current file and haven't saved them, Notepad asks if you want to save it before creating the new file. You use the standard File, Open and File, Save As commands. You can only have one document open at a time in Notepad.
TIP
Although you can have only one file open in a particular Notepad window at a time, you can have multiple Notepad windows running. This enables you to cut, copy, and paste text between windows or perform visual file comparisons.
You should turn on word wrap when you enter text unless you're entering program code that is line oriented. When you do, by choosing Format, Word Wrap, the text wraps within the constraints of the window. If you resize the window, the text rewraps to fit the available space. Note that the word wrap setting doesn't affect the text file itself. That is, Notepad doesn't insert line feeds or carriage returns at the points where the lines wrap.
As with most Windows text programs, the keys shown in Table 5.1 have the effects shown here.
Table 5.1. Keys in Notepad
Key | Moves Insertion Point To |
|---|---|
Home | Start of the line |
End | End of the line |
PgUp | Up one window |
PgDn | Down one window |
Ctrl+Left Arrow | Start of previous word |
Ctrl+Right Arrow | Start of next word |
Ctrl+Home | Start of the file |
Ctrl+End | End of the file |
F5 (particular to Notepad) | Inserts the time and date |
Ctrl+Backspace | Deletes a word to the left |
Del | Deletes letter right |
Backspace | Deletes letter left |
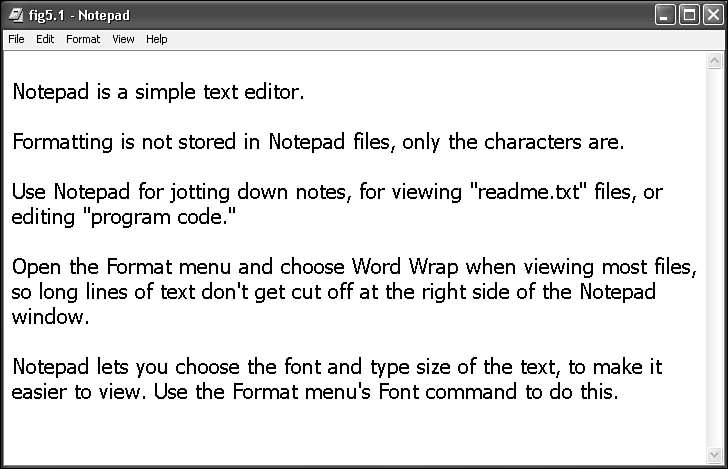
Despite the paucity of formatting options for onscreen display, you can format printed output to some degree. Use the File, Page Setup command to establish headers and footers. Enter your desired footing and heading text. Margin changes and header and footer settings aren't visible onscreen but do print. You can also include the special codes shown in Table 5.2 in the header and footer fields. You can enter these codes alone or within a text string.
Table 5.2. Formatting Codes for Notepad
Code | Effect |
|---|---|
| Includes the current date |
| Includes the page number |
| Includes the filename |
| Forces subsequent text to left-align at the margin |
| Forces subsequent text to right-align at the margin |
| Centers the subsequent text |
| Includes the time of the printing |
Here are a couple examples to help you take advantage of these formatting codes. To print the time and filename at the top of each page, add this to the header field in the Page Setup menu as shown in Figure 5.2:
Printed at &t Filename is &f
If the time the document was printed was 10:30 a.m. and the filename was README.TXT, the header will appear like this when the document is printed:
Printed at 10:30 Filename is Readme.txt
By default, &p (page number) is used in the footer field as shown in Figure 5.2, so the page number will print at the bottom of each page unless you add or remove footer codes.
When you print a document, Notepad lets you choose the page range, the number of copies, and the printer to which the job is sent. See Chapter 6, “Printing and Faxing,” for more details.
For more capable word processing than Notepad can accomplish, you can use WordPad. Though it's not Word or WordPerfect, it works fine for most everyday writing chores. It includes most of the formatting tools people need for typical writing projects, and the price is right. You can edit documents of virtually any length, it supports drag-and-drop editing, and it can accept graphics pasted to it from the Windows Clipboard. WordPad supports the following:
Standard character formatting with font, style, and size
Standard paragraph formatting with changing line spacing, indents and margins, bullets, justification, and right and left alignment
Adjustable tab stops
Search and replace
Headers and footers
Pagination control
Insert and edit graphics
Undo
Print preview
It doesn't do tables, columns, indexes, master documents, outline view, legal line numbering, or anything really groovy, though. Go get Word or WordPerfect if you have that level of needs.
WordPad can save and open files in several formats:
Rich Text Format—. This choice is the default. The Rich Text Format is used more and more as a common format for exchanging documents between word processors, though few, if any, use it as their primary format (it's sort of like an Esperanto for word processors). The Rich Text Format preserves the appearance as well as the content of your document. Graphics and other objects can be saved in the file along with the text but might be lost when you open the file with another application. To learn more about how to insert graphics into a WordPad document so that the graphic will be stored in the document, see “Adding Graphics to a WordPad Document” later in this chapter.
Text Files—. See the discussion of text files earlier in the chapter in the section covering Notepad.
Unicode—. See the discussion of Unicode earlier in the chapter in the section covering Notepad.
WordPad also can open the following document types (although it must save changes to these files as .RTF, Text, or Unicode documents):
Word for Windows—. This choice opens documents stored in the format used by Microsoft Word for Windows version 6.0, and Microsoft Word 95 (.DOC). If you have any version of Microsoft Word installed, incidentally, double-clicking a .DOC file opens it in Word, not WordPad.
Windows Write—. This choice opens documents stored in the .WRI format used by Windows Write, the simple word processor supplied with Windows 3.x. This feature enables you to read README.WRI files supplied with some older Windows applications.
Text Documents—MS-DOS Format—. This choice opens text documents stored with the MS-DOS version of the ASCII character set.
WordPad correctly opens even incorrectly named (wrong extension) RTF and Word 6 files if you select the All Documents option in the Files of Type area in the Open dialog box or type the document's full name. If WordPad doesn't detect a file's format, it opens it as a text-only file. Note that if a document contains formatting information created by another application it will likely appear as garbage characters mixed with the document's normal text.
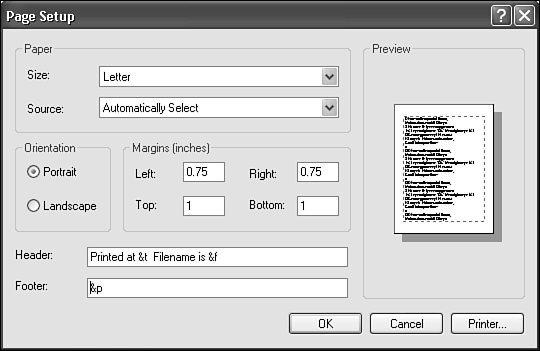
To run WordPad, choose Start, All Programs, Accessories, WordPad. The WordPad window then comes up. Figure 5.3 shows an example of a Notepad file which has been edited with WordPad.
Figure 5.3. WordPad includes moderately sophisticated word processing features. Use the View menu to activate the toolbar and ruler bar shown here.
As with most Windows programs these days, you don't have to memorize what each button on the toolbar does. Just position the mouse pointer over the button and a pop-up screen tip will appear on the status bar at the bottom of the screen.
When you're doing lots of editing and formatting in WordPad, check the View menu. You can turn on as many of the toolbars as you need to quickly change formatting, tab locations, and so on. A check mark next to a bar's name means it's on. They are toggle settings.
You can drag and drop or “tear off” the various toolbars. Just position the mouse pointer over the far left edge of any bar (don't click a button); then drag the bar where you want it.
Editing is simple in this program and complies with Windows standards and then adds a few rules of its own. I'll outline them very quickly. Just enter your text as usual. Lines of text occur automatically and are readjusted if you resize the window, change the margins, or change the font size. You can move the cursor around with a click of the mouse or by using the control codes listed for Notepad in Table 5.1.
You can double-click a word to select the whole word. To select the entire document quickly (select all), move the cursor to the left edge of the document until the arrow changes direction, and then Ctrl+click. To select an arbitrary area, click and drag the pointer over the text. Release when the text is highlighted. You can also select areas of text by pressing Shift and using the arrow keys. The spot where you first click (beginning of the selection) is called the anchor point. You can triple-click to select a paragraph. After text is selected, you can format it with the toolbars and format menu commands.
To move blocks of text, either select the text and use Cut, Copy, and Paste from the Edit menu, or drag it with the mouse to the new location and drop it.
TIP
To insert characters that aren't available on your keyboard, such as ™, ®, or ©, use the Character Map accessory, covered later in this chapter in the section “Character Map.”
WordPad handles each paragraph as a separate entity, each with its own formatting information, such as tab stops. To apply changes to multiple paragraphs, select them first.
To undo the last command, choose Edit, Undo; click the Undo button (the curving arrow) on the toolbar; or press Ctrl+Z.
Undo can undo the following errors: block deletions, anything removed by pressing Del or Backspace (as a unit), blocks replaced by typing, new text typed (back to the last time you issued a command), and character and paragraph formatting changes (if you select the Undo command immediately after making the change).
You can insert a graphic—and other OLE objects—into a WordPad document in one of three ways: by pasting the graphic from the clipboard, by creating the object from scratch as you insert it, or by inserting an existing object stored in a disk file. The basic steps required are similar for either method, but they vary slightly in detail.
Select Edit, Paste to insert a graphic you've put on the system Clipboard.
Select Insert, New Object to create a new graphic using another program or an existing file. In the Insert Object dialog box, choose the type of graphic object you want from the list, and click OK. At the insertion point, an area opens for the graphic. You create the graphic in the second program and then exit the graphics program using the appropriate command (typically Exit and Return) and return to WordPad.
Click the graphic, and then drag the picture's handles (the small black squares along the edges) to resize the image.
After you've pasted the graphic, you have only crude control over positioning it where you want it in the document. You can't move a graphic around with the mouse, and no menu command is available for this purpose. Instead, you must push the picture around in your document with ordinary typing, the Backspace key, or the Tab key, or you can cut and paste it into a new location.
TIP
When you insert an existing object from a file, the Insert Object dialog box offers a Link check box. If you check this box, any changes to the source file are reflected in the WordPad file. This is called Object Linking and Embedding (OLE), and is different than the usual Cut, Copy, and Paste commands. It's not used very often, so it's not covered in this book. For more information about OLE, check the Windows Help system, and search for linking and embedding.
If you want to retrieve the document with graphics intact on another computer, I recommend using the Edit, Paste method if you can do so. Documents created with the Insert, New Object method that used an existing graphic didn't store the object inside the document file, but used a pointer to it. When the document was retrieved from another system, it would have a framing box instead of the actual graphic.
A few WordPad preferences affect viewing of files. You can check the View, Options dialog box to see them. All the tab pages except General Options in the Options dialog box pertain to the various types of documents that WordPad can open: Text Only, Rich Text Format, Word for Windows, Windows Write, and Embedded. Each of these pages offers identical choices. These settings affect display only; none of these choices affect the way your document prints.
Paint is a simple drawing program that creates and edits bitmapped images in a variety of formats. Using free-form drawing tools, text, and special effects, you can create projects such as invitations, maps, signs, and wallpaper for your desktop, and you can edit images linked into documents created by other programs (see Chapter 4 for more details about linking and embedding).
Let me explain why Paint is called a bitmapped image editor. Your computer's screen is divided into very small dots (pixels or pels) that are controlled by the smallest division of computer information—bits. A bitmap is a collection of bits of information that creates an image when assigned (mapped) to dots on the screen. This bitmap is similar to one of those giant electronic billboards in Times Square, New York, that can display the score, a message, or even a picture by turning on and off specific light bulbs in the grid.
Being a bitmapped drawing program, rather than an object-oriented drawing program like Adobe Illustrator or CorelDraw, Paint has some significant limitations to keep in mind—also some advantages. After you paint a shape, you can't move it independently. You can use the computer to remove an area of the painting and place it somewhere else—as if you were cutting out a piece of the canvas and pasting it elsewhere. But all the dots in the area get moved, not just the ones in the shape you're interested in.
Windows XP Professional doesn't come with an object-oriented graphics program. Simple object-oriented graphics modules are included in some word processors and spreadsheets.
An addition to Paint that appeared in the Windows 2000 version and carries over to Windows XP is the capability to save files in JPG and GIF formats in addition to the usual bitmapped (BMP) formats. You can also edit and save files in the TIF and PNG files formats. Table 5.3 lists and briefly breaks down each of these picture formats.
Table 5.3. File Formats Supported by Microsoft Paint
File Format | Full Name | Typical Use |
|---|---|---|
BMP | Bit-Mapped Picture | BMP files store graphics in a format called DIB. They tend to be large in file size, and are used by Windows for features things such as screen wallpaper. |
JPG | Joint Photographic | Highly compressed means of storing graphics files, and Experts Grou often compress to about 5% of uncompressed size. This is a “lossy” format, meaning that some of the detail is lost as a sacrifice for small sized files. Often used on the Web or for storing photos from digital cameras. |
GIF | Graphics Interchange Format | Often used on Web pages for logos or other images with limited color (256 maximum) graphics. Like JPG, GIF files can be stored with compression, making them very efficient in terms of storage space and email or Web transmission. GIF files discard color data rather than image detail. |
PNG | Portable Network Graphics | A relatively new format similar to GIF and created by the World Wide Web Consortium (W3C) as a freely usable, unlicensed format for storing graphics and photos. Browser support for PNG remains spotty at this time, even with the newest Microsoft and Netscape versions. See http://www.libpng.org/pub/png/pngapbr.html for details. |
TIF | Tagged Image File Format | This is one of the most widely supported and cross-platform file formats for images on PCs (including Macs). These files are not used on the Web. Web browsers can't display them, and they are often large. Digital cameras sometimes store highest quality, uncompressed images in TIF format. Because TIF files use lossless compression (no visual data is ever lost), this format is recommended for archival storage of image data. |
If what you want to do is edit photo images (typically JPG, TIF, or GIF) created with a digital camera or scanner, you should use another program such as Adobe Photoshop, Adobe Elements, or PhotoDeluxe, Paint Shop Pro, Kai Photo Soap, or another of the many popular programs designed specifically for photos. Some versions of Microsoft Office come with a photo editor, called Microsoft Photo Editor, that can do the job, too.
TIP
Using the Image Preview feature (discussed in Chapter 7, “Multimedia and Imaging”) you can view, rotate, and perform basic tasks with image documents. You can transfer pictures to your computer from a digital camera or scanner, view your pictures in a slideshow, and annotate your fax documents. The Photo Printing Wizard, in Windows XP, can walk you through the process of printing your digital photos or scanned images. We cover that in Chapter 7, also.
To bring up Paint, choose Start, All Programs, Accessories, Paint. When the Paint window appears, maximize it. Figure 5.4 shows the Paint window and its component parts. I've loaded a BMP-file photograph into the program by double-clicking on a BMP file I found using the Search tool. (See Chapter 4 and Chapter 9 for discussion of the Search tool.)
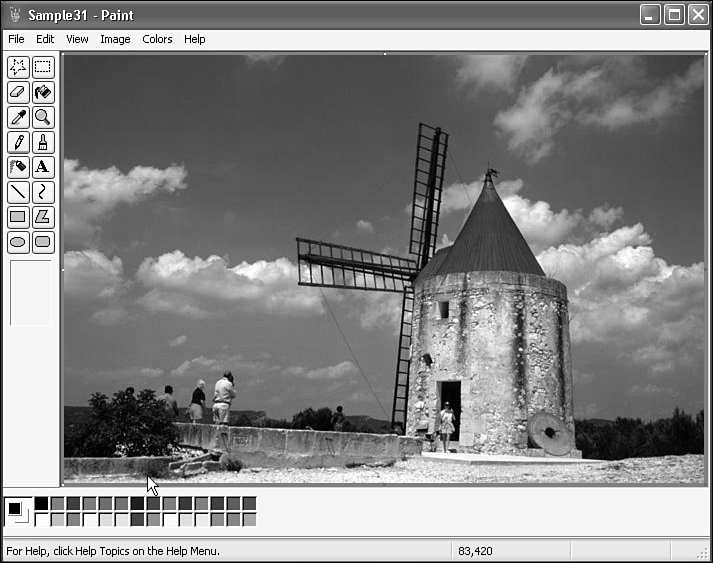
You create the drawing in the central area (or work area). Down the left side, the Toolbox holds a set of tool buttons for painting, drawing, coloring, and selecting. You choose colors from the Color Box at the bottom of the window. The status bar offers help messages on menu choices and displays the coordinates of the mouse pointer.
The object is to choose a tool and start fiddling around. You'll soon learn which tool does what. Hovering your mouse pointer over a tool displays some pop-up text with the tool's name. Some of the tools are a little difficult to figure out, but if you open Help and look up the tool, you can find descriptions there for each of them.
When you start a new picture, you must attend to a few details; then you can get on with painting.
If a picture is open, choose File, New to erase the previous image (if you need to have more than one graphic file open at a time with Paint, just start a new copy of Paint).
Choose Image, Attributes to set the picture size and whether it's color or black and white.
You can alter the size of the overall canvas when you're painting, so don't lose any sleep over perfecting it before you start. An image prints smaller on paper than it appears onscreen because the printer's resolution is much higher (each dot is smaller). So if you're aiming to print out your creation, you might want to do a little experimentation.
Setting the printed size of your image is easy. You used to have to calculate it based on the resolution of your printer and the pixel size of the image. Now you can just choose Image, Attributes and set the size in inches (or cm, or pixels, if you wish). You can check that the size looks about right at any time, by choosing File, Print Preview. Remember, though, that if your picture is wider than it is tall, and if it's printed width is more than about 8 inches, you need to change the page orientation for printing from Portrait to Landscape. To do so, just choose File, Page Setup, and select the appropriate button.
The maximum picture size is limited by available memory and color setting. Black-and-white pictures use far less memory than color pictures do, so they can be much larger. Paint lets you know if you set a picture size that's too large to fit in memory. A black-and-white image is not the same as a grayscale image, in which you can paint with 16 or more separate shades of gray. Black and white has only two colors—black and white. Duh. To create a grayscale image, you must place the desired shades of gray on the palette.
Before beginning to use a tool, you set the color to paint with. You need to set two colors: background and foreground. One of the most fundamental techniques to learn is selecting a color to paint with. In Paint, you control both foreground and background colors independently.
The foreground or drawing color is the main color you paint with. For example, when you add strokes with Paint's paintbrush, draw lines or shapes, or even when you type text, these items appear in the currently selected foreground color. The term background color is somewhat different. Many of the tools (such as the Brush, Pencil, and the Shape tools) let you paint with the so-called background color just as you would with the foreground color. All you have to do is hold down the right mouse button instead of the left one as you paint. The background color also determines the fill color for circles, squares, and other enclosed shapes; the fill color inside text frames; and the color with which you erase existing parts of the picture. If you select a section of the picture and drag it to another location, the resulting “hole” is filled with the background color. You can change the background color as many times as you like.
An alternative technique for selecting colors is using the Eyedropper tool, which lets you “suck up” a color that already appears in the picture. That color becomes the new foreground or background color for use with any of the painting tools.
TIP
You can start a new picture with a certain color as the “canvas.” Before you paint anything on the picture, choose the desired background color, and click anywhere over the work area with the Paint Can tool.
After you have the colors selected, you can use the tools to draw:
Click the tool you want to use to select it.
Position the pointer in the work area where you want to start painting, selecting, or erasing, and then click and hold the mouse button.
Drag to paint, select, or erase. Release the mouse button when you are through.
Some tools (for example, the polygon tool) require multiple clicks. When some of the tools are selected, the area below the grid of buttons provides options for the selected tool. The options are different for each tool.
Every addition you make to an image eventually melds into the picture and can't be undone. However, the program does keep track of the three most recent additions, allowing you some small degree of rethinking. Each time you make a new change, Paint “forgets” the fourth most recent change, and it becomes permanent.
To undo a change, press the fairly universal Undo command key, Ctrl+Z, or choose Edit, Undo. You can undo an undo by choosing Edit, Repeat.
TIP
Use the Save As option on the File menu to save your work periodically under a different filename to give yourself additional margin for changes. If you make a serious error you can't undo, you can then open the most recently saved or an earlier version of your work and continue on from that version.
You might often use Paint simply as a viewer of BMP files. Web browsers do not open BMP files for display, so when you double-click a BMP, it runs Paint (unless the system association for BMP files has been set to another program) and opens the file.
To see the maximum image amount at once, choose View, View Bitmap. All the other screen elements, including the title bar, menu bar, and scrollbars, disappear. Clicking anywhere on the screen or pressing any key returns you to the working screen.
One of the best features of Paint is pixel editing. You can zoom in closely to edit a picture, dot by dot, and can choose from five magnification levels: normal, 2x, 4x, 6x, and 8x(800). Figure 5.5 shows a detail of a full-face portrait, showing only the person's eye. This is at highest magnification, 8x(800). In Paint, you can use any of the standard painting tools at any magnification level. Use the Pencil tool to best change the color of one dot at a time. This feature is most useful when you have a little touchup to do (such as photo retouching), but you can't seem to control the mouse well enough to do it in normal view.

You can choose several BMP formats for saving Paint files; the variations pertain to the number of colors stored in the file. Normally, you can just let Paint choose the correct format for you, but sometimes knowing which format to use comes in handy.
The following are the available BMP formats and their descriptions:
Monochrome bitmap—. Use when you have only two colors (black and white) in your picture.
16-color bitmap—. Use when you have 16 colors or fewer in your picture.
256-color bitmap—. Use when you have more than 16 and fewer than 257 colors in your picture.
24-bit bitmap—. Use when you have more than 256 colors in the picture.
Use the lowest possible setting, based on the number of colors with which you have been painting. The more colors you save, the larger the file. However, saving a picture with a format that has fewer colors might ruin it, causing it to lose detail. You can also save in a variety of other formats, as mentioned earlier. As a rule, save your image in a format that in which your target audience (or program) uses to view it. For example, if you intend to send an image to someone in email or put it on a Web page, stick with GIF, JPG, or PNG. These are the most universal image formats.
The Calculator is a quick and dirty onscreen version of two traditional pocket calculators: a standard no-brainer calculator and a more complex scientific calculator used by statisticians, engineers, computer programmers, and business professionals. They are good for adding up your lunch bill, a list of inventory items, or the mortgage payment on your office building. But neither calculator sports a running tape that you can use to backtrack through your calculations.
To run the Calculator, choose Start, All Programs, Accessories, Calculator. A reasonable facsimile of a hand-held calculator then appears on your screen, as shown in Figure 5.6. You can switch between modes by choosing View, Standard or View, Scientific. The program always remembers which type was used last and comes up in that mode.
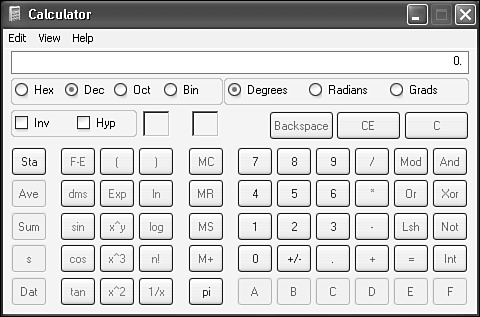
Figure 5.6. The Scientific Calculator is the often-unseen mode that the Windows Calculator can appear in. Many additional functions appear in this mode.
TIP
To quickly see a little help about any Calculator button, right-click the button, and choose What's This?
TIP
To add a series of numbers or to find their mean, use the statistical functions on the Scientific Calculator. This way, you can see all the numbers in a list before you perform the calculation instead of having to enter them one at a time. And don't let the idea of statistics make you nervous; the technique is very simple.
Most of the operations on the Standard Calculator are self-explanatory, but a couple of them—square roots and percentages—are just a bit tricky. Check the Help file for more information. Table 5.4 provides a quick reference chart of keyboard shortcuts.
Table 5.4. Keyboard Shortcuts for the Calculator
Button | Key | Button | Key | Button | Key |
|---|---|---|---|---|---|
% | % | cos | o | MR | Ctrl+R |
( | ( | Dat | Ins | MS | Ctrl+M |
) | ) | Dec | F6 | n! | ! |
* | * | Deg | F2 | Not | ~ |
+ | + | dms | m | Oct | F7 |
+/- | F9 | Dword | F2 | Or | | |
- | - | Qword | F12 | PI | p |
. | . or , | Exp | x | Rad | F3 |
/ | / | F-E | v | s | Ctrl+D |
0 to 9 | 0 to | Grad | F4 | sin | s |
1/x | r | Hex | F5 | SQRT | @ |
= | = or Enter | Hypo | h | Sta | Ctrl+S |
A to F | A to F | Int | ; | Sum | Ctrl+T |
And | & | Inv | I | tan | t |
Ave | Ctrl+A | In | n | Word | F3 |
Bin | F8 | log | l | Xor | ^ |
Byte | F4 | LSH | < | x^2 | @ |
Back | Backspace | M+ | Ctrl+P | x^3 | # |
C | MC | Ctrl+L | x^y | y | |
CE | Del | Mod | % |
You can prepare a complex equation in a text editor such as Notepad and then copy it to the Calculator for execution. For example, you can enter the following in Notepad:
((2+8)+16)/14=
or
(2+(8+16))/14=
Mind your parentheses, and make sure to include the equal sign, or click = on the calculator after you paste in the equation; otherwise, the result will not appear. You can omit the parentheses if you use extra equal signs, like this:
2+8=+16=/14=
Some special characters can be included in your equations to activate various Calculator functions, as shown in Table 5.5.
Table 5.5. Special Calculator Functions
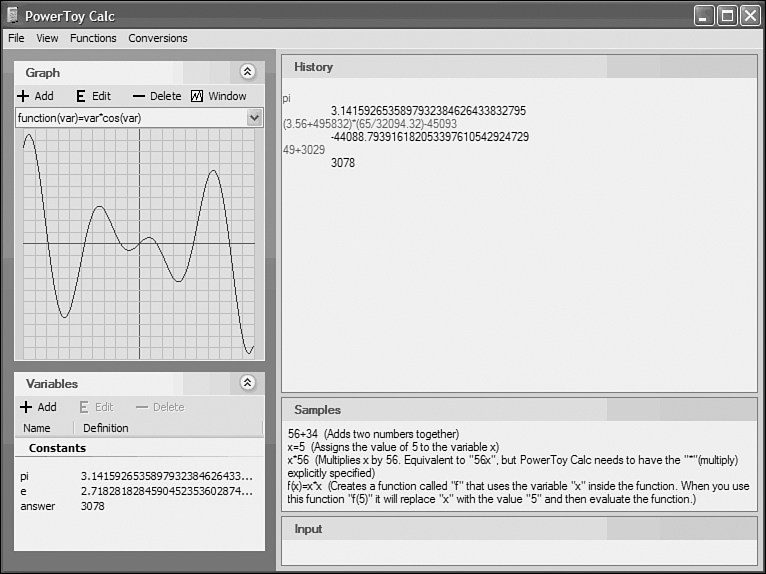
If you're really into calculators, you might want to download the Power Calculator, which is free from Microsoft. It's part of the Windows XP PowerToys. You can download it from
http://www.microsoft.com/windowsxp/downloads/powertoys/default.mspx
With this PowerToy, you can graph and evaluate functions as well as perform many different types of conversions such as length, mass, time, velocity, and temperature. Figure 5.7 shows the calculator.
Note
→ See the discussion on page 883 in Chapter 23 for more information about installing the PowerToys.
Character Map is a utility program that lets you examine every character in a given font and choose and easily insert into your documents special characters, such as trademark (™ and ®) and copyright symbols (©), foreign currency symbols and accented letters (such as ¥) and nonalphabetic symbols (such as fractions, ¾), DOS line-drawing characters (+), items from specialized fonts such as Symbol and Wingdings, or the common arrow symbols (←, →, ↑, and ↓). Some fonts include characters not mapped to the keyboard. Character Map lets you choose them, too, from its graphical display. The Program Map displays Unicode, DOS, and Windows fonts' characters.
Character Map for Windows XP Professional is larger and updated from the one in Windows 98. Now you can choose the character set, rearrange the items in a font (such as grouping all currency types together) to eliminate hunting, and search for a given character.
Character Map works through the Windows Clipboard. You simply choose a character you want to use, click Copy, and it moves onto the Clipboard. Switch to your destination application (typically a word processing file), position the cursor, and choose Paste.
To run Character Map, follow these steps:
Choose Start, All Programs, Accessories, System Tools, Character Map. When the window appears, check the Advanced View box to see more. The window then appears with all the characters included in the currently selected font displayed.
By default, the Character Set is Unicode. This means all the characters necessary for most of the world's languages are displayed. To narrow down the selection, choose a language from the drop-down list.
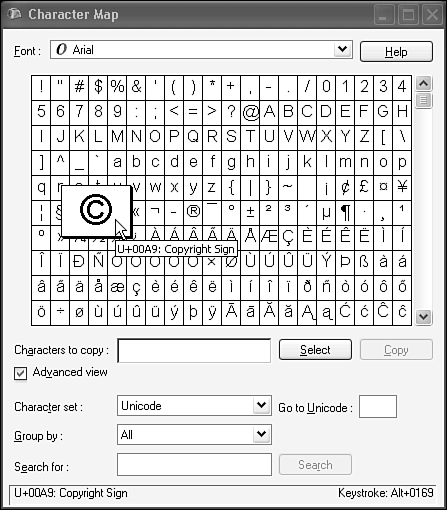
To examine an individual character, click a character box, and hold down the mouse button to magnify it. You can accomplish the same thing with the keyboard by moving to the character using the arrow keys (see Figure 5.8).
Double-click a character to select it, transferring it to the Characters to Copy box. Alternatively, after you've highlighted a character, you can click the Select button or press Alt+S to place it in the Characters to Copy box. You can keep adding characters to the copy box if you want to paste several into your document at once.
Click the Copy button to place everything from the Characters to Copy box onto the Windows Clipboard.
Switch to your destination application, and use the Paste command (typically on the application's Edit menu) to insert the characters into your document. In some cases, you might then have to select the inserted characters and format them in the correct font, or the characters won't appear as you expected. You can, of course, change the size and style as you like.
A useful feature of Character Map lets you choose a subrange from the Unicode. Unicode was designed intelligently with characters grouped in sets. You can choose a subset of a font's characters to help you locate a specific symbol. To check out this feature, open the Group By list, and choose Unicode Subrange. When you choose this option, a box like the one in Figure 5.9 pops up.
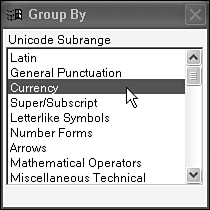
Click the subgroup that you think will contain the character you're looking for. Good examples are currency or arrows. Make sure to open the Group By list again, and choose All when you want to see all the characters again.
At the bottom right side of the Character Map dialog box is a line that reads
Keystroke:
For nonkeyboard keys (typically, in English, anything past the ~ character), clicking a character reveals a code on this line—for example, Alt+1060. This line tells you the code you can enter from the keyboard to quickly pop this character into a document. Of course, you must be using the font in question. For example, say you want to enter the registered trademark symbol (®) into a Windows application document. Note that with a standard text font such as Arial or Times New Roman selected in Character Map, the program lists the keystrokes for this symbol as Alt+0174. Here's how to enter the character from the keyboard:
Press Num Lock to turn on the numeric keypad on your keyboard (the Num Lock light should be on).
Press and hold Alt, and then press 0+1+7+4 (that is, type the 0, 1, 7, and 4 keys individually, in succession) on the number pad. (You must use the number pad keys, not the standard number keys. On a laptop, you must activate the number pad using whatever special function key arrangement your laptop uses.) When you release the Alt key, the registered trademark symbol should appear in the document.
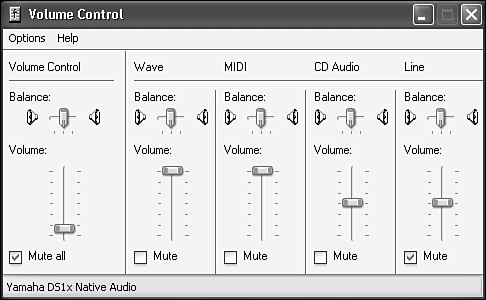
The Volume Control accessory is basically a no-brainer. It provides a pop-up volume control sporting balance, mute, and other controls for your audio subsystem. Whether you're playing radio stations from the Web, CDs from your CD drive, listening to TV if you have a TV tuner card, doing online conferencing with NetMeeting, or recording sound files, you need access to these controls from time to time. Of course, if you don't have a working sound card installed, this accessory isn't available, or at least it won't do anything. A little known fact for many people is that this accessory has two sets of controls—one for recording and one for playback.
To open the volume controls, choose Start, All Programs, Accessories, Entertainment, Volume Control. A shortcut is to double-click the little speaker icon in the system tray on the Windows XP taskbar.
NOTE
If the speaker icon isn't visible, open the Sounds and Audio Devices icon in Control Panel and click the box labeled Place Volume Icon in the Taskbar. Click Apply.
Your sound system's capabilities and possible changes that past users have made to the application's settings determine the format of the volume controls you see. On one of my computers the controls look like what you see in Figure 5.10.
You can alter any volume control's setting by dragging the volume up or down. Change the balance between right and left channels by dragging the Balance sliders left or right. Mute any source input by checking the Mute box in its column.
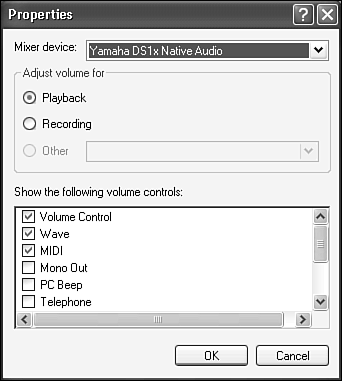
Controls for some input sources are probably not showing. Check out the Options, Properties command. It offers options for turning on various volume controls and possibly special features. Figure 5.11 shows an example. Because audio controls operate differently for different sound cards, check out any Help files that might be available from your audio controls.
If you are doing any sound recording, be sure to see the recording controls, too. Open the Properties dialog box, and choose Recording.
TIP
Sometimes you want to see the playback and the recording controls at one time. To do so, run the Volume Control application twice. Set one for playback and the other one to record. Then adjust them onscreen so that you can see each side-by-side.
TIP
Some sliders in one module are linked to sliders in other modules. Adjusting the Volume setting on one affects Volume settings on the other mixers. For example, adjusting the playback volume in Media Player or your audio CD player or MP3 player will typically alter the “Wave” or the master Volume control slider position on the system Volume Controls.
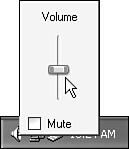
To quickly adjust or mute the sound output from your system, or to adjust the master volume level (useful when the phone rings), click the little speaker icon in the system tray, near the clock, as shown in Figure 5.12. If the speaker icon isn't showing, then you have to turn it on. To turn it on, click Start, Control Panel, Sounds Speech and Audio Devices; click Sounds and Audio Devices, then turn on Place Volume Icon in the Taskbar Notification Area and click OK on the dialog box.
If you are using a sound card with support for more than two speakers, open the Sounds and Audio Devices icon in Control Panel and click the Advanced button in the Speaker Settings section of the Volume tab to select the speaker or headset type you're using to ensure correct operation of your speakers.
Although not an application per se, the Clipboard is an integral part of Windows, and is typically used when working with applications. Chapter 4 introduced the Clipboard indirectly, explaining how to cut, copy, and paste items, particularly files and folders within the Windows GUI.
Because transferring data between applications and documents is such a common task, this chapter offers some additional detail on the techniques you can use to facilitate the process.
The most basic sort of information sharing relies on the Windows Clipboard. As you're probably well aware, you can cut, copy, and paste information from one application to another with relative abandon—assuming both applications allow you to work with the kind of information you're transferring (text, graphics, or musical notes, for example).
Almost all Windows applications use the Clipboard for everyday, on-the-fly data-transfer operations. The Clipboard lets you move text, graphics, spreadsheet cells, portions of multimedia files, and OLE objects from one location to another. It supports both 16-bit and 32-bit Windows programs and can even move text to and from non-Windows programs, within the constraints I explain later in this chapter.
Information cut or copied to the Clipboard goes into system memory (RAM and virtual memory), waiting there until you paste it to a new location elsewhere in the same document or in another document. Even then the data remains on the Clipboard until it's replaced by new cut or copied information or until you exit Windows. The upshot of this arrangement is that you can paste the same information as many times as needed, into as many different locations in your documents as necessary.
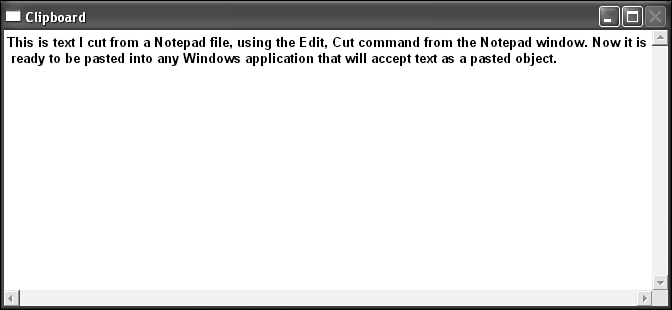
Want to know what information currently resides on the Clipboard? Run the ClipBook Viewer utility that comes with Windows XP to view the Clipboard contents as well as to store Clipboard information on disk (in CLP files or ClipBooks) for later retrieval. You won't find that program on your All Programs menus, but if you Click Start, Run, and enter clipbrd, it should come up. Double-click on the Clipboard's title bar (which is probably minimized at the bottom of the Clipbook Viewer window), and you can see what's in the Clipboard at any given time. Though you may seldom use it, the Clipbook Viewer can be used to share Clipboard contents over the local area network. It's a little tricky to do so, however, and rarely used. Figure 5.13 shows an example of some text on the Clipboard.
NOTE
Some Windows applications maintain their own independent Clipboard-like storage areas for cut or copied data. These proprietary clipboards overcome some of the weaknesses of the main Windows Clipboard. For example, whereas the Windows Clipboard can hold only one chunk of cut or copied data at a time, Microsoft Office 2003/XP has its own “clipboard” that stores up to 12 chunks. In Office 2003/XP apps, a special toolbar pops up as the Office clipboard fills up. The toolbar displays each chunk of data with an icon identifying the data's source application, and you can paste the chunks in any order you need them into your Office 2003/XP documents.
Windows XP maintains time-honored Windows standards (most of them date all the way back to Windows 2.0) for selecting, cutting, copying, and pasting information. This section offers a brief review of the techniques you need. In summary, four steps are required to transfer data from one place to another via the Clipboard:
Select the data. The techniques required to select data depend on the type of information in question and the application you're using. If you're working with text, you can drag across the characters to be selected, or, if you prefer a keyboard approach, hold down the Shift key while you use arrow keys and other cursor movement keys to expand or reduce the selection. Many programs let you select entire lines or paragraphs using techniques such as clicking or double-clicking in the left margin. Selected text appears in reverse colors.
With graphics and other non-text information, selection techniques vary, but you typically just click on the item you want to select, Shift+click to select a series of adjacent items, or drag over adjacent items to select them together. In many applications you can also Ctrl+click to select nonadjacent items. You can usually tell that an item has been selected by the appearance of an outline or small rectangles on its perimeter.
Cut or copy that data to place it on the Clipboard. Choose Edit, Copy to place the selected data on the Clipboard without disturbing the original. You can also choose Edit, Cut to put the information on the Clipboard and remove it from the source document. As mentioned in Chapter 4, many applications let you right-click over the selection and choose Copy or Cut from the shortcut menu that pops up. With the keyboard, the standard shortcuts are Ctrl+X for Cut and Ctrl+C for Copy; however, some applications don't abide by these conventions.
Identify the destination for the information by selecting the destination document and, if appropriate, navigating to a specific location in that document.
Paste the data into the destination document. With the mouse, choose Edit, Paste or choose Paste from the shortcut menu. Using the keyboard, pressing Ctrl+V does the trick, except in the odd, nonstandard application. With any of these techniques, the contents of the Clipboard will appear in the new location.
Note
If the pasted data doesn't look like you expected, see “Pasted Data Doesn't Look Right” in the “Troubleshooting” section at the end of the chapter.
NOTE
Almost all Windows applications have Cut, Copy, and Paste commands on their Edit menus, but that doesn't mean these commands are always available. If you haven't selected anything to be cut or copied, for example, the Cut and Copy commands will be inactive—they appear grayed out on the Edit menu and you can't choose them. For its part, the Paste command can be grayed out even if data is currently on the Clipboard. This happens when the application doesn't recognize the data format in which the Clipboard data is stored.
NOTE
Many Windows applications place cut or copied information onto the Clipboard in multiple formats. For example, suppose you copy some text from Microsoft Word. When the copy operation is complete, the Clipboard will contain at least four representations of that same text: a “plain text” (nonformatted) version, a version in the Rich Text format, a version in HTML, and a picture (an image of the text stored as a line, or vector, graphic). When you paste, the destination application communicates with the Clipboard to decide which format to use. In some cases, the application also has a command that lets you take manual control and decide the right format for yourself. At any rate, the availability of all these formats means that you have a better chance of successfully pasting the data into the destination document.
One of the first rules of organization is to know where things are, and how to keep them in their rightful places. The Search command (or Companion, as it's now called), found in the Start menu or the toolbar in any folder, is a tool often used in this mission. We think of the Search Companion as a supplied application, since it has grown into something formidable, despite the impression the cute little animated Search Assistant gives. Although we mentioned it briefly in Chapter 4 as a way to find and run programs, we wanted to cover this powerful feature more thoroughly in general terms here.
As we mentioned in Chapter 1, Windows XP's Search feature is new and wholly superior to anything in any version of Windows to date. In Windows 9x and NT 4, Search was called Find. The name has changed, as has the functionality of the look of the window. The Search Companion can find a needle in a haystack, and it doesn't much matter where the haystack is or what else is in it. The Search window will find people, computers, Web pages, files, folders, and programs. It will look on the Web, on the local machine, or across the intranet (LAN). In the context of this chapter, let's focus on searching for your multimedia files, document files, and folders, however. In the chapters covering network issues (Part IV) and the Web section (Part III), we'll cover searching out other kinds of information.
Just click Start and choose Search (or as a shortcut I use all the time on 104-key keyboards, press Windows+F). This will bring up the Search Companion window, as shown in Figure 5.14. Notice that this is essentially an Explorer window, but with a Search panel on the left side. By default, you have a little Search Companion there to help entertain you while a search is going on, in the form of a dog. He does tricks, and occasionally makes noise as he scratches himself, so don't be alarmed. You can choose another Search Companion, make him perform a trick, or turn him off by double-clicking on him and choosing from a menu, or by clicking on Turn Off Animated Character.
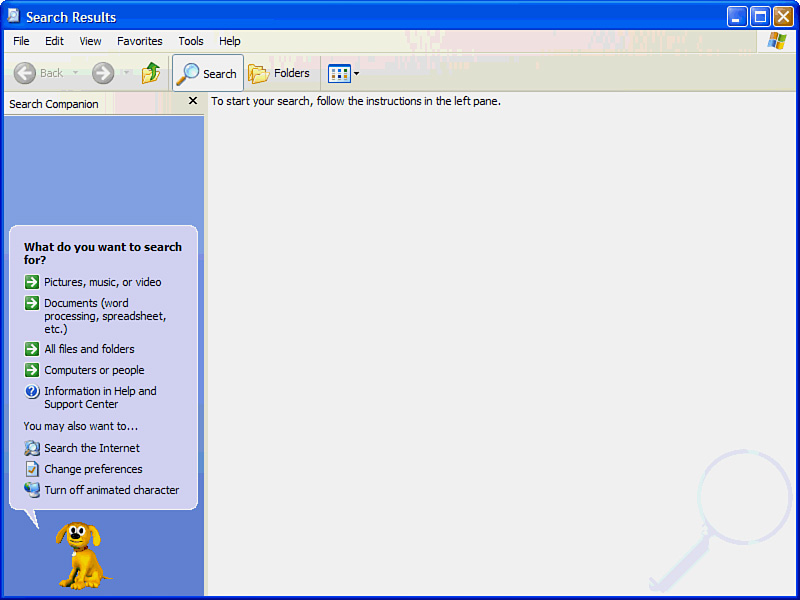
Figure 5.14. The new Search Companion is multitalented. Use it to seek out multimedia files, documents, folders, people, computers, and other stuff.
Like a Web page, the Search Companion has links and Back buttons to move from page to page. In the previous versions of Search or Find, you filled in boxes more like a traditional dialog box, but no longer. It's all HTML-based now and very Webby-looking. There are numerous pages and links within the Search window to explore.
Note
→ To see some searching in action, see the video CD-ROM included with this book, Lesson 1, in which Bob takes you on a tour of the Windows interface.
Let's try a simple search for files on the computer. This is the most frequent kind of search (outside of Web surfing). Suppose I wanted to search for any music on my computer that was by Beethoven.
Notice that I found three files, as indicated in Figure 5.15. After a search is complete (this could take some time as Windows searches through all your hard disk files, but the doggie sure looks cute turning those book pages), the found files are listed to the right. You are asked by the Search Companion whether you are finished searching. If you are satisfied, click Yes; the Search Companion disappears and is replaced by the normal view of an Explorer window, yet the found files remain in the right pane for you to work with as you will (copy, cut, open, run, edit, and so on) by clicking or right-clicking on them.
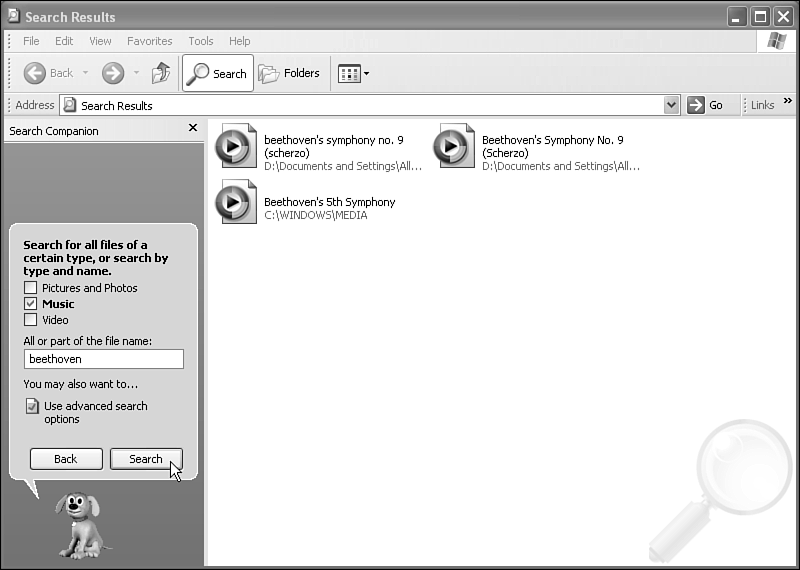
Figure 5.15. Here I've searched for all music with Beethoven in the file name. I'm also showing you the result of the search.
If you are not satisfied with the results of the search (either no hits, or too many hits), notice the several options:
Change the file name or keywords—. This is the most likely thing to do. You may have spelled the file or other item incorrectly. Use a smaller amount of the file name, don't specify the extension, or try a different spelling if you don't know how it's spelled. Maybe specify just the extension, such as *.tif.
Look in more locations—. Well, this is not likely going to help much, since normally a search is conducted on all your local hard disks. But it may be worth a try. Click this to see what options you have. Click the check mark in the resulting box to open a list of places you can look in. Then click Browse to open a box that lets you look all around your system, including on the local area network.
Change whether hidden and system files are included—. There are numerous files on your computer that are normally “hidden” so that you (or someone else) doesn't mess with them and mangle your operating system. If you're searching for DLL files or some other system-related things, you can choose this option. You won't need it for sleuthing out typical documents and programs, though.
You get the idea with the multimedia files. If you're a worker bee who doesn't have time for photos, videos, and MP3 music files, you're probably looking for those business reports you've been slaving over and are freaking out about whether your computer ate them. This happens to me all the time, especially since today's programs want to put your files in weird places that never see the light of day (like somewhere inside of My Documents under some strange user name). So, you'll want to experiment with conducting another search, this time for Documents (this is the second option listed when you first bring up the Search Companion. Notice that it offers two criteria categories for searching—file name and when it was modified. Actually, this makes a lot of sense, since people generally remember at least a little bit about their work-related documents this way, at least I do. “Gee, I worked on that thing two days ago, and I probably would have called it something like Bob's Pleading with the IRS for Mercy.” So I click on Within the Last Week and in the document name area I type in IRS. The results are good (see Figure 5.16). (I've hit the Back button, so you can see both the results and the search criteria.)
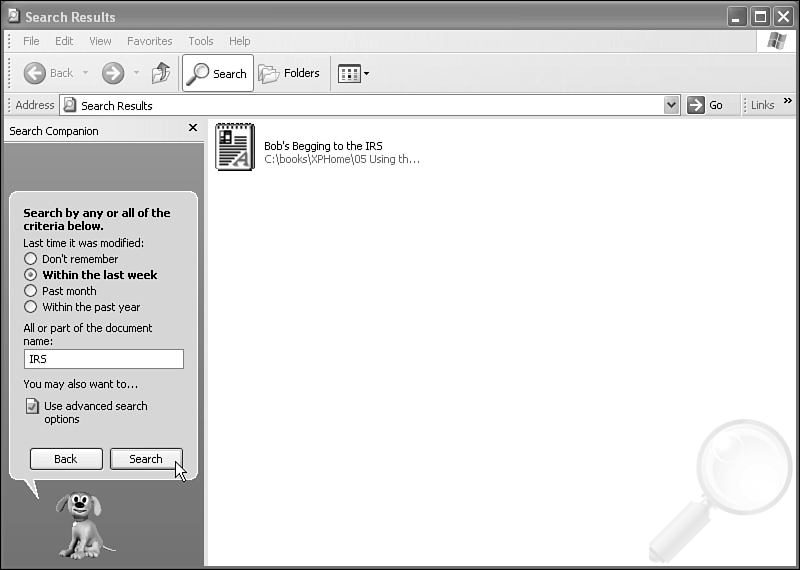
Figure 5.16. Here I've done a search for that file I hope will keep me out of debtor's prison. I used the “time modified” and “file name” criteria, together.
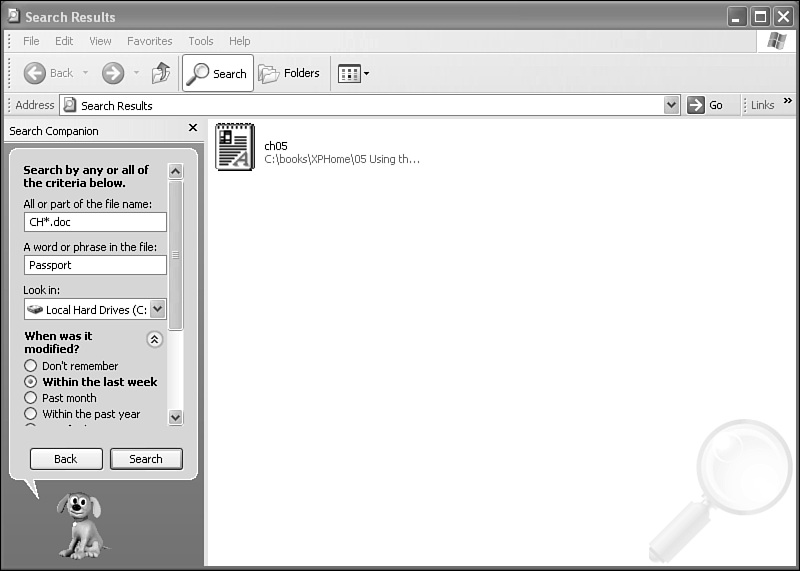
Now for something a little more complicated. Suppose I wanted to find any files that I've modified in the last week, are related to this book, and also contain the word “Passport” in them. This is a real need for me, since I'm working on the Passport topic, and don't want to repeat myself in the chapter I'm writing now. Can the Search Companion help me? Yup. Here's how:
I run the Search Companion.
I choose to search for Documents.
I click on Within the Last Week for the last time it was modified.
I enter the file name
ch*.doc, since I know that all my chapter files start with the letters “ch” and are Word or WordPad files (so they end with “.doc”).I click on Use Advanced Search Options. The box changes a bit to show some advanced settings. I enter
Passportin the lower area of the box (see Figure 5.17).
If you're looking more generally for files or folders (that are not documents or multimedia files), choose the All Files and Folders option from the first page of the Search Companion. He'll now look through more of your folders. This will result in a more exhaustive search, because every file and folder will be examined, not just those that are popular document types.
Just as with the Find box in Windows 9x and NT, you have to be a bit crafty when filtering the search. If you enter a long filename with spaces between the words, the search will likely end up becoming too broad. For example, if you entered
Annual Report 2
in the Search For area, the result would be any file with the word Annual, Report, or 2 in any part of its name. This is annoying. Also, using quotes around the string, as when conducting a Web search, doesn't help either, unfortunately. I was trying to find a folder called Ch 3 and the only way to exactly find it was to enter Ch*3 as the criterion. So keep in mind that you should use DOS-style wildcards when searching for items that contains spaces in their names.
Experiment with other aspects of the Search box, such as searching the Internet or turning on the Indexing Service. The Indexing Service was introduced in Windows 2000 Professional. This tool scans files and folders on your hard disk and builds a database of the words it finds in those documents. This database helps speed up file and directory searches when you're looking for words within files or keywords in file descriptions. The database also helps the Internet Information Services Web server perform Web site searches. To turn it on, do this:
From the first page of the Search Companion click on Change Preferences.
Then choose With Indexing Service (for faster local searches).
Click Back.
Begin your search.
The Indexing Service can index the following types of documents in several languages:
Text
HTML
Microsoft Office 95 and later
Internet mail and news
Any other document for which a document filter is available
The Indexing Service is designed to run continuously and requires little maintenance. After it's set up, all operations are automatic, including index creation, index updating, and crash recovery if there's a power failure.
TIP
You can save any search you have conducted by choosing File, Save Search. It will prompt you to save the search in My Documents and will suggest a file name for it such as “Files named CH05.doc”. When you want to re-run the search, open the folder where you stored the file and double-click it. It will open in the Search Companion. Then click the Search button.
I can't see all the text in a Notepad window. Where did it go?
You must manually turn on word wrap to get the text in a file to wrap around within the window. By default, word wrap is turned off, which can be annoying. The good news is that word wrap is now a persistent setting. After you turn it on and then close Notepad, it should be on the next time you run it. If you need to edit program code, make sure to turn it off, or your program lines will wrap, making editing and analysis of code more confusing.
If you still can't see enough text, remember that Notepad 5.1 now supports font changing for display. Change the display font from the Format menu. Choosing a monospaced font (for example, Courier) might help you line up columns. Choosing a smaller font and/or a proportional font (for example, Times) crams more text into the window.
Inserting and adjusting tab stops in WordPad is a pain. Is there an easy way?
You can easily insert and adjust tabs in WordPad by clicking in the ruler area. Choose View, Ruler to turn on the ruler. Then click in the ruler area where you want to insert a tab stop. You can drag the cursor left and right to see a vertical rule to align the stop. To kill a tab stop, drag it out of the ruler area into the document.
I've opened a photo in Paint, and it looks terrible. Why?
You probably have your display set to too few colors. When too few colors are available to the video display, it “bands” the colors, making photos look like a topographic map. Each sharp delineation between similar colors in the picture is called a band, for obvious reasons. Normally, the colors would blend together evenly. But if the video display's driver is set to 16, or even 256 colors, this is too few to render most photographic images properly.
Typically, photos have well over 256 colors. You need thousands (or millions) of colors to display an attractive photograph. As I said earlier, to edit photos in any professional manner, you should use a program designed for photographic retouching. Still, you can cut and paste, do some pixel editing, add text and so forth, with Paint. First, however, check your display settings by right-clicking the desktop, choosing Properties, and then Settings. Make sure you have your system set to run in 16-bit color or higher.
I'm adjusting the volume control from the system tray icon, but I just don't get any sound.
Total loss of sound can be caused by myriad goofs, settings, hardware conflicts, or program malfunctions. Troubleshooting your sound system isn't always easy as a result. One tip is in order here: If you're using a laptop computer, ask yourself whether the sound stopped working after you hibernated or suspended the system. I've noticed this problem on several laptops, and this bug might not have been worked out of Windows XP Professional for your sound chip set. Try rebooting the computer, and see whether the sound comes back to life. Another thing to look for is a manual volume control on the computer. Many laptops have a control you can turn or push, that's often found along the right- or left-hand side of the computer itself. Such settings override any settings within Windows. If you have a set of powered speakers attached to your computer, make sure they are plugged into power, and are turned on. I often forget to do this, and then wonder why I have no sound. You should consult other chapters in this book that deal with the Control Panel and the Device Manager for serious problems. If none of the above remedies work, then you might have a bad sound card, or it might need a new device driver.
I'm sure I placed information on the Clipboard but the Paste command won't work.
The problem is that the destination document doesn't recognize the format of your Clipboard data. You may be able to work around this obstacle by first pasting the data into another application that does accept the information and then copying and pasting from this way-station app into the intended destination document. Alternatively, try saving the selected information to disk in a file format that the destination app can import.
My pasted data sometimes looks quite different in the destination document than it did in the original.
You might be able to get better results by pasting the data in another format, if the destination application allows this. Look for a command in the destination app such as Edit, Paste Special that lets you select from all the Clipboard formats the application recognizes. Try each format in turn to see which gives the best results.