
In this chapter
ActionScript takes Flash beyond vector graphics and simple animations. With ActionScript you can create user interfaces for rich applications, program multiuser Internet games, or even explore creative possibilities with computational art. One of the great things about ActionScript is that people with different skill levels can use it. You can start with some simple code right away and progress to more advanced coding approaches, such as class-based programming.
Up until now, everything we have discussed about Flash has concerned author-time development. For example, you can use a timeline motion tween to animate the movement of a circle across the stage. With ActionScript, you can program the same animation by writing code that will be executed during runtime while a published SWF file is running. In this chapter, you will learn the basics of coding with ActionScript in Flash.
One of the biggest questions people have when they begin working in Flash is where to place their code. With Flash, you have a lot of options on where you can place the code. Although technically you can attach ActionScript to the timeline of any frame or to the outside of any button or movie clip symbol instance in your project, it’s a good idea to keep your code centralized. All code should be on the main timeline, preferably in the first or second frame. When placing code on the main timeline in the Flash authoring environment, most professional Flash developers place it on its own layer in a blank keyframe. Why? Because it’s easy to find. I use the top layer and name it “actions,” which is a common practice.
Another step that you can take to make your ActionScripting more easily read and organized is to use comments in your code. Comments are used to explain the code clearly and briefly. They are helpful to you when you return to a project months later. In addition, they are helpful to other people who need to work with your code.
There are two ways to write comments in ActionScript. One option is to place two forward slashes at the beginning of a line of text. This signals to the compiler that the rest of the line is to be ignored and not compiled, and to skip to the next line.
// double slashes indicate that this line is a comment
The second method enables you to mark a multiline block of text as a comment, with /* and */ characters framing the commented text. Anything between the slash-astrix bookends is skipped over by the compiler. This can be used to quickly “comment out” multiline portions of your code and help you pin down the source of a bug in your project.
/*
Anything between these slash-astrix bookends
is ignored by the compiler, no matter
how many lines you type in.
*/
One of the simplest things to do with ActionScript is to control the timeline. With ActionScript, you can send the playback head to any frame in the timeline. You can choose a numbered frame, or give that frame a label; however, using frame labels is more flexible than using numbered frames to control the timeline with ActionScript. With frame labels, you don’t have to rewrite all your coding every time you reorganize the timeline.
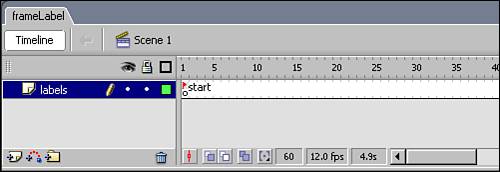
To create a labeled frame, make a new top layer in your project. Place it above your actions layer so that you can easily spot your frame labels. Then insert a blank keyframe. Give the frame a name in the in the <Frame Label> field of the Property inspector. Figure 11.1 shows a frame on the timeline labeled as start.
To control the timeline you can use one of the global functions that are built in to Flash. These functions are all commonly used commands that are listed in the actions listings from the upper-left corner of the Actions panel (see Figure 11.2).

To stop the playback head on a frame, you can use the stop() action attached to a blank keyframe at the location on the timeline where you want to stop.
stop();
The playback head reads the action on this frame and then stops.
To send the play head to a specific frame, you can use the gotoAndPlay() function. For example, use the gotoAndPlay() function to send the playhead back to the start frame label in the first frame, creating an animation that loops continuously.
gotoAndPlay("start");The entry inside the parentheses of this method is the data that the playback head uses to know where to jump on the timeline. This can be either a frame number or a frame label name. The word "start" is in quotes to tell the playback head to go to a frame label with that name.
If you’re creating an animation that changes the color of the sky at certain times of the day, you need some basic information: What is the current time of day, and what color is the sky at different times? You can create a container in your Flash projects to hold that information. In programming, these containers are called variables.
Before you put something into a container, you need the container itself. In Flash, this process is called declaring a variable. When you first declare a variable, you typically use the keyword var and then follow it with a name for the variable. To say “I have a variable named myVariable” in ActionScript, you would enter the following code:
var myVariable;
Now you can give the named container something to hold: the value of your variable. In the following line, write the name of the newly created variable. The equal sign, also called the assignment operator, tells the compiler that you’re about to tell it the value of the variable. Then you write the value. Afterward, use a semicolon to indicate that this instruction is done. Just as a period ends a sentence, a semicolon ends a statement in ActionScript. This is the syntax for assigning a value to a variable.
variableName = variable_value;
Note
You’ll notice that the variable name is written with the first letter of the first word in lowercase and the second letter in uppercase. This is the most common convention for naming variables–lowercaseUppercase. It’s a habit I would suggest you acquire, so that others reading your code can quickly recognize variables.
Imagine there’s a container on a shelf in your fridge with take-out from a restaurant. You might want to say, “Hey container! Whatcha got?” I don’t know about the containers in your fridge, but mine generally don’t answer questions. I have to open them up and look.
The engineers at Macromedia have given us a simple but wonderful tool for looking at the contents of variables while developing and testing ActionScript projects. You can ask your variables what they hold if you use the built-in trace() function. Here’s an example in ActionScript where the variable timeOfDay is assigned the value of "dawn". The value of timeOfDay is then traced to the Output window:
var timeOfDay = "dawn";
trace(timeOfDay);
//returns dawn
Trace is a great tool for developing in ActionScript because you can test whether certain parts of your code are performing as you expect. In other words, it can help you track down bugs and avoid creating them altogether. The trace function tries to find, in memory, the argument it’s given, and then the results are traced to the Output window. These results are not visible to the end user when the published .swf file is played. In this case, the argument is the variable timeOfDay. When you test your movie (Control, Test Movie) in a Flash document with the previous code, dawn comes up in the Output window.
Tip
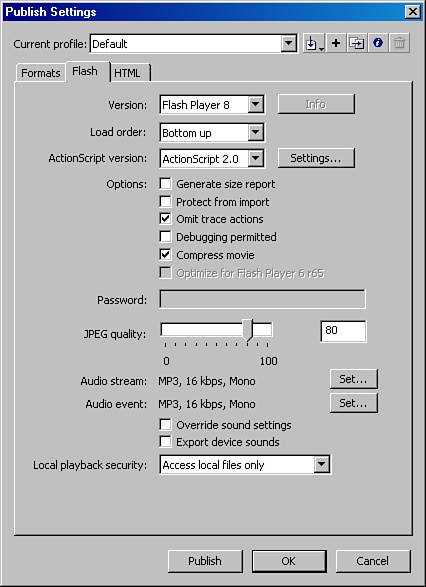
You can exclude trace commands from the compiled .swf file if you change the preferences in the Publish settings of your project. Go to File, Publishing Settings, and select the Flash tab (see Figure 11.3). Click on the check box next to Omit Trace Actions in the options.
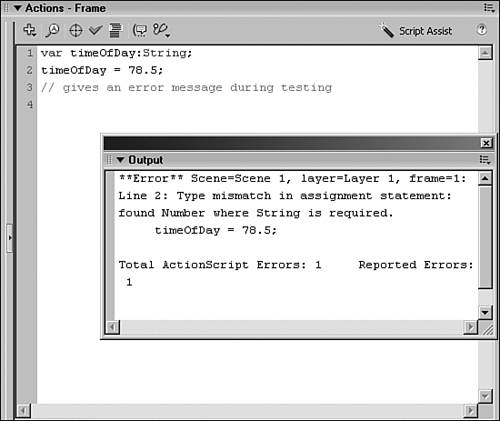
When you begin working with variables, Flash has a powerful way to help you prevent bugs in your projects. To help make sure that the variables you create are holding the correct type of data, you can add some information to your variables called strict typing. When a variable uses strict typing, it means it is assigned a datatype so that the debugger then gives you a specific error message if you try to assign a value of another datatype. For example, if you give the variable timeOfDay a datatype of String, you get an error if you assign it the number value of 78.5 (see Figure 11.4).
var timeOfDay:String;
timeOfDay = 78.5;
// gives an error message during testing
Datatypes are basically ways to store information with different formats. Flash has several basic datatypes, including string, number, Boolean (true/false), array, object, and date. Different datatypes can have different operations performed on them. For example, a number can be multiplied, but a string of characters cannot.
String—. A string datatype can hold a string of characters that is read as text. The characters can be letters, numerals, and other characters. String values are declared between double quotation marks.
var greeting:String = "Hi There!";
Number—. A number datatype consists of numerical digits.
var myAverage:Number = 54;
Boolean—. A Boolean datatype has two possible values: true or false.
var myTest:Boolean = true;
Array—. An array datatype is a list of data values. Elements in an array are indexed by numbers, starting at zero.
var fruitInBasket:Array = ["apples", "oranges", "bananas"];
Object—. An object is a complex datatype and can hold properties and methods. Properties are variables that are attached to an object. Both an object and its properties have names. Properties can also be other datatypes, such as arrays and even other objects.
In the following code, a new object is created and two properties of that object are declared and assigned values.
var myObject:Object = new Object();
myObject.prop1:String = "happy";
myObject.prop2:Number = 42;
During the course of the day, you make countless decisions. Everything you do depends on decisions large and small. Just eating a meal involves decisions, from what to eat to whether to use a fork or spoon.
With code, complex behaviors can be broken down into a series of simple decisions. These are called conditionals, or tests. A test is run, and depending on the result, an action is taken. For example, you may want to check whether the user entered the correct password before running more of the program.
Before jumping into conditionals, I want to briefly mention operators. Operators are the “glue” of ActionScripting. They are symbols that tell the code to do something specific. For instance, when you work with conditionals you’ll often see the ==, &&, and || operators. The == operator compares two elements of a statement, and requires that the elements be equivalent before another section of code can run. The && operator requires multiple conditional statements to be true. The || operator requires one or another conditional statement to be true. This is why it is called the or operator.
There are two main formats for independent conditionals in Flash: 1) if, if-else, and if-else-if, and 2) switch.
When the Flash compiler encounters an if statement, it looks at the condition within the parentheses. If the condition is true, the code within the curly braces is executed. A general if statement looks like this:
if(condition){
    //do something
}
A simple condition compares two expressions, and returns true if the condition is met. Several types of comparisons can be made between expressions. For example, you may want to know whether two expressions are equal or different. Or you may want to know whether one expression is greater than another.
Let’s say that you have a project where you have a movie clip instance for the sky in the background of an animation. What if you want to change the color of that instance to blue, when timeOfDay is "dawn"? Before changing the color of the movie clip instance, you first need to determine what color to change it to. In ActionScript, you might write the following, which compares the value of timeOfDay to "dawn". If they are equal, the code between the curly braces is run and the variable skyColor is assigned the value of "blue".
if(timeOfDay == "dawn"){
    skyColor:String = "blue";
}
Although this will work, you might want to change the color at various times of the day. An else after the first closing curly bracket, followed by a second set of curly brackets enclosing another line of code, presents an alternative code to execute if the condition is not true. In this case, if timeOfDay is "dawn", skyColor is "blue". If not, skyColor is "black". This is called an if-else conditional.
if(timeOfDay == "dawn"){
    skyColor:String = "blue";
} else {
    skyColor:String = "black";
}
You can set another conditional after an else. In fact, you can write a whole sequence of if-else-if statements. In the following example, the variable daytime has a range of numeric values. Notice that the conditional statements are more complex. By using the && logical operator, you can test for two or more conditions at once. Here, it tests whether the value is between specific number ranges:
if(daytime > 0500 && daytime 1130)
    skyColor:String = "blue";
} else if (daytime >1130 && daytime <= 1230)
    sky Color:String = "bright_blue;
} else if (daytime > 1230 && daytime <= 1900){
    skyColor:String = "blue";
} else {
    sky Color:String =" black";
}The switch style of conditionals can be used when you have a list of specific values that you are testing for equality. It works just like an if-else statement, but the code is formatted differently. First, you state that this is a switch conditional, with the variable to be tested in parentheses. Then you list each case that you want to test. The syntax for each case is as follows. Note the colon after the case value, which serves as shorthand for the curly braces.
case "value":
    //code to execute goes here;
The following example shows a series of cases to compare values for the variable daytime. Remember that the keyword case tells the compiler to test whether the next expression is equal to the variable in parentheses.
switch(daytime){

    case "dawn":
        skyColor:String = "dark_blue";
        break;
    case "morning":
        skyColor:String = "blue";
        break;
    case "noon":
        skyColor:String = "light_blue";
        break;
    case "afternoon":
        skyColor:String = "blue";
        break;
    case "evening":
        skyColor:String = "dark_blue";
        break;
    case "night":
        skyColor:String = "black";
}
Switch statements are sometimes easier to read, and are better suited to specific cases than to a range of possible values.
Loops are a type of ActionScript that allow sections of code to execute repeatedly. They usually have a counter to keep track of how many times they have looped. When the counter equals a maximum number, the loop stops running.
Having a counter helps avoid infinite loops, which can cause serious problems in the execution of code, including causing a warning box to pop up. The warning indicates that your code is taking up processor resources and asks you whether you would like to stop running the application. Although this doesn’t crash your computer, it is a serious error in your application. Other ways to avoid infinite loops is to be sure you have a break, or escape, from the loop when the condition for stopping is met.
As with conditionals, it would be helpful to be familiar with some operators used for creating loops before you start using them. These operators are used to keep track of how many times the loop has been repeated. The ++ operator increments the value of your variable by 1. The += is a shorthand operator that says to add the value to the right of the = sign and return a value. So count+=3 adds 3 and returns the value to be used. The -= operator simply subtracts and returns the value.
Note
It makes a difference whether the ++ appears before the variable (pre-increment) or after it (post-increment). Pre-incrementing says to add 1 now and use that value in the code. Post-incrementing says add 1 the next time it is encountered, and to use its current value for now.
The most common type of loop in Flash is the for loop. It enables you to efficiently set up the initial state of a counter, the maximum number of loops, and the amount to increase your loop each time the loop runs. Several other types of loops are available, but this is the one that’s used most of the time.
In a for loop, parentheses wrap the initialization, condition, and increment statements all in one compact line. In this example, i is initialized at zero. The loop runs as long as i is less than 20, and i is incremented by one each time the loop is repeated. That leaves the space between the curly braces free to concentrate on the business at hand: the action that is to be repeated. In this case, it traces the value of i to the output window.
The syntax is as follows:
for (initialization; condition; update){
    statement1;
    statement2;
}
For example,
var i:Number;  // declare the counter
for(i=0; i<20; i++){
    trace(i);
}
This is all it takes to make repetitive actions easily accessible in our projects.
Functions enable you to reuse the same set of statements without having to rewrite the code in several places. They make your code more readable and easier to update. You saw global functions that are built in to Flash when you learned to control the timeline. Now you can create your own.
You can use the function keyword before the function name to create the block of code you are grouping together. Then all the code inside the curly brackets are run when the function is called.
function functionName(arguments) {
    statement1;
    statement2;
}
In this example, the function is named setSkyColor. In the parentheses, the value for timeOfDay is passed to the function.
function setSkyColor(timeOfDay) {
    trace(timeOfDay);
}
When you write a function, it just sits there until you do something with it. To execute the code in a function, you have to call it, passing any arguments it needs to run, and then all the functionality you wrapped inside the function is performed automatically. Here, the value "dawn" is passed to the setSkycolor function already created, which causes "dawn" to be traced to the Output window.
setSkyColor("dawn");With this syntax for defining a function, you don’t have to worry about placing the function definition higher in the code than where you call it from. In fact, it can be at the end of the code or even in a class.
You can also use another syntax format called a function literal. This syntax places the function name first, and then applies the function to that name after the assignment operator. This way of defining a function enables you to change the scope of the function easily and is the most common way to create a global function that can be accessed from any timeline. However, in this format, the definition of the function must be made before you can call the function.
The syntax is as follows:
functionName = function(arguments) {
    statement1;
    statement2;
};
For example,
this.setSkyColor = function(timeOfDay){
    trace(timeOfDay);
}One reason to use functions is to make your code more generalized and reusable. Rather than have a lot of different functions that do the same task but with different information, you can write one function to which you pass information and that runs differently depending on that information.
Imagine that you need to get the result of 2×10. You can write this in code as
var doubleTen:Number = 2*10;
Later on, you may need to multiply 2×6. You could write it as doubleSix:Number = 2*6, or you could see that a pattern is emerging. You could save some effort and keep your code more organized by writing a function to handle all cases where you need to double a number. Such a function would need to know what number to double. You give the function this information by passing an argument to it as in the following example:
function doubleNum(myNum){
    return myNum * 2;
}
You would call this function and pass the value you want to double in the same statement:
doubleNum(6);
//output
12
Remember the switch statement that sets a color for the sky? You can encapsulate it into a function called setSkyColor, with an argument named timeOfDay.
function setSkyColor(timeOfDay){
    switch(timeOfDay){
        case "dawn":
            skyColor= "dark_blue";
            break;
        case "morning":
            skyColor= "blue";
            break;
        case "noon":
            skyColor= "light_blue";
            break;
        case "afternoon":
            skyColor= "blue";
            break;
        case "evening":
            skyColor= "dark_blue";
            break;
        case "night":
            skyColor = "black";
    }
}
This function could then be called when timeOfDay = "morning", like this:
setSkyColor("morning");When this function runs, "morning" becomes the value for timeOfDay and is used in the comparisons of the switch statement.
A function can have several parameters or arguments, but if you find yourself passing a long list of arguments to a function, it may be a sign that you need to simplify your code and break it up into smaller parts. You can do this by creating a series of functions that each contain a single task and then call them from within other functions as you need them. It is with this type of interrelated system that most function-based programming is carried out.
When you use built-in functions, like Math.sin(), Flash returns a value. You can save this value in a variable for later use. Here, the variable x is declared, and it is assigned the value of 5. Next, another variable (myNumber) is declared, and it is assigned the value of the result of passing x to Math.sin().
var x:Number = 5;
var myNumber:Number = Math.sin(x);
trace(myNumber);                // outputs -0.958924274663138
You can write your own functions that return values by using the return keyword.
function squareNumber(myNum){
    // return square of argument
    return myNum * myNum;
}
Using the result of this function is just like using the result of a built-in function:
var x = 5;
var myNumber:Number = squareNumber(x);
trace(myNumber); // outputs 25
A function terminates after a line with return in it. Any code following a return line does not execute.
Scope is a term that has to do with where your variable is declared and where it can be accessed from.
A local variable has a small scope, limited to the function in which it was created. To create a local variable, use the var keyword before you set a name and value for your variable. In the following code, the variable myVeg exists only within the function getVeg.
function getVegi(){
    var myVeg:String = "potato";
    return myVeg;
}
A timeline variable, such as the variable name in a text field on the stage, has a specific timeline scope. To change the value for a variable from a different timeline, you need to use dot syntax to target the specific timeline. Dot syntax gives you access to those other timelines. For example, you might have a movie clip with an instance name of mc2, which lives inside of a movie clip called mc1, which lives on the main timeline. When you want to access mc2, you simply call each child clip in turn.
mc1.mc2
Movie clips have independent timelines, meaning they can have their own variables and actions just as the main timeline does. When you refer to the main timeline you can use _root to set and/or control that timeline from anywhere in the timeline structure. To address the timeline inside a movie clip instance, simply use the instance name. To back out of a movie clip to a parent timeline you can use the relative addressing of _parent. All this addressing is strung together with dot syntax:
//addressing a movie clip from the main timeline
mc1.mcVariable = "mc1 timeline variable"
//addressing the main timeline from inside a movie clip timeline
parent.myVariable = 20;
For example, you could have a variable on the stage with the name myText. You can access that variable and modify its value from anywhere in the code by using dot syntax addressing to target the variable. This function assigns a value to a variable on the main timeline:
function sayHello(){
    root.myText = "Hi There!";
}
sayHello();
The _global keyword makes a variable or a function accessible from anywhere in the project. The _global keyword is used only when declaring the variable. You can declare a global variable with or without assigning a value at the same time:
_global.myGlobal;
_global.myOtherGlobal:Number = 42;
_global.myFunction = function(){
    //some code
}
This function sets a variable on the main timeline (_root) as the value of the global variable. Notice that you don’t need to use any dot syntax addressing when you ask for the value of a global variable.
function getMeaningOfLife(){
    root.meaning = myOtherGlobal;
}
When dealing with scope, the keyword this comes in handy. When used within a function, this refers to the timeline to which the function is applied. For example, if you want to call the function moveButton when the user clicks on a button, you would type in the following:
// move a movie clip 10 pixels to the right
function moveClip(){
    this._x +=10;
}
// attach moveButton function to the circle
circle_btn.onRelease = moveClip;
The keyword this refers to the movie clip to which the function is attached. In this case, it’s circle_btn, not the main timeline.
Chapter 10, “Animation Basics,” discussed the three types of symbols in Flash: graphic, button, and movie clip. Buttons and movie clips are special. They are objects, and you can create instances of them. They can accept user input from external devices, such as the mouse, send this event to ActionScript, and accept instructions from ActionScript. This all requires that the instance have a unique instance name. If the instance is on the stage, you can give it an instance name in the Property inspector.
A button is a specialized movie clip, with four unique frames. Three frames respond to different mouse states (up, over, and down) and one defines the area that responds to the mouse (hit).
Button objects have built-in methods and properties, and you can use these to control a button instance if you attach a function to an instance’s button event. In this example, a function is first defined, and then this function is attached to the button’s onRelease method. Now, when the user releases the mouse after clicking on the button, the button is redrawn 10 pixels to the right of its current position.
// move a movie clip 10 pixels to the right
function moveClip(){
    this._x +=10;
}
// attach moveButton function to the circle
circle_btn.onRelease = moveClip;
Another way to attach a function to a button event is to use a shorthand notation that combines the function definition and the function attachment. In this example, the function is defined inside the onRelease method:
circle_btn.onRelease(){
    this._x +=10;
}
This can be a quick way to attach code to a button event, but it’s not as reusable as attaching a previously defined function to the event. It’s fine for when you want to attach unique code that will not be applied to other instances.
There are many button event methods available in Flash. Button event methods are also called event handlers. I’ve listed a few of them here.
onPress—. AnonPressevent handler is invoked when the mouse is pressed while its pointer is over the hit area of the movie clip to which the event is attached.onRelease—. TheonReleaseevent handler is invoked when the mouse is released, while its pointer is over the hit area of the movie clip.onReleaseOutside—. LikeonRelease, onReleaseOutsideis invoked when the mouse is released. The difference is thatonReleaseOutsideis invoked when the mouse pointer is outside the hit area of the movie clip.onRollOut—. TheonRollOuthandler is invoked when the mouse pointer rolls out of the hit area of the movie clip. This is often paired with theonRollOverevent to trigger events based on the user moving the mouse over a movie clip and then out again.onRollOver—. TheonRollOverevent is triggered when the mouse pointer enters the hit area of the movie clip. A common effect is to change the color or alpha value of the clip to indicate to users that they have encountered an element of the user interface.
The MovieClip object is one of Flash’s most powerful and useful features. As an object, it’s a blueprint from which many instances can be created. After an instance of the object is named, you can access that object’s properties (variables) and methods (functions with tasks specific to the movie clip instance), thereby manipulating each instance separately.
Be sure to name each instance as you create it so you can access it with ActionScripting and dot syntax addressing. Then you can also use the Insert Target Path button in the Actions panel, which lets you select named instances that are on the stage. When selected, its target path is inserted into the text in the Actions panel.
To see any of your code in action and any change in properties, you need to test or publish the movie. You see how your code works after it’s compiled into a .swf. For example, if you change the position (_x and _y properties) and transparency (_alpha property) of a movie clip on the stage with ActionScript, the movie clip appears unchanged until you test the movie.
Tip
If you name your instances with suffixes, code hinting becomes available. For example, if you name an instance ball_mc, code hinting will show you all the methods available for a movie clip.
Each movie clip instance you create has several properties that you can access with ActionScript. Some properties are read-only, which means that you can get the value, but not change it. An example of a read-only property is MovieClip._target, which returns the target path of a movie clip instance as a string. You cannot, however, set the value for _target, which is what makes it a read-only property. See Table 11.1 for descriptions of some of the movie clip properties.
Table 11.1. Movie Clip Property Descriptions
Property | Datatype | Description |
|---|---|---|
| Number | |
| Boolean | If false, any button events attached to the movieclip are not invoked. |
| Number | |
| Boolean | |
| Number | Specify the x and y coordinates of the movieclip relative to the local coordinates of the parent clip. |
| Object | Affects how a movieclip appears when it is in a layer above another object. |
| Boolean | When set to true, the Flash Player caches an internal bitmap representation of the movie clip. |
| Array | An array containing each filter currently applied to the movieclip. |
This property requires a little preparation code to use. We’ll cover this in Chapter 16, “Putting It All Together: Creating an XML-Based Photo Slide Show.” |
This example changes the blendMode property of a movie clip when the user clicks on it. To do so, follow these steps:
On the stage, draw a rectangle and fill it with a gradient.
Convert the shape into a movie clip symbol and name it
box.With the Your New Movie Clip instance selected, open the Property inspector and give the instance an instance name of
box_mc.Create a new layer and add this code to the first keyframe.
function blendEffect(){
    // set blendMode to "hard light"
    this.blendMode = 14;
}
// attach function to event
box_mc.onRelease = specialEffect;
When you test this, the colors in the box_mc movie clip should change when you click on the box.
What if you want to revert to the original color when you click on the box next time? Adding some simple logic can take care of that. Test whether the blendMode is normal. If it’s already normal, you can change it to hard light mode with the integer 14. If blendMode is not already set to normal, you reset it to normal mode with the integer 1.
function blendEffect(){
    // test whether already normal
    if(this.blendMode == "normal"){
        //if normal, set to "hard light"
        this.blendMode = 14;
    } else {
        // revert to normal blend mode
        this.blendMode = 1;
    }
}
// attach specialEffect to box event.
box_mc.onRelease = specialEffect;
That’s all there is to it. You’ve created a movie clip that changes its color on the first click and then reverts to its normal coloring on the second.
Movie clips can have button events attached to them, including all the events listed in the “Working with Buttons” section of this chapter. With no specific hit area determined on the timeline for a movie clip, any filled area in the clip is considered the hotspot for that particular clip. For example, you may want a movie clip to move when the user clicks on it. The following code makes a movie clip move 20 pixels to the right when clicked in your .swf. The filled shape drawn in the movie clip is the hit area for button events.
function moveClip(){
    this._x +=20;
}
moveRight_mc.onRelease = moveClip;
Tip
You can make your movie clip behave exactly like a button and have an up, over, and down visual associated with it. The button timeline is automatically set up to have only four keyframes. To make a movie clip that responds like a button, you must set up the frames yourself.
Create _up, _over, and _down frame labels. This is the only time you ever want to use underscores for a frame label name. Add stop() actions below each frame label. Create a graphic below each frame label as in a regular button.
Any filled shape can serve as your hit area, or you can assign one to a movie clip instance inside your movie clip button by double-clicking the instance and adding the following code to the timeline inside:
this._visible=false;
_parent.hitArea=this;
You cannot see the movie clip button function until you assign a button event (for example, onRelease) to tell the Flash Player to see it as a button.
Movie clip events other than the button events, which you saw being used in the earlier code, can be viewed as “big picture” events. They tend to handle events triggered by data loading or the progress of the playhead from frame to frame. Following is a list of some of these events:
onData—. This event handler is invoked when all the data is loaded into a movie clip.onEnterFrame—. Code handled byonEnterFrameis executed continually at the frame rate of the.swffile.onEnterFrameactions are processed before any other code for that frame.onKillFocus—. TheonKillFocusevent is invoked when focus is removed from a movie clip.onLoad—. When the movie clip is instantiated and appears in the Timeline, theonLoadevent handler is invoked.onUnLoad—. TheonUnLoadevent handler is invoked in the first frame after the movie clip is removed from the Timeline. The code in the handler is executed before any other code associated with the frame.
There might be times when you want to create multiple copies of the same symbol, all of which are acting independently on the stage at runtime. There are three ways to place a movie clip on the stage with ActionScript: duplicate an instance already on the stage, attach a clip from the library at runtime, and create an empty clip on the fly. Each method requires that you give the newly created instance a position by setting the _x and _y properties of the movie clip after it’s been created.
duplicateMovieClip
The duplicateMovieClip method copies an instance that was placed on the stage at author time.
The syntax is as follows:
name_mc.duplicateMovieClip(newname, depth)
For example,
// create a copy of box1_mc, named box2_mc, with depth at 30;
box1_mc.duplicateMovieClip("box2_mc", 30);

// position the new clip on the stage
box2_mc._x = 20;
box2_mc._y = 40;

attachMovie
The attachMovie method copies instances onto the stage from symbols in the library. This can be especially useful when you want to keep your graphic assets off the stage. When you use the attachMovie method, you are creating an instance directly from the library. Rather than copy an instance onto the stage while authoring your project, you are using code to do the same thing while the movie plays.
To use the attachMovie method, you must create a linkage ID for the symbol in the library. Open the library for your project and right-click on the symbol you want to copy from the library during runtime, and then select Linkage from the options. In the Linkage properties box, select Export for ActionScript. The field for the Identifier is now ready for you to give your symbol a linkage idName. This is the name the compiler will use when looking for the symbol to attach.
The syntax is as follows:
name_mc.attachMovie(idName, newName, depth)
For example,
// place an instance of a library symbol on the stage
this.attachMovie("newClip", "newClip1", 10);

//position the new instance relative to its parent clip
this.newClip1._x = 0;
this.newClip1._y = 0;

createEmptyClip
The createEmptyClip method creates a new, empty movie clip. The registration point is set automatically in the upper-left corner.
The syntax is as follows:
name_mc.createEmptyMovieClip(instanceName, depth)
For example,
// create a new movieclip
this.createEmptyMovieClip("myEmptyClip_mc", 100);

// position it relative to parent clip
this.myEmptyClip_mc._x = 30;
this.myEmptyClip_mc._y = 40;
Creating a new movie clip at the same depth as an existing movie clip results in the new movie clip replacing the old one. If you don’t know what the highest occupied depth is in your Flash document, you can use the getNextHighestDepth() method to have Flash determine at what depth to put your new movie clip instance.
this.createEmptyMovieClip("myPhoto_mc", this.getNextHighestDepth());One way to add interactivity to your Flash projects is to create drag-and-drop objects in your user interface. You can make your movie clips dragable as long as the user has the mouse held down by using the onPress button function.
To let the user pick up a movie clip, enable drag in a movie clip’s onPress method:
ball1_mc.onPress = function() {
    startDrag(this);
};
If you want the movie clip to drop when the user releases the mouse, use the onRelease event and the method for stopping the drag or the movie clip.
ball1_mc.onRelease = function() {
    stopDrag();
};Complex interactive effects can be created with dynamically generated masks. Just like a mask created in the authoring environment, dynamic masks have a content layer and a mask layer. To create a masking relationship between two objects, use the following syntax, where myImage_mc is the instance name of the movie clip to be masked, and myMask_mc is the instance name of the movie clip that will be the mask:
myImage_mc.setMask(myMask_mc);
To cancel the mask without affecting the mask layer in the timeline, pass null to the setMask method:
MyImage_mc.setMask(null);
If you have two movie clips on the stage and you want one of them to mask the other until the user clicks on it with the mouse, use the following code:
// assign a movieclip as mask
circle1_mc.setMask(circle2_mc);

// define function to turn off mask
function removeMask(){
    this.setMask(null);
}
// attach removeMask function to onRelease
circle1_mc.onRelease = removeMask;I’ve used the / * comment * / notation, and I’m getting a weird result. Why is some of the text commented out, and some isn’t?
/* style comments cannot be nested. If you’ve already used them in your code, you cannot enclose them in another set. As soon as a closing */ is encountered, the comment is considered closed.
My conditional statement doesn’t seem to be working. Why doesn’t it catch when my variable equals the test?
Check to make sure you’ve used the correct operator for the conditional statement. An equivalence conditional requires two equal signs (==), whereas a value assignment requires one equal sign (=). Also check for typos in the variable name and the condition.
I’ve written a function that is called when the user clicks on a button on the stage. Why doesn’t anything happen when I click on it while testing?
There are two main things to check for. First, make sure that the instance has an instance name in the Property inspector. Second, make sure that you’ve used the correct path and that it’s spelled the same way as it is in the Property inspector when you attach the function to the button. To make sure that the function is actually being called, put a trace command at the beginning. If the test message is traced when you click on the button, you know that the problem is internal to the function and not with the calling of the function.
Before writing any code for a big project, I usually start out with pen and paper and sketch out the code requirements of the project. This “sketch” usually consists of diagrams, equations, and an outline of what functions will be needed. At this point, my functions have names that describe what they do. For example, if a function will be getting images, I’ll name it getImages.
When I finally open Flash, I start by creating an outline of the code with comments. This helps to give an organized structure to the code, much like the headings in a book chapter. As I fill in the outline with code, I continue to comment as I go. This helps me quickly understand what the code is supposed to do, both as I work and when I come back to it later.