
In this chapter
Flash comes with a drawing API (application programming interface). The drawing API is simply a set of movie clip methods that enable you to draw lines, curves, and shapes with fills programmatically with ActionScript.
When Flash saves images in a vector graphics file format, information about the vector shapes in the document is saved as areas of color that are defined by lines and curves. In the authoring environment, you define these lines and shapes with the drawing tools directly on the stage. With ActionScript, you can define the lines and fills of vector graphics dynamically. The images are then drawn, based on your code, when you export to your .swf document and while the .swf is running (run-time).
When drawing “by hand” on the stage of the authoring environment, you can start drawing first and then later convert the lines and shapes into a symbol. However, when drawing with ActionScript, you must create a movie clip symbol instance first, and then draw inside of it. You can think of this movie clip as the paper on which you draw with your ActionScript.
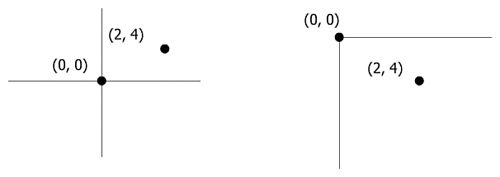
If you’re going to draw with ActionScript, you need to understand how to position your work on the stage. The Flash coordinate system starts with (0,0) in the upper-left corner. The numbers are positive and increase from left to right and from top to bottom of the stage (see Figure 12.1). This differs from the Cartesian grid you might be familiar with. Figure 12.1 shows the two grid systems side by side. Understanding this difference becomes especially important when working with trigonometric functions and you need to covert the Cartesian coordinates to Flash coordinates before applying the result of the function to a movie clip.
All coordinates passed to the movie clip methods related to drawing are relative to the registration point of the parent clip (the clip inside of which you are drawing). If a line is drawn into a clip, the line’s position is relative to the parent clip. If the parent clip is on the stage, its registration point is relative to the stage. The registration point of a movie clip is in the upper-left corner by default. When using the drawing API, you use these coordinates to tell Flash what and where to draw.
The Drawing API methods can be applied to any movie clip instance, including the main timeline. The methods work together and some are dependent on others. For example, a lineStyle() method must define the style of a line before you can draw the line with the moveTo(), lineTo(), or curveTo() methods. The following section describes the movie clip methods available with the Flash Drawing API.
lineStyle()
Before you can draw a line or curve with your script, you first need to define its line style. Think of it as picking up a certain style of pen before drawing on a piece of paper. The lineStyle() statement applies to the lineTo() and curveTo() statements that follow it. When you draw several lines sequentially, you can change the look of any segment by redefining the line style before drawing the segment.
The syntax is as follows:
draw_mc.lineStyle(thickness , rgb , alpha)For example,
myLine.lineStyle(5, 0x333366, 80);
The thickness parameter must have a value between 0 and 255. Any value less than 0 is evaluated as 0 by Flash. Also, any value greater than 255 is evaluated as 255. If no value is specified, the lineStyle is undefined and the line is not drawn.
The rgb parameter is the hex color value for the line. Its default value is black (0x000000).
The alpha parameter sets the transparency level of the line’s color. It can range between 0 and 100. The default value is 100, which represents a completely solid color. Just as with thickness, numbers above the maximum are evaluated at the maximum level and numbers below the minimum are evaluated at the minimum. For example, if you accidentally set the alpha value at -90, it is drawn as 0.
moveTo()
The moveTo method gives your line a starting coordinate. This is rather like putting your pen down on a specific point on the paper and getting ready to draw. In the flow of your code, it should follow the lineStyle statement.
The syntax is as follows:
draw_mc.moveTo(x, y)For example,
myLine.moveTo(100, 200);
The x and y parameters set the coordinates of the starting point for this drawing path. It’s important to remember that these coordinates are relative to the parent clip, much like the position of a patch of paint is relative to the canvas it’s painted on. In this example, the coordinate (100, 200) is positioned 100 pixels down from, and 200 pixels to the right of, the registration point (0,0) of the myLine movie clip.
lineTo()
The lineTo method sets the endpoint of a straight line.
The syntax is as follows:
draw_mc.lineTo(x, y)For example,
myLine.lineTo(200, 200);
The x and y coordinates are relative to the registration point of the parent movie clip (the crosshair inside the movie clip). A straight line is drawn from the previous drawing position to the coordinate set with lineTo().
If you use a lineTo method without first using moveTo, the starting point defaults to (0,0). So, if you plan to start at (0,0), you do not need the moveTo line.
curveTo()
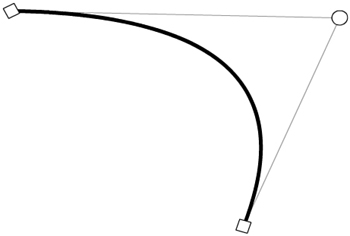
The curveTo method draws a line from a starting point to an endpoint with a curve toward a control point. The starting and end points are called anchor points. It might help to think of this process as drawing a regular straight line and then pulling the middle of it so that it stretches and curves toward a control point but never reaches it (see Figure 12.2).
The syntax is as follows:
draw_mc.curveTo(controlX, controlY, anchorX, anchorY)
For example,
myCurve.curveTo(300, 100, 200, 200);
The controlX and controlY parameters set the coordinates for the curve’s control point.
The anchorX and anchorY parameters set the coordinates for the end point of this curve segment.
clear()
The clear method removes all programmatically drawn elements from the drawing movie clip. It does not affect elements that were drawn in a movie clip during author-time. The MovieClip.clear() statement also resets lineStyle back to undefined.
The syntax is as follows:
draw_mc.clear()
For example,
myCurve.clear();

beginFill()
The beginFill() method enables you to define the fill color and transparency level of a closed shape. It precedes the methods used to draw the outline of the shape and is closed by calling the endFill() method.
The syntax is as follows:
draw_mc.beginFill(rgb, alpha)
For example,
myshape.beginFill(0x003366, 80);
The rgb parameter is the hex color value for the fill. This is the value of the color as you would see it in the Swatch panel, with a 0x proceeding the numeric value.
The alpha parameter sets the fill’s transparency level. It defaults to 100 (solid color).
beginGradientFill()
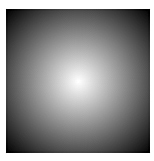
Whereas the beginFill() method lets you define a single fill color and is simple to use, the beginGradientFill() method enables you to define a gradient and is a little more complicated to use. Figure 12.3 shows a gradient filled shape.
The syntax is as follows:
draw_mc.beginGradientFill(fillType, colors, alphas, ratios, matrix)
For example,
this.createEmptyMovieClip("gradient_mc", 1);
with (gradient_mc) {
    colors = [0xFF0000, 0xFF9933];
    alphas = [100, 80];
    ratios = [0, 0xFF];
    matrix = {matrixType:"box", x:100, y:100, w:200, h:200, r:(45/180)*Math.PI};
    beginGradientFill("radial", colors, alphas, ratios, matrix);
    moveTo(100, 100);
    lineTo(100, 300);
    lineTo(300, 300);
    lineTo(300, 100);
    lineTo(100, 100);
    endFill();
}
The fillType can be set to either linear or radial. These gradients are just like the gradients you can create with the tools in the authoring environment. A linear gradient transitions from one color to another in one direction, and a radial gradient transitions out from a central point.
The colors parameter holds an array (a list of values) of RGB hex color values for the gradient. You can use several different colors in one gradient fill.
The alphas parameter is also an array. This one holds the alpha values for the corresponding colors in the colors array. As with other alpha properties, each value can range from 0 to 100. There must be an alpha setting for each color in your colors array. For example, if you have three color elements, you must have three alpha elements.
The ratios parameter is an array that holds color distribution ratios for each color in the colors array. It sets the width of color that is rendered as a solid color before the transition to the next color begins. For example, you may want a span of solid red before the gradient starts to transition into orange. Values for these widths can range from 0 to 255. There must be a ratio value for each color in the colors array.
The matrix parameter is an object (like ratios is an array). It holds the matrixType, x, y, w, h, and r properties.
endFill()
The endFill() method closes the fill command for either beginFill() or beginGradientFill(). If you are drawing several shapes into a single movie clip, be sure to use the endFill() method before using another beginFill() or beginGradientFill() to change the fill color. Although it is not required, it is good practice to close every fill with the endFill() method.
The syntax is as follows:
myshape.endFill();
Now that you have been introduced to the methods of the Flash Drawing API, you can see how to put them together to draw a line. For each step of the process, an analogy to drawing with pen and paper is provided.
Here are the steps to draw a line:
Create an empty movie clip (get a piece of paper):
this.createEmptyMovieClip("myline", 100);Create a style for the line (pick up a pen):
myline.lineStyle(2,0x333366, 100);
Set the starting point for the line (set the pen down on the paper):
myline.moveTo(0,0);
Set the end point for the line (drag the pen across the paper and stop):
myline.lineTo(30,30);
Add as many lineTo statements as you want.
Now that you’ve mastered drawing a straight line with the drawing API, it’s time to throw you a curve. The process is much the same except that you use the curveTo() method instead of the lineTo() method.
Here are the steps to draw a curved line:
Create an empty movie clip:
this.createEmptyMovieClip("mycurve", 100);Create a style for the curved line:
mycurve.lineStyle(2,0x333366, 100);
Set a starting point for the curved line:
mycurve.moveTo(100,100);
Set the end point (the curve’s anchor point) and control point for the curve:
mycurve.curveTo(200, 30, 300, 300);
Drawing a shape involves drawing a series of straight or curved lines with the last line ending at the same coordinates where the first line began (closing the shape).
Here are the steps to draw a shape:
Create an empty movie clip:
this.createEmptyMovieClip("myshape", 100);Create a style for the line and begin the fill:
myshape.lineStyle(2,0x333366, 100);
myshape.begingFill(0x003366, 80);
Set the starting point:
myshape.moveTo(2,2);
Sequentially set the end points for each line or curve in the shape’s line path:
myshape.lineTo(88,2);
myshape.lineTo(88,88);
myshape.lineTo(2,88);
Return to starting point to close the shape:
myshape.lineTo(2,2);
myshape.endFill();
Flash offers two ways to create animations: by drawing the keyframe content “by hand” in the authoring environment or by drawing the frame contents with ActionScript. Even better, you can combine the two approaches as best suits your project needs.
Chapter 10 covered Flash animation basics. Recall that with tweens, you can set the starting point and destination of a symbol instance, and then have Flash “tween” the intermediate frames. You can do much the same thing with ActionScript with the help of the onEnterFrame method of the movieClip object. Anything within an onEnterFrame method executes on every frame. It’s a continuous loop.
The syntax is as follows:
my_mc.onEnterFrame = function() {
    // your statements here
}
To stop an onEnterFrame loop, you must remove the onEnterFrame with the delete operator.
For example,
//An onEnterFrame loop, that counts to 20 and stops
this.i = 0;
this.onEnterFrame = function(){
    i++;
    trace(i);
    if(i>=20){
        delete this.onEnterFrame;
    }
}
With this approach, you can also move the movie clip holding your shape across the stage and stop it when it reaches a certain position.
// move myShape, until it's x-coordinate >= 600
myShape.onEnterFrame = function(){
    this._x += 10;
    if(this._x >= 600){
        delete this.onEnterFrame;
    }
}
As you’ve seen in the previous example, you can essentially program your own motion tweens with ActionScript. You can also program your own shape tweens with the drawing API. Rather than draw in your clip, and then move the clip, you can redraw the line into a new shape and position repeatedly with an onEnterFrame loop. The object stays in one place, but its shape changes. This is analogous to shape tweening.
You can think of your movie clip as a sticky note with your drawing on it. Programming a motion tween is like asking an assistant to move that sticky paper to a specific point at regular time intervals. Programming a shape tween is like asking the same assistant to leave the sticky note where it is while erasing and redrawing the picture a little differently at regular time intervals.
The following code draws a slowly growing shape. When new lines are drawn, the previously drawn lines remain visible. To create a line that slowly stretches, insert a this.clear() statement just above the lineStyle() statement. This way, instead of adding additional lines, you replace the previous line.
this.createEmptyMovieClip("mycurve", 100);
// save starting x-coordinate for curve control point
mycurve.controlX:Number = 200;
// stretch curve toward new control point
mycurve.onEnterFrame = function(){
    var x:Number = this.controlX++
    if(this.controlX <=400){
        this.lineStyle(2,0x333366, 100);
        this.moveTo(100,100);
        this.curveTo(x, 30, 300, 300);
    } else {
        delete this.onEnterFrame;
    }
}
You can modify this code so that the line stretches when the user moves the mouse. Now the curve is redrawn when the mouse is moved and stops when the mouse is still.
// save starting x-coordinate for curve control point
mycurve.controlX:Number = 200;
// stretch curve toward new control point
mycurve.onMouseMove = function(){
    var x:Number = this.controlX++
    this.clear();
    this.lineStyle(2,0x333366, 100);
    this.moveTo(100,100);
    this.curveTo(x, 30, 300, 300);
}Why doesn’t my line show up at run-time?
Make sure that you define the lineStyle before starting your drawing. Until you define a linestyle, it is undefined and the subsequent lines will not be drawn.
Why is my symbol moving in the wrong direction?
Check the sign of the coordinates you’re using. The Flash stage coordinate system has the y-axes positive in the downward direction. A negative _y is located above the stage, and a negative _x is located to the left of the stage.
Why is my fill color not working?
Check to make sure you closed the shape by returning to your starting point when drawing the lines of your shape.
Why does my line start from the upper-left corner?
Make sure to start with a moveTo() statement before using lineTo() or curveTo(). The starting point of a line or curve defaults to (0,0) if you don’t use moveTo() to set another starting point.
Why is my gradientFill not showing up?
Make sure you have all parameters of beginGradientFill() set properly. Any missing properties of the matrix object can cause the method to not function. Check to make sure that you have the same number of elements in the colors, alphas, and ratios arrays. Make sure that you have set the fillType parameter to linear or radial.
Normally it’s best to avoid the with statement. However, it can help make your code more readable when you use the drawing API. For example, consider the following:
this.attachMovie("myBox", "box", 1);
myBox.lineStyle(1, 0x669999, 100);
myBox.beginFill(0x336666, 80);
myBox.moveTo(0,0);
myBox.lineTo(100,0);
myBox.lineTo(100,100);
myBox.lineTo(0,100);
myBox.lineTo(0,0);
myBox.endFill();
Contrast that with the following:
this.attachMovie("myBox", "box", 1);
with (myBox){
    lineStyle(1, 0x669999, 100);
    beginFill(0x336666, 80);
    moveTo(0,0);
    lineTo(100,0);
    lineTo(100,100);
    lineTo(0,100);
    lineTo(0,0);
    endFill();
}
Another option for making this code more readable is to use a local variable (a variable whose scope is available only in the parent timeline) to refer to the new movie clip. Consider the following example:
var b:MovieClip = this.attachMovie("myBox", "box", 1);
b.lineStyle(1, 0x669999, 100);
b.beginFill(0x336666, 80);
b.moveTo(0,0);
b.lineTo(100,0);
b.lineTo(100,100);
b.lineTo(0,100);
b.lineTo(0,0);
b.endFill();