
In this chapter
Object-oriented programming (OOP) is sometimes shrouded in mystery and mysticism. You might have encountered phrases such as “the zen of OOP.” But when you get right down to it, OOP is just a way of organizing code. I’d even go so far as to say that it’s the best way to organize complex or large projects.
Chapter 11, “Introducing ActionScript,” covered simple datatypes in Flash. Variables are containers, and datatypes are a way to say what kind of data can be stored in that container. A variable with a number datatype holds a number, a string holds a string of characters, and an array holds a list of strings, numbers, or objects.
Each datatype has certain properties and methods unique to its type. For example, a number can hold numerical values and have mathematical methods applied to it. A class defines a datatype.
When we start discussing objects, things start getting more interesting. An object can hold properties, which are simply variables of a datatype (the object container holds the variable container). Objects can also hold another complex datatype called functions. In Chapter 11, functions were defined as encapsulated segments of code with a single set of functionality. They are “run” when called by name in another section of code. When functions are stored in an object, they are called methods.
So how do you organize code differently when you work with ActionScript 2.0 and object-oriented programming in Flash? When Chapter 11 introduced ActionScripting, you learned to look at variables and functions as ways to organize your code. Now you’re ready to move to a more sophisticated organizational structure where all of your code is stored in objects, which are simply containers of containers.
However, before you can create an instance of an object, you must have a class. A class describes an object as well as what properties and methods belong to that object. It can be one of the built-in classes, such as Math, or a custom class that you write yourself. In either case, a class is a datatype that describes all the properties and methods that are available to be applied to an object created from the class description.
You can think of a class as the blueprint for an object. Just as many buildings can be constructed from the same set of blueprints, multiple objects can be described by a single class. It is important to understand that all datatypes and objects in Flash are class-based. The MovieClip object, Date object, Array object, Math object, and even the Object object are all based on classes that are built into Flash. For a complete list of all built-in datatypes (classes) available to you in Flash, go to the Action panel and choose Types from the left Action listing.
To continue the blueprint metaphor, a class in and of itself isn’t a very useful thing until you begin creating object instances of that class. There are several ways to create an object instance of a particular class. For example, instances of the built-in MovieClip class can be created at author-time if a shape is converted into a movie clip symbol on the stage. They can also be dynamically created during run-time. There are methods designed specifically for this purpose.
As mentioned, you can create a new instance of a MovieClip object either manually (on the stage or in the library) or programmatically. You can use the following MovieClip methods to create a MovieClip instance with ActionScript:
this.attachMovie()—Grabs a movie clip from the Library.this.createEmptyMovieClip()—Creates a new blank movie clip.this.duplicateMovieClip()—Duplicates a movie clip instance already on Stage.
There might be times when you want to access a class property or run a method without going through an instance of its class. Examples of built-in classes that you might want to access in this way include the Math, Date, and Mouse classes. You’re not creating multiple instances of Mouse, but directly communicating with a single Mouse object.
For example, imagine you want to position a movie clip named dot_mc at a specific distance from the center of a circle. In the following code, the cos and sin Math methods are used with the PI Math property in a formula to determine the position of the dot:
dot_mc._x = 100 * Math.cos(45 * Math.PI/180) + 200;
dot_mc._y = 100 * Math.sin(45 * Math.PI/180) + 200;
The Math object has many other useful methods that you can access directly, without having to create an instance of the Math class. These include Math.random(), Math.cos(), and Math.pow().
The Mouse object also has methods that you can access directly without creating an instance. These deal with making the mouse pointer visible in the Flash movie. By default, the mouse pointer is always visible in a Flash movie. To hide the mouse pointer, call
Mouse.hide();
To show the pointer again, call
Mouse.show();
Most of the time, you use a constructor function to create a new instance of a built-in class. To instantiate these classes, use a constructor function that consists of the instance name, the new keyword, and the name of the class from which you are creating an object. In the following syntax statement, Datatype is the same as the Class.
var instanceName:Datatype = new Class();
This should become clearer as you look at the following examples:
// create an instance of the Array object
var myList:Array = new Array();

//create an instance of the  loadVars object
var partyData:LoadVars = new LoadVars();

// create an instance of the  Number object
var oneHundred:Number = new Number(100);
Now that you have an idea of how the constructor function works you can explore an example more fully. Imagine you’re building an application that helps people organize parties. One of the many details the host needs to keep track of is the guest list. Each guest has individual information. You can create an instance of the Object datatype to hold that information.
var guest:Object = new Object();
After you create your instance, you can then use the dot syntax to start adding properties with values to be stored by the object instance.
var guest:Object = new Object();

guest.name = "Julie Smith";
guest.address = "123 Anystreet";
guest.age = 6;
guest.favoriteFood = "pasta";
guest.likesMushrooms = False;
You can also create object instances for Array and Object objects by using a shortcut called literals. In the following examples, you can see that an Array object uses square brackets to enclose its elements. The Object object uses the names of the properties, followed by a colon, to organize its data.
var my_menu:Array = new Array(); //uses the constructor function
var my_menu:Array = ["eggs", "ham", "beans"]; //use the array literal syntax

var guest:Object = {
        name:"Julie Smith",
        address:"123 Any Street"
}//object literal
Learning how to use the built-in classes that ship with ActionScript can help you understand classes in Flash, but you’re not limited to them. You can also create your own custom classes.
Until this point, you’ve been saving your projects as .fla files and going back and forth between the timeline, the stage, the Actions panel, and other panels in the Flash authoring environment. Now you’ll see a different kind of document—the ActionScript (.as) file. An .as file is a text file that has a specific organized structure and holds only ActionScript code. It can be created either in the Flash authoring environment or in an external editing program.
Custom classes are saved in their own .as files. You can then use your custom classes just as you use the built-in classes. You can save custom classes in any location on your hard drive you wish, but for Flash to find these files when they’re referenced from another file, you need to set the classpath. The classpath is a list of folders where Flash looks for external .as files.
To create a new .as file, go to File, New. This brings up the New Document dialog box. Select the General tab if it is not already selected to see a list of options. Select the ActionScript file option and click the OK button to create an .as file. You can now save this file to a location in your project directory for easy access.
Flash doesn’t automatically know where you keep your .as files. Because they are external files, much like external image files, you have to tell the compiler where to look for them. Use the following steps to set a classpath:
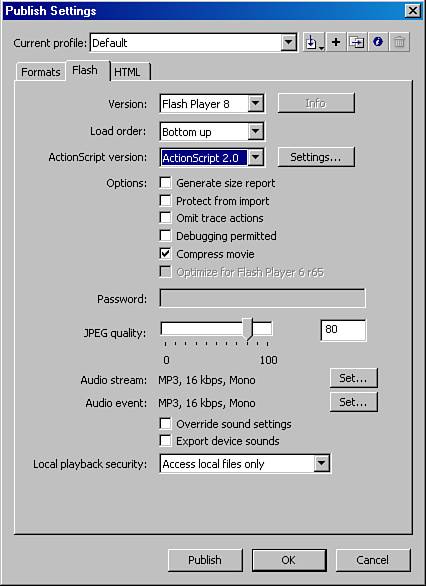
Select File, Publish Settings to open the Publish Settings dialog box.
Click the Flash tab (see Figure 13.1).
Make sure that ActionScript 2.0 is selected in the ActionScript Version pop-up menu.
Click on the Settings button. This brings up a panel for ActionScript 2.0 settings (see Figure 13.2).
Set the Export Frame for classes in this file. The default is the first frame.
Select (or create) a folder on your system as a classpath.
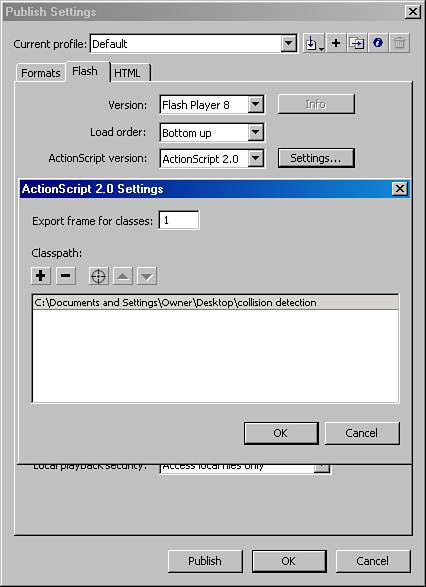
To delete a folder from the classpath, select the path in the Classpath list and click the Remove from Path button.
Tip
As you work on more projects in Flash, you might develop an extensive library of custom classes and their .as files. You can keep them organized by project, by common classes, or any other way that works well for you. You might find it useful to keep them in a place that is easy to find on your system. I keep my .as files, organized by project, in a directory that is easy for me to find and frequently save a backup copy of it.
The ActionScript code in a class is organized into a specific structure. Each class file has a filename (which is the same as its class declaration), and consists of a class declaration, variable declarations, a class constructor, and class methods.
It’s good practice to begin your class file with a comment block that gives the class name and purpose, author name and contact information, initial authoring time, and revision notes and dates, as shown in the following example:
/*
Class Name
Author Name/Contact
Initial Author date/Revision date
Notes:
*/
The class declaration is simply the class keyword followed by the class name:
class myClass{ . . . }The first elements to add inside the class declaration are the variable declarations (note that new code has been shaded):
class myClass {
    // declare class variables
    var my_var1:Number;
    var my_var2:Srting;
    . . .
}
Next, add the class constructor. This defines what properties an instance of your class will have when it’s created. If the constructor is empty, no initial properties are defined for the class:
class myClass {
    // declare class variables
    var my_var1:Number;
    var my_var2:String;

    //class constructor
    function myClass(){
    }
. . .
}
Finally, write the methods for the class:
class myClass {
    // declare class variables
    var my_var1:Number;
    var my_var2:Srting;

    //class constructor
    function myClass(){
    }

    //methods
    function myMethod(){
        //do something here
    }

}
Earlier in this chapter you saw the creation of an instance of the Object class named guest. We can also create your own custom class for that project.
First, declare the class. When you create a new class, it is usually a good idea to use comments to outline the code you’ll be writing. That is what is also done here, as shown in the following example:
class Guest{
    // declare variables
    //class constructor
    // define methods
}
Earlier in this chapter, an instance of the Object class was created and given an instance name of guest. In the same statement, properties of that instance were simultaneously declared and assigned values. Now that you are creating a custom class, you must first declare the properties, separately from assigning values to them:
class Guest{
    // declare variables
    var name:String;
    var address:Object;
    var age:Number;
    var favFood:String;
    var likesMushrooms:Boolean;

    //class constructor

    // define methods
}
Next, add the class constructor to the comment outline. The class constructor is similar to the functions you’ve seen in other chapters except that only properties are defined inside the curly braces. These properties are applied to each instance of your class at initialization (when the instance is created). When you create an instance of your class, you can pass values for its properties, as arguments, to the class constructor.
Take a look at the following code—specifically, the code below the //class constructor comment. First, the function keyword is used, followed by the name of the class, to signal to the compiler that this is the class constructor. Then, the parameters (property values) are listed between the parentheses. These are similar to the variables that you can pass to a function. Within the curly braces of the constructor you can assign the values of the variables you passed to the constructor as values for the properties of the class.
class Guest{
    // declare variables
    var name:String;
    var address:Object;
    var age:Number;
    var favFood:String;
    var likesMushrooms:Boolean;

    // class constructor
    function Guest(cNname, cAddress, cAge, cFavFood, cMush){
        name = cName;
        address = cAddress;
        age = cAge;
        favFood = cFavFood;
        likesMushrooms = cMush;
    }

    // define methods
}
Finally, define methods for the class. People can be fickle, and favorite foods can change. The getFavFood method can be used to return the favorite food of a guest by returning the current value of the instance’s favFood property. The setFavFood method enables you to change the value of the guest’s favFood property by passing a new value for it through the function argument (between the parentheses).
class Guest{
    // declare variables
    var name:String;
    var address:Object;
    var age:Number;
    var fav_food:String;
    var likesMushrooms:Boolean;

    // class constructor
    function Guest(g_name, g_address, g_age, g_fav_food, g_mush){
        name = g_name;
        address = g_address;
        age = g_age;
        fav_food = g_fav_food;
        likesMushrooms = g_mush;
    }

    // define methods
    function setFavFood(food){
        favFood = food;
    }

    function getFavFood(){
        return favFood;
    }
}After you create a custom class, you always use a class constructor statement to create an instance of the class. The syntax for creating an instance of a class is as follows:
// create a new Dinner instance
var myDinner:Dinner = new Dinner();
You can use the class in any ActionScript, including an .fla file or another .as file. To make a custom class accessible from another file, you must use the import statement at the top of the code in that file. For example, to use the Guest class in an .fla file, type the following code into the first line of the Actions panel:
import Guest;
Defined classpaths tell the compiler where to look for the class, but if you create folders within that destination and place the class file inside a subdirectory, you must specify the name of that subdirectory in the import statement. For example, if you have a common classpath to all your .as files, and within that folder you have a folder for a project named DinnerParty, you would use the following import statement:
import DinnerParty.Guest;
Continuing with the custom Guest class just created, the following is an example of creating a Guest instance. To make the code easier to read, assign the values to local variables, and then pass these through to the class constructor.
// set up local vars to hold the values we'll pass to the class constructor
var cName = "Jill Smith";
var cAddress = new Object;
    cAddress.street = "123 anystreet";
    cAddress.city = "anytown";
    cAddress.state = "home state";
    cAddress.zip = 22222;
var cAge = 3;
var cFaveFood = "mac and cheese";
var cMush = false;

// create a new instance of the Guest object
var guest1:Guest = new Guest(cName, cAddress, cAge, cFavFood, cMush);
When you have an instance, you can invoke a method from its class. For example, you can now reset a guest’s favorite food to risotto. To use the class in another class, or an .fla, you must use the import command. If the Guest class was saved in a folder named dinnerParty, you’d use the following line to import it:
import dinnerParty.Guest
From anywhere in the file into which the class has been imported, including from an .fla, you can now use the following code:
//change guest's favorite food to risotto
guest1.setFavFood("risotto");
Now, although you’re not likely to edit code to change a dinner guest’s favorite food, you could use a class like this along with database management classes as part of an event-planning application. This isn’t a tutorial section, but I hope that this concrete example makes it easier for you to understand how to construct your own classes.
When working with class-based programming, you will most often use classes to define objects of which you will later create instances. Their properties and methods cannot be called directly, like a function, but must be accessed through an instance of the class.
However, you may want to use a method or property without creating an instance of its class. When working with your own custom classes, use the static keyword to declare a property or method that you want to use outside of a class’s instance. ActionScript has several built-in static methods, such as Math.random and Math.cos. To use these methods, you don’t create an instance of the Math object. You just call them directly. For example, the following code sets a variable to be equal to the cosine of 20:
var cosTwenty:Number = Math.cos(20);
By default, class methods and properties are public. Public properties and methods can be accessed from outside the class that defines it. For example, after an instance of Guest is created, you can call the setFavFood method for that instance:
guest1.setFavFood("pizza");Private properties and methods, which are defined with the private keyword, can be accessed only from within the class. For example, you might use a private property when using Flash as the user interface to a database application. If you store the data for your guests in a database, each guest’s record has a unique ID number. This isn’t relevant information for the user interface, but it is important for passing information to the database.
private var guestID:Number;
Although you might not use the static and private keywords often, they will come in handy as you continue to develop applications with class-based ActionScript.
Superclasses and subclasses come into play only when you borrow code from one class to run in another related class. The terminology can be confusing, so take a look at an example.
Imagine that you want to generate a random pair of numbers. You can create a class for this purpose, and then when you create an instance of it, you can invoke a method that generates a pair of random numbers.
class RandomPair{
    // declare variables
    var num1:Number;
    var num2:Number;

    // class constructor
    function RandomPair(){
    }
    // define methods
    function getRandomPair(){
        num1 = Math.random();
        num2 = Math.random();
        var pair:Array = [num1, num2];
        return pair;
    }
}
What if you need a pair of random numbers within a narrow range? You can create a subclass (RangeRandomPair) that extends the methods of the RandomPair class. The RangeRandomPair subclass has a method that calls the method from the superclass and tests the results to see whether the numbers are within the range you need. If the numbers don’t meet the requirements, the internal superclass method is called again.
class RangeRandomPair extends RandomPair{

    // declare variables
    var upperLimit:Number;
    var lowerLimit:Number;

    // class constructor
    function RangeRandomPair(upperLim, lowerLim){
        upperLimit = upperLim;
        lowerLimit = lowerLim;
    }

    // define methods
    function getPair(){
        var n1 = super.getRandomPair();
        var n2 = super.getRandomPair();
        if(n1 <= upperLimit && n1 >= lowerLimit
                && n2 <= upperLimit && n2 >= lowerLimit){
            // numbers are both within range, return them
            var pair:Array = [n1, n2];
            return pair;
        } else {
            // numbers are not within range, try again
            this.getPair();
        }
    }
}
Although this case can be handled within a single class, this example should help illustrate the superclass and subclass relationships. Any class can be a superclass, and you can have a chain of superclass-subclass relationships. A subclass extends the code of a superclass to create a more specialized object.
To create a subclass of another class, use the extend keyword with the following syntax:
class SubClass extends SuperClass{
    . . .
}
Now that you’ve started to create relationships between classes and build structures of code, it’s time to move on from class-based systems to explore the use of OOP logic to control events in movies.
When you press a mouse button, that’s an event. When an image finishes loading onto the stage, that’s an event. An event handler triggers actions the programmer wants to occur when an event occurs during run-time. Chapter 11 explored simple event handlers for Button and MovieClip objects. Now, as you explore class-based logic, it’s a good idea to look at object listeners and ways to extend the functionality of the built-in event handlers for MovieClip objects.
You will normally encounter two main types of events in Flash: system events and user input events. System events are generated by the Flash movie and include events such as when data finishes loading or when the movie playhead reaches a particular frame. User input events are generated by the user, such as when the user releases the mouse or a key.
User input events can be “listened” to and acted upon in ActionScript. Several objects can have listeners: Key, Mouse, MovieClipLoader, Selection, Stage, and TextField. An advantage to using listeners is that you can add multiple listeners to the same event.
To use a listener, you must first define a method that will be called when the listener object detects an event. Next, you assign the method to the event handler for that object. And finally, you add the listener to an object that has listener event handlers. What this does is extend the types of events to which a particular object can respond.
For example, imagine that you want the user to use the keyboard to control the movement of a spaceship in your movie. The spaceship instance, which is an instance of the MovieClip class, needs to “listen” to the keyboard and respond to an event generated by the user with the keyboard. To do this, you need to register the spaceship movie clip as a listener for the Key class, as shown in the following example:
function myOnKeyUp(){
    trace("key up");
}
function myOnKeyDown(){
    trace("key down");
}

spaceship.onKeyUp = myOnKeyUp;
spaceship.onKeyDown = myOnKeyDown;

Key.addListener(spaceship);You can make your code more general and reusable by using the this keyword. It refers to the object or movie clip instance that contains it. When a method containing this is called, a reference to the object that contains the method is saved in this.
It’s especially useful when dynamically attaching functions to a movie clip. Imagine that you want to make your spaceship move 10 pixels per frame while a key on the keyboard is pressed. Because the myOnKeyDown function has been attached to the spaceship movie clip, myOnKeyDown is a method of the spaceship object and this refers to the spaceship. You can add this._x +=10; to that function to have it execute when the user holds the key down, as shown in the following example:
function myOnKeyUp(){
    trace("key up");

}

function myOnKeyDown(){
    trace("key down");
    this._x +=10;
}

spaceship.onKeyUp = myOnKeyUp;
spaceship.onKeyDown = myOnKeyDown;
Key.addListener(spaceship);If you want the spaceship to stop moving when it reaches a certain position on the stage, you can add a conditional to the myOnKeyDown function that tests whether the spaceship movie clip’s x position is less than or equal to 300. If the condition is met, the spaceship keeps moving while the key is pressed. However, if the spaceship reaches its destination, its onKeyDown method is deleted and it no longer responds to the keyboard and stops moving.
function myOnKeyUp(){
    trace("key up");

}

function myOnKeyDown(){
    trace("key down");
    if(this._x <= 300){
        this._x +=10;
    } else {
        delete this.onKeyDown;
    }
}

spaceship.onKeyUp = myOnKeyUp;
spaceship.onKeyDown = myOnKeyDown;
Key.addListener(spaceship);
Another way to stop the spaceship from moving is to remove its listener, as shown in this example:
function myOnKeyDown(){
    trace("key down");
    if(this._x <= 300){
        this._x +=10;
    } else {
        Key.removeListener(this);
    }
}Why is my date off by a month?
The Date object parameters start counting at zero, so January is represented by 0 and December by 11. Check that the number you used to represent the month is set correctly.
I’m trying to set a classpath, but the Settings button is faded and it doesn’t respond.
Make sure you have the ActionScript version set as 1.0 or as 2.0. To set a classpath, you must be using ActionScript 2.0.
I get an error when I test my class, which defines a static property in the class constructor.
The class constructor is for setting up the properties that an instance of your class will have. Because a static property is called without an instance of its class, it cannot be defined in the class constructor. Instead, declare a static property where you declare all the variables in your class, but use the static keyword. You can also assign it a value in the same statement.
I called a method from the superclass of my subclass, but it’s not executing.
Check that you placed an import statement at the beginning of your subclass and that you included the extends keyword in your class declaration. Additionally, make sure that you use the super keyword when calling the method from your subclass.
Well-organized code is especially important when working with class-based programming. Be sure to use comments to give visual structure to your document as well as to explain the code.
Just as you organize lines of code into logical groups as functions, you should organize your classes into logical groups of methods and properties. If you find yourself scrolling through pages of code for a single class, this could be an indication that you should rethink your code organization. Look for ways to encapsulate the code into smaller classes that you can use together.