
In this chapter
Before you can begin developing your pages in Dreamweaver, you need to set some parameters regarding the location of your files, the primary file platform in which you will be working, and the location of the testing server (if any). This process, known as defining your Dreamweaver site, helps Dreamweaver ensure that your hyperlinks function properly and that code generated by the application is created in the correct language.
Dreamweaver uses the concept of the site to organize the files in your website into a logical structure so that it can understand the relationships between the files as well as the objects that are contained within those files. For instance, to ensure that you don’t have any broken images in your pages, Dreamweaver needs to know where you will be locating your images so it can ensure that that a proper path is created to an image when it is inserted into your page. Other functionality, such as database connections and cascading style sheets, also rely on the site structure.
In addition, defining your Dreamweaver site enables you to more easily manage the pages, assets, and objects that make up your site. Then, as the number of sites you manage grows, you can easily switch between the sites and Dreamweaver will automatically adjust its configuration based on the settings for each specific site.
Note
To develop in Dreamweaver, you don’t necessarily have to have a remote host or even a web server set up. While you are developing, you can use your local workstation as a testing machine. The only exception is users with the Windows XP Home Edition operating system. This version of the software does not contain built-in web services and, therefore, cannot serve web pages.
The first step in creating your local Dreamweaver site is to create the folder structure that will store your files, images, media files, and supporting documents such as PDF files. Depending on the operating system you are using, you need to create a new folder in the root directory of your web server. If you have already worked through the Fireworks section of this book, you probably have already created a folder called retroscycles in the WWWRoot folder on your hard drive. If you skipped ahead to the Dreamweaver section, now would be a good time to create the retroscycles folder.
After your directory structure is in place, the next step is to define your Dreamweaver site. To define a site, open Dreamweaver and choose Site, New Site from the menu bar. Through the Site Definition dialog box, as shown in Figure 23.1, Dreamweaver offers a basic option and an advanced option for creating a site.
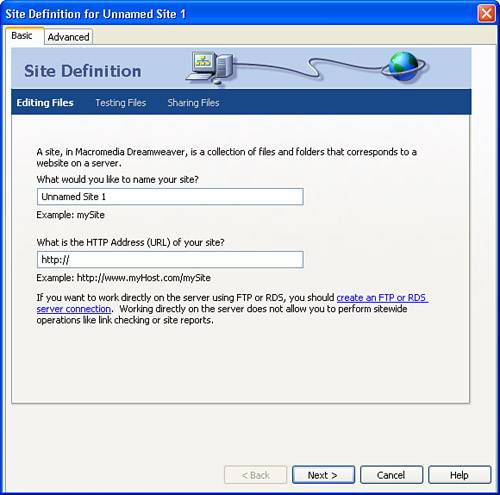
Figure 23.1. The Site Definition dialog box offers a basic and advanced option for defining your site.
The basic option is a simple wizard that asks you to complete questions that provide the bare essentials of information needed to create a Dreamweaver site. In the majority of cases, the information collected by the basic view is enough to begin development work. If you find yourself needing to configure additional features such as cloaking (discussed later in this chapter) or Design Notes, you can use the advanced feature to customize additional site settings.
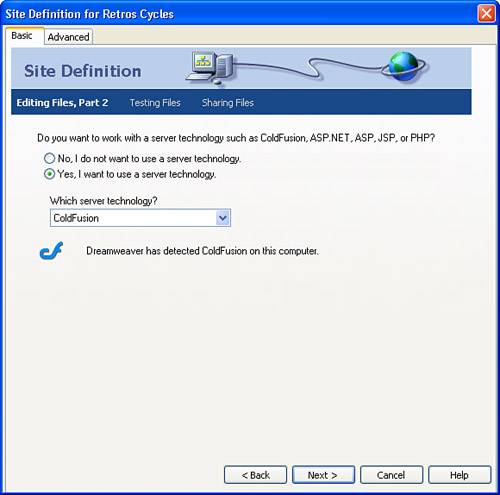
Using the Basic tab, type Retros Cycles as the name for your new site and then type http://localhost/retroscycles as the HTTP address for the site if you are using IIS as your web server or http://localhost/retroscycles:8500 if you are using Coldfusion as your web server. Using the localhost address enables you to test your pages on your local workstation. After you name your site, click the Next button. The next step in defining your site is to choose whether or not you intend to use a server technology to create database-driven pages. This example leverages the ColdFusion platform, so choose the Yes, I Want to Use a Server Technology radio button and then select ColdFusion from the drop-down menu that appears (see Figure 23.2). Click the Next button to continue.
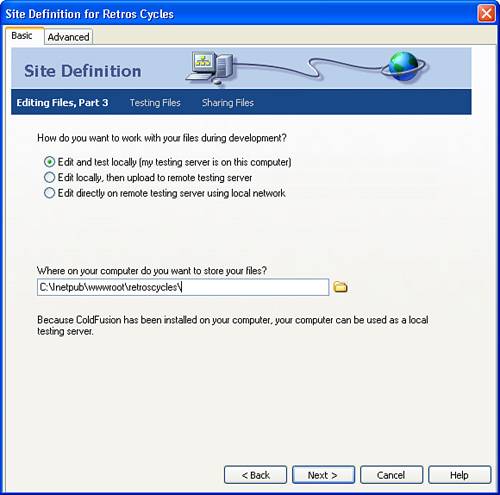
The next step is to determine whether you will be developing and testing your pages on the local workstation, testing them locally and uploading them to a server, or creating and testing the pages directly on a server. In this case, the pages are created locally and tested on the local workstation, so select the first radio button and type the path (or browse) to the retroscycles folder you created on your local workstation (see Figure 23.3). Click the Next button.
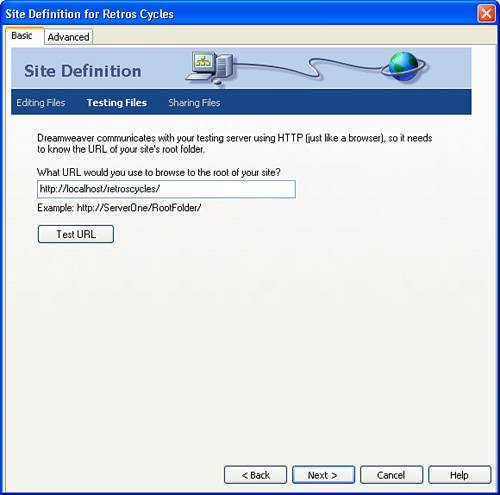
As shown in Figure 23.4, Dreamweaver asks you to confirm and test the URL that will be used to test your pages. Click the Test URL button. If you typed your URL correctly, you receive a confirmation that the URL test was successful. Click the Next button.
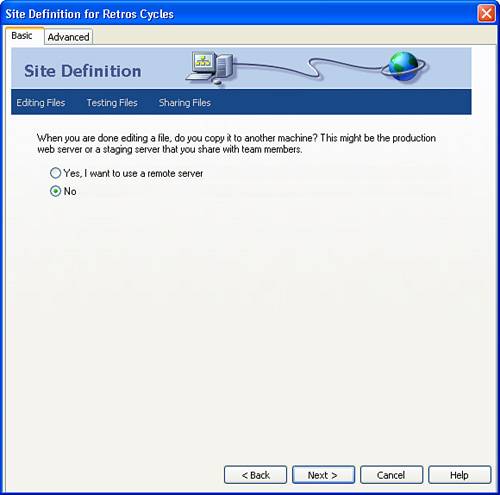
If you plan on copying your files to another server for production, the next step is to identify how Dreamweaver should access that server. Dreamweaver is capable of transferring files via FTP, across a local area network, via WebDAV, via RDS, and through Microsoft’s Visual SourceSafe. The remote connectivity options are covered a little later. For now, choose the No radio button to indicate that you won’t be using a remote server (see Figure 23.5). Click the Next button.
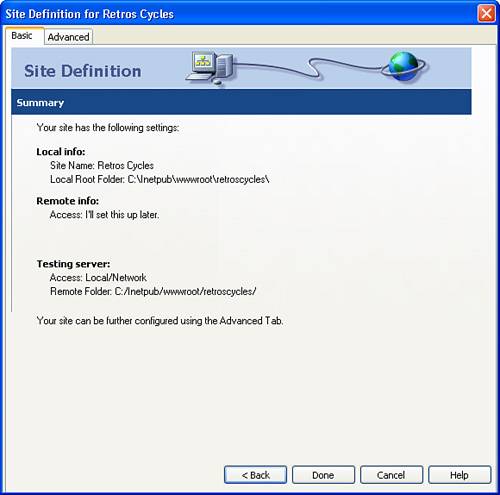
With the necessary settings established, Dreamweaver next supplies the basic summary of the site that you have created (see Figure 23.6). If any of the settings do not appear correct, you can click the Back button to progress backward through the steps to make corrections. To complete the site, click Done.
Note
You can always go back and edit the site in either basic or advanced mode if you find that you need to adjust fields or preferences. To access the site, choose Site, Manage Sites from the main menu.
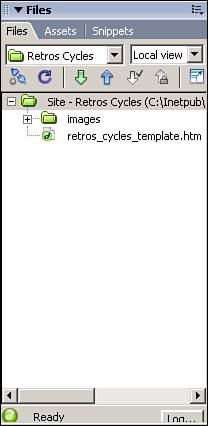
When the Dreamweaver site is completed, you can access the site files, images, and objects via the Files panel shown in Figure 23.7.
Now that you have your local site established, you might need to set up a connection to your remote server that enables you to transfer files between your local workstation and the server where your site is hosted. For instance, if Retro’s Cycles has a web host that allows FTP transfers, you can configure Dreamweaver to easily update the pages stored on the web server with the changes made on your local workstation. Some details about the various remote connectivity types are available in Table 23.1.
Table 23.1. Remote Information Options
To demonstrate how these types of connections are configured, let’s take a look at the FTP protocol because it is one of the most popular. To set up FTP, you need to obtain the following information:
FTP hostname
Login name (this is your user ID information)
Password (this is a password selected or provided to you by your service provider)
Any additional information provided by your service provider regarding required settings
Typically, your service provider configures your login to default to the remote root folder. This folder corresponds to the local root folder because it is the folder where the top-level documents and the subdirectories can be found.
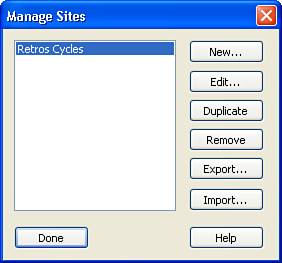
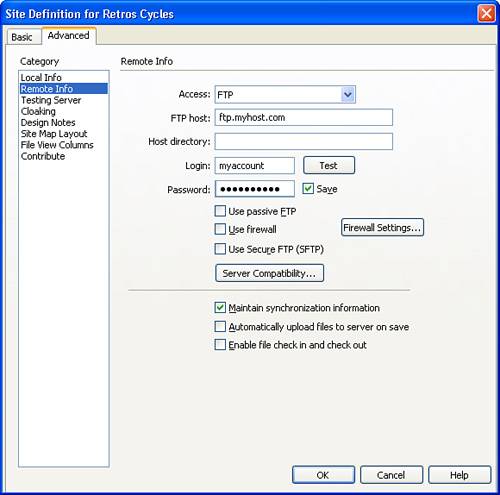
With your FTP information in hand, you can add FTP functionality to your site by choosing Site, Manage Sites from the menu bar. In the Manage Sites dialog box (see Figure 23.8), select the site to which you want to add FTP functionality and click the Edit button.
Next, click the Advanced tab and choose the Remote Info category, shown in Figure 23.9. Change the Access drop-down to FTP and enter the appropriate host information, login ID, and password. If your host requires additional settings, you can configure them via this dialog box as well.
Two other options on the dialog box are worth mentioning:
Automatically Upload Files to Server on Save—. If you check this option, Dreamweaver automatically transfers the site to the remote server whenever you save the site. Because this can actually upload files that are in the process of being edited, I don’t recommend choosing this option unless you are using an external versioning system such as SourceSafe.
Enable File Check-in and Check-out—. If you want to enable this feature, click once in the check box. The advantage of enabling this feature is that if multiple people are working on the site, Dreamweaver helps manage team files to prevent overwriting and the need for additional edits.
To complete the addition of FTP connectivity, click the OK button and Dreamweaver is configured for FTP access. However, because you probably don’t have an extra FTP host handy at this time, click Cancel.
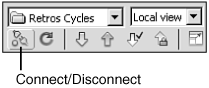
You can connect to and manage the files on your remote site by opening the Files panel (Window, Files), selecting your site from the list, and clicking the Connect button shown in Figure 23.10.
The cloaking feature is another site feature that can make managing your files easier in Dreamweaver. Cloaking enables you to choose which files are displayed in the Files panel and hide files that you wouldn’t necessarily use in Dreamweaver. For instance, when the site images for Retro’s Cycles were created in the Fireworks section, all the PNG files were also saved. Although it’s great to keep the PNG files for future editing of those images, they won’t be used in the Dreamweaver site, so it’s not necessary to display them in the Files panel.
Tip
If you are managing a team of developers, the cloaking feature is a handy tool to hide specific file types from the team members to prevent tampering.
To hide them, cloak them from view by opening the Manage Sites dialog box (Site, Manage Sites), selecting the Retro’s Cycles site, and choosing Edit. Switch to the Advanced view and select the Cloaking category shown in Figure 23.11.

To cloak a specific type of file, check the Enable Cloaking check box and then check the Cloak Files Ending With check box. Type .png in the text box to hide all PNG files and click OK. Dreamweaver re-creates the site cache and excludes all images ending with the .png extension.
After you have created a Dreamweaver site, you’re ready to begin adding pages to your site, editing their content, and (when necessary) deleting or renaming them. For the most part, Dreamweaver follows the same methods of managing documents as most of the popular word processors.
Creating a new document in Dreamweaver can be done in a variety of ways. When you open Dreamweaver, the welcome page (shown in Figure 23.12) offers you a quick way to create pages in some of the most popular formats with a single click.
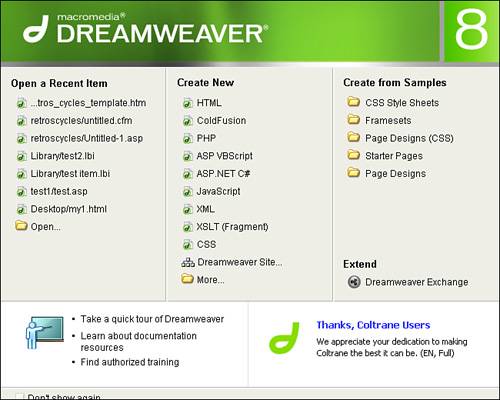
Figure 23.12. The Dreamweaver welcome screen provides you with links to create a variety of new documents.
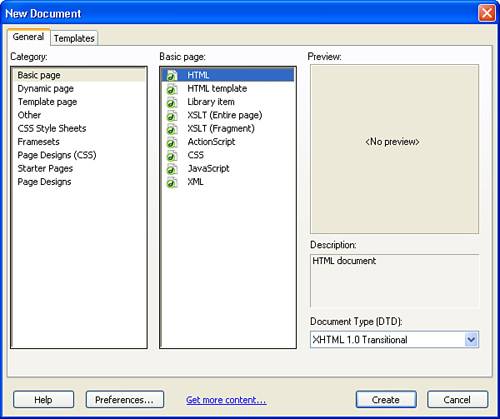
If you have disabled the welcome screen, you can create a new document by choosing File, New from the menu bar. In the New Document dialog box, shown in Figure 23.13, you can choose from the entire range of document platforms that Dreamweaver supports.
A third method of creating a new file is to click the menu button in the Files panel and choose File, New File. Rather than opening a new file, Dreamweaver simply adds a new untitled file to the list of pages in your site (as shown in Figure 23.14) using the default extension for the page (in this case .cfm). You can then open the file by double-clicking on it.

Whenever you modify a page, you’ll want to save the file. Dreamweaver enables you to save a file by choosing File, Save or File, Save As and selecting the appropriate location.
If you have multiple pages open in the Design view, you can also right-click on the page title tab and choose Save, Save As, or Save All to save all the active, unsaved documents.
As you are developing your site or reworking an existing site, you’ll find it necessary at times to duplicate a document to create a new document with similar content, rename an existing document, or delete documents that you no longer need. To do this, simply (Control-click) [right-click] the document in the Files window, choose the Edit submenu, and select the option to fit your needs (see Figure 23.15).
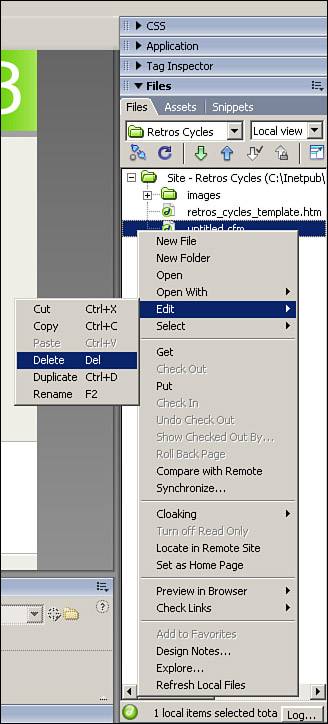
Figure 23.15. With the Site window open and a file selected, you can access a context menu with a variety of options, including Delete, Duplicate, and Rename.
To delete a file, select the Delete option from the context menu. A pop-up window asks whether you really want to delete the selected file. Click OK. The file is now deleted.
Caution
Be sure to always double check your files before you delete them. It’s frustrating to accidentally delete the fruits of your labor just because you didn’t open the file and check it first.
Note
When managing the documents in your site, consider archiving files rather than deleting them. A corollary to Murphy’s Law states that any time you delete a document, it’s likely you’ll need a block of code from it later. If you archive instead of delete, you maintain a copy that you can use down the road.
Duplicating files is particularly handy when you want to use most of the information in a given page but modify some content. You can duplicate the page you want, make modifications to the copy, and then rename the copy.
To duplicate a file, highlight the file to be duplicated in the Site panel. Then bring up the context menu and select Edit, Duplicate. A copy of the file immediately appears with the words copy of in front of the original filename.
To rename a file, bring up the context menu, select Rename, and enter the new name for the file.
To open an existing document located on your hard drive, begin by selecting File, Open. The Open dialog box appears. Browse for your file, highlight the file you want to open, and then click the Open button.
The file now opens and is available for your modifications.
You can also open documents from the Site panel by simply double-clicking the document you want to open.
As you work, you’ll occasionally find that you want to jot down information about the pages with which you’re working to remember later or to tell a co-worker about. Dreamweaver provides a handy tool called Design Notes that enables you to make notes for a page and save them to a separate file. You can also attach Design Notes to objects such as Flash files or applets, and you can use Design Notes in other programs such as Fireworks. Here, the focus is on attaching a Design Note to a new or an existing document. To add a Design Note to your page, be sure to save your page; then choose File, Design Notes from the menu bar.
In the Design Notes dialog box, shown in Figure 23.16, choose a status and type the corresponding note. If you want the note to be displayed whenever the file is opened, check the appropriate check box. If you choose not to check the box, each team member has to review the notes manually.
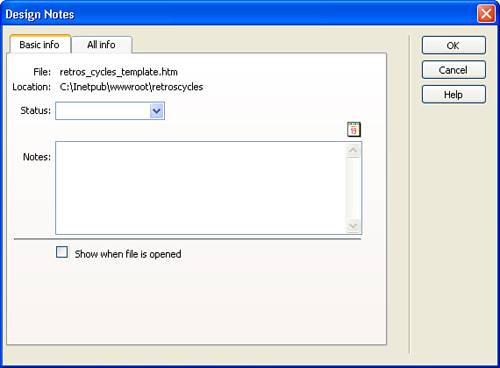
Figure 23.16. The Design Notes dialog box enables you to add notes to your pages to track changes or convey other information.
The file’s status can be marked as follows:
Draft
Revision 1
Revision 2
Revision 3
Alpha
Beta
Final
Needs Attention
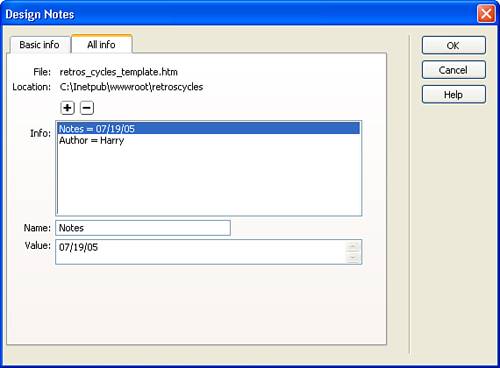
If you want the date to appear with your Design Note, click the Date icon above the Notes text box and Dreamweaver inserts a datestamp. You can also use the All Info tab within the Design Notes dialog box to add name and value pairs to the notes. So if you want to show that the author of the document is Harry, you can do so by clicking the plus symbol in the All Info tab and adding the name of author and the value of Harry (see Figure 23.17).
When you click OK, the Design Note is saved with the page.
You can view and edit your Design Note at any time by selecting File, Design Notes. When the Design Note appears, make modifications by using the Basic and All Info tabs. For example, if you want to remove a name-value pair entry, highlight it in the All Info tab and click the minus symbol.
Before you begin with the layout and content of your page, it’s a good idea to set up the foundation of your page, including elements such as the page title, style preferences, page margins, and backgrounds. Dreamweaver makes it easy to set these preferences through the Document toolbar and the Preferences dialog box.
Titling each page in your site is essential for several reasons. The page title is displayed in the browser window’s title bar and is used to do the following:
Denote bookmarks when a visitor bookmarks that page.
Provide a marker for a browser’s history feature.
Promote better accessibility by assisting site visitors with orientation—your page title helps visitors know where on the web they are, and specifically, where on your site they might be.
Label the page, should it be printed out.
The title is ASCII text that resides in the title container in the head of a web page. It can contain letters, numbers, and character entities as well as spaces.
Note
Although you can use character entities (such as and so on) in the title, you cannot use any HTML or XHTML itself. So, if you want to add quotation marks or a copyright symbol to your title, you can do so by using an entity. However, you can’t use any formatting such as bold or italic.
Whenever you create a new web page in Macromedia Dreamweaver, it has the default title of Untitled Document.
To change the page’s title, type the new name in the Title field in the Document toolbar, as shown in Figure 23.18.
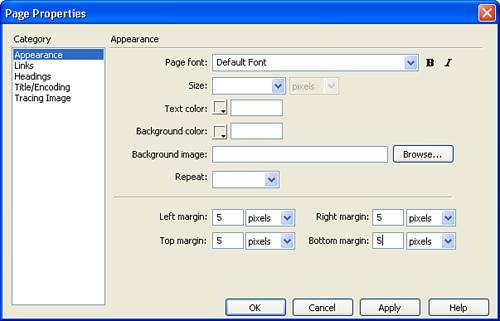
In addition to setting a page title, Dreamweaver enables you to easily customize other page properties. Through the Page Properties dialog box, you can establish elements such as text properties, link colors, page encoding, and much more.
Selecting the right background is important to the design process. You want to select a color that contrasts with the text (foreground) color so that reading is easier. If you decide to use a background image, use one that promotes readability, unless you are going for a completely visual effect.
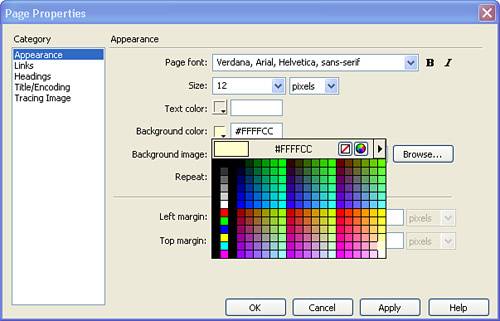
New Dreamweaver documents have a white background by default. You can set the background of the page by choosing Modify, Page Properties from the menu bar to open the Page Properties dialog (see Figure 23.19). In the dialog box, you can either type the hexadecimal color value for the background into the Background Color text field or use the color picker to select from the palette.
Using a background image can enhance the page both aesthetically and functionally, such as when using an image with a heavy transparency as a watermark for your page. However, selecting an inappropriate background can be distracting and cause eyestrain, especially if the site has a lot of text to read.
All background graphics tile by default (see Figure 23.20), which means that the background graphic, no matter how large or small in dimension, repeats horizontally and vertically across the page. So when you create it, consider how it will look when placed end-on-end in two dimensions.
To add a background to your page, open the Page Properties dialog box and click the Browse button next to the Background Image field. Locate the image that you would like to use and click OK. Click Apply and a link to the image is embedded in your code and the background displays in the page.
Caution
If the image file you selected is not within the current website’s local root folder, you are prompted as to whether you want to move a copy of the image file into the website. This is usually a good idea because it avoids the risk of forgetting to transfer the image when you upload the site.
If the image specified in the background URL does not exist, no image is displayed—not even a broken image icon—and the background color is used instead.
Page margins are considered to be the distance between the edge of the viewable area of the browser window and the HTML content within it. You can control the top, bottom, and both side margins by opening the Page Properties dialog box (see Figure 23.21) and typing the appropriate value in the margin field. Be sure that when you type the value, you also select the appropriate unit of measurement.
Although the color of your page text is entirely up to the design you choose and how it integrates with the color scheme of your site, text color is traditionally black for any text running longer than a few sentences. Black text on a white background provides the highest contrast possible and, arguably, is the easiest to read on screen and paper alike.
Of course, to create compelling designs, you might want to use other colors from your palette for the general text color. But remember that the higher the contrast between the text and the background, the more readability is enhanced. What’s more, visitors who are visually impaired (such as those who are color blind) might not be able to see certain colors or combinations of colors. Therefore, your knowledge of the potential audience as well as the intent of the site should help dictate your color choices.
To change the text color with the Page Properties window, adjust the Text color field by typing a hexadecimal value or using the color picker to choose a color.
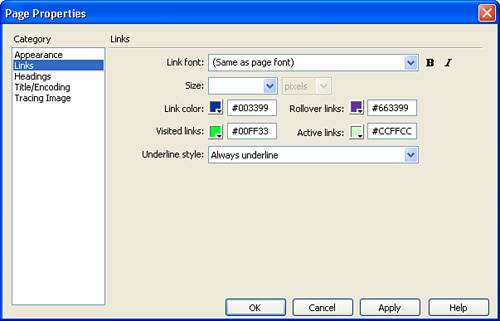
The Page Properties dialog box also allows you to set colors for various different hyperlink states. These states include
Link—. This is the color of the link in its normal state prior to being clicked, and is expressed with the attribute name
link.Visited link—. When a link had been visited by a site visitor, the
vlinkattribute setting changes that link’s color to denote that it has already been followed.Rollover link—. When a hover style is selected, the
rlinkattribute changes a link to this color by default whenever the mouse pointer is placed over the link.Active link—. This is the link color that displays as the visitor clicks on the link. Its attribute name is
alink.
When a new document is opened in Dreamweaver, no default link colors are set. If left unset, each visitor’s browser controls the link colors according to its default settings or the custom settings that have been set by the visitor. Generally, the browser’s default link colors are blue for unvisited links, red for active links, and purple for visited links.
As with other page properties, link colors can be set easily in the Page Properties dialog box. The link colors are located in the Links category of the dialog box, as shown in Figure 23.22. To adjust the values, type the hexadecimal value into the field or use the color picker to choose the desired color.
After you have established your page properties and added content to your page, it is wise to follow a few more steps before you unleash your newest web creation on the world. Taking a close look at how quickly your site loads, conducting a spell check, and checking for browser compatibility will go a long way toward ensuring that your visitors enjoy your site.
Even with the advent of broadband, download speed is still an issue for many web surfers. If anything, faster Internet access has made visitors even more impatient as they wait sites to load. The web is fraught with websites that have become “bandwidth-heavy.” Developers using fast T1 connections tend to forget that just because a page loads quickly in their browsers doesn’t mean that users on DSL, cable, or even 56K connections will tolerate the slowness that they can experience. To avoid creating a site that takes too long to load, you can estimate the speed at which a page will download by looking at the Download indicator at the bottom of the Document window (see Figure 23.23).
Figure 23.23. The Download indicator displays the file size of the page and all its components and approximates the download time at a preselected connection speed.
The Download indicator settings are controlled by the Status Bar category of the Preferences dialog box (accessed by selecting Edit, Preferences, and then clicking the Status Bar category). The indicator speed is set to 56.0 kilobits by default. As you work, set this option to match that of the expected average visitor of your site. However, when your page is complete, you should set this preference at various connection speeds to get an estimate of the download times on both extremely fast and very slow connections.
If the download time appears significant, you can use the Clean Up HTML/XHTML command to remove any extraneous tags and comments. In addition, be sure that you have optimized all images to their fullest without sacrificing too much quality.
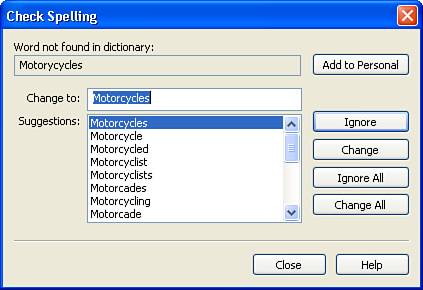
There are very few truly great spellers on the planet, and even the best spellers make mistakes. Dreamweaver’s spell-check feature helps both the best and the worst spellers hide their flaws from public view. To run the spell checker, place your cursor anywhere in the page and choose Text, Check Spelling from the menu bar. The spell checker (see Figure 23.24) stops at the first word in the document that is not in its dictionary and highlights the word. From there, you can choose to update the word manually, choose a word from the suggested list, ignore the word, or add it to your personal dictionary.
One of the biggest pitfalls for web developers is forgetting to check how their sites are rendered by different browsers. There’s nothing worse than rolling out a great web application and then having someone ask you why the pages don’t load properly, the tables are out of alignment, or elements of the application don’t function properly. By checking to be sure that your application works in both Internet Explorer and Netscape, you save yourself the hassle of having to fix problems after the site is released to the public. If you really want to go a step further, test your application in Opera and Firefox as well. Although not currently as popular as IE and Netscape, they are both rapidly gaining popularity.
Note
Checking for cross-browser compatibility means more than just opening the pages in the most recent version of the browser. If you really want to ensure that most visitors can use your site, check the site with several versions of each browser to ensure that the pages are not browser compatible in just one version or another.
To help you create pages that are cross-browser compatible, Dreamweaver has a handy utility called Check Target Browser. By choosing File, Check Page, Check Target Browser from the menu bar, you can run a report that displays each of the browser errors that the page would generate (see Figure 23.25). This command checks the page for specific browsers and versions and looks for page errors that might be generated by those browsers. When the check is complete, you can double-click on any error discovered to display the problematic code in the code view.
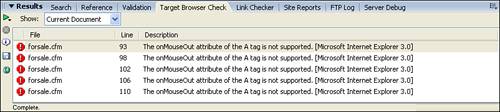
Figure 23.25. The Target Browser Check displays each error that might be encountered and the browser that would cause the error.
Tip
You can edit the browsers that are included in the target browser check by clicking the Target Browser Check menu drop-down in the Results panel. From the menu, choose Settings and select the minimum browser levels you want included in the report.
In addition, if the Document bar is visible, Dreamweaver maintains a running tally of potential browser errors, which can be accessed with a simple click of the Target Browser Check button. Click on the button, which is located next to the Title field, to check your page against the specified target browsers.
The Dreamweaver tools mentioned in this chapter all help you prepare your site for its final journey to the remote server. Nothing, however, beats a good eye. After you’ve cleaned up your HTML, spell checked the site, and ensured that everything is optimized, it’s worth taking one last look at each and every page of the site. Be especially on the alert for the following:
Table layouts that have gone awry as you inserted images and text
Missing page titles, descriptions, and keywords
Commonly misused words that wouldn’t be picked up by the spell checker
Images that don’t suit the final content
Placeholder images that weren’t replaced with final graphics
Cross-browser compatibility and design integrity
Remember that organizations often rely on their website to be the first point of contact with potential customers or clients. Therefore, a site that contains errors, broken links, or problematic code probably won’t project the image the organization is looking for. For this reason, it’s imperative that you take the extra time necessary to ensure that your pages function as expected and are error free. Although Dreamweaver offers some great tools that can help you check for issues, the final check should always be a manual one performed by you.
How can I make sure my site files are always up to date?
To ensure that all files are automatically refreshed, be certain to select the Auto Refresh feature. This is a helpful feature because it updates new files as you add them to the site.
I’m not really sure what the title of my page should be. Is it really necessary?
If you leave title information out of your page, the title publishes as Dreamweaver’s default Untitled Document. This gives your page visitors absolutely no help when trying to orient themselves to the page, figure out its purpose, and/or bookmark the page for further reference. Plus, the title element is required in HTML 4.0 and 4.01, as well as in XHTML 1.0 and 1.1. Using a clear title is an important part of setting page properties, so be careful not to overlook it!
Are there any hard and fast rules for what color links should be? I’d like to make them match my site, but someone said that they have to be a certain color.
Many usability pundits—including Jakob Nielssen—have expressed that the use of colored links other than browser defaults cause usability problems with navigation. Although this might be true for people who are very new to using the web (and nowadays, newcomers see so many different link colors, the point is almost moot), it’s highly unlikely that any experienced user will fail to recognize a link. Unless you are expressly asked by a client or superior to follow defaults, you should feel free to color links as you see fit.
One of the most common—and dangerous—mistakes I see novice web developers engage in is the editing of web pages or applications on their production servers. Usually, these changes are made after an urgent request, and when the change or changes seem relatively harmless. The danger of doing this, however, is magnified when you start making live changes to complex applications such as those that are database-driven. A single slip of the keyboard in the code view and you can delete a single character such as a % in VBScript or a ! in JavaScript. This missing character can either break the application or change its entire functionality. For example, a function that is supposed to check for form fields that are not empty with the != "" command might now check for fields that are empty with the ="" command.
Because of the possibility of making these simple mistakes, it is important to create a development machine where you can test your changes prior to migrating them to your production server. Each change that is made on the development machine shouldn’t just be tested to see whether the page loads, but also tested to ensure that the entire page functions as expected. Only after you are positive that your changes are valid should you move it into production and even then, it’s a good idea not to replace the previous file, but rename it and archive it in case you need to step back a version.
This process might seem tedious and time-consuming, but I speak from experience in saying that it can ensure that the changes you make do not adversely affect your web application.