
In this chapter
“Working smart” in web development is usually equated with reusability. As we have talked about in previous chapters, you can save time by reusing library elements, reusing code snippets, and even reusing your workspace layout. This chapter focuses on one of Dreamweaver’s strongest features when it comes to reusability—page templates.
Imagine being able to create one single web page that you could then duplicate with a few clicks of your mouse and use over and over and over. You might be thinking, “Hey, I can already do that by creating a page and choosing File, Save As for every page that I need.” Although this is true, it doesn’t enable you to make site-wide changes by editing a single file, which is what templates offer over the Save As option.
When you create a template in Dreamweaver, the page code that is specified as locked content is stored in a separate Templates folder within your site. Then a child page that is derived from the template links to the single instance of the template. Whenever you make changes to that single template document, the updates are automatically included in every child page that still remains attached to the template. Pretty cool, eh?
Creating a new template can be done in either of a couple of ways. You can build a template from scratch by creating the page layout and then saving it as a template, or you can create a template based on a page you have already built, which is a really nice feature. That means that you can go backward through any sites you have created in the past and update the pages so that they are based on a template.
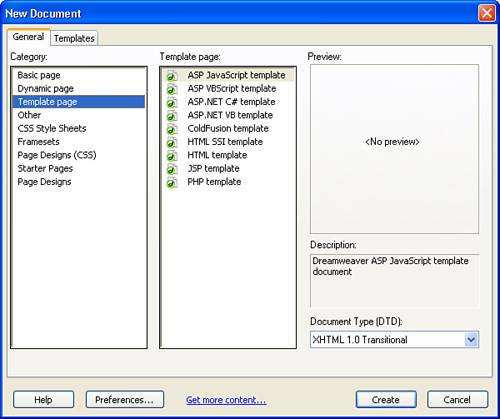
Creating a template from a brand new page is the easiest way to build a template. To create a template, choose File, New from the menu bar. In the New Document dialog box, shown in Figure 27.1, choose the Template page category and then choose the platform on which you want your base page developed. Click Create to build the blank page.
Although the resulting page may look like any other new page, Dreamweaver has added some code to indicate that this is a template.
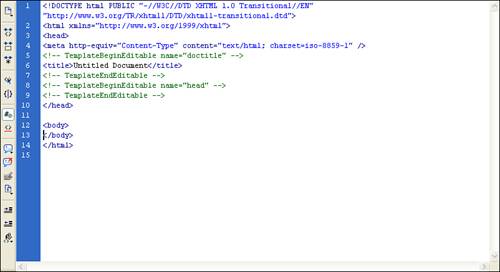
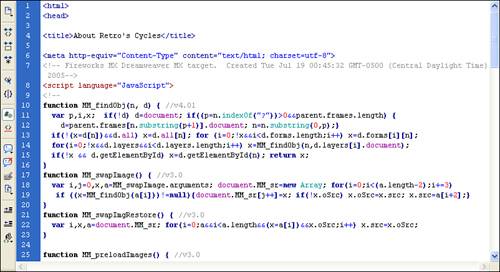
Click the Code button on the Document toolbar to switch to the Code view and you can see some additional markup that has been added to the page. As you can see in Figure 27.2, Dreamweaver has added an editable region for the title so that the title of each page can be adjusted to reflect the page’s contents. As you’ll see in a bit, these editable regions are what make it easy to customize the content stored in templates.
If you already have a page that you want to convert to a template, doing so is pretty simple. The first thing you need to do is take a look at the page and determine which areas of the page will remain static and which need to be able to be updated. By default, every area of the new template is locked down so items such as navigational elements, logos, and links that are common to each page can be updated easily. Those areas that need be altered on each page such as text content, photos, and so on will need to be specified later as editable regions so that you can customize each child page.
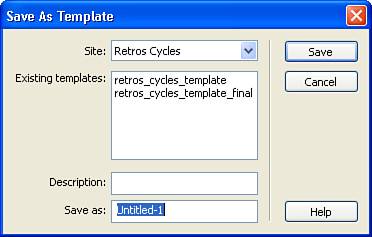
After you know which areas should remain locked and which will become editable regions, open the page and choose File, Save As Template. In the Save As Template dialog box, shown in Figure 27.3, choose the site to which you want the template to be related, type a description of the template, choose a template name, and then click Save.
Before the save process is completed, Dreamweaver asks whether you want to update the links in the document (see Figure 27.4).
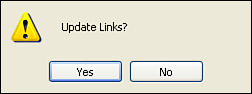
Figure 27.4. Dreamweaver asks whether you would like to update the links located within the template.
This occurs because Dreamweaver is moving your page out of the root of the site and into a subfolder named Templates. That means that the relative links to graphics and pages need to be updated to reflect the template’s new location. Click Yes and Dreamweaver does the rest. After the save is completed, you’ll notice that the file is now named with a .dwt extension, which indicates that it is now a Dreamweaver template.
Regardless of whether you created your template from scratch or by converting an existing page, you now need to designate certain areas of the page as editable. When child pages are created from the template, these are the only areas that can be modified, so be sure you have planned carefully.
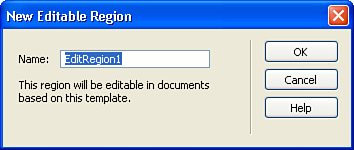
To designate an area as an editable region, select the area (usually a cell within a table) and choose Insert, Template Objects, Editable Region from the menu bar. As shown in Figure 27.5, the New Editable Region dialog box asks you to provide a name for the new region. Type a name and click OK.
Tip
When naming your editable regions, set up a naming convention that you will use throughout all your templates. One suggestion is to use “er” as the prefix, so when looking at your code you would recognize something named erPageContent as an editable region of a template.
After the editable region has been placed in the page, a placeholder is inserted, marked by the name that you specified. You can enter any text or placeholder content that you’d like in that editable region, and it will be used as the default for any child pages that are created. So if you have a content editor that might add information to your page designs, you might type something like Add your page content here to indicate that this is the area to type information or add images.
Another type of template region is called an optional region. These regions hold content that may or may not be visible on every page, depending on whether or not you want to show it. For instance, suppose some of your pages have an image in the main content area. Some pages might not have a corresponding image, so you would want to be able to turn the image on for some pages and off for others. Enter the optional region.
Designating an area as optional is just as easy as creating an editable region. To choose the area, select Insert, Template Objects, Optional Region from the menu bar. In the New Optional Region dialog box, shown in Figure 27.6, type the name for the region and choose whether you want the region visible by default on child pages.

If you want to enhance automation of your optional region’s visibility, you can click the Advanced tab and specify an expression that triggers whether or not the region is visible. Click OK to create the new region in your page.
Note
For a great tutorial on using expressions to control template regions, check out the Macromedia TechNote at http://www.macromedia.com/cfusion/knowledgebase/index.cfm?id=tn_16317.
Repeating regions are those over which you want to give your content editor control to duplicate. For instance, if you were to create a table with two rows in an editable region, the content editor would be able to type in those two rows, but not add any additional rows. If, however, you made the rows repeating regions, the content editor would be allowed to create new rows because the new rows are exact duplicates of the data that is in the repeating region.
For instance, a blog would be a perfect example where a repeating region might be appropriate. As the web developer, you could create a template for the pages that contain the blog and lock down every aspect of the page except the repeating region where the content editor is to make periodic entries. Because the region is set to repeating, they would be able to create new entries at their convenience without ever worrying about adversely affecting the site design.
To create a repeating region, choose Insert, Template Objects, Repeating Region from the menu bar. Type a name for the repeating region and click OK.
An additional template tool that is available for your use enables you to allow certain objects within a template to have editable attributes. Objects that you can specify as having editable attributes include tables, images, layers, or Flash movies. For instance, if you want to place an image placeholder in your template that requires the URL to be editable on each child page, you could add the placeholder and make only the URL editable.
To set an object’s attribute as editable, select the object and then choose Modify, Templates, Make Attribute Editable from the menu bar. In the Editable Tag Attributes dialog box, shown in Figure 27.7, select the attribute that you want to edit and click the Make Attribute Editable check box. Specify the appropriate label, type, and default and click OK.
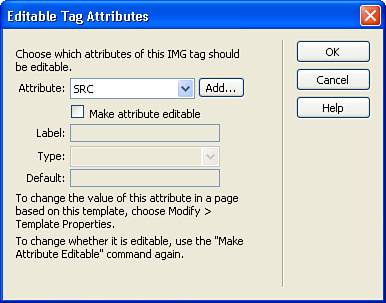
After the attribute has been set to editable, you should be able to view that attribute in the Property Inspector and see that it has been replaced by special code such as @@name@@. This markup indicates to the template that this is an editable attribute in any child pages.
Editing an existing template is very similar to editing any other document. To open a template for editing, choose File, Open from the menu bar. In the Open dialog box (see Figure 27.8), navigate to the Templates folder in your site root and then open the template that you want to edit.

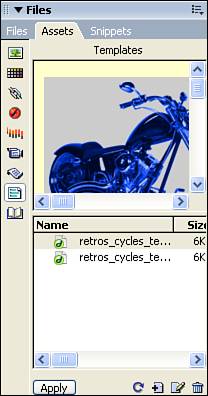
You can also edit a template by selecting the Templates category in the Assets panel, and double-clicking on the template you want to edit (see Figure 27.9).
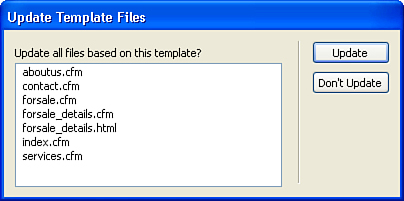
After you have made the necessary changes to the template, choose File, Save from the menu bar. After the page is saved, you need to replicate those changes out to any child pages by either allowing Dreamweaver to do it when you save the changes, or manually initializing the process later by choosing Modify, Templates, Update Pages from the menu bar. In the Update Template Files dialog box, shown in Figure 27.10, choose which pages to update and click the Update button.
After the updates are completed, all the changes made to the template should be replicated out to your child pages.
After you have your template created and saved, you’ll probably want to start creating pages based on it. Before you start generating pages, though, you need to know a few things about templates and their child pages.
As I mentioned earlier, the templates created for your site are located in a subfolder of your site root called Templates. It’s important that you don’t rename or move that folder, or you won’t be able to automatically update pages that are reliant on templates.
In addition, when you make changes to the pages and templates within your site, you need to be sure that you not only transfer child pages, but also transfer the template file to the server if it has been modified, so that the child pages can be viewed correctly.
Lastly, you should be aware that creating pages based on templates can add quite a bit of code to your pages and more code means slower load times. If you are building a website that needs to be accessed via dial-up connections and the site has a complex layout, you need to balance the slower load times with the benefits that templates offer for site maintenance.
Creating a new child page from a template is similar to creating any other new file and can be done by choosing File, New from the menu bar. In the New Document dialog box, however, select the Templates tab (see Figure 27.11), where Dreamweaver displays all of your different sites and the templates that are stored associated with them.
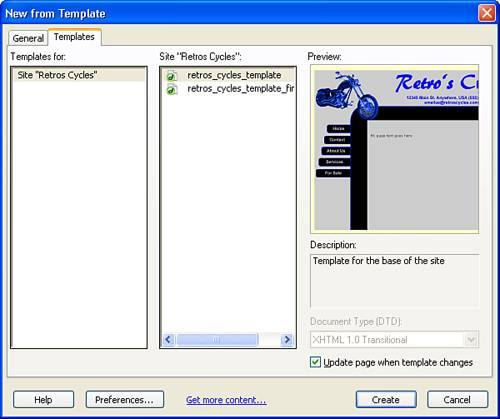
Figure 27.11. The New from Template dialog box enables you to select from the available templates associated with your site.
To create a new child page, select the template on which you want to base it and click Create. Dreamweaver creates a new page and indicates that it is based on a template by placing Template: and the name of the source template in the upper-right corner of the page (see Figure 27.12).
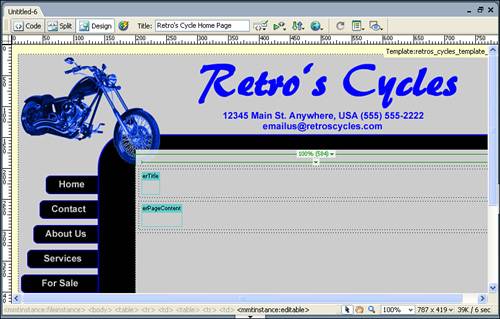
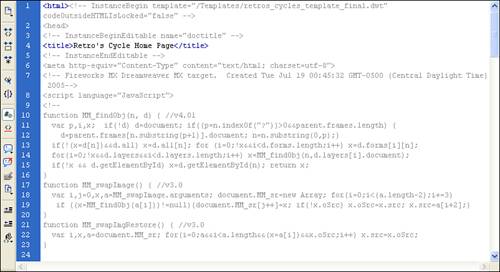
In addition, if you switch to Code view (see Figure 27.13), you’ll notice that the majority of the code for the site is grayed out. Because these regions are locked by the template, you can’t adjust them in either Design or Code view.
To make changes to the child page, adjust the content of the editable regions on the template and then save the page.
If you want to bring existing pages into your template/child page structure, Dreamweaver offers a tool to assist with the process. The benefit is that all the pages in your site can be based on a template, which means that your entire site can be updated through template updates.
Be aware, however, that to successfully apply a template to an existing page, you need to do some work to ensure that the existing page already has the same structure as the template. Trying to apply a template to a page that is structurally different really doesn’t work. Keep in mind that the goal here isn’t to have Dreamweaver modify the structure of your existing pages—things go bad when you ask Dreamweaver to mesh two different pages’ structures. The goal, instead, is to ensure that all pages that do have the same page structure can be updated via the template.
To apply a template to an existing page, open the page and choose Modify, Templates, Apply Template to Page from the menu bar. As shown in Figure 27.14, the Select Template dialog box enables you to choose from the available site templates. Choose the appropriate template and check the box indicating that the page should be updated when the template is changed.
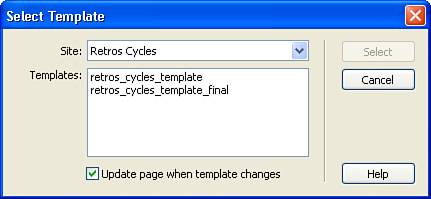
Figure 27.14. The Select Template dialog box enables you to choose which template to apply to the page.
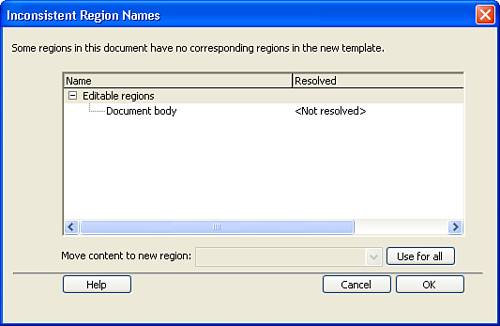
Click Select and Dreamweaver presents you with any content that might not fit into the template schema, and enables you to determine how to deal with the existing content prior to the application of the template (see Figure 27.15).
To apply the template, click OK and the template regions and markup code are added to the page.
As I mentioned earlier, when you apply template data to your pages, Dreamweaver adds markup code indicating where template regions should begin and end. Depending on how complex your template is and how many different regions it contains, this markup can be considerable, which affects the download speeds of your pages.
In addition, the template markup does provide information about your site’s structure, naming conventions that you use, and the simple fact that the pages were created based on a template.
If you are concerned about bandwidth or you want to conceal the information stored in the template markup, you might consider removing the markup before you publish your pages to the web. Dreamweaver offers several different ways to remove the markup, each having a slightly different effect. Be aware, also, that after your template markup is removed, Dreamweaver no longer can perform automatic updates to the page when the template is updated.
The Clean Up HTML command, found under Commands, Clean Up HTML, enables you not only to remove your template markup, but to run a check on other aspects of your code as well. Depending on how in-depth you want Dreamweaver to get when analyzing your code, you can check any or all of the options (see Figure 27.16).
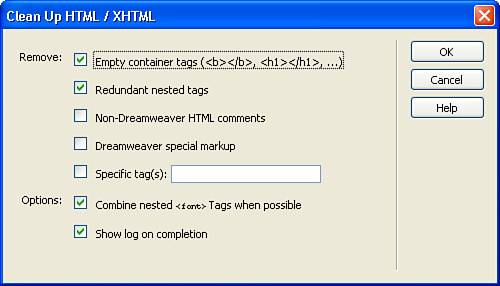
The option that removes template markup is the Dreamweaver Special Markup option. To apply the cleanup, click the OK button and, if you chose to display one, Dreamweaver provides a log of the changes that were made to the page.
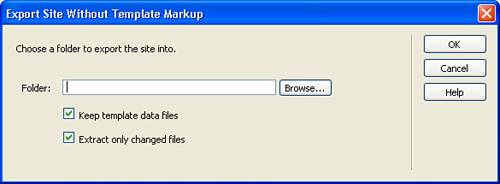
The second option you have for removing template markup is to use the Export Without Markup command. This command exports the entire site to another folder, removing all the template markup as it goes. The nice thing about this feature is that it ensures that all the pages in your site are as bandwidth-friendly as possible. In addition, when you use this command, your original site is left intact with the markup in place while the copy of the site is created with all template and library references removed. Be aware, however, that this command affects your entire site, so don’t use it if you want to remove markup from only a single page.
To export your site without markup, choose Modify, Templates, Export Without Markup from the menu bar. In the Export Site Without Template Markup dialog box, shown in Figure 27.17, choose a folder to receive the export and indicate whether you want to keep the original template data files or extract only changed files. Click OK to export the site.
The third option for removing markup is one that can be used on a page-by-page basis. Suppose you have a page that you need to have a similar look and feel to the rest of your site, but you also need to change some of the elements that would normally be protected by the locked regions in your template. Not a problem. Dreamweaver enables you to create a new page based on the template and then detach it from the template so that your page structure will match that of the template to start, and locked regions won’t stop you from making changes to the page. In addition, after the page is detached from the template, all template markup is removed.
To detach a page from a template, choose Modify, Templates, Detach from Template from the menu bar. After they are detached from the template, all template regions are removed and the page becomes fully editable again (see Figure 27.18).
In addition, with the page detached from the template, switch to the code view and you’ll notice that the template markup has been removed and the code is now fully editable again (see Figure 27.19).
One last element of templates that we need to cover is the nesting of templates inside one another. To nest a template, you would create a primary template, and then create a child page based on that template and save it as a secondary template. This secondary template is then nested inside the primary template and any changes that are made to the primary template are not only propagated out to child pages based on the primary template, but also affect the secondary template and any child pages based on the secondary template.
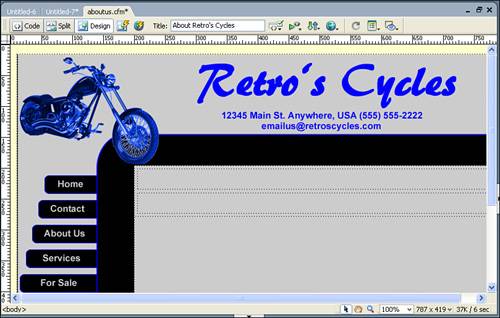
Sound confusing? Let’s look at a scenario that might occur in the real world and it should get a little clearer. Suppose that Retro’s Cycles asked you to design a set of pages that their administrative assistant could update. They don’t want her to be able to change the site layout, but they’d like her to be able update content and maybe add a few photos. Sounds like a good opportunity for a template, right? So, you’d create a template with an editable region that would allow the administrative assistant to edit the content in only that region. Pretty straightforward.
But what happens when the company wants to allow the sales manager to update the details of the various used motorcycles for sale in the “For Sale” section of the site? They want the administrative assistant to update the general copy for the rest of the site, but the sales manager should be the one updating the pages in the For Sale section.
The way to accomplish this is to create a series of child pages from the original template and save them as the pages for the site. The admin can access each of the editable regions for these pages. The second step, however, is to save the For Sale page as a template and then spawn child pages from that secondary template. The service manager can then be sure that his pages retain the look and feel of the For Sale section and he can update the pages as necessary.
As you can see, nested templates can get very complicated, very quickly. For that reason, put some serious thought into whether or not they are something you want to use. Although they can be a good tool for ensuring consistency across your site, they can get very difficult to manage as the number of nested templates you use grows.
I made some changes to my template and when I saved it, no updates were made to my child pages. What gives?
The most likely reason that your child pages were not updated is that the changes made to your template were in the editable regions. Because editable regions do not depend on the template, Dreamweaver does not update child pages when changes to the template’s editable regions are made.
In earlier versions of Dreamweaver, I recall there were issues applying behaviors to the editable regions of child pages because the Dreamweaver behaviors needed to write to the <head> section of the page. Do these issues still exist in Dreamweaver 8?
No. You can apply Dreamweaver behaviors to any content within your editable regions and Dreamweaver adds the necessary JavaScript code to the head section of your child page.
Does this mean that I can use the Insert, HTML, and Head Tags commands successfully to add metadata to my pages?
Yes. This command now inserts the meta tags into the <head> section of your page, even if it is template-driven.
I did some cleanup of my files and folders and now my child pages don’t show any of the template items anymore. What did I do and how can I fix it?
More than likely, you moved or renamed the Templates folder. This is not an option because Dreamweaver’s template markup relies on the name and location of this folder remaining static. The answer to fixing the issue is to put the Templates folder back where it was or rename it back to Templates.
You have heard it from me in previous chapters, and you’re going to hear about it again: bandwidth, bandwidth, bandwidth!
As I have mentioned throughout this chapter, one of the downsides to using templates is that the additional markup code added by Dreamweaver increases page size, which can slow down your load times. If your goal is to produce the leanest, meanest code possible (which it should be), then using templates doesn’t fit with that concept because the markup unnecessarily bloats your file sizes. Does this mean that you can’t use templates and still accomplish the most bandwidth-friendly pages possible? Absolutely not! It does mean that you’re going to have to take a few extra steps to ensure that your code is as clean as possible.
The best way to accomplish clean code after using templates is to export the entire site without markup before you publish it to the web. This means that on the development side you get to take advantage of all the functionality that templates have to offer, but after you export the pages without markup and publish them, your visitors get to take advantage of the cleanest code and, therefore, the fastest-loading pages possible.