
In this chapter
With all the Macromedia Studio tools in your toolbelt, you’re ready to get to work. This chapter takes a look at the process of building the core elements of the site for the client, Retro’s Cycles. Although you won’t build the entire site out, you’ll see items such as the site template built in the Fireworks section, create a Dreamweaver template and child pages, and then build out the For Sale section, using database-driven content.
When you finish this chapter, you should have a good understanding of how Dreamweaver can be leveraged to create a database-driven website and should be able to continue building on the site from there.
Note
Before you start these exercises, you need to create the Retro’s Cycles Dreamweaver site. If you haven’t done that already, revisit Chapter 23, “Creating a Dreamweaver Site,” and learn how to create the site.
Earlier in the Fireworks section of the book, you saw how Fireworks can be used to create an HTML template for your site that includes images, hyperlinks, and rollover buttons. Now would be a good time to revisit that template and see how you can use it to begin building out the site for Retro’s Cycles.
Note
If you haven’t worked through the Fireworks section of the book, now would be a good time to look it over. If you’re comfortable with using Fireworks to create HTML templates or just want to skip to building in Dreamweaver, you can also download the support files for this chapter from http://www.retroscycles.com/supportfiles.
Open Dreamweaver.
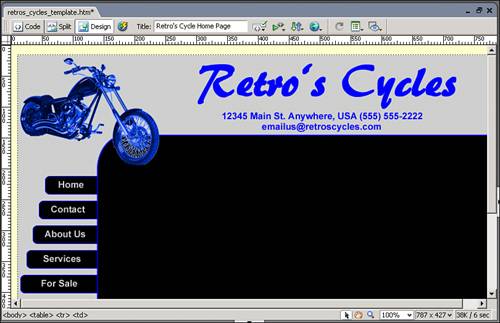
Open the file named
retros_cycle_template.htmthat you created in the Fireworks section of the book (see Figure 30.1).Click on each of the navigation links on the left side and ensure that the Property inspector (see Figure 30.2) indicates the following links for each of the rollover buttons:
Home—. Links to
default.cfmContact—. Links to
contact.cfmAbout Us—. Links to
aboutus.cfmServices—. Links to
services.cfmFor Sale—. Links to
forsale.cfm
For each of the rollover buttons, add the appropriate Alternate text, as shown in the following list, by typing the value in the Alt field in the Property inspector. This assists users with disabilities who might visit the site.
Home—. Return to the Home Page
Contact—. Contact Us
About Us—. About Retro’s Cycles
Services—. Learn About Our Services
For Sale—. Motorcycles We Offer for Sale
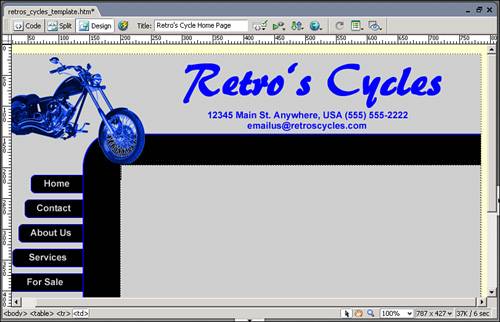
Click on the black image located in the main content area of the document and press the Delete key. Fireworks placed this image here as a placeholder. You want the background of your content area to match the background of the site, so deleting the image is necessary (see Figure 30.3).
Next, you need to ensure that any content placed in the main content area does not run up against the black borders, so you need to add a table to the main content area to provide a buffer. From the menu bar, choose Insert, Table.
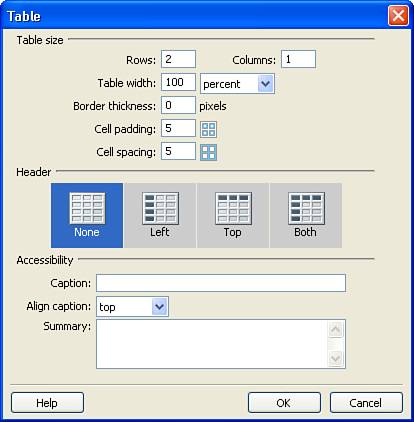
In the Table dialog box (see Figure 30.4), create a table that has two rows and one column and is 100% in width. Set the border thickness to 0, the cell padding to 5, and the cell spacing to 5, and then click OK.
Place your cursor inside the top row of the new table and click the Align Center button on the Property inspector.
Next, we need to ensure that the table always stays at the top of the main content area. To do this, select the table and press the left arrow key on your keyboard. This places your cursor inside the
<td>tag that houses the table. In the Property inspector, select Top from the Vert drop-down options.Save the page.

Now that you have made the necessary adjustments to the Fireworks template, you can easily turn the page into a Dreamweaver template and spawn child pages from it.
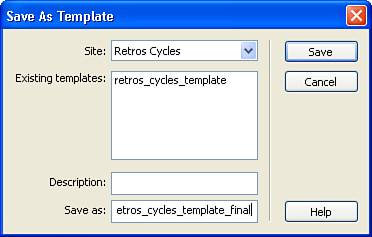
In the Save As Template dialog box, choose the Retro’s Cycles site and save the template as
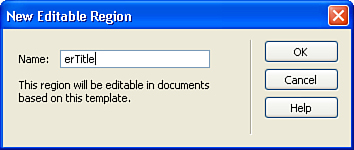
retros_cycles_template_final(see Figure 30.5). Click OK to save the template. When asked to update links, click Yes.With the template saved, you need to add editable regions to the template. Select the top row of the table and choose Insert, Template Objects, Editable Region from the menu bar. In the New Editable Region dialog box, name the editable region
erTitle, as shown in Figure 30.6. Click OK to close the dialog box.Select the bottom row of the table and add an additional editable region named
erPageContent.Save the template.
Lastly, you need to create the child pages that are based on the template. From the menu bar, choose File, New.
In the New Document dialog box (see Figure 30.7), choose the Templates tab and select the Retro’s Cycles site. Choose
retros_cycles_template_finalas the base for your new document and click Create.Choose File, Save from the menu bar and select ColdFusion Templates from the type menu. Save the page as
index.cfmin the root of the site folder.Following the same process, spawn a second page based on the template. In the Title field of the Document toolbar, type
Contact Retro's Cycles(see Figure 30.8), choose ColdFusion templates from the type menu, and save the page ascontact.cfm.Follow the same process to create pages saved as
aboutus.cfm, services.cfm,andforsale.cfm.Set the titles for each page as follows:aboutus.cfm—About Retro’s Cyclesservices.cfm—Our Servicesforsale.cfm—Motorcyles For Sale

Now that you have the base pages for the site, you can be sure that any changes made to the template are applied to each of your child pages.
One of the dynamic elements that the client has requested is a database-driven section of the site that displays the motorcycles that are currently for sale. To accommodate this, a field called status has been created in the tbInventory table. This field is set to record either a 0 or 1 value, with 0 being for sale and 1 being sold. Before you can display the motorcycles that are for sale on the site, you need to build a recordset that contains only those motorcycles that are currently for sale.
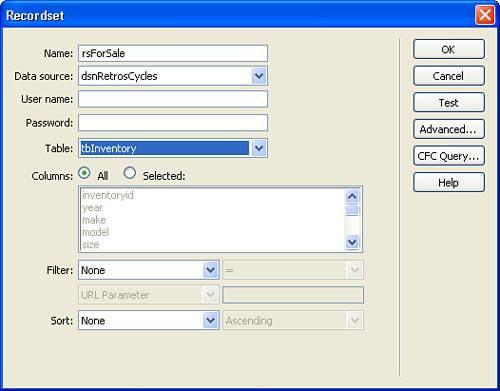
In Dreamweaver, switch to or open the
forsale.cfmpage.On the Server Behaviors panel, click the plus sign and choose Recordset from the menu. In the Recordset dialog box, type the name
rsForSale, choose thedsnRetrosCyclesdata source, and choose thetbInventorytable (see Figure 30.9).Note
Because the original page was developed in an HTML template and then converted to a ColdFusion page, you might need to reconfigure your site so that the test server address is set to http://localhost:8500/retroscycles before you can create your recordset. You can adjust this in the settings for your site.
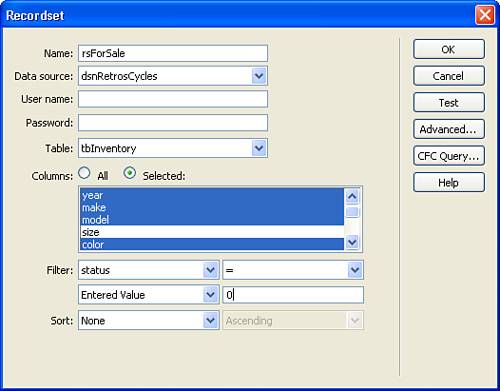
Next, click the Selected radio button to limit the fields that are retrieved from the database. Using the Ctrl key and the mouse, select the
inventoryid, year, make, model, andcolorfields. Set a filter that retrieves only records where the status is equal to the entered value of 0, as shown in Figure 30.10. Click OK to create the recordset.
To build out the For Sale section of the site, you need to have two pages. The first displays all the motorcycles in the rsForSale recordset. Each motorcycle listed contains a hyperlink to a second details page that provides the user with additional details about that specific motorcycle.
Displaying the motorcycles that are for sale can become a difficult task as the inventory grows. Before the advent of dynamic web pages, each entry would have been manually added to a table, which can quickly become a tedious task. Dreamweaver, however, provides an easy way to retrieve the motorcycles that are for sale from the database and display them in a dynamic table. To create a dynamic table, follow these steps:
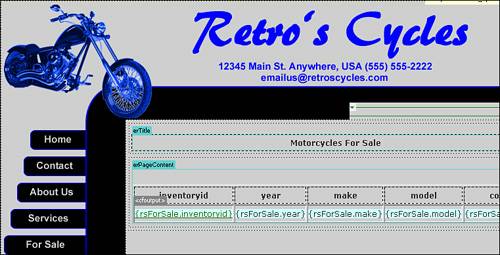
Place your cursor in the
erTitleeditable region. TypeMotorcycles For Salein the region. Highlight the text and click the Bold button on the Property inspector.Next, you need to place a dynamic table in the page content section. Delete the
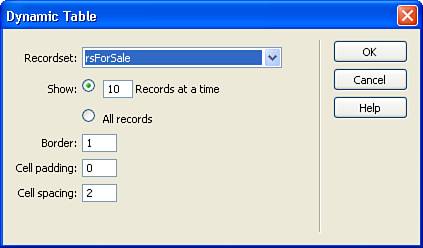
erPageContentsplaceholder text and place your cursor in theerPageContenteditable region. Next, choose Insert, Application Objects, Dynamic Data, Dynamic Table from the menu bar.In the Dynamic Table dialog box (see Figure 30.11), choose the
rsForSalerecordset and choose to show 10 records at a time. Set a border for the table to 1, the cell padding to 0, and the cell spacing to 2. Click OK to create the table.Select the table and choose Center in the Align field of the Property inspector. Select the top row in the new dynamic table and click the Align Center button and Bold button on the Property inspector.
Lastly, you need to create a hyperlink that enables the user to click on the
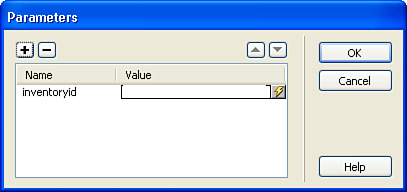
inventoryidand view additional details about the motorcycle. Select theinventoryidelement in the first cell of the table and typeforsale_details.cfmin the Link field of the Property inspector. Click the folder icon next to the Link field and then click the Parameters button in the Select File dialog box.In the Parameters dialog box (see Figure 30.12), type
inventoryidin the Name field and click the lightning bolt icon in the Value field to choose a data binding.In the Dynamic Data dialog box, expand the
rsForSalerecordset and selectinventoryid. Click OK to close the dialog box and click OK again to close the Parameters dialog box. Click OK one more time to close the Select File dialog box and the hyperlink is created in the page. As shown in Figure 30.13, theinventoryiddata binding is now a hyperlink to theforsaledetailspage.Save the page.
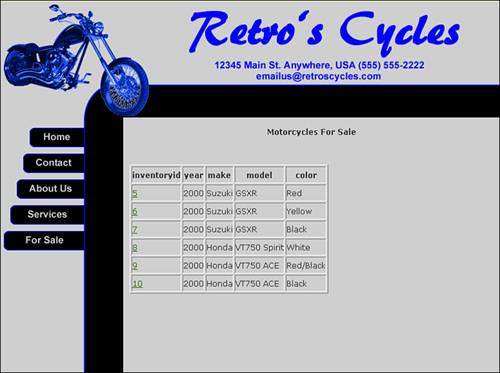
Click the F12 button on your keyboard to preview the page in your browser. As shown in Figure 30.14, the page now contains a data table that lists the motorcycles that are for sale.
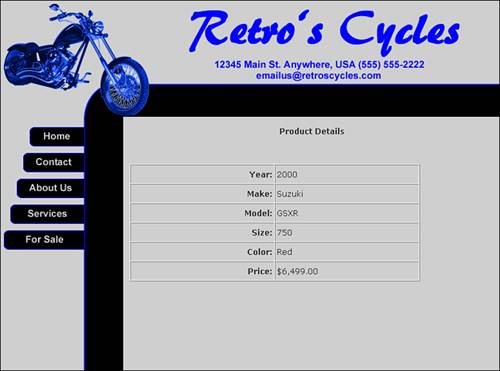
The last step in creating the For Sale section of the site is to create a details page that shows additional information about the specific motorcycle the user has chosen.
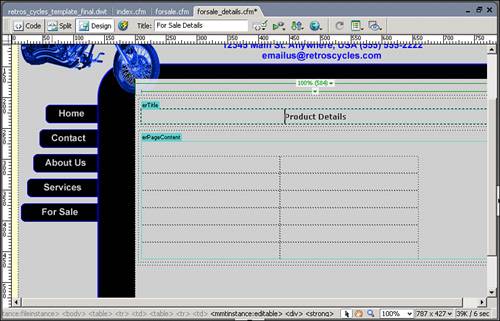
Create a new page based on the
retros_cycles_template_finaltemplate. Change the page title to read “For Sale Details” and save the page asforsale_details.cfm.Place your cursor in the
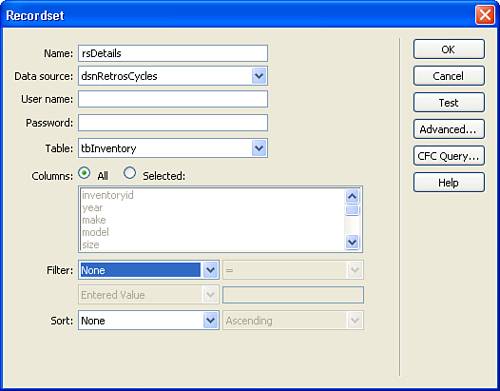
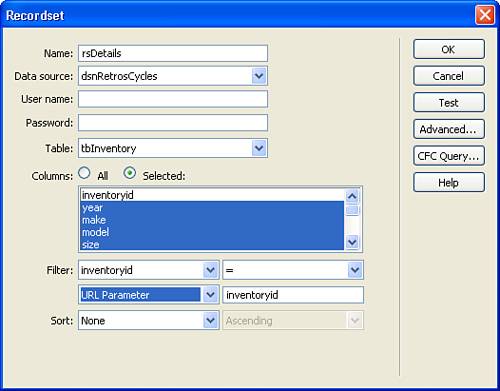
erTitleeditable region and typeProduct Details, select the text, and click the Bold button on the Property inspector.Create a new recordset for the page by clicking the plus sign on the Server Behaviors panel and choosing Recordset from the menu. In the Recordset dialog box, shown in Figure 30.15, name the recordset
rsDetails, choose thedsnRetrosCyclesdata source, and select thetbInventorytable.Next, select the following fields to be included in the recordset:
Year
Make
Model
Size
Color
ListPrice
Set a filter on the recordset that selects only the record where
inventoryidequals the URL Parameterinventoryid, as shown in Figure 30.16. Click OK to create the recordset.Place your cursor in the
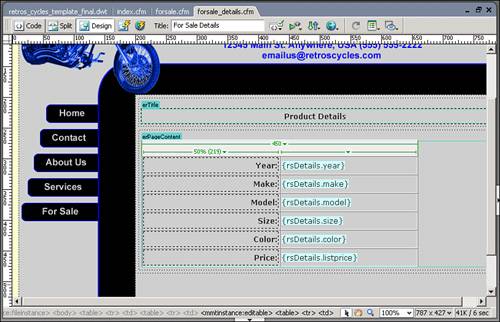
erPageContenteditable region and add a table to the page that contains six rows, two columns, and a width of 450 pixels. Set the border to 1, the cell padding to 2, and the cell spacing to 0. Click OK to insert the table, as shown in Figure 30.17.In the left column of the table, add the following values in each of the six cells:
Year:
Make:
Model:
Size:
Color:
Price:
Select the left column and click the Align Right and Bold buttons on the Property inspector. Set the width of the column to 50% by typing the value in the
Wfield.For each of the labels in the left column, drag the appropriate data binding from the Bindings panel into the corresponding cell in the right column. When completed, your page should look like Figure 30.18.
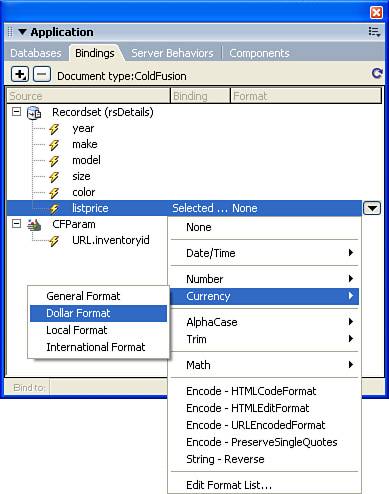
Select the listprice data binding and in the Bindings panel, scroll to the right, and drop down the format menu. From the menu, choose Currency, Dollar Format (see Figure 30.19).
Save the page.
Switch to the
forsale.cfmpage in Dreamweaver and press the F12 key on your keyboard to preview the page in your browser. Click on any of the inventory IDs and you are directed to theforsale_details.cfmpage with the corresponding details (see Figure 30.20). Click back to return to the original table and test the other links.
In this chapter, you have seen how to use a template created in Fireworks to create a Dreamweaver template and spawn child pages. In addition, you saw the process of creating recordsets that draw data from a database and created a set of pages that enable you to display items for sale and their corresponding details.
In the final section of the book, we take a look at how Contribute, Macromedia’s content management tool, can be used to edit web pages without disrupting the site’s structure.
When I view my page in the browser, no data is displayed. What went wrong?
The likely suspect is the recordset. If no data displays, it means that your recordset is empty. Take a look to see that all filters you applied are filtering on the correct field and that the filter is spelled correctly.
If the recordset is correct, check the link that you created on the For Sale page and be sure your parameters are spelled correctly and that the binding you chose is the appropriate binding.
When I make changes to my template and update the child pages, will it affect the dynamic data stored in my editable regions?
No. Dreamweaver templates do a really good job of working around dynamic data. Making updates to your templates should have no adverse effect on your data.
In this chapter, you learned how to create two separate pages that display dynamic data. The first displayed a list of products for sale and the second displayed product details based on information passed to the page through the querystring. You walked through the process so you could learn the details of creating each one individually and better understand how each piece works.
Fortunately, creating these types of related pages doesn’t have to be this long of a process. Dreamweaver has a built-in application object called a Master Detail Page Set that creates the basics of both pages for you. To use this tool, create a new dynamic page and create a recordset that draws the appropriate records for the master page. Next, choose Insert, Application Objects, Master Detail Page Set from the menu bar. The dialog box for the application object walks you through the process and actually creates both pages for you.