
Chapter 50. Understanding the Global Assembly Cache
The Visual Studio IDE is a great place to create applications, but in most cases, you need to deploy them to your customers. The .NET Framework offers a nice infrastructure for making this possible, but you need to know some concepts about the infrastructure before effectively deploying applications. Often you can create libraries and reference those libraries, or third-party libraries, other than the .NET Framework base libraries in your projects. These libraries need to be deployed together with your application, but the .NET deployment model for assemblies works differently from the COM model. The goal of this chapter is to illustrate how .NET base libraries are organized, why you can be sure to find them on a target machine, and how you deploy your own libraries or third-party libraries that your applications work with. This information is important if you consider deploying an application is not only deploying the executable, but also all libraries required by the application. This is the reason you need to read this chapter before discovering the deploying modes offered by the .NET Framework and Visual Studio 2012.
The Dll Hell Problem
One of the biggest problems of the COM programming model is the Dll hell. COM components (such as ActiveX controls or type libraries) need to be registered so the system knows where to find them even if they are not available in the application directory. The problem is when you have different versions of the component installed on the same machine. Registration can be painful, and there are often many problems in making an application recognize the correct version of the component. In many cases, an application will not work correctly. This is the reason the situation is called Dll hell. Since version 1.0, the .NET Framework provides a brilliant way to solve this big problem by introducing assemblies and the Global Assembly Cache (GAC). Before discussing the GAC, it is important to understand how assemblies can be deployed and recognized by applications and why they solve the Dll hell problem. To accomplish this, we need to discuss the most basic mode for deploying assemblies—the XCopy deployment.
XCopy Deployment
If you have been an MS-DOS person, you will remember the XCopy command. It enabled you to copy entire directory trees, including files and subdirectories, from one location to another. In honor of this command, the most basic deployment technique in the .NET Framework is XCopy deployment. The reason for this name is that a .NET application can work when the executable and the assemblies referenced by the executable all reside in the same folder. According to this, you can deploy an application by copying its folder. This approach has a huge implication—if an application folder contains a copy of required assemblies, these are isolated from one another and do not require registration anymore. Because they are no longer required to be registered, multiple versions of an assembly can reside on the same machine avoiding the big problem of the Dll hell.
Base Class Library Assemblies
The preceding discussion is not valid when talking about the Base Class Library assemblies being part of the .NET Framework and cannot be included in the application folder. They stay in the GAC as covered in next section.
When you compile your project, Visual Studio generates a Bin subfolder within the project folder. Bin contains Debug and Release subfolders (referring to default build configurations). Both folders contain the executable and referenced assemblies. You can perform an XCopy deployment by distributing the content of the Release folder, and your application will work. XCopy deployment is something you have to know to understand how things work. In a business environment, you will deploy your applications with professional installers, such as InstallShield for Windows Installer and ClickOnce, which are discussed in the next two chapters. Another consideration about XCopy deployment is that every application keeps its own copy of referenced assemblies. This means if you have ten applications referring to the same assembly, you will have ten copies of the assembly. This is good in that assemblies will not interfere with each other, especially in the case of different versions. However, it can be annoying if you have ten copies of the same version of your assembly. A solution to this is provided by the Global Assembly Cache, which solves other problems and is the subject of the following section.
The Global Assembly Cache
The .NET Framework consists of hundreds of libraries and tools. Most libraries implement the Base Class Library. The BCL’s assemblies are located in GAC. This is the reason you can be sure a .NET application requiring only base assemblies can correctly work on a target machine that has the .NET Framework installed. The GAC can be considered as a repository of shared assemblies. This means that an application can have a reference to an assembly available in the GAC instead of bringing its own copy of the assembly as happens in the XCopy deployment. The GAC is a folder in the system and is located at C:WindowsAssembly. Because of the particular nature of this folder, its representation within Windows Explorer is a little bit different from other folders. Figure 50.1 shows how the GAC is represented in Windows Explorer.
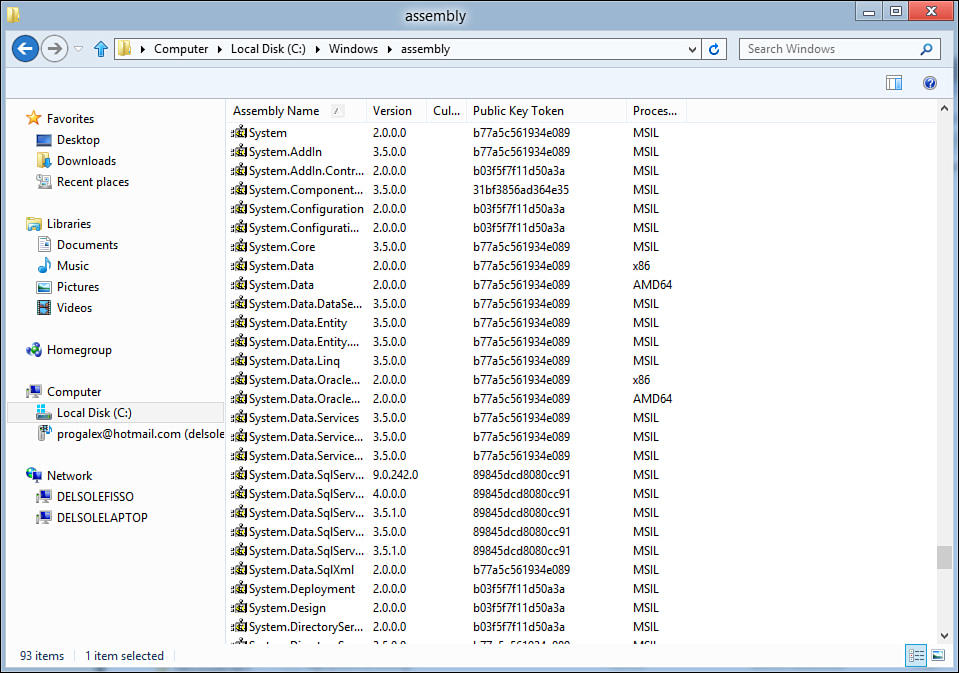
Figure 50.1. The Global Assembly Cache shown in Windows Explorer.
You might notice from Figure 50.1 how the GAC lists installed the assemblies, version number, public key token, and target processor architecture. The public key token is a unique identifier, which identifies the assembly within the .NET infrastructure. If the assembly targets a specific culture, this information is also shown. You can easily notice how different versions of the same assembly can be available in the GAC. (For example, check the System.Data.SqlServerCe.dll assembly.) This is important because it means the GAC is responsible for handling different versions of the same assembly, solving the versioning and registration problems.
Installing and Uninstalling Assemblies
A common way for referring to assemblies available in the GAC is saying they are installed into the GAC. (Installing an assembly to the GAC means making the assembly recognizable by the GAC and by the .NET Framework while the physical file stays in its original location.) Suppose you have an assembly named C:MyAssembliesMyLibrary.dll and you want to install this assembly into the GAC. The installation procedure adds to the GAC metadata information for the assembly but does not copy the file to the GAC; instead, MyLibrary.Dll remains in C:MyAssemblies. Installing and uninstalling assemblies to and from the GAC is a step you have to divide in two parts: development time and real deployment time. At development time, you have two opportunities for installing assemblies to the GAC. The first way is invoking the GacUtil.exe command-line tool passing the /i option and the assembly name. The following is a command-line example for installing an assembly:
GacUtil.exe /i C:MyAssembliesMyLibrary.dll
You uninstall an assembly from the GAC by passing the /u option to GacUtil, as in the following command line:
GacUtil.exe /u C:MyAssembliesMyLibrary.dll
The second way for installing assemblies is dragging them to Windows Explorer opened to the GAC folder. To uninstall one or more assemblies, right-click the assembly name and select Uninstall.
Installing and Uninstalling Require Elevated Privileges
Administrators using an Access Control List can protect the Global Assembly Cache folder. If this is your situation, remember that installing and uninstalling assemblies to the GAC requires elevated privileges. If you are using Windows Vista, Windows 7, or Windows 8, you will be required to run the command prompt or Windows Explorer with administrator privileges before attempting to install or uninstall assemblies.
Both ways can be useful at development time, but they cannot be absolutely indicated at deployment time for several reasons. The most important reason is that both ways have no reference counting and it is not appropriate to require your user to manually manipulate the GAC with Windows Explorer. Because of this, you should always choose professional installation systems, such as InstallShield for Windows Installer, that install and uninstall assemblies without troubles. The next chapter discusses setup and deployment projects for Windows Installer, covering GAC situations. ClickOnce has some limitations from this point of view because it does not allow installing assemblies to the GAC, which is important to consider when deciding the deployment strategy. In addition, installing assemblies to the Global Assembly Cache has a huge requirement—you can only install assemblies signed with a strong name.
Signing Assemblies with Strong Names
A strong name is a signature added to assemblies to provide uniqueness and represents the assembly’s identity. It is composed by the assembly name, version, culture, public key, and digital signature. The public key is generated from the related private key, which is stored in the assembly manifest.
To avoid security issues, strong-named assemblies can only use type from other strong-named assemblies (such as the Base Class Library assemblies).
You have two modes for signing an assembly with a strong name. The first is invoking command-line tools such as Sn.exe and Al.exe. But because most of your developer life is spent within Visual Studio, the second mode is offered by the IDE. To add a strong name to your assembly, you first open My Project and then select the Signing tab where you flag the Sign the Assembly check box as shown in Figure 50.2.
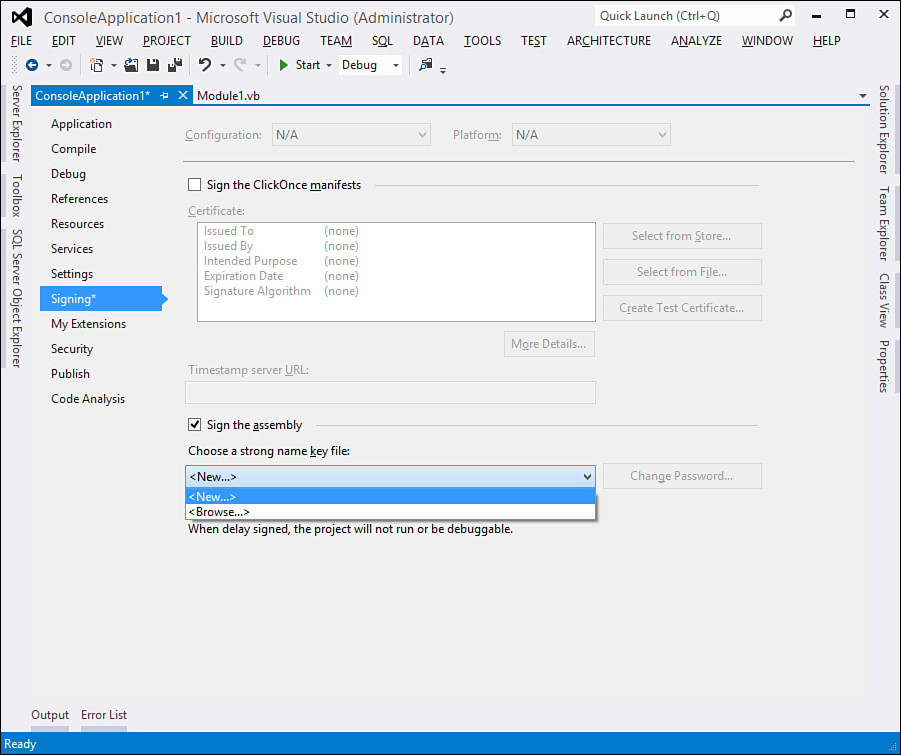
Figure 50.2. Adding a strong name to the project.
You can either add a new strong name or import an existing one. To add a new strong name, click the <New...> item in the combo box (see Figure 50.2). You will be prompted for specifying the filename and a password. This generates a .pfx file that is added to the project and is visible in Solution Explorer. For instance, in the Create Strong Name Key dialog box, type MyStrongName as the filename and MyStrongName as the password. Figure 50.3 shows how to accomplish this.
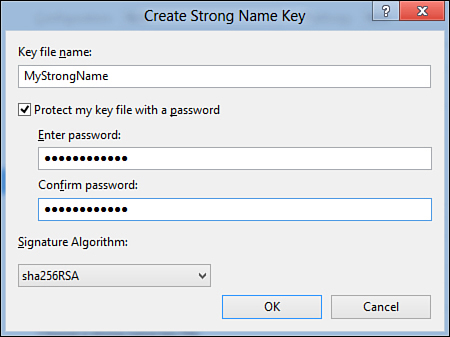
Figure 50.3. Providing name and password for the new strong name.
Specifying a password is not mandatory. If you do not provide a password, Visual Studio generates an .snk file instead of a .pfx one. I strongly recommend you provide a password.
Take note of the password you assign to strong names. It will be required every time you open the project from another computer different from the one where you first added the strong name.
In Visual Studio 2012, you can specify an encryption algorithm, between sha256RA and sha1RSA. Both calculate a hash for the input data, which is the signature. The first one produces a 256 bit hash, the second one a 160 bit hash. The default selection is sha256RA and you can leave it unchanged. Choosing an encryption algorithm is a new feature in Visual Studio 2012. Remember that strong names are not the equivalent of certificates (such as Authenticode) that provide security trust, other than uniqueness, according to .NET security requirements. Finally, strong names can be applied to assemblies with the delay signing technique (see the Delay sign option in the MyProject Signing tab). In a few words, this technique writes only the public key in the executable and requires the private key be passed at a later stage, preventing the project from being compiled, debugged, and run from within Visual Studio. Because of this you need to skip the signature verification (e.g. running the Sn.exe tool passing the -Vr option). It is worth noting that you can disable signing enforcement on a machine even at the specific assembly signature level in the event you need to delay sign, but still want to debug. This topic is not covered in more detail because of its particular nature. You can get more information in the official MSDN documentation at http://msdn.microsoft.com/en-us/library/t07a3dye(VS.110).aspx.
CLS-Compliant Assemblies
Signing assemblies with strong names is mandatory in case you want them to be CLS-compliant.
Top Reasons for Installing (or Not) Assemblies to the GAC
As a rule, installing assemblies to the GAC is something that should be restricted only to particular scenarios. Situations when you want to take advantage of the GAC can be summarized as follows:
• Multiple applications referencing the same assemblies—In this case, it can be convenient to have a single copy of assemblies in the GAC instead of providing several copies in the application folder.
• Versioning—The GAC can maintain different versions of the same assembly. This problem is solved by the XCopy deployment, but your company can have a deployment strategy that prefers the GAC.
• Security—The GAC can be managed by system administrators for controlling-permissions using the Access Control List. If you need this control, installing assemblies to the GAC is a good choice.
In all other cases, you should refrain from installing assemblies to the GAC. Remember that this procedure affects the .NET Framework and any mistake can be fatal.
Summary
This chapter discussed important concepts you need to know before deploying .NET applications. You saw how the .NET Framework solves the Dll Hell problem by avoiding the need of component registration and allowing the XCopy deployment. Then you saw what the Global Assembly Cache is and how you can manage it for sharing assemblies among multiple applications. In addition, you got information on strong names and on how to apply them to your assemblies so these can be installed to the GAC. Finally, you understood how to configure Windows Registry for making custom assemblies in the GAC visible from the Add Reference dialog box in Visual Studio. All this information is important to understand how you deploy libraries, controls, and assemblies together with your executables. Now that you know this, you are ready to deploy your applications with Visual Studio tools.