
The PPU’s most important role is managing the Synergistic Processor Elements (SPEs). In many applications, this is the PPU’s only role. This management process entails loading executable code into an SPE, initializing its data, starting execution, and monitoring events as the execution proceeds.
The SPE Runtime Management Library (libspe) provides the functions that make this management possible. It is no exaggeration to say that this is the most important library in the SDK. You can write Cell applications without knowing about vectors or direct memory access, but if you don’t know libspe, your applications won’t be able to access the entire Cell processor.
It may seem premature to discuss SPE management before explaining what SPEs are or how they work. But the libspe functions described in this chapter don’t access SPE resources directly. Instead, they operate on data structures that represent aspects of an SPE’s operation. The central data structures are program handles and contexts: Program handles serve as wrappers around SPE executables, and contexts wrap around the SPEs themselves.
This chapter will not discuss libspe functions that deal with interprocessor communication, such as mailboxes, channels, and DMA. It only covers contexts and program handles: what they are and how they’re created, modified, and destroyed. This discussion begins with a brief description of these two structures and then provides a walkthrough of how to create a basic libspe executable (with and without the IDE).
PPU code accesses SPEs through data structures called contexts, and each context represents a single SPE. This data structure contains fields that access the SPE’s processing unit, memory, and communication resources. Most of this chapter deals with how contexts work and the different ways they can be used.
To be useful, a context must be loaded with SPE-specific instructions. In libspe, these executable instructions are represented by a data structure called a program handle. Figure 7.1 shows how program handles and contexts work together to execute an SPE application.
The libspe routines that make up the context’s life cycle take some time to get used to. Before I describe them individually, I’d like to show how they work together in a basic example.
As depicted in Figure 7.1, the first step in managing an SPE’s operation is to create a program handle from an SPE executable. For this first libspe example, Listing 7.1 presents the SPE code that will be used to create the executable.
The only difference between this listing and the code in previous chapters is that main accepts three parameters. These are initialized by the PPU application and are given by the following:
spe_id:Identifies the SPE execution threadargp:Data sent by the PPU to the SPEenvp:Environmental data passed to the SPE
The argp and envp parameters can take any 64-bit integer value, but they’re commonly used to send effective addresses from the PPU to the SPE. The SPE can then use the addresses to load additional data from main memory.
Note
The SPE (Synergistic Processor Element) consists of the SPU (Synergistic Processor Unit), which processes data, and the MFC (Memory Flow Controller), which transfers data between the SPU and the rest of the Cell. The terms SPE and SPU can generally be used interchangeably.
Despite its length, the PPU code in Listing 7.2 is simple. It starts by accessing a program handle (spu_basic) and creating an SPE context (ctx). Then it loads the program handle into the context, runs the context, and destroys the context.
Example 7.2. PPU Code to Launch the SPU Executable: ppu_basic.c
#include <stdio.h>
#include <stdlib.h>
#include <libspe2.h>

extern spe_program_handle_t spu_basic;  /* Program handle */

int main(int argc, char **argv) {
   spe_context_ptr_t ctx;               /* Context */
   unsigned int entry_point;            /* Start address */
   int retval;                          /* Return value */
   spe_stop_info_t stop_info;           /* Stop info */

   /* Create the SPE Context */
   ctx = spe_context_create(0, NULL);
   if (!ctx) {
      perror("spe_context_create");
      exit(1);
   }

   /* Load the program handle into the context */
   retval = spe_program_load(ctx, &spu_basic);
   if (retval) {
      perror("spe_program_load");
      exit(1);
   }

   /* Run the program inside the context */
   entry_point = SPE_DEFAULT_ENTRY;
   retval = spe_context_run(ctx, &entry_point, 0,
                            NULL, NULL, &stop_info);
   if (retval < 0) {
      perror("spe_context_run");
      exit(1);
   }

   /* Deallocate the context */
   retval = spe_context_destroy(ctx);
   if (retval) {
      perror("spe_context_destroy");
      exit(1);
   }
   return 0;
}
Don’t worry if you can’t follow what the functions are doing just yet. For now, it’s important to combine ppu_basic.c and spu_basic.c into a single executable. Then when you run the PPU executable, you’ll see the output generated by the SPE.
The Chapter7 folder contains two subdirectories related to the basic application: basic_cl and basic_ide. They contain the same source code, but the first project is structured to be built from the command line, whereas the second is meant to be built in the Cell SDK IDE.
There are three files in the basic_cl project folder: ppu_basic.c, spu_basic.c, and Makefile. This project structure is simple and convenient, but in many cases, it’s a good idea to keep PPU code and SPU code in separate directories. This organization becomes particularly helpful when you need to load different executables on different SPEs.
If you look at the Makefile in the basic_cl project, you’ll see that the build process consists of three steps. The first is straightforward: Build the SPE executable from the spu_basic.c source. This is accomplished with the following command:
spu-gcc spu_basic.c -o spu_basic
The next step requires explanation. Before the SPE executable can be accessed by the PPU, it has to be converted into a PPU object file (*.o). The Makefile performs this conversion with the ppu-embedspu command, which is discussed in the following section. The full conversion command is given by
ppu-embedspu -m64 spu_basic spu_basic spu_basic.o
This creates the PPU object file spu_basic.o from the spu_basic executable. If you’re compiling for a 32-bit system (such as a simulator), switch the -m64 flag to -m32.
After the object file has been created, the PPU executable can be built with the last step:
ppu-gcc -o ppu_basic ppu_basic.c spu_basic.o -lspe2
If all goes well, the output of ./ppu_basic should look like this:
Hello World! My thread id is 268509248
The SPE generates the string and sends it to the PPU for display.
Unlike command-line usage, the Cell SDK IDE requires that PPU code and SPE code be placed in separate projects. For this reason, the basic_ide folder contains two project folders: ppu_basic and spu_basic. To build a single executable from these project folders, perform the following steps:
Create a new C project in Eclipse (Managed Make if available) called spu_basic. Select Cell SPU Executable as the project type and click Finish.
Import SPE source code into the project. Right-click spu_basic, select Import and General, File System. Click Browse and select the Chapter7/basic_ide/spu_basic folder. Click OK and select the check box for spu_basic in the window that follows. Click Finish and the project will compile automatically.
Create another C project in Eclipse called ppu_basic. Select Cell PPU Executable as the project type and click Finish.
Import PPU source code into the project. Right-click ppu_basic, select Import and General, File System. Click Browse and select the Chapter7/basic_ide/ppu_basic folder. Click OK, select the check box for ppu_basic in the following window, and click Finish. The project will not compile successfully because the SPE Runtime Management Library hasn’t been added to the link step.
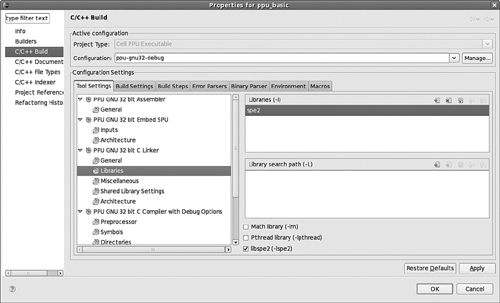
To link the libspe library into the build, right-click the ppu_basic project and select Properties. On the left of the Properties window, click the C/C++ Build entry. In the Tool Settings tab, select the Libraries option under the PPU GNU 32 bit C Linker heading. This is shown in Figure 7.2.
On the right, you’ll see a box entitled Libraries (-l). To the right of the title, you’ll see a paper icon with a green plus sign. Click this icon and type spe2 in the dialog box. Click OK and
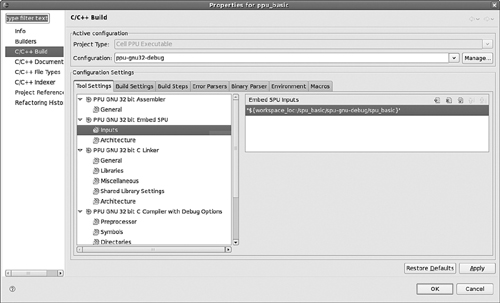
libspewill be linked into the executable.Click Inputs under the PPU GNU 32 bit Embed SPU heading. In the Embed SPU Inputs box on the right, click the paper icon with the green plus sign.
Click the Workspace button in the Add file path dialog, expand the spu_basic project, and select the
spu_basicexecutable in the spu-gnu-debug folder. Click OK in the File selection dialog, OK in the Add file path dialog, and OK in the Properties window. This tells Eclipse to convert the SPU executable into a PPU object file and link it into the PPU build process. This is shown in Figure 7.3.
When you’ve completed these steps, the ppu_basic project will build successfully and you’ll be able to run ppu_basic using the process described in Chapter 5, “The Cell SDK Integrated Development Environment.” In the console window, you should see a result similar to the following:
Hello World! My thread id is 268509248
Now that you’ve seen what a basic libspe application looks like, it’s time to explore the functions that manage SPE operation. The full management process can be divided into seven tasks (not all required), and Table 7.1 lists each along with the functions that perform them.
Table 7.1. Steps in the SPE Management Process
Task | Function(s) |
|---|---|
1. Examine system configuration. |
|
2. Embed the SPE executable into the PPU application. |
|
3. Create a context for each SPE. |
|
4. Create an event handler and register events. |
|
| |
5. Load the program handle into the context and run. |
|
| |
6. Wait for events and analyze stop information. |
|
| |
7. Deallocate data structures. |
|
| |
|
This section describes each function in detail. The basic application in Listing 7.2 didn’t use all of them, but as the discussion progresses, example code is provided that accesses multiple SPEs, handles events, and analyzes why the SPEs terminated their operation.
The code in Listing 7.1 accesses a single SPE on a single processor, so there’s no need to examine the target system. But when execution is distributed across multiple SPEs and multiple Cell devices, it’s important to know exactly what resources are available. For example, IBM’s QS20 blade server contains two Cells with a total of 16 available SPEs. Sony’s PlayStation 3 provides a single Cell and makes six SPEs available for use.
libspe accesses system information with the function spe_cpu_info_get. Its full signature is given by the following:
int spe_cpu_info_get(unsigned int info_requested, int cpu_node)
The first argument, info_requested, specifies the type of information the function should return. It can take one of three values:
The second argument, cpu_node, identifies which processor in the system is being examined. If the system supports NUMA (nonuniform memory access), this value identifies the Cell by its NUMA designation. Otherwise, there may be no clear relationship between this number and the processor. Use 0 if only one processor is available or −1 for information about all the Cell processors combined.
For example
spe_cpu_info_get(SPE_COUNT_USABLE_SPES, 0)
returns 6 on the PlayStation 3 because there are only six SPEs available. Replacing 0 with −1 produces the same result.
Before an executable can be loaded onto an SPE, it has to be embedded in a PPU object file. For example, to run the spu_basic executable in Listing 7.1, it must be converted into spu_basic.o, a PPU object file called a CESOF (CBE Embedded SPE Object Format). Then, during the build process, the object file is linked into the PPU application. Appendix A, “Understanding ELF Files,” provides more information about CESOF files and object files in general.
In addition to this compile-time embedding, libspe makes it possible to access SPE executables during runtime. Figure 7.4 shows how compile-time and runtime embedding are performed.
In both cases, the end goal is to create an spe_program_handle_t data structure to serve as the program handle.
The PPU code in Listing 7.2 accesses the program handle with the following line:
extern spe_program_handle_t spu_basic;
This assumes that the SPE executable has already been converted into a PPU object file containing a program handle called spu_basic. As shown in the Makefile, the conversion process is performed by ppu-embedspu, which creates a PPU object file from the SPE executable. Its usage is given by the following:
ppu-embedspu -m64 spu_id spu_id spu_id.o
The parameters are as follows:
-m64/-m32:Specify whether the target is a 64-bit or 32-bit PowerPCspu_basic:Name of the handle for the SPU programspu_basic:Name of the input SPE executablespu_basic.o:Name of the output PPU object file
To make the program handle available to the PPU code, the object file must be added to the PPU build:
ppu-gcc -o ppu_basic ppu_basic.c spu_basic.o -lspe2
If you use the SDK IDE, the IDE embeds the SPE executable for you. In the example described earlier, you configured this by adding the SPE executable (spu_basic) as an input into the project’s build properties. During the build process, the IDE looks for the executable and uses ppu-embedspu to create an object file called spu_basic.o. Then it links this object file within the PPU application during the build.
Instead of linking an SPE object file into the PPU build, you can dynamically embed the SPE executable at runtime. libspe provides the spe_image_open function for this purpose. This function accepts the name of an SPE executable, memory-maps its executable segment into its process space, and returns a pointer to the program handle. Its signature is given by the following:
spe_program_handle_t *spe_image_open(const char *filename)
The following code shows how spe_image_open is used. This maps an SPE executable, spu_basic, to memory and returns a pointer to the memory-mapped program handle:
spe_program_handle_t* image;
image = spe_image_open("spu_basic");
if (image == NULL) {
   perror("spe_image_open");
   return errno;
}
After the spe_program_handle is created and the executable is run, it can be deallocated with spe_image_close.
As explained earlier, a context represents an individual SPE—its processing unit, registers, and communication resources. Contexts are created with spe_context_create, and the function’s signature is given by the following:
spe_context_ptr_t spe_context_create(unsigned int flags,
                                     spe_gang_context_ptr_t gang)
The first parameter, flags, controls aspects of the context’s behavior and communication. It takes one of the following values or an ORed combination thereof:
SPE_EVENTS_ENABLE:The PPU will be notified when SPE events occur.SPE_MAP_PS:Memory-mapped access is provided to the SPE’s problem-state area.SPE_CFG_SIGNOTIFY1_OR:Configure Signal Notification Register 1 to operate in Logical OR mode.SPE_CFG_SIGNOTIFY2_OR:Configure Signal Notification Register 2 to operate in Logical OR mode.SPE_ISOLATED:The SPE executes its application in secure isolation mode.SPE_ISOLATED_EMULATE:The SPE executes its application in a manner resembling the secure isolation mode.
The SPE_EVENTS_ENABLE flag tells the PPU to monitor SPE events as they occur, and the next subsection explains how to respond to events in code. SPE_MAP_PS gives you low-level access to the SPE’s problem-state (unprivileged) resources. This important capability is discussed at length in Section 7.5, “Direct SPE Access.” The next two flags deal with SPE signals, which are discussed in Chapter 13, “SPU Communication, Part 2: Events, Signals, and Mailboxes.”
SPE_ISOLATED shields the SPE from intrusion by isolating the SPE and its local memory from the rest of the chip. SPE_ISOLATED_EMULATE makes it possible to test secure applications. Chapter 14, “Advanced SPU Topics: Overlays, Software Caching, and SPU Isolation,” describes SPE security in detail.
The second parameter, spe_gang_context_ptr_t, is a collection of contexts called a gang context. Gang contexts are important if you want to manage multiple SPEs as a group. Section 7.4, “Gang Contexts and Affinity,” discusses the subject of gang contexts.
This function returns a context that represents a random SPE. In code, contexts are accessed through an spe_context_ptr_t, which points to an spe_context. These two structs are declared as follows:
struct spe_context {
   spe_program_handle_t handle;
   struct spe_context_event_priv* event_private;
   struct spe_context_base_priv* base_private;
};
typedef struct spe_context* spe_context_ptr_t;
The first field, handle, holds the program handle created from the SPE executable. event_private stores information regarding SPE events and base_private stores information about the SPE’s resources.
You can gain information about SPE resources through the base_private field, but IBM recommends against accessing base_private and event_private directly in code. There are easier, cleaner ways to obtain low-level access to SPE resources, and Section 7.5 explains how they work.
If the context is created with the SPE_EVENTS_ENABLE flag, the PPU can monitor SPE events using the Cell’s event handling mechanism. These events include when and why the SPE stopped executing and the details of its communication with other elements. Configuring event processing in a PPU application requires three steps:
Create an event handler.
Create and initialize an event for each event type to be monitored.
Register the events with the event handler.
This event handler is created with the function spe_event_handler_create. This has no parameters, but returns an spe_event_handler_ptr_t struct to handle events.
After the event handler has been created, it needs to be told which types of events it should respond to. Each event type is represented by an spe_event_unit_t data structure, whose declaration is as follows:
typedef struct spe_event_unit {
   spe_context_ptr_t spe;
   unsigned int events;
   spe_event_data_t data;
} spe_event_unit_t;
The first two fields, spe and events, must be initialized before the event can be registered with the handler. The spe field is the context that should be monitored. The events field holds the type of event to be monitored, and can take any of the following values or an ORed combination thereof:
SPE_EVENT_SPE_STOPPED:Responds when the SPE finishes processingSPE_EVENT_IN_MBOX:Responds when the SPE inbound mailbox is able to receive dataSPE_EVENT_OUT_INTR_MBOX:Responds when the SPE receives data in its outbound interrupting mailboxSPE_EVENT_TAG_GROUP:Responds when the DMA transfer associated with a given tag group has completedSPE_EVENT_ALL_EVENTS:Responds to all the above events
The first event type, SPE_EVENT_STOPPED, is the simplest and most common. The PPU receives this event when the SPE halts. The rest of the events, involving mailboxes and tag groups, are discussed in Chapters 12, “SPU Communication, Part 1: Direct Memory Access (DMA),” and 13, “SPU Communication, Part 2: Events, Signals, and Mailboxes,” which explain how SPEs perform communication and data transfer.
After an event has been created and initialized, it can be registered with the event handler. This tells the event handler what events it should be interested in. Registration is performed by spe_event_handler_register, whose signature is given by the following:
int spe_event_handler_register(spe_event_handler_ptr_t evhandler,
                               spe_event_unit_t *event);
As an example, the following code creates an event handler called ehandler and an event called event. This event will respond to SPE_EVENT_STOPPED events produced by the context ctx. The last line registers event with ehandler:
spe_event_handler_ptr_t ehandler = spe_event_handler_create();
spe_event_unit_t event;
event.spe = ctx;
event.events = SPE_EVENT_STOPPED;
spe_event_handler_register(ehander, &event);
Once event handling is configured, the PPU application starts the SPE’s execution and waits for events to occur. These are the subjects of Steps 5 and 6, respectively.
At this stage, the application has a program handle (spe_program_handle_t) representing the SPE executable and a context (spe_context_ptr_t) representing the target SPE. Now the program handle can be loaded into the context. This is performed by spu_program_load, and its signature is as follows:
int spe_program_load(spe_context_ptr_t spe,
                     spe_program_handle_t *program)
This is simple to use and understand, but remember that a context can only support one program handle at a time.
After the program is loaded into the context, spe_context_run starts execution on the SPE. Its signature is given by the following:
int spe_context_run(spe_context_ptr_t spe, unsigned int *entry,
                    unsigned int runflags, void *argp, void *envp,
                    spe_stop_info_t *stopinfo)
The second argument, entry, contains an address in the SPE’s 256KB local store (LS). When the function starts, this argument tells the SPE where it should start processing instructions. If this parameter is set to SPE_DEFAULT_ENTRY, the SPE will start processing instructions at its default address.
When spe_context_run completes, entry holds the address of the last processed instruction. If the SPE halts, spe_context_run can be called again, and the SPE will continue processing instructions where it left off.
The third argument, runflags, configures aspects of the SPE’s execution. This can take one or both of the following values:
SPE_RUN_USER_REGS:SPE Registers 3, 4, and 5 will be taken up with the 48 bytes pointed to byargp.SPE_NO_CALLBACKS:The SPE cannot call on the PPU to perform functions beyond the SPE’s capability.
As shown in Listing 7.1, the three parameters received by the SPE’s main function are spe_id, argp, and envp. These are normally stored in Registers 3, 4, and 5 within the SPE. If the SPE_RUN_USER_REGS flag is set, these registers will be taken up with only the data pointed to by argp.
The SPE_NO_CALLBACKS flag disallows the SPE from offloading functions to the PPU. This can be dangerous because SPE’s won’t be able to rely on the PPU to perform functions such as printf. PPU-assisted functions will be discussed further in Chapter 10, “Introducing the Synergistic Processor Unit (SPU).”
After initializing the SPE registers, spe_context_run tells the SPU to start processing instructions at the entry location. When the function completes, information about the SPU’s halted execution is stored in the final argument of spe_context_run, stopinfo. This information can be helpful in analyzing the SPE’s operation.
If a context was created with the SPE_EVENTS_ENABLE flag, its operation will be monitored as the executable runs. The events received by the event handler can be accessed by the function spe_event_wait. Its signature is given by the following:
int spe_event_wait(spe_event_handler_ptr_t evhandler,
                   spe_event_unit_t *events,
                   int max_events, int timeout);
The first two arguments are simple; the first identifies the event handler, and the second points to one or more events that were detected during the time of the wait.
The third argument, max_events, specifies the maximum number of events that the function will receive before completing. timeout specifies the maximum number of milliseconds that the function will wait before returning. -1 tells the function to wait indefinitely. The return value of this function is the number of events received during its operation.
libspe also provides a function that returns information about a context’s completion. This function is spe_stop_info_read and its signature is given by the following:
int spe_stop_info_read(spe_context_ptr_t ctx, spe_stop_info_t *stop_info)
The second argument, stop_info, points to data related to the context’s termination. The spe_stop_info_t struct is declared as follows:
typedef struct spe_stop_info {
   unsigned int stop_reason;
   union {
      int spe_exit_code;
      int spe_signal_code;
      int spe_runtime_error;
      int spe_runtime_exception;
      int spe_runtime_fatal;
      int spe_callback_error;
      /* Reserved fields */
      void *__reserved_ptr;
      unsigned long long __reserved_u64;
   } result;
   int spu_status;
} spe_stop_info_t;
The first field, stop_reason, identifies the broad reason why the SPE stopped. It can take one of five values:
SPE_EXIT:The SPE terminated normally, and the exit code is stored inspe_exit_code.SPE_STOP_AND_SIGNAL:The SPE terminated because of a stop/signal instruction. The signal number is stored in the 14 LSBs ofspe_signal_code.SPE_RUNTIME_ERROR:The SPE stopped because of a runtime error or exception. If it was an error, the error type (SPE_SPU_HALT,SPE_SPU_SINGLE_STEP,SPE_SPU_INVALID_INSTR, orSPE_SPU_INVALID_CHANNEL) will be stored inspe_runtime_error. If it was an exception (SPE_DMA_ALIGNMENT,SPE_DMA_SEGMENTATION, orSPE_DMA_STORAGE), the exception type will be stored inspu_runtime_exception.SPE_RUNTIME_FATAL:The SPE stopped because of a fatal error, such as an operating system failure. The errno is stored inspe_runtime_fatal.SPE_CALLBACK_ERROR:The SPE stopped because of a failed attempt to call a PPU function. The function’s return code is stored inspe_callback_error.
The result field provides additional data about the SPE’s termination. The nature of the information it contains depends on the value of stop_reason. The last field, spu_status, is unnecessary for most applications.
Listing 7.3 shows how libspe event handling is performed in code. The SPE code in the events project is the same as that in the basic project, but the PPU application creates an event handler to monitor when the SPE completes its processing. When the SPE_EVENT_SPE_STOPPED event occurs, the PPU application displays stop_reason and the value of spe_exit_code.
Example 7.3. Monitoring SPE Events from the PPU: ppu_events.c
#include <stdio.h>
#include <stdlib.h>
#include <libspe2.h>

#define MAX_EVENTS 16

extern spe_program_handle_t spu_events; /* Program handle */

int main(int argc, char **argv) {
   int i, event_count;
   spe_context_ptr_t ctx;               /* Context */
   unsigned int entry_point;            /* Start address */
   int retval;                          /* Return value */
   spe_stop_info_t stop_info;           /* Stop info */

   spe_event_handler_ptr_t ehandler;    /* Event handler */
   spe_event_unit_t event;              /* Event to be
                                           handled */
   spe_event_unit_t events[MAX_EVENTS]; /* Events to be
                                           received */

   /* Create the context */
   ctx = spe_context_create(SPE_EVENTS_ENABLE, NULL);
   if (!ctx) {
      perror("spe_context_create");
      exit(1);
   }

   /* Create an event handler and event */
   ehandler = spe_event_handler_create();
   event.spe = ctx;
   event.events = SPE_EVENT_SPE_STOPPED;
   spe_event_handler_register(ehandler, &event);

   /* Load the program handle into the context */
   entry_point = SPE_DEFAULT_ENTRY;
   retval = spe_program_load(ctx, &spu_events);
   if (retval) {
      perror("spe_program_load");
      exit(1);
   }

   /* Execute the program inside the context */
   retval = spe_context_run(ctx, &entry_point, 0,
                         NULL, NULL, &stop_info);
   if (retval < 0) {
      perror("spe_context_run");
      exit(1);
   }

   /* Receive events and analyze stop information */
   event_count = spe_event_wait
      (ehandler, events, MAX_EVENTS, 10);
   printf("Number of events detected: %d
", event_count);
   for (i=0; i<event_count; i++) {
      if (events[i].events & SPE_EVENT_SPE_STOPPED) {
         printf("Received SPE_EVENT_SPE_STOPPED
");
         spe_stop_info_read(events[i].spe, &stop_info);
         printf("Stop reason: ");
         switch(stop_info.stop_reason) {
            case 1: printf("SPE_EXIT
");
                    break;
            case 2: printf("SPE_STOP_AND_SIGNAL
");
                    break;
            case 3: printf("SPE_RUNTIME_ERROR
");
                    break;
            case 4: printf("SPE_RUNTIME_EXCEPTION
");
                    break;
            case 5: printf("SPE_RUNTIME_FATAL
");
                    break;
            case 6: printf("SPE_CALLBACK_ERROR
");
                    break;
         }
         printf("Exit code: %d
",
            stop_info.result.spe_exit_code);
               }
       }

   /* Free the event handler and context */
   spe_event_handler_destroy(ehandler);
   retval = spe_context_destroy(ctx);
   return 0;
}
The displayed output should look similar to the following:
Hello World! My thread id is 268537872
Number of events detected: 1
Received SPE_EVENT_SPE_STOPPED
Stop reason: SPE_EXIT
Exit code: 0
As shown, event handling begins after the SPE completes its operation. In this case, the PPU waits until either 16 events have been received or until 10ms have elapsed.
The last step in SPE management is simple but important. libspe provides three main functions that deallocate memory for its data structures:
spe_image_close:Unmaps the SPE object mapped byspe_image_openspe_event_handler_destroy:Deallocates the event handler created byspe_event_handler_createspe_context_destroy:Deallocates the context created byspe_context_create
The first function is required only if runtime file conversion is used, and the second function is usable only when the application creates an event handler. The third function deallocates the SPE context, so it is always necessary in libspe applications.
Looking back at the code in Listing 7.3, you may feel disappointed. It has many good points but there’s one glaring deficiency: It executes code on only a single SPE. Even the PlayStation 3 provides six SPEs, so you’d think that an application of that size and complexity would access more than one.
The problem is that the PPU thread halts when spe_context_run is called. If you want to invoke this function to run multiple contexts at once, you need to make the function calls in separate threads. Specifically, you need to create POSIX threads (pthreads) and use each pthread to make a separate call to spe_context_run. With pthreads, you can also constrain SPE resource access with mutexes and condition variables.
This section discusses how pthreads are used in libspe code and explains the conventions used by IBM in its sample applications. This subject is very important, so before getting into the code, let’s briefly review the basics of pthreads.
In my opinion, the best way to explain pthreads is to contrast them with Linux processes. When one Linux process creates a second process to perform a task, the new process is completely separate; it receives its own program instructions and resources (registers, file descriptors, heap, stack, and so on).
But when a Linux process creates pthreads to perform tasks, the pthreads are only partially separate. Each pthread receives its own set of instructions, but must share much of the process’s resources with other pthreads. Using pthreads allows for independent processing without allocating all the resources needed for a separate process. But because the threads’ resources are shared, the programmer must ensure that critical resources are accessed in an orderly fashion.
The pthread standard (IEEE-1003.1c) lists hundreds of pthread routines, but this brief treatment describes three: pthread_create, pthread_exit, and pthread_join. The first function creates the pthread and initializes it with data and the function to be processed. The signature of pthread_create is given as follows:
int pthread_create(pthread_t *thread,
                   const pthread_attr_t *attribute,
                   void* (*function)(void *),
                   void *data);
The arguments are listed as follows:
thread:Pointer to the thread’s identification number (similar to a file descriptor)attributes:Pointer to configurable thread attributes (NULLfor default behavior)function:Pointer to a function that accepts avoid*argument and returnsvoid*data:Pointer to data to be used as the function argument
For example, if you want to create four threads that all perform the function func on a char* called string, you could run a loop similar to the following:
for (i=0; i<4; i++)
   pthread_create(&thread[i], NULL, &func, (void *)string);
After the threads have been created, they invoke the function identified in pthread_create. The thread terminates when the function returns or when the thread calls pthread_exit. The function’s signature is given by the following:
void pthread_exit(void *return_value);
The function argument points to the return value of the thread’s function.
As the threads continue processing, the calling thread can perform other tasks. When it needs a thread to finish, however, it calls pthread_join. This causes the calling thread to wait for a specific thread to complete its task. Its signature is given by the following:
int pthread_join(pthread_t thread, void **value_ptr);
The first argument identifies the thread to be waited on, and the second points to the return value of the thread’s function.
If you look through the SDK’s sample code, you’ll find that threads in PPU code are coded similarly from application to application. This is because IBM developers rely on a set of code conventions that specify how to create, initialize, and join threads. This book adopts these conventions for all libspe-based applications, and as you become better acquainted with these conventions, you’ll be better able to understand the SDK’s examples.
By convention, the function to be performed by threads is called ppu_thread_function. This function calls spe_context_run to start the SPE executable, and then calls pthread_exit to terminate the thread.
The ppu_thread_function generally receives a data structure called ppu_thread_data. This is declared as follows:
typedef struct ppu_pthread_data {
   spe_context_ptr_t speid;       /* The SPE context */
   pthread_t pthread;             /* The thread */
   void *argp;                    /* Initialization data */
} ppu_pthread_data_t;
The first field points to the SPE context to be run, and the second is the pthread structure itself. The third argument points to the data that will be used to initialize the SPE. This data is usually packaged in a data structure called a control_block, and the content of this structure depends on the nature of the application.
In summary, the pthread code conventions in this book are as follows:
ppu_thread_function:The function called by the thread, callsspe_context_runppu_thread_data:The data received by the thread, contains a pointer tocontrol_blockcontrol_block:The data used to initialize the SPE
If the discussion of libspe and pthreads makes sense so far, the code in Listing 7.4 shouldn’t pose any difficulty. It accesses the program handle like the previous PPU applications, but now multiple SPEs respond instead of just one.
Example 7.4. PPU Code That Creates SPE Threads: ppu_threads.c
#include <stdio.h>
#include <stdlib.h>
#include <libspe2.h>
#include <pthread.h>

/* The data sent to the pthread */
typedef struct ppu_pthread_data {
    spe_context_ptr_t speid;
    pthread_t pthread;
    void* argp;
} ppu_pthread_data_t;

/* The function executed in the pthread */
void *ppu_pthread_function(void *arg) {
   ppu_pthread_data_t *data = (ppu_pthread_data_t *)arg;
   int retval;
   unsigned int entry = SPE_DEFAULT_ENTRY;
   if ((retval = spe_context_run(data->speid,
      &entry, 0, data->argp, NULL, NULL)) < 0) {
      perror("spe_context_run");
      exit (1);
   }
   pthread_exit(NULL);
}

/* SPU initialization data */
unsigned long long control_block;

/* SPU program handle */
extern spe_program_handle_t spu_threads;
ppu_pthread_data_t data[16];

int main(int argc, char **argv) {
   int i, retval, spus;

   /* Determine number of available SPUs */
   spus = spe_cpu_info_get(SPE_COUNT_USABLE_SPES, 0);
   if (argc != 2) {
      printf("Usage: 'ppu_threads <1-%u>'
", spus);
      exit(1);
   }
   else if ((atoi(argv[1]) < 1) ||
      (atoi(argv[1]) > spus)) {
      printf("Usage: 'ppu_threads <1-%u>'
", spus);
      exit(1);
   }
   else
      spus = atoi(argv[1]);

   /* Create a context and thread for each SPU */
   for (i=0; i<spus; i++) {

      /* Create context */
      if ((data[i].speid = spe_context_create
            (0, NULL)) == NULL) {
         perror("spe_context_create");
         exit(1);
      }

      /* Load program into the context */
      if ((retval = spe_program_load(data[i].speid,
         &spu_threads)) != 0) {
         perror("spe_program_load");
         exit (1);
      }

      /* Initialize control block and thread data */
         control_block = i;
          data[i].argp = (void*)control_block;

      /* Create thread */
      if ((retval = pthread_create(&data[i].pthread,
         NULL, &ppu_pthread_function, &data[i])) != 0) {
         perror("pthread_create");
         exit (1);
      }
   }

   /* Wait for the threads to finish processing */
   for (i = 0; i < spus; i++) {
      if ((retval = pthread_join
          (data[i].pthread, NULL)) != 0) {
          perror("pthread_join");
          exit (1);
      }
      if ((retval = spe_context_destroy
          (data[i].speid)) != 0) {
          perror("spe_context_destroy");
          exit (1);
      }
   }
   return 0;
}
If the compiled application is executed with the command
./ppu_threads 4
the displayed output will look like this:
Hello World! The value of argp is 0
Hello World! The value of argp is 3
Hello World! The value of argp is 1
Hello World! The value of argp is 2
Note the difference between this and the SPE output in previous projects: The SPE prints the value of argp, not speid. The argp data is initialized inside the PPU application by casting the unsigned long long value of control_block to a void*. argp is usually set to an effective address, but this example uses a number so that the SPE doesn’t have to access main memory.
In the example code provided so far, all the contexts have been created with the second argument set to NULL. This second argument refers to a gang context, which is essentially a group of contexts. A gang context is created with spe_gang_context_create, whose signature is given by the following:
spe_gang_context_ptr_t spe_gang_context_create(unsigned int flags)
At the time of this writing, there are no available flags for this function. No other function uses gang contexts except spe_gang_context_destroy. There is no way to set gang-level properties or access the individual contexts of a gang. But gang contexts serve one important purpose: They enable affinity between contexts. This is an important concept and requires some background.
If your application uses multiple SPEs and requires a great deal of memory access, it’s important that the SPEs be positioned properly to keep bus contention to a minimum. (Chapter 12 discusses this in detail.) However, there’s no way to pick which SPE is represented by a given context; the libspe functions make this association randomly. But if you create a context with affinity for another, the two contexts will correspond to adjacent SPEs. This means that communication between the two SPEs won’t interfere with other SPEs using the bus.
The function that enables affinity is spe_context_create_affinity, and its signature is given by the following:
spe_context_ptr_t spe_context_create_affinity
   (unsigned int flags, spe_context_ptr_t neighbor,
   spe_gang_context_ptr_t gang)
This function creates a context whose SPE is adjacent to the one represented by neighbor, whose value can be NULL. This function can be used repeatedly to create a chain of adjacent contexts.
The last argument identifies a gang context, and this cannot be NULL. Contexts with affinity must belong to the same gang. Also, all the contexts in a gang must be created before any of them can run executables. The flags argument is an ORed combination of the following:
SPE_EVENTS_ENABLE:The PPU will be notified when SPE events occur.SPE_MAP_PS:Memory-mapped access is provided to the SPE’s problem-state area.SPE_CFG_SIGNOTIFY1_OR:Configure Signal Notification Register 1 to operate in Logical OR mode.SPE_CFG_SIGNOTIFY2_OR:Configure Signal Notification Register 2 to operate in Logical OR mode.SPE_ISOLATED:The SPE executes its application in secure isolation mode.SPE_ISOLATED_EMULATE:The SPE executes its application in a manner resembling the secure isolation mode.SPE_AFFINITY_MEMORY:The new context will correspond to the SPE closest to main memory.
The first six flags are the same as those used in spe_context_create, but the last one is unique for contexts created with affinity. This flag, SPE_AFFINITY_MEMORY, associates the context with the SPE closest to the Memory Interface Controller (MIC). By placing a context as close as possible to memory, the transfer between memory and the SPE will be rapid and won’t block other SPEs from communicating with one another. Only one context can be created with this flag.
The following code creates a gang context and a chain of eight adjacent contexts. The first of the contexts will be placed closest to main memory.
/* Create the gang context and eight contexts*/
spe_gang_context_ptr_t gang = spe_gang_context_create(0);

/* Create the eight contexts */
ctx[0] = spe_context_create_affinity(SPE_AFFINITY_MEMORY,
   NULL, gang);
for(i=1; i<8; i++)
   ctx[i] = spe_context_create_affinity(0, ctx[i-1], gang);

/* Destroy the eight contexts and the gang context */
for(i=0; i<8; i++)
   spe_context_destroy(ctx[i]);
spe_gang_context_destroy(gang);
Individual contexts must be freed with spe_context_destroy before the gang context can be deallocated with spe_gang_context_destroy.
On my PlayStation 3, spe_context_create takes approximately 400 microseconds—a long time for a function that just creates a data structure to interface an SPE. The reason for this is that spe_context_create does more than just create a context; it also creates an entire file system for the SPU, called SPUFS (SPU File System), whose files represent aspects of the SPU’s operation and storage. By accessing these files, you can directly read or modify SPE resources with common Linux file commands.
libspe also provides three functions that acquire information about the SPU’s LS and its internal registers. This section describes SPUFS and these functions in detail.
Note
Accessing the SPU directly is uncommon and recommended only for debugging. Because of the communication required, this can take a significant amount of time.
When a new context is created, the PPU creates a subdirectory in the /spu directory that stores information about the contexts used in an application. If the application creates a context with a process ID of pid and a thread ID of tid, the folder corresponding to the context will be /spu/spethread-pid-tid.
Each context folder contains a specific set of files, listed in Table 7.2. Users can change the permissions of these files, but they cannot be added to or removed.
Table 7.2. Files in the SPUFS Context Folder
File | Access | Content |
|---|---|---|
object-id | R | Pointer to the SPU’s executable code |
phys-id | R | The SPU’s physical identification number (0–7) |
mem | R/W | SPU’s LS |
psmap | R/W | Memory map of the SPU’s internal registers |
regs | R/W | SPU general-purpose registers |
srr0 | R/W | Interrupt Return Address Register |
cntl | R/W | SPU Control/Status Register |
npc | R/W | Next program counter |
mss | R/W | Multisource Synchronization Register |
mfc | R/W | Memory Flow Controller |
spu_tag_mask | R/W | MFC Tag Mask for SPU DMA |
event_mask | R/W | Mask for SPU interrupts |
decr | R/W | Decrementer |
decr_status | R/W | Decrementer Status |
fpcr | R/W | SPU’s Floating Point Status and Control Register |
mbox | R | First SPU-PPU mailbox register |
mbox_stat | R | Status of mbox register |
ibox | R | Second SPU-PPU mailbox register |
ibox_stat | R | Status of ibox register |
wbox | W | PPU-SPU mailbox register |
wbox_stat | R | Status of wbox register |
signal1 | R/W | Signal notification channel 1 |
signal1_type | R/W | Control behavior of signal1 |
signal2 | R/W | Signal notification channel 2 |
signal2_type | R/W | Control behavior of signal2 |
This table lists read and write access, but additional operations are available for many of the files. For example, the mem file can be accessed with pwrite, pseek, lseek, and mmap. With mmap, you can map an SPU’s entire LS into the process space.
The phys-id file is particularly interesting. Accessing this file is the only way to determine which of the SPUs (0–7) a given context is assigned to. Unfortunately, the content of this file is initialized after the SPU executable starts running. This means there’s no way to specify in advance which SPU should perform a given processing task.
The code in the spufs project creates a context and searches through /spu to determine the physical ID of the context’s corresponding SPE. The search is performed with the code shown here:
/* Find the context's ID */
int n = scandir("/spu", &spu_files, NULL, alphasort);
while(n—)
   if(!strncmp(spu_files[n] > d_name, "spethread", 9)) {
      sprintf(temp, "/spu/%s/phys-id", spu_files[n] > d_name);
      file = fopen(temp, "r");
      fgets(temp, 128, file);
      printf("context = %s, physid = %s
",
         spu_files[n] > d_name, temp);
      fclose(file);
   }
free(spu_files);
If this code is inserted in a PPU application after spe_context_run is called, it will display the name of the context folder and the SPE’s physical ID. If the ID can’t be resolved, the phys-id file will contain a value of 0xFFFFFFFF, or -1. In some cases, forcing threads to delay with sleep allows the PPU to access phys-id accurately.
libspe contains three functions that provide information about the SPE’s internal resources:
int spe_ls_size_get(spe_context_ptr_t): Returns the size of the SPE’s LSvoid* spe_ls_area_get(spe_context_ptr_t): Memory maps the LS to the process spacevoid* spe_ps_area_get(spe_context_ptr_t, ps_area): Memory maps a part of the SPU’s problem state
The first function is useful when you’re dealing with different generations of the Cell. The second, spe_ls_area_get, maps the SPE’s LS to main memory, allowing applications to directly read and modify the LS. It’s more efficient to use DMA for this, but this function has an important use: It returns the effective address of an SPE’s LS. By sending this address to other SPEs, the PPU can enable SPE-SPE communication.
The third function, spe_ps_area_get, maps one of five sets of SPE registers to memory. This is only available if the SPE_MAP_PS flag is used to create the context. The second argument, ps_area, specifies what data should be returned, and can take one of five values:
SPE_CONTROL_AREA:Returns the SPE’s control registers, such as the status register, program counter, and Run/Control registerSPE_MFC_COMMAND_AREA:Returns the registers in the SPE’s Memory Flow ControllerSPE_MSSYNC_AREA:Returns the registers involved in synchronizing communication between SPUsSPE_SIG_NOTIFY_1_AREA:Returns a pointer to the SPE’s signal notification area 1SPE_SIG_NOTIFY_2_AREA:Returns a pointer to the SPE’s signal notification area 2
The type of struct returned by the function depends on which of the five flags are used. These data structures are large and complicated, and are described in depth in the SPE Runtime Management Library documentation.
The SPE Runtime Management Library (libspe) is one of the most useful and important libraries in the SDK. Its functions manage every aspect of SPE operation, from loading the executable into SPE memory to analyzing why the executable stopped. The functions may seem strange at first, but they’ll become more familiar as you progress in Cell programming.
The fundamental data structure in libspe is the context. Each context represents a complete SPE, including its processor, memory, and communication resources. Nearly all PPU applications manage contexts in the same way: They create the context, load the program handle, and then run the context. When the executable finishes, the context is deallocated.
When a PPU application runs a context, its calling thread comes to a halt. For this reason, multiple contexts are usually run inside of Linux pthreads. Using regular pthread functions, the PPU application can run multiple contexts and wait for each to finish processing. IBM uses a standard set of conventions to manage contexts in threads, and they are followed throughout this book.
In addition to context management, libspe makes it possible to directly access SPE resources. The SPU File System (SPUFS) provides a file-based means of accessing SPE memory and registers. This low-level access can be complicated, but if you need information like which context an SPE is assigned to, it’s the only way.
Many applications only use the PPU for SPE management, but it’s capable of much more. In particular, it can process values in groups called vectors. The next two chapters deal with the process of coding with vectors, also called SIMD (Single Instruction, Multiple Data) programming.