
Sony’s add-on tools make it possible to access PS3 capabilities that go beyond those provided by the Linux operating system. New tools are released on a regular basis, and to update these packages on your console, two tasks are required:
Install the add-on RPMs contained in the CELL-Linux-CL_date-ADDON.iso file.
Update the Linux kernel to a version that supports the new features.
The first part is easy and takes less than five minutes. The second part is much more involved. This appendix describes both tasks.
There are many instances in which you don’t need the add-on RPMs, but you still have to update the kernel. You may need to configure features like hugepages, kernel debugging, or new file system management. In this case, skip Section B.1, “Add-On Packages for the PlayStation 3,” and proceed to Section B.2, “Configuring and Installing a New Linux Kernel,” which discusses the process of configuring, compiling, and installing a new Linux kernel.
Chapter 2, “The Cell Software Development Kit (SDK),” explains how to obtain the CELL-Linux-CL_date-ADDON.iso file, burn it to a CD, and use the CD to install Linux on the PlayStation 3. But there’s more on the CD than kboot; this CD contains updates of the Cell’s add-on tools that extend the capabilities of Linux on the PS3. This section explains what these packages are (at the time of this writing) and how to install them.
You can find the PS3 add-on packages in the target directory on the CD, and Table B.1 lists the files currently available. The source code for these packages can be found in the CD’s src directory.
Table B.1. PlayStation 3 Add-On Packages and Files
SDK Component | Description |
|---|---|
glibc-kernheaders-x.y.z-date.ppc.rpm | Contains header files for kernel compilation |
initrd.img-x.y.z | Initial ramdisk used during boot |
kernel-x.y.z-date.ppc64.rpm | Files related to the latest release of the Linux kernel |
kexec-tools-date-version.rpm | Reboot another kernel during Linux operation |
perfmon2_libpfm-x.y-date.ppc.rpm | Libraries for the performance monitor |
perfmon2_pfmon-x.y-date.ppc.rpm | The PS3 performance monitor |
ps3-utils-x.y.z-num.ppc.rpm | Utilities for the PS3 (see Table B.2) |
ps3-utils-libs-x.y.z-num.ppc.rpm | Libraries for the PS3 utilities |
vsync-sample-x.y.z-num.ppc.rpm | Example code for accessing the PS3 frame buffer |
wpa_supplicant-x.y.z-date.ppc64.rpm | Provides WPA (Wi-Fi Protected Access) interface for Linux |
The glibc-kernheaders package is required when compiling a new kernel and the kernel package installs a new kernel executable into /boot. Frame buffer programming is the topic of Chapter 19, “Programming the Frame Buffer: Linux and the PlayStation 3,” which makes use of the code in the vsync-sample package.
The ps3-utils package contains command-line executables that simplify the process of interfacing the PS3. Table B.2 lists each utility and provides a brief explanation of its purpose.
Table B.2. PlayStation 3 Utilities
Utility | Description |
|---|---|
| Change video mode settings for the PS3 |
| Shut down Linux and boot the PS3 Game OS |
| Access the PS3’s flash ROM |
| Send Other OS image to PS3’s standard output |
| Initialize the PS3’s real-time clock |
The ps3-video-mode utility enables you to change display settings without having to modify configuration files. ps3-flash-util provides low-level access to the console’s system flash memory, including boot flag settings, image compression flags, and internal database entries. The PlatformSpecficUtilities.html file in the CD’s doc directory explains each of these utilities in detail.
Installing the PS3 packages is a simple process. The first step involves mounting the add-on CD. After inserting the add-on CD into the PS3, create a mount point with the following command:
mkdir /mnt/cdrom
Then mount the CD with this:
mount -o loop /dev/cdrom /mnt/cdrom
To install all the PS3 packages, enter the following:
rpm -ivh --force /mnt/cdrom/target/*.rpm
Alternatively, you can install individual packages by replacing *.rpm with the names of the packages you’re interested in.
Broadly speaking, after you’ve installed the Linux kernel on a Cell system, you’re better off leaving it alone. But when you want to add patches or enable capabilities like hugepages, there’s only one thing to do: You have to configure, recompile, and reinstall the kernel. This section explains how this is done for the PlayStation 3, but the general process extends to other Cell systems.
This discussion assumes that you’ve burned the latest add-on ISO file (CELL-Linux-CL_date-ADDON.iso) onto a CD and that you’ve inserted the CD into the PS3. It also assumes that you have root privileges on your system.
The directions in this section provide a walkthrough of three main tasks:
Accessing the kernel source code
Configuring and building the kernel
Configuring the PS3 to boot the new kernel
Even if you’re only enabling a single feature like hugepages, you’ll need to proceed through the entire process.
The src directory on the add-on CD contains a file called linux-x.y.z-date.tar.bz2. This is the compressed source code for the latest Linux kernel. The kernel is the central controller of the Linux operating system: It manages all the processes, memory, and devices associated with the system.
This section explains how to decompress the kernel and prepare for compiling it. These directions make three assumptions:
The add-on RPMs on the CD are installed.
The mount point, /mnt/cdrom, exists.
The add-on CD is in the PlayStation 3.
If these requirements are met, mount the CD with the following command:
mount -o loop /dev/cdrom /mnt/cdrom
Then decompress the kernel file into /usr/src with this command:
tar -xjvf /mnt/cdrom/src/linux-x.y.z-date.tar.bz2 -C /usr/src
The decompression takes about a minute to complete. When it’s finished, you can look through the kernel source code in /usr/src/linux-x.y.z-date.
Before you can compile the kernel, however, you need to install dtc, the device tree compiler. Before you can run dtc, you have to install git. To install this component and its dependencies, enter the following command:
yum install git
The father of Linux, Linus Torvalds, chose git as the primary tool for managing the Linux kernel. For the purposes of this appendix, git is important because it downloads source code repositories with the clone command. Download the dtc source code repository into /usr/src/dtc with this command:
git clone git://www.jdl.com/software/dtc.git /usr/src/dtc
If this repository is unavailable, look through the developerWorks forum to find the current location of the dtc repository. After you’ve downloaded it, change to /usr/src/dtc with the following:
cd /usr/src/dtc
To build the device tree compiler, enter the following:
make
Then install the dtc tool with this command:
make install
At the time of this writing, the Logical Volume Manager (LVM) must be updated before the kernel is built. To install the patch, enter the following:
rpm -Uvh http://david.woodhou.se/lvm2-2.02.24-1.fc7.ps3.ppc.rpm
If this produces an error or the package can’t be found, it should mean that the LVM problem is fixed and no longer needs to be updated.
The kernel is decompressed and the compiler is created. Just to be sure that there are no files left from a previous build, change to the /usr/src/linux-x.y.z-date directory with
cd /usr/src/linux-x.y.z-date
and clean the environment with
make mrproper
Next, still in /usr/src/linux-x.y.z-date, copy the existing configuration file (.config) to this directory with the following:
cp arch/powerpc/configs/ps3_defconfig .config
Now run the configuration tool, menuconfig, with this command:
make menuconfig
The result should look as shown in Figure B.1.
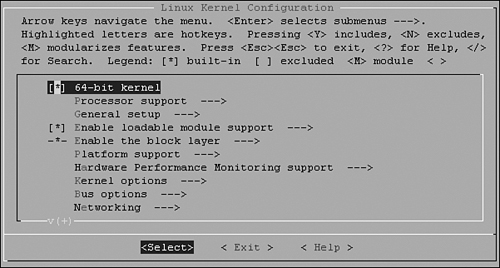
menuconfig provides a text-based interface for modifying the kernel configuration file. You’re free to make whatever changes you like, but there are two changes that are particularly important:
Configure the kernel to support the LVM.
Go to Device Drivers and select [ ] Multiple Devices Driver Support (RAID and LVM). Press Y to include this option and then press Enter. Select Device Mapper Support and press M to modularize this feature. Exit back to the top-level menu.
Configure the kernel to support hugepages.
Go to File Systems and then Pseudo Filesystems. Find HugeTLB File System Support and press Y to include this option. Exit back to the top-level menu.
You might also be interested in the networking options, NUMA support, or the real-time clock.
When you’ve finished, exit from the main menu and select Yes to save the kernel configuration. Build the kernel with three commands in succession:
makemake modulesmake modules_install
When the build is finished, you’ll find a file in /usr/src/linux-x.y.z-date called vmlinux. This executable contains the new Linux kernel.
To make sure Linux boots from the new kernel, vmlinux must be placed in the proper directory and identified in the boot configuration script. The first part is simple:
cp vmlinux /boot/vmlinux-x.y.z
where x, y, and z are the version numbers (major, minor, and revision) of the Linux kernel. If you’re prompted to overwrite an existing file, do so. This is the kernel file installed by the add-on package. If you don’t have enough memory to overwrite the file, delete the existing file and reenter the cp command.
Next, copy the configuration file with the following command:
cp .config /boot/config-x.y.z
Then overwrite the existing file if one exists. Copy the system map with
cp System.map /boot/System.map-x.y.z
and then make a new initial ramdisk image with the following:
mkinitrd /boot/initrd-x.y.z.img x.y.z
Finally, the boot configuration file, /etc/yaboot.conf, needs to be updated with the version of the new kernel. There’s no need to change the existing text; it’s just important to add a new section identifying the new kernel image and version information. The following shows what the modified file looks like, with the new section in boldface:
# yaboot.conf generated by anaconda

boot=/dev/sda
init-message=Welcome to Fedora!
Hit <TAB> for boot options
partition=1
timeout=80
install=/usr/lib/yaboot/yaboot
delay=5
enablecdboot
enableofboot
enablenetboot
nonvram
mntpoint=/boot/yaboot
usemount

image=/vmlinux-2.6.24
       label=latest
       read-only
       initrd=/initrd-2.6.24.img
       root=/dev/VolGroup00/LogVol00
       append="video=720p rhgb quiet"

image=/vmlinuz-2.6.21-1.3194.fc7
       label=linux
       read-only
       initrd=/initrd-2.6.21-1.3194.fc7.img
       root=/dev/VolGroup00/LogVol00
       append="video=720p rhgb quiet"
As shown, the image name has changed, the label value has changed, and the value of initrd has changed. The rest of the information in the bolded section is the same as in the section beneath it.
Once the changes have been made to yaboot.conf, enter
reboot
to start system shutdown. If the console hangs instead of entering standby mode, turn off the console and turn it back on. kboot will load the new kernel by default, but you can go back to the old kernel by entering linux at the kboot prompt.
To verify that the new kernel is running, enter the following:
uname -r
You should see the x.y.z version numbers of the new kernel. To verify that hugepages are enabled, enter
grep Huge /proc/meminfo
and you’ll see the allowed size for Linux hugepages on the Cell.