According to the dictionary, a queue is a line of people waiting. Queues in Microsoft CRM are collections of information waiting for action, such as activities and cases waiting for processing. Activities are tasks, appointments, calls, and e-mails. (See Chapter 14 for more about creating and managing activities.) Cases are service support tickets. (See Chapter 22 for more about working with cases.) Processing means assigning and accepting activities and cases. Queues are handy not only for providing centralized lists of outstanding activities and cases, but also for sorting tasks by subject matter or assignment.
Queues are ways to route issues and cases to departments without having to assign them directly to individuals. Issues requiring third-level support (that is, the people in your organization who know how to fix anything) can simply be assigned as such to the queue. The people responsible for providing third-level support monitor their queue and, when they're available, take over the case. In some organizations, an individual has the responsibility for issue routing monitoring the various queues and assigning the cases to people based on skill sets.
Cases or issues can be assigned to more than one queue but not at the same time. Perhaps a customer calls with an issue that is handled by a level 1 customer service representative (CSR). If that person can't solve the problem, the level 1 CSR escalates the issue to a level 2 CSR. That CSR does most of the legwork and reassigns the case back to the first CSR to ensure that the client is informed of the solution. Soon after, the case is closed.
Queues can also be used as e-mail inboxes. In Microsoft CRM 4, a queue can be associated with an e-mail inbox, and all incoming e-mail to that mailbox will show in the queue.
Queues are a valuable tool for your company. You can examine them for up-to-the-minute information on how many customers have a specific issue or how many CSRs are engaged with issues relating to a specific product. This information can go a long way toward optimizing the efficiency of the service department and helping identify issues in other departments as well.
Note
Before associating a queue with an inbox, ensure that the e-mail associated with that inbox should be seen by everyone with access to the queue.
In this chapter, we discuss the various queues defined by Microsoft CRM, and we tell you how to use them. You'll also discover how to create, modify, and manage your own queues.
Your company probably has a person who acts as a human router, directing service calls and e-mails to the appropriate CSRs or taking care of an escalated situation when the CSR can't handle it. You may call these people customer service managers, quality attention retainers, or what have you, but for this book, we call them service managers. They are the optimal choice for creating and defining your queues because they manage the front lines of your customer service department. Your service managers also know the strengths and weaknesses of your CSRs and can assign them to the proper queues; in this way, your best washing machine guy isn't dealing with refrigerator issues.
When you assign your CSRs to queues and then assign activities and cases to those queues, you're giving your people (and your company) an effective and efficient means of solving problems and making customers happy.
How many queues should your company have? Queues should be as numerous as it makes sense logistically in your company. An organization with only a few CSRs should not have a large number of queues, when one or two would do the trick. Larger organizations should decide on queue design based on the types of products or services sold. Queues could be set up based on product line, such as one for coffee beans, one for coffee brewers, and one for coffee grinders. Another approach is to set up queues based on department, such as engineering, billing, and shipping departments. Then if you need a department involved in a case, you can assign an activity or the entire case to that departmental queue.
Microsoft CRM comes with two predefined queue areas, which you can see in the Queues window's navigation pane: the My Work queue, listing folders for the activities and cases assigned to you, and the Queues area. The Queues area displays all the queues that you have access to.
When you look into a public queue, you see all activities and cases associated with that queue, whether they're assigned to you or not. Everyone who is a member of that queue can see these activities and cases.
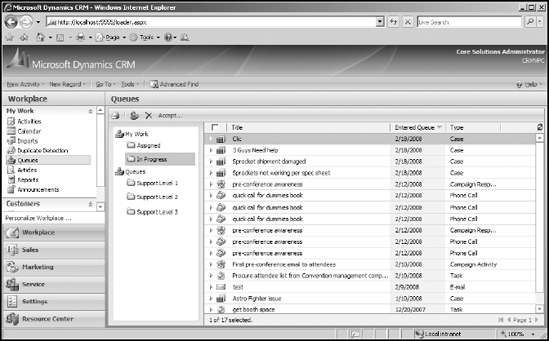
The My Work queue, shown in Figure 25-1, has two folders:
Assigned: You'll find all the cases that are assigned to you. These are cases that you haven't accepted yet. We cover accepting cases in the section called "Working with Cases and Activities Assigned to Queues," later in this chapter.
In Progress: These are all the cases you've accepted, and you're currently working on them.
Users who are assigned the appropriate rights can create queues. Because you can create many queues in Microsoft CRM, we recommend that you plan your queues around your company's workflow. Create a master plan of all your services and products and determine how you want to handle customer service scenarios before building your queues.
For example, a chocolate chip cookie manufacturer could have a queue for shipping-related issues: freshness or breakage. Whereas a bank may create queues based on the depositor: ordinary depositors, wealthy depositors, small business accounts, and large corporate accounts. Cases can be assigned based on the person or organization initiating the issue.
Follow these steps to add your new queues:
On the navigation pane, click the Settings button.
At the top of the navigation pane, click Business Management.
The Business Management window appears on the right.
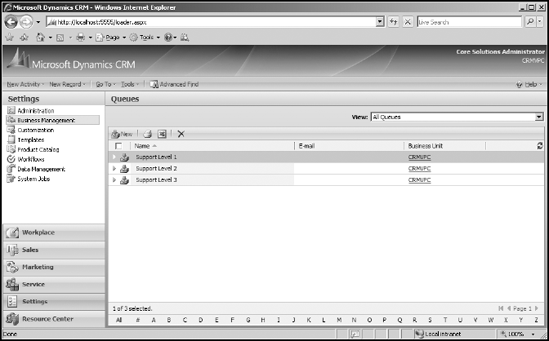
Click Queues.
The Queues window appears, as shown in Figure 25-2. All queues are listed here.
In the window's toolbar, click the New button.
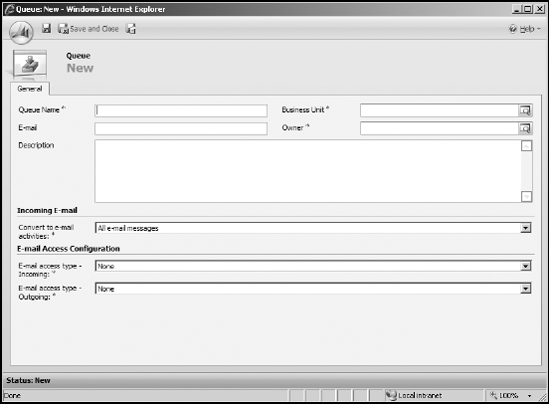
The Queue: New window appears, as shown in Figure 25-3. Three fields are required: Queue Name, Business Unit, and Owner.
In the Queue Name field, enter a name for this queue.
Remember to keep it simple and descriptive. This is the only way your users will know which queue a case belongs to.
In the Business Unit field, click the magnifying glass to display the Look Up Records window and select the appropriate business unit.
Business units are similar to departments or regions. For example, if you're in the Customer Care department or a regional center, and you want to create a queue for your staff, you would select Customer Care or the name of your regional center here. See Chapter 6 more on creating business units.
In the Owner field, choose an owner for the group.
Clicking the magnifying glass opens a Look Up Records window with all your users. Choose one and click OK. You're returned to the Queue: New window. The owner essentially monitors the queue — assigning cases, shifting workloads, and so on.
Indicate the e-mail account associated with the queue.
This step is optional. However, if you have an e-mail support box such as [email protected], add the e-mail address here. All e-mail sent to [email protected] can be seen in the queue. See your system administrator for help with setting up the routing of e-mail to a queue.
If you want, enter a description for the queue, as well as any important notes.
Make a choice from the Convert to E-Mail Activities drop-down list. The choices are as follows:
All E-Mail Messages: All e-mail sent to the inbox listed above will be sent to the queue.
E-Mail Messages in Response to CRM E-Mail: Only e-mail sent by people outside of your organization in response to your e-mail will be sent to the queue.
E-Mail Messages from CRM Leads, Contacts, and Accounts: All sent e-mail that can be associated with existing Lead, Account, or Contact records will be sent to the queue.
Make choices from the E-Mail Access Type - Incoming and E-Mail Access Type - Outgoing drop-down lists.
This pertains to the setup of the e-mail router, which is beyond the scope of this book. Ask your system administrator what values you should enter in these fields.
Click the Save and Close button.
The Queue: New window closes, and you return to the main Queues display, where your newly created queue is listed along with the other queues. The e-mail address and business unit for each queue is also displayed.
In Chapter 22, we discuss cases and how to assign them to queues. In some organizations, case-related activities — and not entire cases — are assigned to queues. For example, a CSR logs an issue with a Spacely Sprocket that needs to be reviewed by a technical designer. The CSR retains ownership of the case but assigns a review and comment task to the new VP of Development, Mr. Jetson.
We already mentioned that when a new activity (a task, a phone call, an e-mail, an appointment, and so on) is created, it can be found in the In Progress queue of the person who created the activity. This is true unless the creator of the activity changes the owner, in which case the activity will be in the Assigned queue of the assignee or the queue Assigned. Microsoft CRM doesn't automatically assign it to a queue except as mentioned above.
Your service manager isn't going to monitor all activities created by every CRM user, only those assigned to a queue. Service-related activities created by workflow and assigned to a queue are easily monitored by the service manager. (See Chapter 9 for more on workflow.)
Here's where your service manager ensures his job security. He looks at the activity and assesses the situation: Simple issues can go to the level 1 support queue but advanced issues can jump all the way to the level 3 support queue. This efficient utilization of your company's resources (that is, the service manager's training and fancy computer equipment) saves time, prevents redundancy, and most importantly, makes the customer happy. This is CRM working as all managers envision.
Activities should be created first and then assigned to a queue. You can't create an activity from within a queue. (See Chapter 14 for details about creating an activity.)
As we mention earlier in the chapter, activities can be assigned to queues or to users. The difference? Queues can have a number of users assigned to them, and a user is just that: a single individual.
Keeping that in mind, as the service manager, when should you assign activities to an individual CSR or manager and when should you drop an activity into a queue for the next available CSR to pick it up?
A good service manager determines the answer to these questions based on the situation. He then determines the best course of action and assigns activities accordingly. If the assignment process is the same all the time, workflow rules can be created to automate the functions of assignments and escalation. (See Chapter 9 for details on rules and workflow.)
As we discussed earlier, most likely case activities are assigned to a queue but other activities can be assigned to users. Because this chapter is all about queues, we're going to assign an activity to a queue. Activity assignment can happen regardless of how you get to the activity form — we're going to get there from the Activities window, but you can do so from the In Progress queue, case, contact, account, opportunity, or any entity associated with activities. Follow these steps to assign an activity to a queue or a user:
On the navigation bar on the left, click Workplace.
At the top of the navigation pane, click Activities.
You can sort the activities by clicking the column headers or filter the activities according to date, type, or status (under the View drop-down list).
Double-click the activity to open it.
On the menu bar, choose Actions
Assign or click the magnifying glass to the right of the owner field.
The Confirm Assignment dialog box appears.
Select the queue to which you want to assign this activity:
Click the magnifying glass icon.
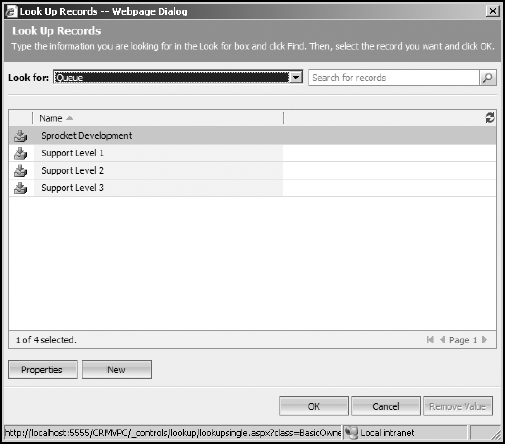
A Look Up Records dialog box appears, as shown in Figure 25-4.
In the Look For field, click the arrow and select Queue from the list.
A list of all current queues is displayed in the lower part of the screen. You can also assign activities to users from this window.
Note
Queues don't accept assignments, but users do! (We show you how to do that in the next section, "Accepting activities.")
Double-click the queue or highlight the queue and click OK.
You return to the Confirm Assignment dialog box.
You can also search for queues using the Find box or alphabetize the queues by clicking the Name column header.
In the Confirm Assignment dialog box, click OK.
You're back in the Activity window.
Click the Save and Close icon.
Note that the task is still displayed in the Workplace: Activities window. It's still a legitimate activity. However, you can see the task also in the Queues display because you've assigned the task to a queue.
Under My Work in the navigation pane, select Queues and find the queue to which you assigned the activity. Click that queue to open it.
The Queues window appears (refer to Figure 25-1). You now see the activity assigned to that queue.
Tip
Remember to save, Save, SAVE! Always click the Save and Close button, even if you're reassigning a previously created activity. This way, you guarantee that all changes will be saved.
For this section, let's become the CSR. We need to picture ourselves in a cubicle with a bunch of information attached to the cubicle walls by push pins. Our cube mates are also CSRs, so when you understand this section, yell EUREKA! And perhaps you can teach them. Better yet, have them buy their own copies of this book.
There are two types of activities:
Activities or Cases assigned directly to you (which are in the Assigned folder under My Work: Queues).
Activities or Cases assigned to a queue that you monitor (which are found in the public queue in the Queues window).
In either case, you have to accept the activity or case before you can begin work on it. If no workflow rules are in place, it's up to you to monitor your queues for outstanding activities or cases.
You need to find the queues you are monitoring before you can accept an assignment. To find queues:
On the navigation pane, click the Workplace button. In the upper part of the pane, select Queues (under My Work).
In the pane on the right, click the Assigned folder under My Work or click a folder under Queues to display any pending activities or cases.
Click an item to highlight it.
Click the Accept button on the toolbar.
The Confirm Assignment dialog box appears, asking you to verify that you want to move the selected activity to your In Progress folder.
Click OK.
Tip
Queue windows don't automatically refresh, you can click the refresh icon on the top right of the grid or click the queue on and off and then on again.
You've now accepted the activity or case.
After the activity or case moves to your In Progress folder, you can open it, create associated activities, and ultimately complete it. You may also reassign the activity or case. When completed, it will no longer be in your In Progress folder. It will be found in the history of the case, contact, account or whatever entity you related to it.