
Stool Made from Bike Parts and Crutches
Make this adjustable stool from found materials By Ryan “Zieak” McFarland
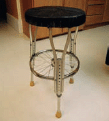
Figure A: The finished stool

Figure B: The raw materials
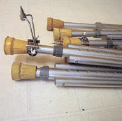
Figure C: No need for these pointy tips for use during icy conditions!
Figure D: Cut the crutches to length at the hole
Take a few metal crutches, a couple of bicycle wheels and inner tubes, and a few bolts, along with some insulation and a piece of plywood, and you have the makings for an adjustable height stool.
1. Supplies and materials
You will need:
![]() Crutches (3–4)
Crutches (3–4)
![]() Bicycle wheels with a 16" diameter (2); BMX bike size
Bicycle wheels with a 16" diameter (2); BMX bike size
![]() Inner tubes from a 26" tire (4); mountain bike type
Inner tubes from a 26" tire (4); mountain bike type
![]() Sheet metal screws
Sheet metal screws
![]() Carriage bolts, washers, and nuts
Carriage bolts, washers, and nuts
![]() Rigid insulation
Rigid insulation
![]() Plywood
Plywood
Tools:
![]() Drill and drill bits
Drill and drill bits
![]() Hacksaw
Hacksaw
![]() Ratchet and sockets
Ratchet and sockets
![]() Sabre saw
Sabre saw
![]() Marker
Marker
![]() Scissors
Scissors
![]() Rags
Rags
![]() WD-40
WD-40
I purchased the metal crutches from a thrift store. They were $2 per pair. Try to get two pairs that are as close to identical as possible. (You might consider buying an extra pair that fit you in case you need them some day. A few years ago I tore a muscle in my leg and was charged $80 for a pair.) Remove the handles from the crutches. The bicycle rims don’t need to be perfectly straight—the ones I used were in horrible shape. I didn’t bother trying to true the wheel; I wanted to see if this idea would work first. You can probably get the wheels and inner tubes at any bike shop for free. You’ll want to remove the axles. Wash the grease off of the hubs.
2. Cut the crutches to length
Use the hacksaw to cut the crutches off. Set the crutch to the shortest height and then measure 22" up. Mark that spot with the marker and cut at the nearest hole. That will give the leg strength where the rim attaches. I used 22" because that was the height of a stool that I have. I wanted this to start at that height and go higher.
3. Calculate the leg locations
I used three legs, but in hindsight, four would have been better. Three legs is a little tippy when the stool is high and a person is getting on or off of it.
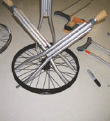
Figure E: Calculate the leg locations
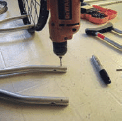
Figure F: Drill pilot holes in the crutches
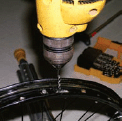
Figure G: Drill pilot holes through the rims
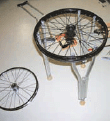
Figure H: Assemble the top. Starting to look like a stool.
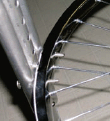
Figure I: Marking the bottom wheel rim for notching
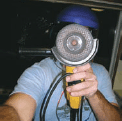
Figure J: Safety first!
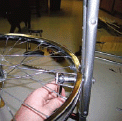
Figure K: Bolting on the lower rim. Supervisory cat in the background.
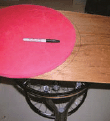
Figure L: Marking the plywood shape for the seat, using the foam for a template
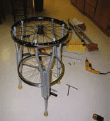
Figure M: Getting ready to put the seat on
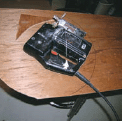
Figure N: Cutting the plywood with the sabre saw
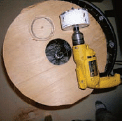
Figure O: Cutting a hole in the center of the plywood to fit over the hub
Figure P: Tie the end of the inner tube and tuck it under a spoke to anchor it
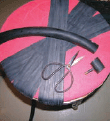
Figure Q: Don’t forget to cut off the valve stem
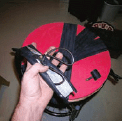
Figure R: Cutting down the length of the inner tube
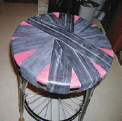
Figure S: Wrap the lengths of tube across each other until they cover the seat
Starting where the opening for the inner tube valve stem is, count the spokes on the rim you plan on being the seat. Mine was 36. I divided that by 3 and used that number to space each of the crutches out 12 spokes. Note that, since each leg has two attachment points, the spacing will be from one leg “Y” to the corresponding “Y” of the next leg. Mark the locations of the 6 attachment points with the marker (Figure E).
4. Drill pilot holes
I drilled a hole slightly smaller than the threads of the screws I used through the steel rim and used an even smaller bit for the pilot holes in the aluminum of the crutch leg. This is a safe place to experiment because it will be covered up unless you upholster the stool differently than I did. I also used the scrap pieces from the crutches to get a feel of how far I could put the screw into the aluminum before the screw stripped the hole. If you have problems with this then just bore the holes out and bolt through like the bottom rim will be (Figures F-G).
5. Assemble the top
Put the screws in and admire the progress! Now measure 16" down from that rim and mark the inside of each of the legs. This is a comfortable distance (for me) to have my feet resting on the bottom rim. If you have a favorite stool, measure the distance to find what works well for your leg length. By attaching the rim here, the distance will stay where we like it no matter what height the stool is adjusted to (Figure H).
6. Ready the bottom wheel
After a bit of trial and error, I found that it was important to notch out a section of at least the top flange of the bottom rim to allow the crutch to adjust in height while bolting the legs on securely. I drilled through either side of the adjustable leg portion and through the corresponding part of the rim. Then, by sliding a few of the carriage bolts in, I could mark the sections of the rim that needed to be trimmed back. I used the marker to blacken the end of the bolt that was closest to the valve stem opening of the rim. That made sure I didn’t have to fiddle with the rim and the legs trying to get bolts through misaligned holes. Cut the areas out for the center section of the leg. This could be done with a hacksaw and some frustration, or you can use an angle grinder. Making a smaller cut on the bottom flange of the rim isn’t a bad idea; if you tighten the rim and legs together too far, the rim might press into the crutch leg and restrict the adjustment of the height (Figures I-K).
7. Cut the insulation and plywood to fit the rim
Use the rim as a template to cut a piece of rigid insulation or a thick foam pad. Then use that to mark plywood and cut the shape with a sabre saw. Cut out a 3" hole in the center of the board. This will let the hub pass through and allow the wood to lay a bit flatter. Using a sabre saw would work, but a 3" hole saw worked fantastically (Figures L-O).
8. Use inner tubes to cover the seat
Cut the valve stems off of the inner tube and then cut along the full length. If there are lines on the rubber to follow, use them to help cut a straight line. Tie a knot in one end of the inner tube and tuck it under one of the spokes. Stretch the inner tube over the top and wrap under until you have gone across the top three times—rotating around the seat as you go. Tie another knot in the end and tuck under another spoke. Repeat three more times but switch the direction of the wraps on each inner tube to prevent the wraps from forming a fan shape (Figures P-S).
9. Clean the seat
I used WD-40 to clean the inner tubes, but just about any cleaner certainly would work. Especially something designed for rubber.
For more of my projects and activities, visit my website at zieak.com.
Ryan “Zieak” McFarland lives in Alaska and spends his days as the parks and recreation director for a small town. Nights and weekends he does computer stuff, tinkers with projects, and spends quality time with his friends.