
Who knew how entertaining (and possibly annoying) paper clips and tape could be? By Alexander Palfreman-Brown, aka Scissorman
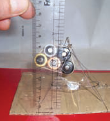
Figure A: The finished trebuchet
Bored at work? Build your own 3" trebuchet out of paper clips and throw balls of Blu-Tack up to an amazing 4 feet. WOW!
1. Tools and materials
![]() Pliers (needle nose would be best)
Pliers (needle nose would be best)
![]() Scissors
Scissors
![]() 8 paper clips
8 paper clips
![]() Cellotape
Cellotape
![]() Thin string
Thin string
![]() Blu-Tack (poster tack)
Blu-Tack (poster tack)
![]() Corrugated cardboard, approx. 6" x 6"
Corrugated cardboard, approx. 6" x 6"
![]() Ballast (I used a bunch of batteries from our recycling box)
Ballast (I used a bunch of batteries from our recycling box)
![]() Rubber band
Rubber band
2. Straighten and shape the paper clips
Use the pliers to make the paper clips as straight as possible. At the very end of four of the paper clips, make an eyelet big enough to insert another paper clip through (but not much bigger). At the other end, make a dog leg. Try to make it on the same plane as the eyelet!?! If you lay it on a flat surface and it lays flat, it is ok.
3. The axle
Next, shape the axle. The distance between the hooked ends is about 2". It should be wider than your intended ballast. The U shape in the middle must be centered.
4. The arm
Make a loop in another paper clip about 1/2” from the end and then make another eyelet in the same end. Make a little hook at the other end (Figure G).
5. The trigger
The trigger is a little hard to describe; Figure H shows the two shapes. The bump on the left is to pull. The loop on the right is there to catch the little hook on the arm.
6. Beginning the assembly
Take the axle and insert it through the loop in the arm (not the eyelet) so that it sits in the U (Figure J). I wrapped cellotape around the axle on either side of the U just to give it some thickness, so it doesn’t slide all over the place.

Figure B: Tools and materials

Figure C: Straighten the paper clips with pliers

Figure D: Make eyelets in the ends of four paper clips

Figure E: Then make a bend like a dog leg at the end

Figure F: Make the axle by hooking over the ends and making a “U” shape in the middle

Figure G: Make the arm; it needs a loop near one end, and an eyelet
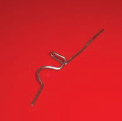
Figure H: The trigger—the most difficult shape

Figure I: The components, ready for assembly

Figure J: Insert the axle through the loop in the arm

Figure K: Mark the base
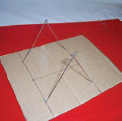
Figure L: Setting up the legs on the cardboard base

Figure M: Mount the axle on the legs
7. The base
Mark the cardboard base with a center line. The two lines are about 3" apart and the little Xs on those lines are also 3" apart (Figure K). Poke the dog leg ends of the supports into the four Xs so that the ends are between the layers of the corrugated card (Figure L). If you made the dog legs at the right angle (not a right angle, though), they should sit nicely.
8. Mounting the axle
This is a little bit fiddly, but poke the hook ends of the axle through the eyelets in the supports, then bend the hooks down with the pliers (Figure M). Tape between the legs to make an A-frame, then run some tape from the crosspiece of the “A” shape to the sides of the cardboard base to prevent side to side motion (Figure N).
9. Mounting the trigger
Push the end of the trigger into the layers of card where the center line intersects the support line (the side that the arm hook is on). The other end of the trigger needs to run in a slit so that it can slide back and forth. Don’t make the slit too long or else you risk the trigger being pulled out (Figure O).
10. The ballast
Make a little hook with paper clip number 8, and tape to the battery. Use the rubber band to attach a whole bunch of batteries together. When they’re all assembled and hooked on the arm make sure the ballast is not touching the base.
11. The ammo
Take the string, put a loop in it and push the free ends into a pea-sized lump of Blu-Tack. Wrap it around a couple of times and then smoosh the Blu-Tack into a ball. The extra string inside will allow you to experiment with the best length for maximum distance when firing. A good length is about 2/3 the distance from the hook to the axle along the arm.
12. Using the trebuchet
Hook the ammo over the arm, pull the arm down, and trap the hook with the trigger. Position the ammo on the center line and at full extension of the string. Aim and fire by pulling the loop on the trigger towards you.
Warning: The arm moves fast and has a sharp little hook on it. Because this weapon has limited accuracy, you can't predict the path of the Blu-Tack. When arming or firing, protective eye gear needs to be worn by the user and anyone within its range.

Figure N: Stabilize the legs with some tape between them and over the edge of the cardboard

Figure O: Mount the trigger on the cardboard base
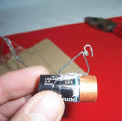
Figure P: Make a hook and tape to the ballast

Figure Q: Attach the rest of the ballast with the rubber band
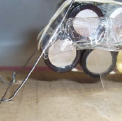
Figure R: Hook the ballast on the arm

Figure S: Place the ends of the string in a blob of Blu-Tack
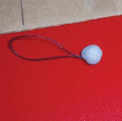
Figure T: Smoosh the BluTack into a ball

Figure U: Hook the ammo over the arm and trap the hook with the trigger

Figure V: After the launch; note the wrap of tape that prevents string from sliding up the arm

Figure W: Fine tune for accuracy

Figure X: Release pin modification; rotated 90 degrees
To prevent the string from sliding up the arm (which will interfere with a successful Blu-Tack launch), wrap tape around the arm below the hook.
13. Extras
I’ve already mentioned changing the string length to change the way the ammo flies. Changing the weight of Blu-Tack, changing the weight of ballast, and altering the hook angle will all affect the flight path of your ammo. Adjusting the angle of the hook will change the point at which the ammo is released. Release too early, and the ammo will fly straight up (if not backwards); release too late, and it thumps down right in front of the trebuchet.
14. Release pin modification
When I was building a new trebuchet, I found a more reliable way of launching the ammo. I rotated the release pin 90 degrees so that now instead of drawing back like a bolt, it’s hinged and rolls back off the hook of the arm. You launch by pulling back on the lever. It’s a very simple modification, and you can use the original pin, though it may need some reshaping. Just make sure that it’s placed far enough toward to release the hook, and that it doesn’t snag the ammo on its journey past.
Alex Palfreman-Brown lives in Hertfordshire, England, with his wife and daughter. His mantra is “What would MacGyver do?”