
Have sweet industrial dreams on this sturdy, adjustable bed made from iron pipe
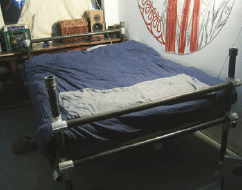
Figure A: The finished bed
A bed made from iron pipe. The design is simple yet sturdy. Not too pricey, simple to make, and easy to adjust/disassemble, this bed will give your room an industrial feel.
1. Acquire Materials
Here are the required materials:
![]() 1-1/2” Schedule 40 iron pipe: available at plumbing/hardware stores; it’s rather heavy. You can buy 10' lengths and then cut it yourself. Note that 1-1/2” pipe is not actually 1-1/2” in diameter. It’s really closer to 1-7/8"!
1-1/2” Schedule 40 iron pipe: available at plumbing/hardware stores; it’s rather heavy. You can buy 10' lengths and then cut it yourself. Note that 1-1/2” pipe is not actually 1-1/2” in diameter. It’s really closer to 1-7/8"!
![]() Hacksaw/pipecutter/chopsaw: for cutting the pipe down
Hacksaw/pipecutter/chopsaw: for cutting the pipe down
![]() Couplers: you can buy these from McMaster Carr; they are used to build railings. They are sometimes called “speed rail” or “speedrail.” Search the online mcmaster.com for “speedrail” and order the couplers you want. I got mine for free and they were all of the “4 outlet crossover” kind so I used only those, but there are more suitable configurations.
Couplers: you can buy these from McMaster Carr; they are used to build railings. They are sometimes called “speed rail” or “speedrail.” Search the online mcmaster.com for “speedrail” and order the couplers you want. I got mine for free and they were all of the “4 outlet crossover” kind so I used only those, but there are more suitable configurations.
![]() Allen wrench: for opening and closing couplers
Allen wrench: for opening and closing couplers
![]() Plastic pipe-end covers: get these at the place with the pipe; they protect your floor
Plastic pipe-end covers: get these at the place with the pipe; they protect your floor
![]() 1 x 8 wood panels for making the slats, and 2 x 4s for holding the slats together.
1 x 8 wood panels for making the slats, and 2 x 4s for holding the slats together.
2. Prep
Measure your mattress and couplers to determine how long your pipe pieces have to be. For my queen size mattress and couplers I needed:
![]() 57" (x4) for the head and tail of the bed, including the headboard and tailboard
57" (x4) for the head and tail of the bed, including the headboard and tailboard

Figure B: Measured and cut pieces
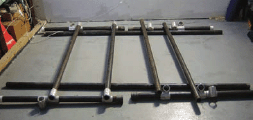
Figure C: Laying out the headboard
![]() 42" (x4) for the four legs
42" (x4) for the four legs
![]() 87" (x2) for the lengthwise pieces Cut and deburr your pipe.
87" (x2) for the lengthwise pieces Cut and deburr your pipe.
3. Headboard
Slide the couplers on the pipe, and make up your headboard. It doesn’t have to be in its finished shape, but keeping it square as you work will make it easier to assemble the whole thing. Use the Allen wrench to tighten down the couplers.
4. Tailboard
Do the same assembly for the tailboard.
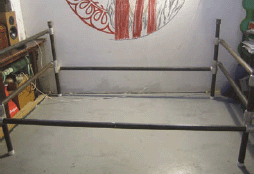
Figure D: The assembled frame

Figure E: Slat assembly
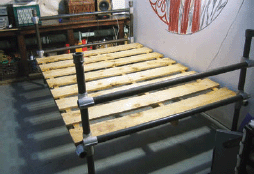
Figure F: Another view of the slat assembly
5. Frame assembly
Have a friend or two help you hold up the head and tailboards while you slide the lengthwise pieces in. Now you should square the design, make sure it’s level, and get it into a final configuration.
6. Slats
Use the 1 x 8 wood to make slats that will form the support for your mattress. Use three 2 x 4 pieces to hold the slats together, using wood screws to hold the whole thing together.
User Notes
Stephen T says: You can adjust the feel of the bed by changing the size/spacing of the support slats. Wider boards as shown will give a quite firm feel. Smaller (1" x 4") slats will give the bed a softer, more springy feel… just have to use more of them. For people w/o tools… no problem. The lumber yard/home center will chop the boards to size for you… same with cutting the pipe.
Dennis Vogel has an Instructable for an Aluminum Pipe Bed: www.instructables.com/id/Aluminum-Pipe-Bed
Mark Rehorst built a loft bed with PVC: Yes, PVC can be used for this sort of thing. I built a loft bed for my son about 6 years ago using 2" PVC pipe. You can see it and DL plans here: http://mark.rehorst.com/PVC_Loft_Bed/index.htm
Jon Rutlen built it! This is mine. It took me about an hour. I used 1" pipe and I actually got Home Depot to cut the pipes for me. I used different fittings that made the cross bars equal with the long bars.

Jon Rutlen’s build
7. Done!
Add your mattress and sheets. Now take a nice nap.
Limor Fried designs and sells open source hardware and kits at her company, Adafruit Industries, located in New York City.