

Figure A: The microscope in action

Figure B: Do you know where this is on a $20 bill?

Figure C: More $20 bill microprint

Figure D: Close-up of a liquid crystal display (switched off)
Here’s a medium-resolution USB microscope I made for just under $100 in parts (you should be able to do the same, even if you buy the parts new).
Parts:
![]() A RadioShack pocket scope. Model MM-100, part number 63-1313
A RadioShack pocket scope. Model MM-100, part number 63-1313
![]() A white LED
A white LED
![]() A Logitech QuickCam Pro for Notebooks (Carl Zeiss optics), model 960-000045
A Logitech QuickCam Pro for Notebooks (Carl Zeiss optics), model 960-000045
![]() 30 AWG wire
30 AWG wire
![]() Heat-shrink tubing or black electrical tape
Heat-shrink tubing or black electrical tape
![]() Hot glue gun (or whatever glue your prefer)
Hot glue gun (or whatever glue your prefer)
Figure A shows the microscope in action. Figures B, C, and D show some views through the scope.
1. Modify the microscope
This is pretty easy: the microscope comes with an incandescent bulb that is normally powered by two 1.5v AAA batteries. Just rip these all out (see Figure E) and replace the light with a single white LED and extend its leads up through the case using the 30 AWG wire. Use heat-shrink tubing or electrical tape here to insulate the leads.
Test your light with a battery and make note of which lead is the anode, and which is the cathode.
On the camera board there is a small (freaking bright) orange LED. Carefully remove it and wire the leads from the white LED in its place. With this camera, the LED is under software control, and USB provides all the power. Make sure these leads have plenty of slack.
Apply a generous amount of hot glue to provide strain relief for the wires. Be careful positioning the white LED so that it points generally where the camera lens points. Figure F shows the location of both lights.
2. Remove plastic packaging from the camera
You might be able to do this step (Figure G) without taking it apart, but mine was already apart and things went well.
But from what I remember there is a metal shield with the Logitech logo on it; if you pry that up and away from the glue, there’s a single screw holding the entire case together.
3. Assembly
OK, if you have the LED wired in well, put the microscope back together (you didn’t lose those screws did you?).
Next, remove the little rubber bit from the microscope eyepiece, notice that the inside edge of the eyepiece has a graduated cone shape; this will help the camera fit square on. It might even help to do this with the camera connected so you get the camera mounted to the microscope nice and square.
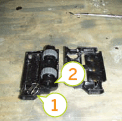
Figure E: 1. Metal from the battery connectors; you need to rip all this out 2. Fine adjustment

Figure F: 1. White LED, hotglued in place 2. Remove orange surface mount LED; in this orientation the cathode (negative lead) is on the left

Figure G: Remove the packaging from the camera

Figure H: 1. Webcam with plastic package removed 2. Screw

Figure I: Assembling the microscope
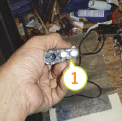
Figure J: 1. Neodymium magnets

Figure K: Scrap wood and steel base
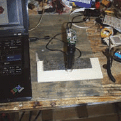
Figure L: Attaching the microscope

Figure M: Core memory board from an old CDC6600

Figure N: Magnified core memory
A nice ring of hot glue around the remaining microscope will help mount the lens of the camera to the microscope eyepiece without getting any glue anywhere near the lenses. Figures H and I show the assembly.
4. Make a base
This thing is really, really light so I glued a couple neodymium magnets (Figure J) to the bottom and created a wood base with a chunk of scrap metal on it (Figure K). You can find these magnets from many dealers, such as K&J Magnetics (www.kjmagnetics.com) and Applied Magnets (www.magnet4less.com).
The idea here is that the magnet will easily slide but otherwise won’t move; this would be a frustrating problem with such tiny, tiny things.
Figure L shows the assembly in place.
5. Take some pics
Now you can take some pictures. At the beginning of this Instructable, I showed a few pics of things you might have around so you can get a sense of how much things get magnified.
One really neat thing I had around was a piece of core memory from an old CDC-6600 machine (classic machine nuts can begin going crazy now).
In Figure M you can see a broad picture of the board, and Figure N is a close-up of the toroid and wire mesh that make up the memory cells.
Since the camera is a 2 megapixel camera, it’s got pretty good resolution, and the software from Logitech seems like it was made well for the job. The Zeiss lens has an electromechanical focus that adjusts well to the bizarre focal length we have here.
Mike Davis is a geek with the Make:NYC group.