
A simple, adjustable tube-lamp to light your lair
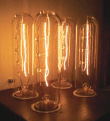
Figure A: Warm, but also Mad Scientist-y
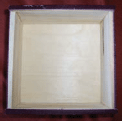
Figure B: The interior of an unfinished pine box used for the base

Figure C: Wiring the sockets and dimmer switch
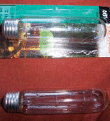
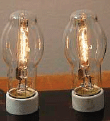
Figure D: Display case light bulbs
Here’s a captivating light source suitable for normal usage and able to be dimmed down like a nice relaxing night light. This project is a Makerfriendly version of The Tube Lamp by Nik Willmore (www.e-dot.com).
1. Intro
Note: This project involves live electrical current and wiring that can be potentially dangerous. Take all proper safety precautions when working with AC electricity.
Note: Please do not try to reproduce this project for the purpose of making money—to do so would hurt the original designer.
A few years ago, I saw this little beauty called The Tube Lamp pop up online, designed by Nik Willmore. I decided it was exactly what I needed for my little Mad Scientist Laboratory. Unfortunately, I couldn’t spare (or justify) the disposable cash needed to purchase it, though I would like to some day as his lamp still has a captivating hold on me. :-)
This project shows you how to make a much more cost-effective version of the tube lamp design. Rough estimate of costs involved is around $20 depending on the supplies you choose.
2. The base
A simple unfinished pine box with sliding lid (lid not shown in Figure B) that I picked up at the local arts and crafts store (Michael’s) for about $2. It was the perfect size to fit the four light sockets. I sanded it all down and painted it after cutting the holes for the sockets in the bottom.
To make the lamp, the box was flipped over and the bottom became the top, so if I have to make any adjustments or replacements, I can turn the box on its side and slide open the lid.
3. Wiring
In Figure C you can see the inside of the box/base showing the back side of the light bulb sockets as well as the back end of the dimmer switch box and all the interconnecting wires. The light sockets were wired in parallel (one linking to another like a daisy chain) with one end of the power cord connected to the daisy chain of sockets, and the other end of the power cord connected to the dimmer switch.
The most expensive part of this whole project was the standard dimmer wall switch (push in to turn on and off, rotate to dim or brighten). It’s the black box on the left in Figure C. It ran me about $7 at a home supply store.
To wire up everything, take all the black wires coming out of the sockets and bunch them together; I used wire ties to keep them all together. Do the same with the white wires coming from the sockets. Use a wire nut to connect all the white wires together and have them connect to one of the wires from the power cord. Connect all the black wires from the sockets together as well and wirenut them together with one of the two black wires coming from the dimmer switch. Then connect the remaining black wire from the dimmer switch to the other wire on the power cord.

Figure E: Light sockets set into the base
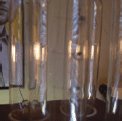
Figure F: Light bulbs before life-giving electricity is applied
4. The bulbs
I used simple 40W tube display case light bulbs, available at most home supply stores (I purchased mine at Lowe’s). You can also look around online and find other display case bulbs with different filament patterns inside. Some are quite bland, others look spectacular when dimmed down, and you can trace the path of the filament in them.
5. Setting the sockets in the box
The light bulb sockets set in the cut-out holes. I made sure to cut the holes a bit small, and then lightly hand-sanded them till the sockets fit in properly with a few millimeters of the white socket exposed. I used a little bit of clear glue around the entire socket and the inside of the hole to attach it, as well as a thicker ring of glue around the sockets on the inside of the box.
The light sockets themselves were purchased at Lowe’s and are fairly cheap as well ($2 or so), and are designed for ceiling lamp repair and replacement.
6. Light bulb innards
In Figure F, I tried to get a close-up of the bulb's insides. Didn’t turn out perfectly, but you get the idea.
7. Finish
The finished product (Figure A) lets off a nice glow and is certainly an eye catcher. Everyone wants to know what it is and where I got it; not bad for a lamp I made for less than $20 (not including the sweat and blood you may or may not donate to this project).
User Notes

Trevor Myers built one with an old treasure chest
Dave Britt used halogens inside the lamps.

Jason Hull used a PVC end cap for the base
I used a nice black radio knob to replace the boring beige knob that comes with the dimmer switch.
If you liked this project, be sure to check out the smoke stack lamp Instructable that I’ll be posting, where I used some of the things I learned from this project. Right now, I’m still putting the finishing touches on that project, but you can see some shots of it in my Flickr photo stream (www.flickr.com/photos/timmyj/sets/72057594103809737).
Thanks for checking out my first Instructable!
Timothy Johns currently resides in south Jersey, working as a graphic designer, while striving to perfect his art, photography, and design projects.