

Crafting a Bento
How to make beautiful and delicious Japanese box lunches By Clamoring
Bentos, or boxed lunches, have a long history rooted deep in ancient Japan. They originally began as simple meals requiring little or no effort to assemble. Today they are a vibrant art form that is popular worldwide.
This project will attempt to provide the basic design principles, resources for obtaining the necessary tools, and some of the traditional rules for making beautiful and delicious bentos.
1. Know the rules (then break them!)
Like many other Japanese art forms, bento-making has its own set of guidelines. Traditional bentos follow a couple of basic rules:
![]() The 4-3-2-1 rule: 4 parts rice, 3 parts protein, 2 parts vegetable, and 1 part “treat” (usually either pickled vegetables or something sweet)
The 4-3-2-1 rule: 4 parts rice, 3 parts protein, 2 parts vegetable, and 1 part “treat” (usually either pickled vegetables or something sweet)
![]() Sushi should be prepared with more wasabi than usual
Sushi should be prepared with more wasabi than usual
![]() Pack foods with flavors that might run or stick together with a divider. Separate wet foods from dry using a nested or altogether separate container such as a cupcake form. Sauces and dressings go in their own bottles (usually with a lid or cap).
Pack foods with flavors that might run or stick together with a divider. Separate wet foods from dry using a nested or altogether separate container such as a cupcake form. Sauces and dressings go in their own bottles (usually with a lid or cap).
![]() Oily foods (like gyoza) should be packaged on top of an absorbent material
Oily foods (like gyoza) should be packaged on top of an absorbent material
![]() Bentos should not require any refrigeration or heating
Bentos should not require any refrigeration or heating
![]() Above all else, your bento should be equally as nice to look at as to eat! (Note that this is the only rule that is not optional! :-)
Above all else, your bento should be equally as nice to look at as to eat! (Note that this is the only rule that is not optional! :-)
2. Assemble hardware
If you’re into kitchen gadgets, making bento boxes can be a very fulfilling pastime. There are tons of super-cute accessories with which to decorate your lunches. Many of these items can be found online (check the end of this article for links). If you’re lucky enough to have a large Asian market in your town, you’ll probably be able to find everything you need there. However, if you don’t have one nearby, don’t fret. We’ll talk about options using readily available items you probably already have in your kitchen.
The first thing you need is a bento box. This will influence your portions, your shapes, and even what types of food you use. There are several types (see Figure K). Cute shapes like the bullet train and Pandapple boxes are most popular for kids. Tiered boxes, like the shamrock bento, are more often used for adult lunches. Lock & Lock boxes are fantastic for two reasons. One, they come with individual, removable dividers. Two, they lock completely air tight. I’ve started seeing Fit & Fresh brand in stores. The orange one pictured here has a separate ice ring you can freeze as well as a folding spoon. If you want to get started right away and don’t have any of these types of boxes, you can also use a standard container. The actual shape of your box will have a lot to do with the final design of your box.


Figure I:
1. One part treat
2. Packed separate from wet tomatoes
3. Two parts vegetables (heirloom tomatoes)
4. Three parts protein (egg and tofu)
5. Pickled daikon (a type of radish), red bell pepper, parsley, wasabi (hot mustard)
6. Four parts rice
7. Bento sushi is made with more wasabi than usual
8. Fresh ginger
9. Wasabi, blackberry, pickled ginger
10. Soy sauce
11. Bell peppers (used mostly as a space filler)

Figure J: 1. Craft knife set 2. Craft punch 3. Miniature cookie cutters
Cupcake forms and dividers are very handy when keeping flavors from mingling. Mini forms fit well in bentos. There are also silicone forms available that are great if you have something really wet or messy (like spaghetti). The most common divider is green plastic grass but there are lots of other specialty designs.
Many colors, shapes, and sizes of specialty forks designed especially for bento boxes are available. Regular shrimp forks are small in size, easy to find in stores, and fit in many boxes. Skewers or toothpicks can be cut to size and decorated should you be so inclined. A nice pair of chopsticks will round off your bento set. I like the ones that come in a matching box.
Many of the fancy patterns you see in bentos are made with some form of cutter. A cutter can be a cookie cutter, craft punch, or craft blade. I use my craft blade more than any other bento tool! Cutters are especially handy for cutting nori (seaweed/sushi paper), vegetables, or sliced tofu or meat. Who doesn’t want little carrot stars on their salad?
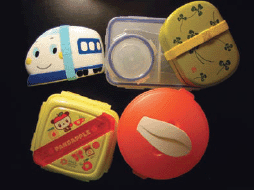
Figure K: Bento boxes, both child and adult styles

Figure L: An assortment of (left to right): Barbecue skewers, shrimp fork, mini bento forks, chopsticks with box

Figure M: An assortment of sauce bottles and a funnel
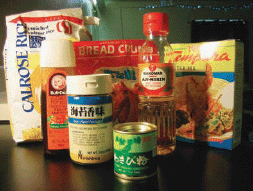
Figure N: Bento supplies (left to right)—Sushi rice, tonkatsu sauce, furikake (rice seasoning), wasabi powder (just add water), mirin, Japanese-style bread crumbs, tempura mix (no egg required)
Probably one of the more difficult specialty items to substitute is a sauce bottle. Barring proper bottling, you can also put sauce into a ziplock bag (towards one corner) and secure the sauce with a rubber band. This would be something like a pastry frosting bag only very small. At lunch, you can clip the tip off and squeeze the sauce out. I have also folded tinfoil into a little cup shape. If you go that route, be sure you use it for a thicker substance (like peanut butter) rather than something liquidy (like soy sauce) as it will probably leak.
Once you have your supplies together you’re ready for some serious bento making!
3. Gather specialty food items
A trip to your local Asian market is important in creating a traditional bento. But if you live in an area where you do not have access to such items don’t fret. There are lots of creative and healthy ways to make a bento from seasonal local ingredients.
![]() Calrose rice is your first choice for sushi rice. Minute rice isn’t going to cut it.
Calrose rice is your first choice for sushi rice. Minute rice isn’t going to cut it.
![]() Tonkatsu sauce is simply good on everything. It’s mostly used on tonkatsu (fried cutlet, usually pork) but it is also very delicious on steamed veggies. It’s similar to Worcestershire sauce.
Tonkatsu sauce is simply good on everything. It’s mostly used on tonkatsu (fried cutlet, usually pork) but it is also very delicious on steamed veggies. It’s similar to Worcestershire sauce.
![]() Furikake is used as a rice seasoning to spice up bland rice. It is usually a mix of dried seaweed bits, sesame seeds, dried shrimp, and various salts (vegetarian options such as the one below are available).
Furikake is used as a rice seasoning to spice up bland rice. It is usually a mix of dried seaweed bits, sesame seeds, dried shrimp, and various salts (vegetarian options such as the one below are available).
![]() Japanese bread crumbs are primarily used in making tonkatsu and fried shrimp. I think you could use regular bread crumbs in a pinch, but the ones marked Japanese seem to be lighter.(Maybe it’s just my imagination!)
Japanese bread crumbs are primarily used in making tonkatsu and fried shrimp. I think you could use regular bread crumbs in a pinch, but the ones marked Japanese seem to be lighter.(Maybe it’s just my imagination!)
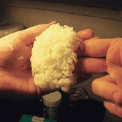
Figure O: Making a pocket in the sushi rice. Sprinkle salt on hands when forming a ball and keep hands moist to prevent rice from sticking.

Figure P: Form the pocket

Figure Q: Stuff the ball. Here hard boiled egg and seitan (wheat gluten) cooked in soy sauce is used. When stuffed, cover the hole with more rice.

Figure R: One option is to cover the entire onigiri in nori
![]() Mirin is a sweet light syrup used in making sushi rice and tomago (egg) sushi.
Mirin is a sweet light syrup used in making sushi rice and tomago (egg) sushi.
![]() Tempura mix can be used to make tempura batter. You can make your own mix but if you use a premade one you can eliminate the egg.
Tempura mix can be used to make tempura batter. You can make your own mix but if you use a premade one you can eliminate the egg.
![]() Wasabi can be purchased in powder or paste form. Don’t let the pleasant light green color fool you—this stuff will clear your sinuses!
Wasabi can be purchased in powder or paste form. Don’t let the pleasant light green color fool you—this stuff will clear your sinuses!
Now that you’ve done your shopping I suppose you’re wondering what to put into your bento. Let’s look at a few options.
4. Stuff to put in your bento—onigiri
Onigiri, rice balls with filling, are a wonderful comfort food. They are fun to make, fun to look at, and fun to eat. They also serve as a nice parcel to decorate as they have a large surface area. The simplest onigiri, and maybe the most traditional, is simply a rice ball with an umeboshi (pickled plum) in the middle. Umeboshi are extremely popular in bento boxes and especially onigiri.
First you must decide on your filling. Just like sushi, you could put anything you like in an onigiri. Something with a little body is best as anything too fluid will tend to seep. Some commercially packaged onigiris pack the nori separately so that it stays crispy. Some common fillings are tuna, chicken, curry, boiled spinach, umeboshi, or tofu. It is also common to flavor the rice.
After you have decided on your filling take some rice and form a ball. You can make it as large or as small as you like. Using your fingers or a utensil to make a pocket. Add your filling and top with some rice. The triangle is probably the most common onigiri shape. Just form with your hands (see Figures O-S). It’s so easy!
5. Stuff to put in your bento—tempura
Tempura is a crispy batter coating used on vegetables or shrimp (although you could use it on anything that will hold together in hot oil). It’s fantastically cheap and easy to make.
The batter consists of: 1 egg, 1 cup ice water (it is important that the water is ice cold), and 1 cup all-purpose flour. Mix gently until blended but still lumpy. Use immediately. While you can certainly fry this at this point, it is extra delicious if you also bread your food. Japanese bread crumbs are light and give a big crunch.
You should have three containers: one with the batter, one with the breading, and a pan with hot vegetable oil. Dip your item in the batter, roll in the breading, shake off excess. In Figure T we’re doing string beans. Fry the beans in the oil, drain off excess on a paper towel. That’s it!
Often served with tonkatsu sauce (see step 3 for more info).
6. Stuff to put in your bento—sushi
Sushi is probably the most versatile food you can put in a bento box. Believe it or not, it is quick and easy to make. Aside from cooking the rice, making a sushi roll can take as little as five minutes.
Sushi could certainly be its own Instructable. Instead of trying to cover every type of sushi you could find in a really fantastic bento box, I’m only going to cover one just to get you started. Maki sushi is the round, nori-wrapped (seaweed) sushi roll with any number of tasty fillings. Let’s use the tempura beans from the last step to fill this one.

Figure S: The finished onigiri. The one on the left is wrapped in nori, the one on the right has been lightly fried to give the rice a crispy texture and then covered with a nori star band (with the stars cut using a craft punch)

Figure T: Tempura, battered in tempura mix and Japanese bread crumbs and fried in a hot vegetable oil
Prepare your sushi rice and let it cool. Calrose rice with a dash of rice vinegar and a dash of mirin is what I like to use. The kind of rice you use is important—use sushi, calrose, or sticky rice.
Now you have your rice, nori, wasabi, and your fried beans. It’s time to roll!
Place your nori paper (seaweed) shiny side down on your table or bamboo mat. Prepare a shallow dish of water to dip your fingertips in to keep the sticky rice from sticking to your fingers. Cover the entire sheet with rice except for a strip about an inch wide at the top. Place the wasabi and beans about two inches up from the bottom. Roll tightly, bottom to top, and stop just short of the bare nori strip at the top. Wet the top strip with water from your fingertips and complete the roll. Cut in half and in half again (see Figures U-Z).
You now have sushi to add to your bento boxes! It’s small, doesn’t require refrigeration, and it’s fun to make!
7. Design your bento!
When I start a bento, the first thing I look at is my main item (e.g., onigiri or sushi). I almost always have this in mind before I start cooking. I then choose my bento box and go from there.
As we previously discussed, your bento box will have a great deal to do with your overall design. For example, if you have a traditional lacquerware bento box with rounded corners you are going to need to fill in some odd spaces. Likewise, boxes with dividers built into them may or may not be the right size for what you want to do.

Figure U: Sushi rice, cooked and ready to roll

Figure V: With wet hands, squish the rice gently into the nori. When covered, leave an inch at the top and add wasabi.
After space filling, you’ll want to consider color. By far, fresh fruits and vegetables are going to have the best colors. Fresh, slightly steamed veggies will yield a brilliant spectrum. It is considered unappetizing to have a bento that is uniform in color.
Texture is also very important. Smooth shiny surfaces next to spiky shapes next to billowy veggies treat the eye to a visual array of excitement. Noodles look great furled up into a “bird’s nest.”
Giving your bento a name or a theme can pull the whole piece together and inspire details. Although you would think it might be the first step in the design process it is often the last. It is surprisingly easy to put together a bento that is full but not finished. Many times just a small pair of eyes cut out of nori, a few carrot hearts, or a tiny little fork can make an ordinary lunch into a bento box.
8. My romp into bento madness
From 1998 to 2000, I lived in Narita, Japan, where I worked at a summer camp teaching English to little kids. On my very first day, I was blown away by what the kids brought for lunch. There was not a single PB&J or bag of potato chips to be found. Instead, vegetables were lovingly cut into animal shapes, anime characters graced lunch box lids, and personalized messages were crafted right into the food. I could tell right away that the Japanese bento is more than a school lunch, it is an art form.
Bento fun isn’t exclusive to children. A lunch prepared for a husband might not include a sausage cut lovingly into the shape of an octopus but might instead include a handmade onigiri (rice ball) with a curry filling. A lunch purchased on the bullet train might not include a tomato with a face, but could well include hand-dipped fried shrimp.
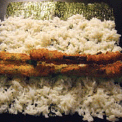
Figure W: Add your filling, in this case, our tempura string beans

Figure X: Roll the roll. Two hands are required (unless taking photos with one).

Figure Y: Wet the unriced 1" strip with water and finish the rolling to seal

Figure Z: The sushi roll is ready to be cut to the desired size
While modesty prevented them from saying so, I learned that my students’ mothers woke up very early every morning to ensure their husbands and children left the house with bentos they could be proud of. Making a nutritious and cheerful bento is an investment of time. It takes longer than microwaving a pizza or throwing together a bologna sandwich. It is also considered an extension of the preparer’s love for the recipient. Originally simple meals that required little preparation, bentos have blossomed into an exciting new trend. The intricate designs and unusual foods were intimidating at first but I have learned and compiled ways around these challenges. Like any gadget enthusiast, I have collected a pile of tools with which to play with. And like any busy crafter, I have collected just as many time-saving techniques.

Figure ZA: The female figure was cut out of nori with a craft knife. Make sure the rice is cool before applying or the nori will shrivel. Note the use of contrasting colors and textures.
9. Inspirational links
Bento ideas are commonly shared among bentomakers worldwide. Below are some of the places I regularly go to for supplies and new ideas.
Jbox (jbox.com)
Cooking Cute (cookingcute.com)
Bento TV (bentotv.com)
Obento, My Bento (Flickr group) (flickr.com/groups/367772@N22)
Bento Boxes (Flickr group) (flickr.com/groups/bentoboxes)
Note: The online Instructable for this project also includes a 3-part tutorial on making gyoza (Asian dumplings).
Besides making beautiful and delicious bentos, Kayobi Tierney (aka Clamoring on Instructables) likes to dabble in jewelry making and electronics. You can see more of her tinkerings at clamoring.com.