
Freak out your cat, scare small children, and make grown men weep with this terrifying costume! By Missmonster
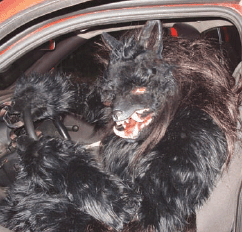
Figure A: Cruisin’!
Create your own werewolf costume with a moving jaw, padded body, and lots of fur! This is my second full, crazy costume, the first being an armored demon. I do costuming as a hobby, but I’m a full-time artist. If you have any questions, feel free to ask via Comments on this Instructable’s project page and I’ll try to answer them as best I can.
Thank you for checking out my Instructable. I hope it inspires you to make a big mean creature of your own. Have a great Halloween!
1. Start the head
You will need:
![]() Upholstery foam
Upholstery foam
![]() Plaster gauze strips
Plaster gauze strips
![]() Lotion
Lotion
![]() Elastic
Elastic
![]() Hot glue
Hot glue
![]() Needle and thread
Needle and thread
Using plaster strips, make a little half mask. Don’t forget to lube your face with some lotion!
When the half mask is done, start adding some foam to protect your noggin. Nothing too thick, you don’t want the wolf to have a huge balloon cranium (or maybe you do, whatever). With the foam added, now make a little elastic bit to hold it on. Sew it into a ring and add a little hot glue to the sewn parts to make sure it stays. Add some strips over the foam to make it more solid.
2. Add the snout and jaw
You will need:
![]() Celluclay
Celluclay
![]() Aluminum armature wire
Aluminum armature wire
![]() Pourable plastic resin (optional)
Pourable plastic resin (optional)
![]() Resin epoxy glue
Resin epoxy glue
![]() Hot glue
Hot glue
Basically I formed a little wire armature for the snout, you can see it running along the sides there, nice and ugly. I then glued it down with the epoxy and glued some foam over the wire armature with hot glue. Snip the foam snout down to the shape you want. Make it a little skinnier than needed since we are going to add to it.
I then coated the entire thing with resin to make it super strong!
Mix your celluclay and create a basic snout. Let this dry for awhile.
3. Add the jaws and teeth
You will need:
![]() Sculpey
Sculpey
![]() Dremel tool or sand paper (Dremel tool will save a ton of time)
Dremel tool or sand paper (Dremel tool will save a ton of time)
![]() Aluminum wire armature
Aluminum wire armature
![]() Key ring (minus keys)
Key ring (minus keys)
![]() Elastic
Elastic
![]() Epoxy glue
Epoxy glue
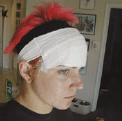
Figure B: Starting the mask with plaster strips

Figure C: Placing foam inside the mask for cushioning
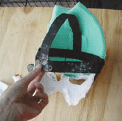
Figure D: Adding elastic to keep it on your head
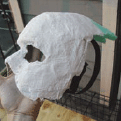
Figure E: Finished halfmask

Figure F: Building the snout over an armature
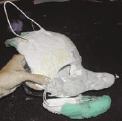
Figure G: Adding the lower jaw
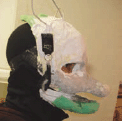
Figure H: Try it on for fit

Figure I: Snarly teeth!
Once the clay dried I went and Dremeled down a lot of the texture. I didn’t think I’d be covering the whole thing with fur, my plan was to hand glue hair and then leave most of it smooth…so I really got into smoothing the face which was sort of a waste. Oh well, that’s what happens when you make it up as you go along! I also added wire ears and the jaw. The jaw was also made with plaster strips molded onto my actual chin. A wire serves as the support for the foam mandible, just like with the upper head.
The jaw works by making a little ring that attaches to the upper head—the lower jaw hooks in and is removable. I made the hook with some wire formed into a hook shape, attached to an elastic loop.
4. Detailing the head and making the teeth
You will need:
![]() Sculpey
Sculpey
![]() Oven to bake Sculpey
Oven to bake Sculpey
![]() Sharpie marker
Sharpie marker
![]() Dremel tool
Dremel tool
![]() Spray primer
Spray primer
![]() Epoxy glue
Epoxy glue
I added plaster strips to the ears as well as paper clay. Lots of shaving, sanding, and swearing later, and we kind of have a werewolf on the way. Sculpting with paper clay sucks. I just did a little, let it dry, sanded, added more—repeat until happy. It’s frustrating but it’s worth it to me. This paper-mâché clay is REALLY light and really strong. It takes patience. I’d work on it between other projects so I didn’t get too annoyed. Oohhhh man, this is where it got fun. The teeth are Sculpey, molded to the jaw, then baked and glued in. I also put a little snarl over them in paper clay later on. I also used a ton of primer on this thing while I was obsessing over the smoothness, that’s why the whole thing is suddenly grey. Notice how I marked the teeth so I could glue them in easier later on. I didn’t detail the teeth as much as I could have but it works anyway.
5. Finish up the head
You will need:
![]() Acrylic paint
Acrylic paint
![]() Brushes
Brushes
![]() Clear epoxy
Clear epoxy
![]() Hot glue
Hot glue
![]() Fake fur
Fake fur
![]() Scissors
Scissors
![]() X-Acto knife
X-Acto knife
Time to paint him! Again, I had thought most of the front face would be naked so I cared way too much about painting it all nice. It’s not a total flat black, there’s actually a little shading and highlighting. That red stuff in the jaw is tool dip, I figured I’d seal the inner face since it can get pretty nasty in there with all the sweating I’d be doing. Easier to wipe off and makes it a little smoother.

Figure J: Paint the face black so it doesn’t show through the fur. Wear a ninja mask under it!

Figure K: Seal the teeth and start adding fur to the face

Figure L: Looking hairy!

Figure M: Don’t forget the back of the head—use hot glue to stick it all on.
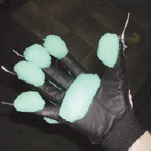
Figure N: Glue foam pads onto a baseball batter’s glove and add the claws

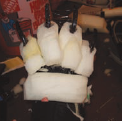
Figure O: Furring the paws

Figure P: Paint the pads and claws black

Figure Q: Furring the arms
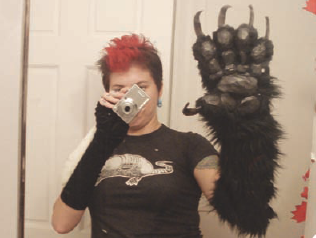
Figure R: Furred arm—look at the paws on that thing! Note the opera glove on other arm
I also have some black eye makeup to blend things a little better…and a balaclava to hide my mouth (ninja mask type hood). The teeth have been sealed with a glossy clear epoxy. Do a test on your epoxy first, because the brand I used for the bottom teeth yellowed within a month or two and they no longer matched. The teeth are not a pure white, either. I did stain them a little but it doesn’t show up too well in the flash. The hair was weird—at first I added mohair that I dyed and glued in piece by piece. Like I have mentioned, I was going to have a somewhat naked face and was going to blend the hair into the skin. Dumb waste of time. I ended up hot gluing on fake fur and trimming it to become short on the face and snout, and blended that into longer hair towards the top of the head. I also bought some long high-quality fur from National Fiber Technology for the back of the head. I used hot glue to attach all of the fur onto the face and head. Cut fur through the backing with an X-Acto, it will help keep the fur intact; if you use scissors to cut through the fur, it will make it difficult to blend pieces.
6. Make some paws
You will need:
![]() Baseball batters’ gloves
Baseball batters’ gloves
![]() Epoxy
Epoxy
![]() Dremel tool
Dremel tool
![]() Plastic craft claws
Plastic craft claws
![]() Foam
Foam
![]() Scissors
Scissors
![]() Needle n’ thread
Needle n’ thread
![]() Fake fur
Fake fur
![]() Armature wire
Armature wire
![]() Opera gloves
Opera gloves
![]() Acrylic paint
Acrylic paint
![]() Clear polyurethane
Clear polyurethane
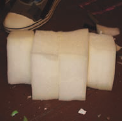
Figure S: Glue together a block of foam for the feet
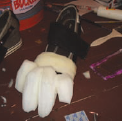
Figure T: Carving the toes Figure
U: Adding claws Figure
V: Trying them on for size!

Figure W: Claw detailing

Figure X: Don’t forget to fur the feet
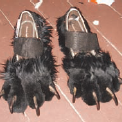
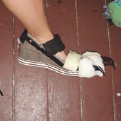
Figure Y: Feet strapped onto shoes with fur toes trimmed
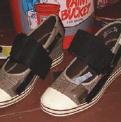
Figure Z: Shoes with Velcro straps to keep the feet on
Put the foam over a baseball batter’s glove. Hot glue it on. The wires make the claws sturdy on top of the fingers (the claws will fit over the wire; create a hole in the claw with the Dremel tool). The foam makes the hand look like it has different stubbier joints and hopefully a little less human (Figure N).
Glue the claws onto the finger wire with epoxy. Paint the claws and seal with the clear epoxy. I painted the paw pads first with the latex to reduce the pores of the foam, then went over that with black tool tip (there are better ways to make paw pads but this is what I did). I shaved down the finger tip fur and let it fade into longer fur on the back of the hand (Figures O-P).
Cut the fingers off of the opera gloves, put one on and insert it into the glove. Using hot glue—yes, hot glue—glue on strips of fur up to your elbows. The trick is to use a low heat glue gun (NOT the large high heat!). Apply your glue onto the strip of fur, let it cool for a minute and then apply it to the opera glove. It will be warm but won’t burn you. You just need it to stick enough to hold in place. Once all the fur is attached, remove the opera glove with the paw still attached and sew all of the fur seams together. Lower arm done! (Figures Q-R)
7. Make the werewolf feet
You will need:
![]() Shoes
Shoes
![]() Foam
Foam
![]() Hot glue
Hot glue
![]() X-Acto knife
X-Acto knife
![]() Plastic claws
Plastic claws
![]() Epoxy
Epoxy
![]() Acrylic paint
Acrylic paint
![]() Dremel tool
Dremel tool
![]() Clear polyurethane
Clear polyurethane
Add Velcro around the top of your shoe, then some around the sides for the end of the fur legs to Velcro on to. I also made a strap for this brand of shoe, which also has Velcro on top of it for the legs to attach to.
I riveted AND glued the Velcro on—don’t want it going anywhere! Plus rivets are fun to install. Toes! Basic block of foam, carve with scissors to round them out a little. Don’t bother too much with making it super smooth, it’s going to be covered with fur anyway. :-) I glued my claws in by cutting a slit into the foam, filling it with hot glue, and inserting the claw. Paint your claws and varnish them with polyurethane. Add strips of fur, hot glue it all down, trim the toe fur, and you are done! (Figures S-Z)

Figure ZA: Adding foam to fronts of the legs to look like dog legs

Figure ZB: Foam on the backs of the legs helps get the digitigrade look

Figure ZC: Furring the body with more hot glue
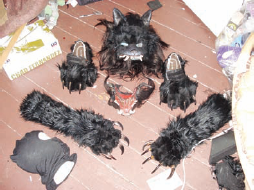
Figure ZD: Body parts

Figure ZE: Building up the shoulders and upper back—werewolves are beefy!

Figure ZF: Trying it on
8. Make the body
You will need:
![]() Fake fur
Fake fur
![]() Hot glue
Hot glue
![]() Leotard
Leotard
![]() Under armor-type shirt
Under armor-type shirt
![]() Foam
Foam
I used a duct tape dummy to help out with sizing. I put a leotard with an under armor shirt over it. Then I hot glued foam shapes over the shoulders, chest and back to make a beefy upper chest. Then to create a digitigrade leg (dog leg appearance—not a backwards knee like everyone thinks, they just have shorter lower legs, longer feet, and stand on their toes). I added foam to the front of my top leg and the back of my calf to make a shape like I’m bending my knees, even when the leg is straight.
Try the suit on every so often with the head on to make sure the proportions are okay. Trim accordingly—get the foam right because you don’t want to have to go back a step to fix things. Remember, you will be adding fur on top of the foam. This will add more bulk, so slight shapes are best. The shirt and leotard connect with Velcro. I sewed and then glued the corresponding sides to the inside of the shirt and outside waistline of the leotard. Also add some Velcro to the elbows of the shirt; this is where the lower arms will connect.
Cut shapes of fur with your X-Acto (cut the back as to not mess up the fur) and hot glue it all on. Place the pieces close together, fill gaps with smaller pieces. After you are satisfied, sew all of the glued on pieces together so when you flex and bend, the fur does not show seams and gaps. I also included a photo of all the parts we have covered so far.
9. Try it on
You will need:
![]() Colored contacts
Colored contacts
![]() Kryolan aqua makeup (buy at sillyfarm.com)
Kryolan aqua makeup (buy at sillyfarm.com)

Figure ZG: Scary contacts add attitude

Figure ZH: Come closer…
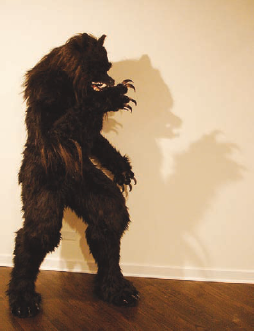
Figure ZI: Strike a pose!
You are pretty much done. Get some colored contacts to look less human and really freak people out! I blended my face into the black of the mask with some Kryolan makeup. It mixes with water and can be applied with a finger or brush and does not rub off too easily.
Add a tail if you feel like it! I didn’t document that process but just sew some fake fur, stuff it then sew it to your wolf’s butt.
Try on your new suit! You may need to make some changes and adjustments, but congrats!
You are now a werewolf. Stay hydrated and be very careful, this suit gets really hot. You will lose a lot of water and moving will take a little more out of you. Take frequent head breaks (take off the head and hood) in front of a fan and have someone around to help you get in and out of the suit, aka a wrangler. A wrangler can also help you spot trouble where you can’t see it (people tugging on the suit from behind or kids getting a little too aggressive), or do simple things like open doors for you when your claws can’t. Most people will be really cool and want to pose for photos or pet you, but be aware of people just wanting to make trouble with an easy target. Especially drunk people! Having some back-up can make the difference between having a great time out or getting your costume damaged and you possibly hurt. I have had some bad experiences being out alone with another costume and I’d hate for anyone else to have the same trouble. But don’t let all that scare you. It’s going to be awesome and you will have a great time. Go scare some kids and have a great Halloween!
Missmonster, aka Melita Curphy, is a freelance artist living near Chicago. She paints, sculpts, makes lots of monsters, and loves to scare kids as the werewolf. Check out her art at www.missmonster.com.