Ah, the Nintendo Entertainment System. Brings me back a lot of good memories: Super Mario Bros., Double Dragon, Megaman. It also brings back not-so-great memories. The agony of changing cartridges, blowing until you’re dizzy and still getting nothing but a flashing screen when you start the console. When you finally got the cartridge to run, it could freak out at any time from the smallest dust particle in the connectors.
Luckily, those days are gone. NES emulators can be found for the PC. These nifty little programs are designed to run NES games as accurately as possible. All you need is the emulator itself, and a ROM for a NES game. You can obtain public domain ROMS for the NES from http://pdroms.de/files/nes.
I wanted to play NES and other oldish consoles on the NES PC, and also play Divx/DVD videos and more. Playing NES games on your computer is fine, but I wanted more of an original feel to it. I thought I’d be able to put a PC full with hard drive and DVD drive inside of a NES case, attach some controllers to it, and hook it up to my TV.
Here’s the full list of console emulators my NES PC currently has installed:
![]() NES
NES
![]() Super NES
Super NES
![]() Sega Mega Drive/Genesis
Sega Mega Drive/Genesis
![]() Sega Master System
Sega Master System
![]() MAME (Arcade)
MAME (Arcade)
![]() Game Boy (Color)
Game Boy (Color)
![]() Game Boy Advance
Game Boy Advance
![]() Sega Game Gear
Sega Game Gear
![]() Turbo-Grafx 16 / PC-Engine
Turbo-Grafx 16 / PC-Engine
![]() Sony Playstation (games run from CD drive)
Sony Playstation (games run from CD drive)
![]() Nintendo 64
Nintendo 64
The NES PC is used without mouse or keyboard! Everything is done using the gamepads, which makes it feel more like a console (like it should!).
1. Parts you’ll need
An NES (duh)
You’re free to use a non-working one, as the only part you’ll be using is the case.
Motherboard and processor
You will need a motherboard and processor. Because of the tiny size of the NES case, you’re not going to be able to fit a normal ATX motherboard in it. I used a Mini-ITX motherboard. They are 17cm by 17cm, so it’s a great fit for the NES case. You can purchase Mini-ITX motherboards from www.mini-itx.com and also www.mini-box.com. I bought a Jetway 1.5GHz C7D motherboard. It was relatively cheap but powerful enough for my needs. Mini-ITX boards come with an integrated (built-in) processor, sound card, and video adapter. This is great when space is a luxury you can’t waste. You should make sure the processor won’t generate too much heat. There’s little space for air to move around in the case, so it might get a bit too hot.
Note: It’s important that your motherboard have a TV-out connection: either S-Video (preferred) or Composite. If you have an LCD screen you might want DVI or HDMI.
Memory
The motherboard needed DDR2 memory, so I got a 1 GB stick of that.
Storage
I already had an old 40 GB 2.5" laptop hard drive. It won’t work with a standard IDE connector, so I got a 44-pin to 40-pin IDE adapter. I also had a slimline DVD/CD drive from the same old laptop. It also needed a slimline to IDE adapter to work. You can obtain these parts from some Mini-ITX vendors, but you should also search Google for them (try searching on “44-pin to 40-pin IDE” and “slimline to IDE adapter,” without the quotes).
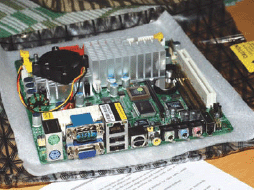
Figure B: The Jetway Mini-ITX motherboard
Power
You will need a power supply unit (PSU). There’s a problem, though. ATX power sources are too big to fit inside the case. I ended up using an 80 Watt picoPSU. It’s a tiny DC-DC power source. It works like a laptop’s power source: you attach an external power brick that handles the AC/DC conversion and provides the picoPSU with 12V DC power.
Connectors
You will need leads to attach the power LED, power switch, and reset switch to your motherboard. I got them from an old computer, but you can purchase such cables from computer parts vendors. I also used some old case fans I had. If you’ve chosen a cooler motherboard/processor combination than I did, you might not need extra fans. There are some very cool fanless VIA EPIA boards, but they’re not very powerful performance-wise.
Tools
You won’t be needing any special tools other than a Dremel or something similar. It’s used for cleaning out the case bottom and cutting out the hole for the backplate. You’ll also need to solder some wires for the power/reset switches.

Figure C: PicoPSU power supply
Note: Take care when handling the motherboard, memory, etc. They are extremely sensitive to static discharge, so make sure you’re properly grounded!
2. Preparing the case
Following the example of other NES PC builders, I got rid of all the original NES hardware except for the power LED and power/reset switches. The NES power switch stays in when you press it. This can be fixed by removing a small metal part on the top part of the switch (compare the power and reset switches: the power switch has the metal part, the reset switch doesn’t).
Next, I marked which plastic parts I’m going to need with a marker. Basically, you need only the four corner standoffs and the plastic parts that keep the reset/power switches in place. I also marked part of the case bottom to be cut off (marked in Figure D with a yellow line) to make space for the hard drive that will sit under the motherboard.
3. Preparing switches and power LED
Next, I unscrewed the switches and power LED from the case and soldered the motherboard leads for them. Make sure there are no shorts that could cause problems. The PCB is nice and big, ’80s style, so you shouldn’t have trouble.
4. Placing the hard drive
The hard drive will sit under the motherboard to maximize space efficiency. First, I covered the hole I cut (see step 2) with some plastic so the hard drive bottom wouldn’t be seen from the outside.

Figure D: Prepping the enclosure—cut away everything except the corner standoffs and switches. You’ll need to cut away the indicated portion of the case bottom to make room for the hard drive, too.

Figure E: 1. Power LED 2. Power switch 3. Reset switch 4. Attach this to the motherboard’s connectors.

Figure F: The red area shows where the hard drive goes (trim away the standoffs and raised portion to make it fit)
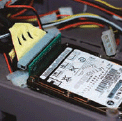
Figure G: The hard drive in place
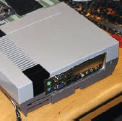
Figure H: Fitting the backplate into the case

Figure I: Connecting the optical drive
Next, I placed the hard drive (the location is marked in red in Figure F) and covered the top with duct tape so as not to short-circuit the motherboard, which will sit directly on top.
Note: I later found out the 2.5" laptop HD I had was broken, so I ended up using a regular 3.5" 160GB one. It fit just as well, but was a bit higher so the motherboard had less space vertically.
5. Cutting a hole for the backplate
Next I placed the motherboard on top of the hard drive (the other end of the board sits on top of the power/reset switches). I measured where the I/O backplate (this should be included with your motherboard) would need to be placed and carefully Dremeled a hole in the top and bottom halves of the case to fit the plate.
Figure H shows the hole. A tad ugly, but the picture was taken before I did any sanding. It’s much nicer now. The fit was alright, so I used hot glue on the bottom half to make sure the plate stayed in place.
6. Placing the DVD/CD drive
I decided to use heavy-duty duct tape to fix the optical drive to the top of the case. Slimline optical drives are very light, so the tape worked fine. I had to cut off a part of the case (check Figure J) to fit the drive.
7. Putting it all together
I connected the IDE cables, the power for the hard drive and DVD/CD, drilled a hole for the PSU connector and squeezed the case-halves together. After some considerable violence, I managed to screw the case closed.
Note: I later noticed the processor was running too hot (over 70C!) so I added two extra fans: one on the top (see Figure L) and one where the original controllers were attached. Because of this I can’t put USB connectors into the controller ports…they have to be attached to the backplate. Oh well!

Figure J: Installing the optical drive—1. You’ll need to cut away plastic here 2. This is a good place to install an extra fan.
8. Testing it all and installing software
With trembling hands I attached the power, keyboard, and mouse. I then connected the video-out to my television and pressed “Power.” Success! The red power LED happily turned on and I was greeted with the BIOS loading screen. I put my Windows XP installation CD in the drive and started installing.
After installing Windows, drivers, an Internet browser, etc., I moved all my games to the NES PC’s hard drive. Next, I set up the front end that will work as my operating system “shell” (for a list of emulator front ends, see www.zophar.net/frontends/universal.html). As soon as Windows opens, the front end automatically starts fullscreen, hiding the Windows interface. I also went through some extra steps to make the NES PC seem less like a computer:
Boot screen
Using Stardocks Bootskin (www.stardock.com/products/bootskin), I switched the default loading screen to a more Nintendo-ish picture.
Login
My Windows booted straight to a Welcome screen, where you’re supposed to select which user to log in as. I got rid of the log-in screen by following these steps:

Figure K: The drive, nicely hidden under the cover
1) Click Start Menu → Control Panel, then select User Accounts.
2) Select “Change the way users log on or off”
3) Un-tick the “Use the Welcome screen” and apply this setting. Close the User Accounts window.
4) Click Start Menu → Run, and type “control userpasswords2” and press Return
5) Un-tick “User must enter a username and password to use this computer”
Enter the password for the person you want to login as.
Customize startup
Next, I removed the “Loading settings” message that appears when Windows is starting up:
1) Click Start Menu → Run, type regedit, and press Return.
2) Navigate to the entry: HKEY_LOCAL_MACHINE → Software → Microsoft → Windows → Current-Version → Policies → System.
3) If there is an entry for “DisableStatusMessages” set it to 1. If there is no entry, right-mouse click the System word, and select New→DWORD value, and enter DisableStatusMessages, rightmouse to edit the value of it, and enter 1.
Disable pop-up balloons
To turn off the obnoxious pop-up info balloons in the right bottom corner of the screen:
1) Click Start Menu → Run, type regedit, and press Return.
2) Navigate to the entry: HKEY_CURRENT_USER → Software → Microsoft → Windows → CurrentVersion → Explorer → Advanced.

Figure L: The NES PC, all put together (1 & 2 are good locations for cooling fans)
3) If there is an entry for “EnableBalloonTips” set it to the decimal 0 (the digit zero). If there is no entry, right-mouse click the “Advanced” word, and select New→DWORD value, and enter “EnableBalloonTips,” right-mouse to edit the value of it, and enter the decimal 0 (the digit zero).

Figure M: Detail showing the fan described in Figure J

Figure N: Installing Windows XP
Lastly, and most importantly, I added the front end to the Startup folder in the Start Menu. That way, when Windows is started, the front end is automatically launched!
In Memoriam: Hashim "hatsuli" Al-Ani
Gareth Branwyn writes: When we were putting this book together, after choosing this project for inclusion, we sadly discovered that its author, a 19-year-old Finnish teen named Hashim Al-Ani, aka hatsuli, had lost a battle with cancer. Like any community, virtual or otherwise, people on Instructables were saddened by the news and offered stories on the forums of how he had helped them with their build of his project and offered other tech help. His mother, not an Instructables user, signed up to Instructables and posted this on the forum topic about her son’s death:
Thank you for your kind words. To be honest, I cannot take any credit for what he was like. He just turned out to be a wonderful young man—all I did was love him.
I am so deeply impressed by your comments here. This world was something we were not part of. I mean, I knew all his friends, but the Web was his alone. Now I get to know some of you and to have a peek into this side of him.
He was very talented in so many ways. Computers were only part of his life. He was a talented guitar player and did wonderfully in his studies. For some reason, his life was meant to be this short but he seemed to have left a big footprint!—Mamu
Part of his “footprint” is this Instructable. If you build it, take a moment to consider the life of the talented young man who dreamed it up. And when you have your NES PC up and running, be sure to savor the heck out of the experience. Hatsuli would have wanted it that way.