
How I etched a decorative brass plate for my laptop lid

Figure A: Would you like to come over to my desktop and see my etchings?
My brass etching method draws heavily from this instructable (www.instructables.com/id/Makeyour-own-Embossed-Business-Cards-using-Acid-E) and this website (steampunkworkshop.com/electroetch.shtml), so I thank the respective authors for their sterling work. There are many different ways of doing this, but when I was researching it, there weren’t many thorough tutorials, so this may still be useful for some people. If you’re interested, do scour the Internet and you’ll find a wealth of information about toner transfer and etching—some good, some bad, some just plain puzzling.
The artwork I used is a piece called Tribal Eagle (http://tinyurl.com/3lh36n) by *xx-trigrhappy-xx and is used with permission.
1. What you need
![]() Brass plate (I got mine from eBay)
Brass plate (I got mine from eBay)
![]() Fabric iron
Fabric iron
![]() Computer to prepare artwork
Computer to prepare artwork
![]() Laser printer and laser OHP acetate (or do what I did and get a print shop to photocopy it onto acetate for you)
Laser printer and laser OHP acetate (or do what I did and get a print shop to photocopy it onto acetate for you)
![]() Permanent OHP marker (useful for touching up the mask before etching)
Permanent OHP marker (useful for touching up the mask before etching)
![]() Insulating (PVC) tape (get at home or hardware stores)
Insulating (PVC) tape (get at home or hardware stores)
![]() Masking tape (ditto)
Masking tape (ditto)
![]() Scissors
Scissors
![]() Non-metal kitchen scouring pad
Non-metal kitchen scouring pad
![]() Kitchen towel
Kitchen towel
![]() Acetone (optional—but useful. Nail polish remover is mostly acetone and will do nicely.)
Acetone (optional—but useful. Nail polish remover is mostly acetone and will do nicely.)
![]() (Hydrated) ferric chloride crystals
(Hydrated) ferric chloride crystals
![]() Fine wet and dry sandpaper
Fine wet and dry sandpaper
![]() Some form of sanding block (I just used a scrap of wood I had lying around)
Some form of sanding block (I just used a scrap of wood I had lying around)
![]() Cheap plastic container (you’re not going to be able to reuse this for food!)
Cheap plastic container (you’re not going to be able to reuse this for food!)
![]() Rubber gloves (essential)
Rubber gloves (essential)
![]() Goggles (essential for safety)
Goggles (essential for safety)
![]() Dust mask (optional if you’re careful and do the painting outdoors—there’s not much painting involved)
Dust mask (optional if you’re careful and do the painting outdoors—there’s not much painting involved)
![]() Spray paint (I used black enamel satin-finish from Wilkinson)
Spray paint (I used black enamel satin-finish from Wilkinson)
![]() Super Glue
Super Glue
2. Preparing the artwork
The first thing is to get your B&W artwork prepared and printed to the right size onto OHP acetate. This can be done directly by a laser printer, or indirectly, by printing onto normal paper and then photocopying onto acetate. The process of toner transfer does effectively reflect the image though, so if you have text, make sure you mirror the image before printing. A word to the wise though: this has to be done with either a laser printer or a photocopier and not an inkjet! Only toner will mask off the areas of the brass that we don’t want to mask—ink won’t work.
Remember, any areas that are black will be masked off, not etched, and will end up brasscolored, whereas any areas that are white will be etched and end up black on the finished plate.

Figure B: 1. Jar of acetone 2. Brass plate for etching 3. Image photocopied onto OHP acetate 4. Image printed four times to allow for screwing up!

Figure C: Lining up the mask. Note that masking tape only goes over one edge of plate. This allows the acetate to be pulled away from the plate easily.
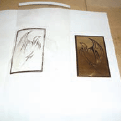
Figure D: Image is mirrored by the toner transfer
3. Prepare the plate
Cut the plate down to the correct size and shape and finish off the edges—it’s easier to do this now than after etching. Most importantly though, clean the plate! Use the kitchen scourer to scrub the front of the plate until it’s shiny (but it doesn’t have to be polished) and free of any tarnish or dirt. Then, use the kitchen towel dipped in acetone to thoroughly clean the surface to remove any oil or grease. Try not to touch the face of the plate now—the cleaner the plate is, the better the toner will transfer later.
Warning: acetone is extremely flammable. If you get any on your hands, it’ll dry out your skin, so use some moisturizer on it afterwards.
4. Line up the mask
Align the plate with the artwork on the OHP film and use the masking tape to stick it down carefully. Make sure the tape is only on one side of the plate, as this will make removing the film later much easier. Also make sure the tape is taut, as otherwise, the artwork will move and you’ll transfer the toner in the wrong place (Figure C).
5. Toner transfer
Place the brass/acetate sandwich on a heatproof surface (I used some scrap cardboard) and heat up the iron. You want the iron as hot as possible (no steam). Start with the brass-side up and press down on the back of the metal with the iron. This will preheat the brass and help the toner melt. After 20 seconds or so, flip the brass/acetate over without touching the brass, which will by now be extremely hot. Place a piece of paper over the acetate, and once again, press down on the brass (this time through the paper and acetate) with the iron, keeping the iron moving. Be careful not to melt the acetate. The actual toner transfer happens very quickly, and I found it needed very little heating with this method (around 5-10 seconds). Take the iron away and immediately peel the acetate back carefully. This must be done while the brass and toner are still hot (which is difficult to do if you’re using paper to transfer it). If you let the toner cool first, it will come away with the acetate rather than remaining on the brass. You’ll also find that the adhesive on the masking tape will melt with the heat, so it’s easier to peel this off while the brass is hot (Figure D). Don’t burn yourself!
6. Check and finish the mask
This is the time to check that you’re happy with the toner transfer. If you’ve messed up and need to start over, the acetone will dissolve the toner from the plate easily and you can try again (with a fresh sheet of OHP acetate). If the toner layer is a bit thin, you can carefully align another printed sheet of acetate with your already partially coated brass and try the toner transfer step again. This is one of the major benefits of using OHP film rather than the other options that people have said work (e.g., magazine paper, inkjet glossy paper, press ‘n’ peel toner transfer paper, etc.). Make sure that the brass plate is free from bits of melted acetate, which can happen if you heat the acetate too much.
If you’re happy with it, use the insulating tape to cover the back, sides, borders (if you want them), and any other large areas that you don’t want to etch (Figure E). Touch up any bits of the mask that look slightly thin on toner with the permanent OHP marker (Figure F).
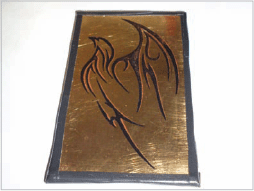
Figure E: The border is created with tape and the sides of the plate are masked off as well as the back
7. Etch
Time to etch! Put on your rubber gloves and goggles. Make up the ferric chloride solution according to the back of the packet in your plastic container and immerse your plate in the solution. The etchant will work much faster if it’s warmed—I think the packet recommends 40-50˚C. I placed the container with the etching solution in a larger basin half-filled with hot water to achieve this (Figure H). It will work at room temperature, but take longer.
What I found much more important was to agitate the solution while etching. This ensures a fresh supply of etchant to the plate and will speed up the process tremendously. I just donned my gloves and picked up the plate every 10-15 minutes and used that to swirl the solution around before putting the plate back down and leaving it again. Time-consuming, but it works well and has the benefit of simplicity.
My etching took about three hours until I decided it was done. You can monitor the progress by gently feeling the surface of the etch with your (gloved) fingers. You probably won’t see any depth to the etch until it’s nearly done. However, keep an eye on the mask, as eventually, it will start to flake off—when this happens, you definitely need to remove the plate, as you’ll start to etch in places you don’t want to.
Ferric chloride is nasty stuff, so do this outdoors, and don’t get it on your skin. Don’t breathe the fumes, and beware: it stains anything and everything indelibly.

Figure F: Look closely at the thick part of the wing (compared to Figure E). I’ve touched it up with black permanent marker.
8. The etched plate
No, we’re not quite done yet. But Figure I shows the plate fresh out of the etchant bath. When you’re happy with it, remove it from the bath and rinse thoroughly with water. You’ll see that my plate is covered with verdigris. This didn’t happen on the first two plates I did, but did on this one. I’m not entirely sure why…
9. Disposing of the etchant solution
First: don’t bother! You can keep the etchant for the next plate you do (it will gradually take longer to etch the plate as the solution becomes weaker over time). Second: when you do need to dispose of the etchant, do so responsibly. DO NOT put it down the drain! The ferric chloride is corrosive to lots of metals, but more importantly, it now contains dissolved copper that is harmful to wildlife. What you need to do is neutralize the solution with an alkali (something like washing soda) that will precipitate out the copper as a solid. Then, you can dilute the liquid with lots of water and put that down the drain, as long as you filter/decant off the solid copper and dispose of that safely. Check your local rules and regulations for safe disposal of environmental contaminants.
10. Painting the plate
Time to finish it off! Once again, clean and dry is the name of the game here. Get a hold of your spray paint and shake it to mix it. Do some test spraying onto old newspaper until you’re happy with your technique. Remember: light, even passes larger than the object being sprayed, and thin coats. Once you’re happy, stick the plate down and paint it! I sprayed mine with three light coats of the paint, letting it dry between each coat. Remember to spray from different angles to ensure that you catch all edges of the etched plate. Ensure the paint is thoroughly dry before continuing. If you’re impatient like me, use a hairdryer!
Remove all the tape from the edges and back, and you’ll probably find that it’s left all sorts of gunk. I’d clean this off carefully by scrubbing gently. Rinse the plate and dry with a kitchen towel.
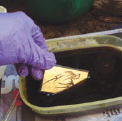
Figure G: Placing the plate in the etchant
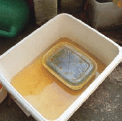
Figure H: The hot water bath used to warm the etchant. It’s brown because the ferric chloride solution gets everywhere!

Figure I: The plate fresh from the etchant bath after rinsing with water

Figure J: Spraying the plate with cheap black enamel paint
11. Finishing off the plate
Nearly there. Grab your wet and dry sandpaper and wrap it around your sanding block (the block is just there to keep the paper flat) and sand the surface of the plate. This will expose the brass on any areas that were not etched. Don’t worry about the way it scratches the paint surface—it gives it a nice pseudo-aged look.
Once you’ve cleaned down to the brass all over the unetched areas, add a bit of water to the plate (this makes the wet and dry sandpaper effectively a finer abrasive) and scrub with small circular motions all over the plate to ensure a nice finish. If the paint has been scratched unevenly, then carefully use the paper without the sanding block on the unscratched areas and even it out. When you’re happy with the finish, rinse the plate and dry.
Don’t forget, if you completely screw up this stage, all is not lost—just clean the plate, respray, and try again!

Figure K: The finished plate!
12. Attach to the object of your choice
Final step: glue it on. I used Super Glue, as it’s quite good at sticking mixed materials (in this case, metal to plastic) and can be removed with the appropriate solvent. I’d recommend using the masking tape as before to allow you to align the plate first, flip it up so that you can spread the glue, and then flip it back to stick it correctly into position (Super Glue dries really quickly).
Brian Tang is a student at Balliol College in Oxford, England.