

This is how to make an excellent excuse for driving a lag bolt into your wall
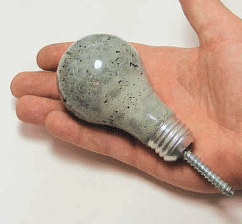
Figure A: The finished Concrete Light Bulb Wall Hook
The Concrete Light Bulb Wall Hook is an excellent excuse for driving a lag bolt into your wall. Functional yet stylish, it gives a nice industrial design feel wherever you mount it.
Last winter after breaking out the serious cold weather gear, I found myself fighting the coat rack next to the front door. It was, to put it bluntly, failing miserably. Tipping over, breaking off, it was a mess. I swore before the next winter I would drive some serious hooks into the wall that would handle all my heavy overcoat needs. I just haven’t seen any kickass hooks yet that I liked enough to justify making serious holes in my walls.
Cut to the last few months. As mentioned in my blog (www.whamodyne.com) I’ve been playing around, trying to make a concrete light bulb. Why? Because I find the contrast of blending a new material like concrete into an everyday shape like a light bulb to be a great design element. So while messing around with these guys, I realized this would be a great excuse to drive lag bolts into my wall for hooks. By embedding a lag bolt into the concrete light bulb, I could make a wall hook that was useful enough to handle anything I wanted to hang off it. Thus this project was born.
This was originally an entry in the Etsy/Instructables SewUseful Contest, because I’m the kind of guy who enters a sewing contest with concrete and no sewing. If you are not familiar with Etsy.com, it’s a place where people sell their handmade goods, and I set up a store to sell my bulbs there. So if you love this idea but don’t want to make it yourself, not to worry! I have them for sale in my Etsy shop at http://whamodyne.etsy.com.
1. Tools and materials
You will need a work area where a little sand, concrete mix, and even glass shards won’t be a problem. Make sure you have a small brush and dustpan available at all times. Normally you wait till the end to shatter the light bulb, but it can happen at any point in this process so be ready for cleanup from the very start.
Caution: Do not attempt this Instructable with Compact Fluorescent Bulbs (CFLs), which contain highly toxic materials. CFLs require special handling whenever they break or are disposed of.
Tools (see Figure B)
![]() Small pair of pliers
Small pair of pliers
![]() Small pair of wirecutters
Small pair of wirecutters
![]() Small screwdriver
Small screwdriver
![]() Carbide scribe. You can use something like an awl or even a long skinny nail, but I found my trusty old scribe to be invaluable for this.
Carbide scribe. You can use something like an awl or even a long skinny nail, but I found my trusty old scribe to be invaluable for this.
![]() Plastic tub to mix the concrete in. I used an empty 5-pound tub of spreadable margarine.
Plastic tub to mix the concrete in. I used an empty 5-pound tub of spreadable margarine.
![]() A scrap of wood to mix the concrete with. You could use an old wooden spoon or something like that if needed.
A scrap of wood to mix the concrete with. You could use an old wooden spoon or something like that if needed.
![]() Plastic spoon to put the concrete mix into the light bulb.
Plastic spoon to put the concrete mix into the light bulb.
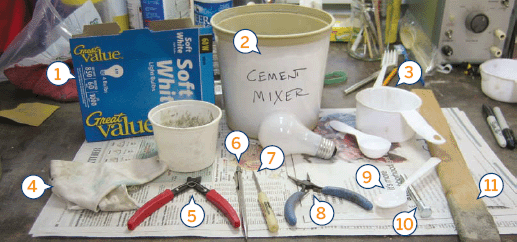
Figure B: 1. Cheap light bulbs 2. Tub from 5 pounds of spreadable margarine 3. Measuring cup and spoon 4. Rags are always handy 5. Small wirecutters 6. The carbide scribe 7. Small screwdriver 8. Pliers 9. Plastic spoon 10. One 5/16” lag bolt, 3.5" long 11. Scrap wood to mix the concrete
![]() A measuring cup and measuring spoons for adding the correct amount of concrete mix and water.
A measuring cup and measuring spoons for adding the correct amount of concrete mix and water.
![]() A toothbrush you won’t be using for your teeth anymore. I picked up a twelve pack of cheap toothbrushes from the dollar store. Every workbench should have a set of these.
A toothbrush you won’t be using for your teeth anymore. I picked up a twelve pack of cheap toothbrushes from the dollar store. Every workbench should have a set of these.
![]() Coffee stirrer and plastic cups
Coffee stirrer and plastic cups
![]() Gloves and safety glasses. These are a must because the glass bulb often breaks and little shards go flying in all directions, including straight at your eyes.
Gloves and safety glasses. These are a must because the glass bulb often breaks and little shards go flying in all directions, including straight at your eyes.
![]() Misc. items like Sharpies, some rags, etc.
Misc. items like Sharpies, some rags, etc.
Materials:
![]() Quikrete Mortar mix. I got the 10-pound bag at the local home improvement store for $2. This is enough to do over a dozen light bulbs. I could have purchased the 60-pound bag for $7 at a much lower cost/volume, but this project really doesn’t need that much.
Quikrete Mortar mix. I got the 10-pound bag at the local home improvement store for $2. This is enough to do over a dozen light bulbs. I could have purchased the 60-pound bag for $7 at a much lower cost/volume, but this project really doesn’t need that much.
![]() Light bulbs. Just the cheapest standard sized incandescent light bulbs you can find. I got mine at Wal-Mart. A pack of four for 77 cents. Can’t beat that with a stick.
Light bulbs. Just the cheapest standard sized incandescent light bulbs you can find. I got mine at Wal-Mart. A pack of four for 77 cents. Can’t beat that with a stick.
![]() Water. You’ll need about 4 tablespoons worth. I kept a bottle of water nearby on the bench and refilled it from the tap when needed.
Water. You’ll need about 4 tablespoons worth. I kept a bottle of water nearby on the bench and refilled it from the tap when needed.
![]() Lag Bolt. I’m using a 5/16” lag bolt, 3.5" long. 5/16” was the largest sized lag bolt I could fit into the light bulb without cutting off the head. I didn’t want to do that because the head gives the bolt a lot of grip when embedded in the concrete. With a lag bolt 5/16” in diameter, I can drill a 1/4” hole in the wall to get a good balance between grip and ease of installing. In other words, it turns easily into the wall, yet holds really well.
Lag Bolt. I’m using a 5/16” lag bolt, 3.5" long. 5/16” was the largest sized lag bolt I could fit into the light bulb without cutting off the head. I didn’t want to do that because the head gives the bolt a lot of grip when embedded in the concrete. With a lag bolt 5/16” in diameter, I can drill a 1/4” hole in the wall to get a good balance between grip and ease of installing. In other words, it turns easily into the wall, yet holds really well.
Note: Concrete is a mix of cement, water, and aggregates. My research showed that a sand mix, aka mortar mix, is good when using a smooth-surfaced mold like the inside of a light bulb. It gives a very high shine when cured. A sand mix is different from your generic concrete in that the aggregates doesn’t have any gravel, just various sizes of sand. I decided to do it with mortar mix instead of your standard bag of generic concrete.
2. Hollow out the light bulb
In the beginning I found the directions at TeamDroid (www.teamdroid.com/diy-hollow-out-a-light-bulb) to be a great help on how to do this. Now that I’ve done it over a dozen times it’s routine. With practice this becomes quick and simple. There is another Instructable describing how to hollow out a light bulb here (www.instructables.com/id/EH8FGYFOB9EQZJIN8P) to get another perspective on it. TeamDroid linked to a GE tech spec on a standard bulb at www.gelighting.com/na/business_lighting/education_resources/environmental/downloads/msd/msds_incandescent_lamps.pdf.
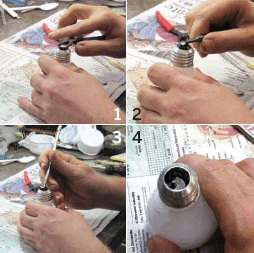
Figure C: 1. Prying up one edge of the metal circle with the blob of solder in it at the end of the bulb 2. Pulling up the edge (just rip that sucker right off) 3. Prying up the purple glass insulator pieces 4. Some of the purple glass insulator has been removed—take the rest out with the screwdriver
For much of this step, you will be poking around inside the light bulb trying to break off the internal glass bits. Do this over a trash can and often shake the light bulb out over the trash can to get rid of the glass shards. Wear safety glasses at all times. More than once some glass flew up towards my face when I was doing this. Figures C and D illustrate the procedure described here.
First, grip the metal circle with a blob of solder in the middle at the bottom of the light bulb with your pliers and gently pry it up from the dark purple glass insulator. This is pulling a wire in the middle that you want to break, so just pull it off.
Once that is done, take your carbide scribe and over a trash can, pry into the hole you just made in the purple glass insulator and break up that purple glass. You want to remove all the purple glass insulator from the light bulb body. I use the scribe to start some cracks and lift off a section of it, then I follow up with the screwdriver to get the rest. Turn the light bulb upside down and shake out all the glass bits that have fallen inside.
Inside there is a small glass tube that pokes up into the glass insulator. You might or might not have already broken that off by now. If not, just use the screwdriver as a lever against it until it snaps loose. Empty into the trash can.

Figure D: 1. Folding over those metal tabs on the inside of the light bulb. This removes a “lip” that broken glass bits can hide in 2. Breaking the last glass cylinder inside the bulb by pushing down with the scribe until something breaks 3. Cleaning up the last bits of glass that could block the hole on the inside of the bulb 4. All the internal parts have been removed and the glass bits shaken out.
Now you have a hole in the bottom of the light bulb. At this point I take my pliers and gently bend over the metal tabs on the inside of the hole so there is no “lip” on the inside. Later when you have broken up the rest of the inside pieces, there isn’t anywhere for the bits to catch and stay in the light bulb when you shake it out.
There should be a wire visible inside that’s soldered to the side of the metal screw piece. Take your wire cutters and cut the wire as close to the side of the bulb as possible.
Now, the inside has a glass cylinder you need to break off and clean up the edges to finish the job. Take your scribe or screwdriver and put it down into the light bulb until it meets resistance. Tap it gently until something breaks. Then using the screwdriver, lever against the side of the light bulb to clean out whatever remaining glass bits are left. You want the neck of the light bulb to be clear from the hole all the way down the body. Turn the bulb over and shake it out one more time to get rid of the last of the internal glass pieces floating loose.
Take a toothbrush and while dry, push it into the light bulb and start loosening up the dry white powder. Pay special attention to the neck of the bulb.
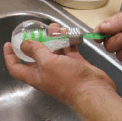
Figure E: Doing the final cleaning. All the white powder residue should be removed by now.

Figure F: A hollowed out, cleaned and rinsed bulb. Set it aside to dry.
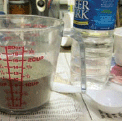
Figure G: A cup and a quarter of the mortar mix ready to be mixed up, with the tablespoon at the ready.
Don’t worry if you can’t get the stuff the toothbrush can’t reach at this point. I found the bulb cleans out easier if you do loosen up the white powder in the neck before it gets wet.
Now take it over to the sink and add a little soap and water. Scrub around with the toothbrush and shake the bulb to get the water everywhere, as shown in Figure E. Pull out the toothbrush and then wash out the soapy water from the bulb. At this point it’s all nice and clean inside without any soapy residue. Set it aside to dry out (Figure F). Now it’s time to mix up the concrete.
3. Mix up the concrete
This is the part that’s more art than science. I’ve found that in the small batches this project calls for, it’s very easy to add too much or too little water to the mix. When you are mixing an entire 60-pound bag of concrete, being off a teaspoon on the water doesn’t matter that much. When you are mixing up just a cup of concrete, that teaspoon starts to matter.
Mortar mix, when cured in a glass mold like we are using, gives a very nice gloss surface. The lower the amount of water you use, the smoother and more glass-like the surface is, and the stronger the resulting cured concrete is. However, the lower the amount of water you use, the harder it is to have it fill in the gaps on the sides and it leaves lots of holes and divots. Getting the mix liquid enough to spread out but not too liquid that it loses its strength is one of the issues on the water-to-dry mix ratio. Finding the correct compromise between these two issues is really a matter of practice and personal taste. I would suggest you play around with it in multiple bulbs if you are interested in getting the best result you can.
The ratio I’ve found works well is about 1.25 cups of the mortar mix and a hair under four tablespoons of water. This is more mortar mix than you need to fill a light bulb, but there is always some spillage and trying to reduce the amount means even more accuracy on the water measurement. This is a good place to start (Figure G). So measure out a little under four tablespoons of water and put that into your plastic tub.
Slowly mix in the mortar mix a little at a time. Let a little bit get wet, then a little more, then a little more while stirring the whole thing. It’s a bit like making biscuit dough at this level, but you're pouring the dry into the wet instead of the other way around. The consistency should be good enough that the mortar mix wants to stick together in one large clump, but it isn’t sopping wet. If you feel you need to add more water or mortar mix to get it correct, then go for it. Just do it a little bit at a time. A small amount of either material makes a large impact at this point.
Once it’s at a consistency you like, keep stirring nice and slow for a few minutes. You want everything to be thoroughly wetted as much as possible. See Figure H.
Caution: At this moment the clock starts and you have 30 to 45 minutes to finish the light bulb before the mortar mix starts to harden up.
Once you have thoroughly mixed up the mortar mix, bring out the light bulb and start filling.
4. Start filling up the light bulb with the mortar mix
You are working on a time limit at this point as the mortar mix starts to set. If you can get it all done in thirty minutes or so it should be fine.
Put your light bulb into a small plastic tub with the hole pointing upwards. When you are adding the mix there is always spillage and you don’t want that all over your work area. I put a little bit of sand in the bottom so it will stay straight early on; once you add a few spoonfuls of the mortar mix it stands up straight on its own.

Figure H: 1. Add a bit under four tablespoons of water to your tub 2. Slowly pour in the dry mortar mix to the water while stirring 3. Starting to get there—it’s just reaching the point where it wants to clump up in one large ball 4. Yum. Bake at 375 degrees for 12 minutes… wait, sorry, wrong Instructable!
Take a plastic spoon and scoop up a level amount of the wet mortar mix. Holding the end of the spoon over the hole in the light bulb, use your finger on the other hand to push it down into the hole. Some will spill over the edges of the hole; that’s ok. You made almost twice the volume of mortar mix as will go into the light bulb.
After four or five spoonfuls into the light bulb, you want to vibrate it so the mortar mix liquefies and spreads out evenly on the inside. Shake it back and forth to make it liquefy. If there is an air bubble visible on the side that just won’t fill in no matter how you shake, tap it repeatedly with your fingertip. This moves the bubble up and the liquid towards the tapping.

Figure I: 1. A scoop of the wet mix in the plastic spoon, use your other hand to feed it into the light bulb 2. This is before any shaking—the mix needs to be vibrated and tapped to spread out and coat the inside of the bulb 3. Whole lot of shaking going on 4. After shaking and tapping, it’s starting to liquefy and spread out.

Figure J: Getting there. At this point it’s time to add the lag bolt to the light bulb.

Figure K: Adding wet mortar mix around the lag bolt.
Repeat these (a handful of scoops, much shaking and tapping to fill in the gaps and make it all liquid, all shown in Figure I) until you reach half way up the neck of the bulb. At that point (Figure J) it’s time to add the lag bolt.
5. Put in the lag bolt and finish filling the bulb
Before putting in the lag bolt, mark off with a Sharpie where 1.5" is from the pointy end so you know how far to push it down.
Put the lag bolt into the mortar mix (Figure K). Because the light bulb shape has some undercutting with the mold, the mortar mix wants to clump up in the middle of the bulb and not grip the sides. You can use the head of the lag bolt to tap down the pile in the middle of the bulb so it starts filling in all the gaps.
Keep adding mortar mix around the lag bolt to fill it up. Holding the lag bolt firmly to make sure it does not rattle, keep shaking the bulb and tapping the sides to fill in gaps and liquefy the mortar mix.
Take a coffee stirrer (Figure L) and use that to tap down the mortar mix. You want to keep adding the mix, tamp and fill, tamp and fill. Finally the entire bulb is all done and you are tamping on the top. You want the mortar mix to be level with the top of the hole but not sticking out in a bulge.
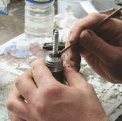
Figure L: Tap it down with a coffee stirrer; you could borrow one from Starbucks.

Figure M: Full and ready to go, the metal threads have been cleaned up of concrete gunk
When you are all done, put the light bulb with the lag bolt pointing up in a spare plastic cup. Like my coffee stirrer, the ones I used were also borrowed from Starbucks. Take a rag and clean up the metal threaded part of the light bulb as well as you can—you don’t want the mortar mix drying on it.
Set this to the side for at least five days to let the mortar mix cure as shown in Figure M. I normally write the date it was made on the glass with a Sharpie so I can keep track.
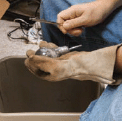
Figure N: Tapping the light bulb over a trash can to create cracks and get some of the glass to fall off the bulb.
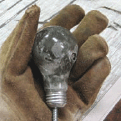
Figure O: The bulb after much whacking

Figure P: 1. Brushing it off to get all the loose glass and especially glass grit off the bulb and into the trash can 2. Prying off the glass on the bulb piece by piece with the carbide scribe—it likes to fly off sometimes so be careful 3. Cleaning up the neck of the bulb where the metal meets the glass, making sure there is no glass showing or that could come loose later 4. Brushing the whole thing down with the shop brush to get out the last of the debris
6. Crack the light bulb
Let the mortar mix cure for at least five days. A few days more is a good thing.
This is the part where you are breaking up the light bulb glass into little bits and pieces on purpose.
Glass will be flying in all directions, so wear safety glasses and at least one glove (like in the pictures) at all times!
Over a trash can, hold the bulb in one hand that has a glove on it. I’ve tried to use gloves on both hands at this stage and didn’t have the fine control I wanted. You might be able to do it.
Taking a hard metal object, start striking the side of the light bulb. In Figure N I’m using my carbide scribe. The glass will start to crack and form spider web fractures. Keep hitting. Eventually small pieces will fall and/or fly off of the bulb.
When you have formed a good number of cracks around the bulb (Figure O), take a toothbrush and scrub it vigorously over the entire bulb. This will brush into the trash can any glass grit or loose pieces. Then take your carbide scribe (or awl or sharp nail) and start to pry up the edges of the glass left on the bulb. Some of it will come off in large chunks, some of it will come off a little piece at a time. Try to aim for the trash can but know that it won’t all go in there, some of it will pop up and go in any direction. If a large piece of glass doesn’t want to come up and doesn’t have any cracks in it, beat it with the metal object some more to create the spider web. Every so often take the toothbrush and rub down the light bulb to get rid of any ground-in glass or loose bits.
When all the glass has been removed from the light bulb, take your scribe and carefully go around the neck of the bulb where the metal met the glass. Make sure there are no loose glass shards under the lip of the metal. Shake and tap the bulb to see what floats loose. When you are done, take a shop brush and run it over the entire bulb one more time to get any glass grit or loose pieces out of the holes in the concrete. Figure P shows all the steps needed to get the glass off.

Figure Q: It’s done! Look at the high gloss smooth finish on that sucker. The holes give it character.
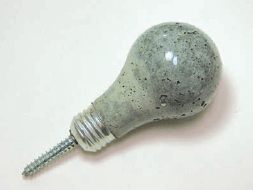
Figure R: All set with a very nice surface
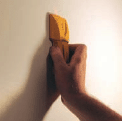
Figure S: There be a stud here somewhere
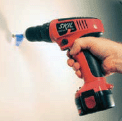
Figure T: Drilling the hole. The blue tape is the depth stop at 1.5".
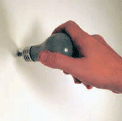
Figure U: Just hand screw it in

Figure V: Hang your hat. Showing off my pride for my beloved Oakland A’s
It’s done! The mortar mix often leaves pits and holes even with all that shaking and tapping you did, but I think it adds a bit of character to the whole thing and makes each one you do unique. Feel the glossy smooth glass finish on the bulb and how it reflects the light (see Figures Q and R). Now it’s time to mount it!
7. Mount it on the wall
Now that you have this killer Concrete Light Bulb Wall Hook, it’s time to mount it into the wall. The steps here are fairly simple.
Find the stud: This hook needs a wood stud in the wall. There are multiple ways to find a wood stud. In Figure S, I’m using a cheapie stud finder.
Drill the hole: Using a 1/4” drill bit (Figure T), drill a hole 1.5" deep into the wall.
Screw it in: The hole is big enough that you can screw it in (Figure U), but the bite is good enough that it can hold just about anything you want to hang off it.
Heavy overcoats, small children, whatever strikes your fancy.
Hang your… Or you could use it as a hat hook (Figure V). It’s all good.
Ray Alderman putters around and makes stuff in his workshop in Central Virginia.