
Make the tin can stove that hoboes have used since time immemorial By Tim Anderson

Figure A: Salmon head and giblets soup on an olive oil can stove

Figure B: How NOT to leave a campsite. A hobo stove prevents this.
The tin can stove is quick to make, easy to light, and does a lot of cooking with mere handfuls of twigs for fuel. It doesn’t make much smoke or shine much light, in case you don’t want to be found. It also doesn’t leave fire scars or start forest fires very easily, and that’s good for both fugitives and environmentalists!
Another tin can would be the cooking pot for all you living-history hobo re-enactment enthusiasts. Preferably with a piece of wire through two holes in the lip to hang it like a little bucket.
In Figure A, I’ve used my favorite can for a hobo stove: a 3-liter olive oil can. I’m cooking salmon heads and giblets in a soup on a driftwood pile in the rain in British Columbia. I consumed the olive oil during the weeks it took me to learn to catch salmon. This is a new stove, the paint hasn’t all burned off yet, and it needs more air intakes. With just one door, there will be charcoal left in the ashes. With three doors everything gets burned, and it’s easier to feed it fuel.
1. Don’t do this!
The hobo stove and some common sense will leave your campsite looking like wilderness.
Figure B shows what bad camping leaves behind.
Not visible in Figure B is a pile of poo left by the users of this site. They thought they buried it, but rain washed the sand right off of it, and the bacteria from it washed down into the oyster beds and now the tribe won’t be able to sell their oysters. In this area you’re supposed to dispose of human waste in deep water in the current, or bury it a couple stones’ throws from the water in an 8" or greater deep pit.
Strange to say, but kayakers are the bad guys in this case, much worse than power boaters even.
In case you’re tuning in late and want the current eco-dogma: shellfish farming is usually good for the environment, whereas salmon farming is usually bad.
2. Pressure cooker on a hobo stove
I’m cooking a Plecostemus South American Armored Catfish (Figure C) I caught with my cast net west of Lake Okeefenokee, Florida, in the swamp along Fisheating Creek. I finished eating the olive oil in this can during the days it took to learn to throw the net. These are aquarium sucker fish that were dumped out and are breeding wild and growing large. The meat is very yellow and very tasty. The thick scales fit together in a very interesting way but I couldn’t think of any use for them.
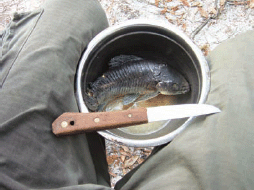
Figure C: Cast-net caught Plecostemus South American Armored Catfish going in the cooker

Figure D: Using a pressure cooker to prepare an entire day’s meal on a hobo stove
The pressure cooker is heavy but that doesn’t matter so much in a canoe (Figure D).
It’s a joy to use. I can cook all my food for a day at once. I would boil a dozen eggs with a stainless bowl of bread dough resting on top of that, all inside the cooker. I formed the dough into a bagel shape so the steam would cook it better, and it got steamed into a really good bagel. Especially when I used seawater in the dough. That was the perfect amount of salt. I just get a roaring fire going until the cooker is steamed up, then I forget about it, fire dies down and goes out. Everything gets cooked perfectly and I don’t have to pay attention to it.
This cooker has two more bottom doors on the sides that you can’t see, and burns the fuel completely. There’s no charcoal left in the ash.
If you don’t want soot on your pot, wipe soap all over it before putting it over the fire. Afterward, the soot will wash off easily.
3. Be your own hobo
We’re going to make the hobo stove shown in Figure E. The license plate is optional, but something like that, even a folded piece of tinfoil, is nice so you won’t harm the surface under your stove. This stove is tall and narrow, so you’ll need to pound three sticks around it to support your pot, or put it between three rocks, or hang your pot over it.
Get the tallest can you can find. You need height for convection to give you good airflow. This coconut juice can is good. It’s tall and the steel is pretty heavy for a drink can so it’ll last a while.
Food cans had lead solder in the joints until 1993, so don’t use old cans. Pineapple cans have zinc plating inside in case you think you need to breathe more zinc.
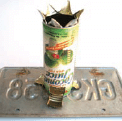
Figure E: A ready-to-use hobo stove on a license plate base to protect beneath the stove
Figure F: Carefully cutting an asterisk pattern in the top of the can
4. Make the initial incision
Cut an X or asterisk in the top of the can (Figure F).
Warning from my Granddad: “Don’t cut toward yourself and you won’t get cut.”
These flaps are going to be the pot supports. The bottom on this can is heavier than the top, so I’m turning the can upside down to make them. The other end has the pry-tab open, and that makes it hard to make the pot supports turn out right. You’ll get a better result by opening the can by cutting the X instead of whatever the vendor intended.
5. Pry up and crease the flaps
Pry up the flaps (Figure G). Don’t cut yourself on the sharp corners. Crease each flap down the middle as shown in Figure H. That makes them a lot stronger. Figure I shows the top of the stove after all the flaps have been positioned correctly.
Figure G: Prying open the flaps
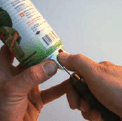
Figure H: Creasing each of the flaps
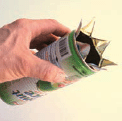
Figure I: The finished stove top
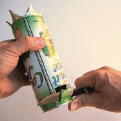
Figure J: Cutting the airintake and stoking doors
6. Cut doors
Cut some drawbridge-style doors in the sides near the bottom. Those are the air intakes and stoking doors (Figure J).
7. First use
The first time you use it, wait for a while for the paint to burn off it. Stay back and don’t breathe the fumes.
It’s really easy to start a fire in one of these stoves. Start with wispy stuff or paper if you’re still that close to civilization. Then work up to pencilsized pieces. Thumb thickness is probably the most you’ll want for cooking. Thicker than that tends to smoke, cuz you’ll put in wet pieces by accident.
You can toss it in the top before you put the pot on, and then poke them in under the pot. You can feed longer sticks in gradually through the doors in Seminole star fire fashion.
It’s so quick to start one of these stoves, sometimes I’ll pull over and do my cooking at a rest stop or by the side of the road. I’ll put an aluminum license plate under the stove so I won’t leave a mark on the pavement. A folded piece of aluminum foil or flat rock is just as good.
I don’t worry about trouble from authorities, because it’s so easy to move the fire or put it out. But I’ve never been hassled. The rules about fires are usually about “open fires” and this isn’t one.
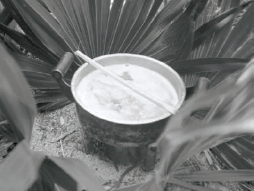
Figure K: Using a three-stick pot stand and a palmetto plant as a windscreen
8. Three-stick pot stand and palmetto leaf windscreen
I’ll sometimes pound three sticks into the ground to support my pot (Figure K). That’s good if the pot is too wobbly or heavy on top the stove or if I want to get it a bit higher off the stove.
If it’s windy, you’ll want to put a windscreen around your stove. Otherwise the heat will all get blown away and cooking will take too long.
Here I’ve made a windscreen from palmetto leaves stuck in the ground and I’m cooking on a three-stick pot stand with a can of Mexican “Fuego” brand sterno. I’m in the jungle back from the beach on a biosphere reserve in the Yucatan Peninsula. This is oatmeal with olive oil, cocoa, and honey in it.
Tim Anderson co-founded zcorp.com, manufacturer of 3D printers that are computer-controlled machines that build sculptures. He travels looking for minimum-consumption technologies developed by poor people. He writes the “Heirloom Technology” column for MAKE magazine and has written 150+ Instructables.