
Keep your vision clear without getting cold hands! By Mike Warren

Figure A: Amazing wiper glove
Last year I was hanging out with a friend while he was checking out snowboards and I saw a glove that had a tiny wiper blade attached to it for cleaning your visor when it gets wet. While I don’t snowboard, I do ride a motorbike. I also live on the rainy west coast of Canada, which means even in the spring and summer I can expect to get rained on. I had just bought new gloves for this season a few months back and decided that this would be a neat project to try out. Enough talk, let’s make something!
1. Acquire materials
I’d say go out and buy a wiper blade, but that’s just crazy talk. Wipers are expensive if bought new and we only need about 1/10th of just one of the blades, so instead of buying one just to throw away, why not just walk down the street and take one off that pesky neighbor who decides that mowing the lawn first thing on a Saturday morning after a heavy night out is a good idea, or you can just happen upon one in the recycling bin outside your apartment. Either way works.
2. Break apart the wiper
Yup, it’s my favorite part. Time to break stuff! Wipers come in a variety of types and makes, but they are all going to follow the basic structure of assembly, so taking them apart may be different than what I’ve shown. Don’t worry, we need just the rubberized part, so destroying the outer housing isn’t an issue. Take a sharp knife and carefully cut into the rubber until you hit the silver metal shanks that hold the rubber blade in place. Cut off more than you think you need just in case; I cut about 13cm (5"). The rubber part extends beyond the shanks, but your knife will not fit—instead of trying to cut it, just grab the rubber and pull it out sideways along the length of the shank; the small section of rubber still attached will easily break. In Figure C I have also removed the metal shanks, we don’t need them. I thought about having a system that would make the blades removable but it was too much effort and not worth the trouble. Mechanically fastening them to the glove is far easier.

Figure B: Check the recycle bin.

Figure C: Taking apart the wiper.
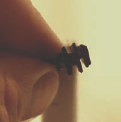
Figure D: Trimming the blade.
3. Rubber surgery
From the rough-cut piece of the blade, we’re going to need to trim that profile down a bit (Figure D). Grab a sharp knife and start at one end and simply slice down the length of the blade to trim off the smaller underside portion of the blade (Figure E). We’re doing this so the wiper sits flat on the glove and won’t wobble around so much. Again, every wiper will be a little different, but should all be roughly the same, so if yours doesn’t look just like this don’t worry, just trim down what you can so you have a nice solid base for your wiper to sit flat on your glove.

Figure E: Careful!

Figure F: Blade after trimming.

Figure G: Heavy needle, heavy thread.
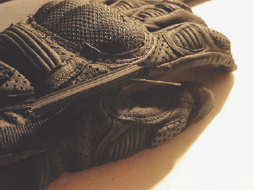
Figure H: Sewing on the blade.
4. Needle and thread
Now I’m not sure if there are Instructables about how to thread a needle and simple sewing stitches, but there should be. I’ll leave that in the realm of members Smexy Dead and threadbanger. The type of needle you use should be a fairly thick gauge so it doesn’t snap and poke out your eyeball, and the thread we’re using here is a heavy nylon with a gloss coat. Really, anything will work, just make sure you’re using some heavy thread as you really don’t want this to come off.
5. Putting it all together
The original I saw had the wiper on the thumb, but for this application it wasn’t the ideal location since it would possibly rub against the part where my bike grips meet the clutch reservoir. I elected to place the wiper where the thumb joins with the hand as shown in the picture. I positioned the blade and attached the ends first, then made a few more simple stitches in the middle. It’s that easy!
6. Done!
If all goes according to plan then you should be done. It’s a fairly simple project and it works great, especially since the alternative is a smeared visor, which isn’t very much fun.
7. Final thoughts
I had originally designed this to be a slide using the metal shanks from the blade body, that way the blades could be interchangeable. However, it was too difficult to implement for such an easy project, and sewing it directly on the glove is idiot-proof. Also, after a few days riding, I thought an alternate position for the blade might be under the meaty part of the thumb, which would still allow you to wipe your visor and keep it out of the way of any bike controls. I’d be interested to see any modifications of this cheap and easy build, such as if anyone finds a way to make the blades replaceable and fix it to the glove without scratching the visor. Good luck, and please post your results, it’s a fun build!