
How to Make Your Own Plastic Vacuum Former
Make a plastic molder using parts from around the house By Adam Harris
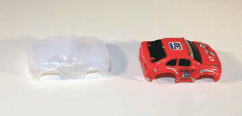
Figure A: A mini R/C car body copied with a peanut butter jar vacuum former
Plastic vacuum formers are an important part of the prototyping process. If you need a nice plastic robot body or custom case for a project you are doing, get your tools, ’cause this project is easy to build and fun to play with.
Vacuum formers are based on a simple concept. They use the power of a vacuum to suck heated, gooey plastic sheets very tightly around an object you place in them, making a 3D copy of pretty much whatever you want.
Plastic vacuum formers are usually big, expensive machines, however many of us don’t always need to make huge pieces for our projects, so these machines would be pointless to have—or at least that’s what I tell myself so I won’t be tempted to buy one. Our vacuum molder will be a good size for most projects you’re likely to deal with.
1. Gather the pieces
The main parts to this machine are:
![]() A “workspace,” the place where the object to be copied is set and the magic happens. This has holes drilled in it so the suction is fairly even over the entire surface.
A “workspace,” the place where the object to be copied is set and the magic happens. This has holes drilled in it so the suction is fairly even over the entire surface.
![]() A hollow cavity, like a strong, airtight box. This is also used to get the same approximate suction on all parts of the top, while adding support to the machine.
A hollow cavity, like a strong, airtight box. This is also used to get the same approximate suction on all parts of the top, while adding support to the machine.
![]() A vacuum cleaner (shop vacs are a pretty good choice because they have a lot of suction, but a normal vacuum cleaner will work, too). This is the source of our vacuum/suction.
A vacuum cleaner (shop vacs are a pretty good choice because they have a lot of suction, but a normal vacuum cleaner will work, too). This is the source of our vacuum/suction.
![]() Two frames to hold sheets of plastic. These can be two picture frames, or they can be made of Popsicle sticks.
Two frames to hold sheets of plastic. These can be two picture frames, or they can be made of Popsicle sticks.
The first vacuum molder I made was supposed to just be a test run but it worked so well that I now use it for any small parts I make. In this Instructable, I will first show you how to make one of these. You don’t have to build it, but it will illustrate the concepts of how and why the machine works. Then I’ll show you how to use it. A bigger machine is described later in this article.
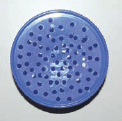
Figure B: The jar lid with a matrix of holes drilled in it
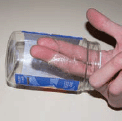
Figure C: Hole cut in side of jar to accept neck from soda bottle
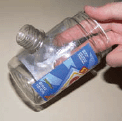
Figure D: Attaching the vacuum port (soda bottle neck)
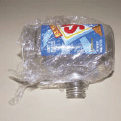
Figure E: Wrapping the jar with Saran Wrap
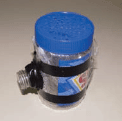
Figure F: Sealing the jar/Saran Wrap with electrical tape and attaching the lid
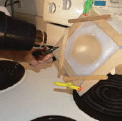
Figure G: Using a heat gun to soften the plastic stock over the frame
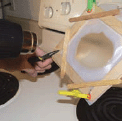
Figure H: The plastic will get gooey and flexible when it’s ready
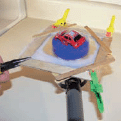
Figure I: Applying the vacuum to the vacuum former
Parts list for very small plastic molder:
![]() A plastic peanut butter jar or similar. (Don’t use glass as you will need to cut it.)
A plastic peanut butter jar or similar. (Don’t use glass as you will need to cut it.)
![]() A 2-liter Coke bottle or similar
A 2-liter Coke bottle or similar
![]() A home vacuum cleaner, or similar
A home vacuum cleaner, or similar
![]() A few sheets of Saran Wrap
A few sheets of Saran Wrap
![]() Some good tape, like electrical tape or duct tape
Some good tape, like electrical tape or duct tape
Tools needed:
![]() A good sharp cutting knife or razor (be careful not to cut yourself!)
A good sharp cutting knife or razor (be careful not to cut yourself!)
![]() An electric drill with a small drill bit—a Dremel with the standard 1/8” drill bit works nicely
An electric drill with a small drill bit—a Dremel with the standard 1/8” drill bit works nicely
Got all that? Good. Let’s start.
2. Start building
First, drill a bunch of little holes in the lid of the jar, spaced about 1/4” apart. Try to evenly space them in a grid pattern. This will become our “workspace,” as shown in Figure B.
3. Prepare the jar
Cut a hole in the side of the peanut butter jar just large enough that little more than the tip of the 2-liter bottle top will fit through it. This is shown in Figure C.
4. Adding the “port”
Use a knife to cut the top off of the soda bottle. Put the top of the bottle through the hole in the jar from the inside, as shown in Figure D.
5. Make it airtight
Now Saran Wrap and tape the whole assembly. (Make sure to get Saran Wrap in the threads of the screw top of the jar.) This is shown in Figure E.
6. Put a lid on it!
Put the lid back on the peanut butter jar. The whole thing should be airtight except for the holes in the top.
7. Use it
Select whatever object you want to copy. Some tips on selecting appropriate objects:
![]() Make sure that the object is not tapered at the bottom. This will make it impossible to get out of the plastic shell we are making.
Make sure that the object is not tapered at the bottom. This will make it impossible to get out of the plastic shell we are making.
![]() Make sure that the entire object fits on the workspace, leaving plenty of holes around the edges. Make sure the object can stand the pressure and heat of the process, otherwise it will deform or melt.
Make sure that the entire object fits on the workspace, leaving plenty of holes around the edges. Make sure the object can stand the pressure and heat of the process, otherwise it will deform or melt.
![]() Make sure the object is not too tall. If it’s too tall, the plastic will stretch too much and become too thin to work with.
Make sure the object is not too tall. If it’s too tall, the plastic will stretch too much and become too thin to work with.
![]() Make sure there isn’t too much detail on the object.
Make sure there isn’t too much detail on the object.
For my test subject, I chose the body of a tiny R/C car. For plastic, I use the sides of 1-gallon water jugs or milk jugs. Cut off the sides of the jugs and clamp them (or hold them somehow) between the two frames. To form, place the selected object onto the workspace and put a spacer under the object so that the final product will look better. Use the vacuum cleaner’s attachment hose to connect the vacuum cleaner to the 2-liter bottle top on the vacuum former. You may need to tape the hose to the vacuum port.
Heat up the plastic between the frames with a heat gun, or hold the plastic over the burner of an electric stove until the plastic starts to get gooey and sag in the middle. HDPE plastic will turn from white to clear when it’s warm, this is normal. DO NOT use a gas burner; it will catch the plastic on fire which is not good. Figure G shows the plastic before heating, and Figure H shows the plastic at the optimal temperature for forming.

Figure J: The molded plastic copy removed from frame
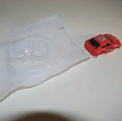
Figure K: The copied object removed from the plastic shell
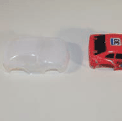
Figure L: The copied object cleaned up and ready for use
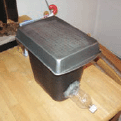
Figure M: A bigger version of the vacuum former, made from a trash can and baking pan
8. Stretch it over the part
Once the plastic is good and saggy, slowly place it over the object to be copied. The plastic will stretch over it. Try to get a good seal all around the object, it should be airtight to get maximum suction. Once the airtight seal is formed, turn on the vacuum. Don’t keep it on, just hit it with a good burst for about a second. This is shown in Figure I.
9. Done with molding
The plastic will be sucked tight to the object and to the workspace. When you turn off the vacuum cleaner, if the plastic is still gooey enough to come up slightly, hit it again with another burst from the vacuum cleaner. It should be done by that point. Hold it steady as the plastic totally hardens. When it’s done, leave it alone for a little while so the plastic can cool off.
Once the plastic is cooled, take the frames off. It should look something like Figure J.
10. Clean up the edges
Remove the object you copied from the plastic (Figure K), cut the extra plastic off (Figure L), put it in the recycling bin, and you’re done!
11. Building bigger…
Get some more practice with the smaller unit, see what you can do with it and how it all works. If you would like to make a bigger vacuum former, you’ll need the following:
![]() One 5-gallon plastic trash can with an approximately 8" x 12" rectangular top
One 5-gallon plastic trash can with an approximately 8" x 12" rectangular top
![]() One 8" x 12" metal baking pan
One 8" x 12" metal baking pan
![]() One to two tubes of silicon caulk
One to two tubes of silicon caulk
![]() One 20-ounce soda bottle or similar
One 20-ounce soda bottle or similar
![]() Two picture frames about 8" x 10"
Two picture frames about 8" x 10"
You do basically the same procedure as with the smaller unit, just on a larger scale. Drill a grid pattern of small holes in the baking sheet. Cut the bottom off the 20-ounce soda bottle. Cut a hole near the bottom of the trash can just large enough for the 20-ounce bottle. (Now here’s where I have had a bit of a problem. You may need to reinforce or brace the inside of the trash can and/or the bottle with some wood or something before you go on. Otherwise, they might collapse under the vacuum pressure. It hasn’t caused too many problems for me but it might depending on your setup.)
Put the soda bottle in the hole in the trash can and caulk the seal between them strongly, making sure you have an airtight seal. Then, turn the baking sheet upside down and caulk it to the trash can. Let it all dry thoroughly and you are done. The finished product is shown in Figure M.
12. Closing thoughts
Large plastic sheets are available online from numerous suppliers. Check out the United States Plastic Corp. for material or be creative and use things around the house.
When you’re finished with the plastic mold, you can fill it with fiberglass resin, Alumilite, or other casting material to generate a nearly exact copy of your original object.
Adam Harris is a graduate student in the field of electrical engineering. He is also a freelance writer, musician, co-owner of SheekGeek LLC, and all-around hacker.