
How to build one part of the complete costume By Martin Raynsford

Figure A: The finished project
The arc reactor work by Tony Stark before he completed his Iron Man outfit is the inspiration for my own arc reactor. It has 10 well-defined sections and a glowing center as shown in Figure A.
I’m rather pleased with the results and very happy with the segments of light that emanate from it. I’d also like to pay respects to the other arc light reactor on Instructables… imagine my horror as the weekly round up arrives in my inbox only to find out that I had been beaten to the write up for the same project.
1. The materials
I wanted to make something substantial for this project and I remembered I had some suitable plastic in my cupboard. This is the key component for the project. This material is called Polymorph plastic (Figure B) and can be bought from places such as eBay and craft supply shops. It’s a thermal plastic that melts around 60˚C and it becomes something resembling Plasticine modeling clay. From there it is simple to mold it into the desired shape.
The next thing we will need is a light source. I wanted the whole thing to be quite thin when it was finished, so I opted for some surface-mount white LEDs. Surface-mount LEDs have a very wide viewing angle and being white they produce quite a lot of light, so they are perfect for this application. You can find surface-mount LEDs from electronics suppliers. These LEDs are in a PLCC 2 package which means they are still large enough to be soldered by hand.
You may also want some surface-mount resistors to go with those LEDs. I used the amazing program at LEDCalc (ledcalc.com) to work out exactly what values I need. I am running these LEDs from a 9V battery and wanted 20mA of current to flow throw them. LEDCalc suggested how exactly they should be wired and what values I needed.
For my LEDs I required 5x 180Ω resistors and 1x 330Ω resistor.

Figure B: Polymorph plastic (also sold as Shapelock)
I mounted the LEDs on a piece of plywood, but anything will do as you are gluing the surface-mount components down for ease of soldering. A 9V battery and battery clip are providing the power for the system. These can be bought from any electrical store as required.
Finally you’ll need some wire for the detailed decoration. Wire coat hangers could be used but I used tin copper wire of 22 AWG gauge. There is nothing special about the wire, it’s just hard finding something chunky enough for the job.
2. Wiring of the LEDs
Some assembly is required for the LEDs. I took my round piece of wood that I was using to mount the LEDs on and I started to glue the LEDs in the desired places (Figures C-D). The circuit from LEDCalc, shown in Figure E, suggested I used 5x 2 LEDs and one single LED in parallel. This ties in well with the arc reactor so I had the single LED in the middle and the pairs arranged around the edges.
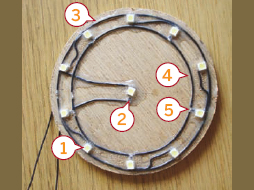
Figure C: 1. SMD LED 2. R2 3. Positive wire 4. Negative wire 5. R1
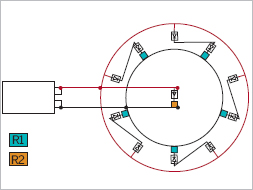
Figure D: Wiring layout
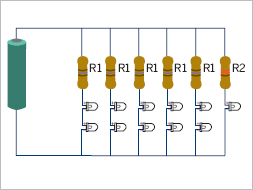
Figure E: Schematic
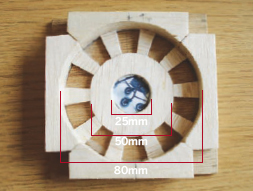
Figure F: The balsa wood mold
As you can see from Figure C, I made two rings of wire around the edges: the outer wire is 9V and the inner wire is 0V.
The power wires are passed through the back plate through a small hole that will allow me to power the LEDs when they are encased in the plastic.
3. Making the plastic shape
This is the key stage of the build. The Polymorph plastic behaves like Plasticine when it is heated to temperature. This allows it to be pressed into a mold and form the desired shape. As always I wish I had more photos of the stages involved but I don’t and it’s too late to go back (let this be a lesson for budding Instructable writers).
I formed the mold using balsa wood again on a more solid plywood base (Figure F). I cut the outer circle out of balsa to the required depth of the arc reactor. I used thinner strips of balsa as relief pieces and provide the detail in the plastic. (These are roughly the same depth as the wire I used).
I heated the plastic using water from the kettle. Once ready, it becomes transparent and malleable. I took care to make sure it was pushed right into the mold to reach all the corners of the mold. Once it was fully pushed into the mold, I pushed the LED disk into the back of the plastic. The plastic pushes slightly around the disk that holds it in place, as shown in Figure G. The disk must be aligned with the slots in the mold so that each LED is directly under a raised piece of plastic. (There are no photos of this because it was all done with some haste.)
Figure H shows the plastic once it has been removed from the mold. You can clearly see the raised sections of plastic and the gaps that are soon to be filled with wire. Under each bump there is an LED; the plastic adds to the diffusion of each LED and really adds to the overall effect.
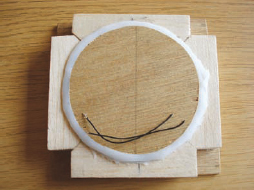
Figure G: Setting the plastic in the mold
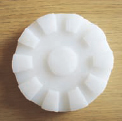
Figure H: The plastic, after removing from the mold
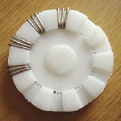
Figure I: Adding the wire to the reactor
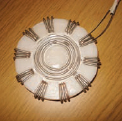
Figure J: The reactor with all the wires
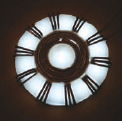
Figure K: The arc reactor powered up

Figure L: Modeling the reactor
4. Adding the details
The final step of making the reactor is to add the wire details. I drilled holes in the plastic to hold the wire around the edge of the device. I then bent each piece into a C shape, hooked it into a hole on the edge of the plastic, and again into the holes in the center (Figure I). This was enough to secure them in place. Finally, I shaped four wire rings to go around the center of the reactor, as shown in Figure J. These are held in with PVA wood glue, although any clear drying glue should do the job just as well.
As you can see in Figure K the device lights up very well and looks really good, now onto the final stage to bring it all together.
5. Bringing it together
With the arc reactor now finished, this final stage is about bringing it all together in a costume. I brought a sleeveless T-shirt from the local store for a few pounds. I carefully sewed a pocket on the inside of the shirt to hold the reactor (this proved to be a very good idea due to the number of people that wanted me to take it out and show them during the evening). The wires from the reactor run down the T-shirt and into my back trouser pocket.
After a week's worth of effort I still had nearly zero facial hair so I ended up padding it out with some black shoe polish. I’m particularly proud of the whole chubby Tony Stark thing I had going on but then the photo in Figure L was taken at the wrong end of the evening after quite a lot of good food and drink… normally I’m only half as fat.
I hope you find this useful and encouraging for your own projects!
Martin Raynsford says: “I’m 28, live on the south coast of England, am married to a very understanding wife, and I have a degree in robotics. I don't have kids yet but when I do they are going to win all the fancy dress competitions.”