Chapter 3. Setting Up Resources

In this chapter, you will learn how to: | |
✓ | Set up basic resource information for the people who work on projects. |
✓ | Enter basic resource information for the equipment that will be used in projects. |
✓ | Enter resource information for the materials that will be consumed as the project progresses. |
✓ | Enter cost resource information for financial tracking. |
✓ | Set up cost information for work resources. |
✓ | Change a resource’s availability for work. |
✓ | Record additional information about a resource in a note. |
Tip
Do you need only a quick refresher on the topics in this chapter? See the Quick Reference entries in Setting Up Resources.
Resources include the people and equipment needed to complete the tasks in a project. Microsoft Office Project 2007 focuses on two aspects of resources: their availability and their costs. Availability determines when specific resources can work on tasks and how much work they can perform, and costs refer to how much money will be required to pay for those resources. In addition, Project supports two other types of special resources: material and cost.
In this chapter, you will set up the resources you need to complete the TV commercial project. Effective resource management is one of the most powerful advantages of using Project instead of task-focused planning tools, such as paper-based organizers. You do not need to set up resources and assign them to tasks in Project; however, without this information, you might be less effective in managing your schedule. Setting up resource information in Project takes a little effort, but the time is well spent if your project is primarily driven by time or cost constraints (and nearly all complex projects are driven by one, if not both, of these factors).
Important
Before you can use the practice files provided for this chapter, you need to install them from the book’s companion CD to their default locations. See "Using the Book’s CD" for more information.
Setting Up People Resources
Project works with three types of resources: work, material, and cost resources. Work resources are the people and equipment that do the work of the project. We will focus on work resources first and then turn to material and cost resources later in this chapter.
Some examples of work resources are listed below.
Work Resource | Example |
Individual people identified by name | Jon Ganio; Jim Hance |
Individual people identified by job title or function | Director; camera operator |
Groups of people who have common skills (When assigning such interchangeable resources to a task, do not be concerned who the individual resource is as long as the resource has the right skills.) | Electricians; carpenters; extras |
Equipment | Video camera; 600-watt light |
Equipment resources don’t need to be portable; a fixed location or piece of machinery, such as a video editing studio, can also be considered equipment.
All projects require some people resources, and some projects require only people resources. Project can help you make smarter decisions about managing work resources and monitoring financial costs.
Tip
This tip describes enterprise project management (EPM) functionality. The combination of Project Professional and Project Server provides substantial, enterprise-level resource management capabilities, such as skills-based resource assignments and a centralized enterprise resource pool. For more information, see Part 4.
In this exercise, you set up resource information for several people resources.
Important
If you are running Project Professional, you may need to make a one-time adjustment to use the Computer account and to work offline. This ensures that the practice files you work with in this chapter do not affect your Project Server data. For more information, see "Starting Project Professional“.
Note
OPEN Wingtip Toys Commercial 3a from the DocumentsMicrosoft PressProject 2007 SBSChapter 3 Simple Resources folder. You can also access the practice files for this book by clicking Start, All Programs, Microsoft Press, Project 2007 Step by Step, and then selecting the chapter folder of the file you want to open.
On the File menu, click Save As.
The Save As dialog box appears.
In the File name box, type Wingtip Toys Commercial 3, and then click Save.
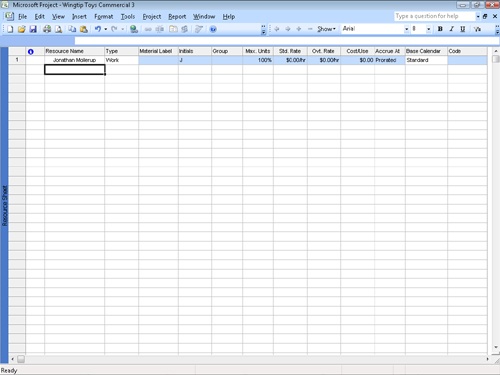
On the View menu, click Resource Sheet.
You will use the Resource Sheet view to help set up the initial list of resources for the Wingtip Toys TV commercial project.
In the Resource Sheet view, click the cell directly below the Resource Name column heading.
Type Jonathan Mollerup, and press
 .
.Project creates a new resource.
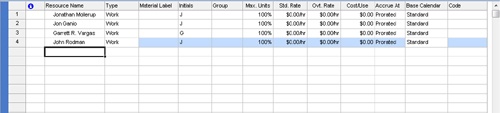
On the next empty rows in the Resource Name column, enter the following names:
Jon Ganio
Garrett R. Vargas
John Rodman
You can also have a resource that represents multiple people.
In the Resource Name field below the last resource, type Electrician, and then press
 .
.In the Type field, make sure that Work is selected, and then press
several times to move to the Max.
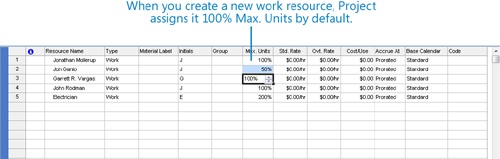
Units field.The Max. Units field represents the maximum capacity of a resource to accomplish any task. Specifying that a resource, such as Jon Ganio, has 100% maximum units means that 100% of Jon’s time is available to work on the tasks to which you assign him. Project will alert you if you assign Jon to more tasks than he can accomplish at 100% maximum units (in other words, if Jon becomes overallocated). As you can see, 100% is the default Max. Units value for new resources.
In the Max. Units field for the electrician, type or select 200%, and then press
.Tip
When you click a numeric field, up and down arrows appear. You can click these to display the number you want, or simply type the number in the field.
The resource named Electrician does not represent a single person; instead, it represents a category of interchangeable people called electricians. Because the Electrician resource has a Max. Units setting of 200%, you can plan on two electricians being available to work full time every workday. At this point in the planning phase, it is alright that you do not know exactly who these electricians will be. You can still proceed with more general planning.
Now you’ll update the Max. Units value for Jon Ganio to indicate that he works half time.
Click the Max. Units field for Jon Ganio, type or select 50%, and then press
.
Setting Up Equipment Resources
In Project, you set up people and equipment resources in exactly the same way because people and equipment are both examples of work resources. However, you should be aware of important differences in how you can schedule these two work resources. Most people resources have a working day of no more than 12 hours, but equipment resources might work around the clock. Moreover, people resources might be flexible in the tasks they can perform, but equipment resources tend to be more specialized. For example, a director of photography for a film or video project might also act as a camera operator in a pinch, but a video camera cannot replace an editing studio.
You do not need to track every piece of equipment that will be used in your project, but you might want to set up equipment resources when
Multiple teams or people might need a piece of equipment to accomplish different tasks simultaneously, and the equipment might be overbooked.
You want to plan and track costs associated with the equipment.
In this exercise, you enter information about equipment resources in the Resource Information dialog box.
In the Resource Sheet, click the next empty cell in the Resource Name column.
On the Standard toolbar, click the Resource Information button.
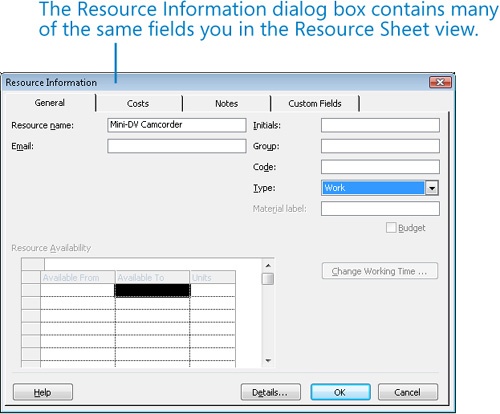
The Resource Information dialog box appears.
Click the General tab if it is not already displayed.
In the upper portion of the General tab, you might recognize the fields you saw in the Resource Sheet view. As with many types of information in Project, you can usually work in at least two ways: a table or a dialog box.
In the Resource name field, type Mini-DV Camcorder
In the Type field, click Work.
Tip
The Resource Information dialog box contains a button labeled Details. If you have an e-mail program that complies with the Messaging Application Programming Interface (MAPI) and the program is installed on the same computer as Project, you can click Details to see contact information about the selected resource. MAPI-compliant programs include Microsoft Office Outlook and Outlook Express.
Click OK to close the Resource Information dialog box and return to the Resource Sheet.
The Max. Units field shows 100% for this resource; next, you will change this percentage.
Tip
You can also double-click on an empty cell in the Resource Name column to create a new resource using the Resource Information dialog box. Note that when creating a resource in this way, you cannot enter a Max. Units value. However, you can edit this value in the dialog box, as well as in the Resource Sheet, after you create the resource.
In the Max. Units field for the Mini-DV Camcorder, type or click the arrows until the value shown is 300% and press
.This means that you plan to have three camcorders available every workday.
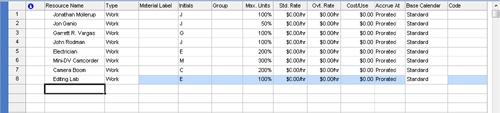
Enter the following information about equipment resources directly in the Resource Sheet or in the Resource Information dialog box, whichever you prefer. In either case, make sure Work is selected in the Type field.
Resource name
Max. Units
Camera Boom
200%
Editing Lab
100%
Setting Up Material Resources
Material resources are consumables that you use up as the project proceeds. On a construction project, material resources might include nails, lumber, and concrete. For the toy commercial project, video tape is the consumable resource that interests you most. You work with material resources in Project mainly to track the rate of consumption and the associated cost. Although Project is not a complete system for tracking inventory, it can help you stay better informed about how quickly you are consuming your material resources.
In this exercise, you enter information about a material resource.
In the Resource Sheet, click the next empty cell in the Resource Name column.
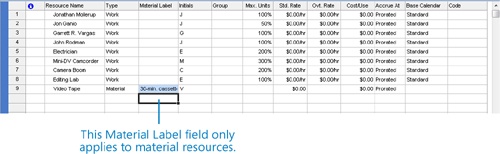
In the Type field, click the down arrow, select Material, and press
.In the Material Label field, type 30-min. cassette and press
.You will use 30-minute cassettes as the unit of measure to track video tape consumption during the project.
Note that you cannot enter a Max. Units value for a material resource. Since a material resource is a consumable item and not a person or piece of equipment that performs work, the Max. Units value doesn’t apply.
Setting Up Cost Resources
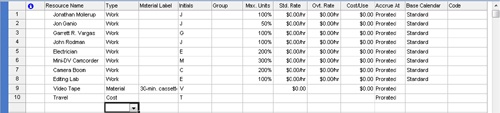
The third and final type of resource that you can use in Project is the cost resource. You can use a cost resource to represent a financial cost associated with a task in a project. While work resources, such as people and equipment, can have associated costs (hourly rates and fixed costs per assignment), the sole purpose of a cost resource is to associate a particular type of cost with one or more tasks. Common types of cost resources might include categories of expenses you’d want to track on a project for accounting purposes such as travel, entertainment, or training. Like material resources, cost resources do no work and have no effect on the scheduling of a task. However, after you assign a cost resource to a task and specify the cost amount per task, you can then see the cumulative costs for that type of cost resource, such as total travel costs in a project.
Entering Resource Pay Rates
Almost all projects have some financial aspect, and cost limits drive the scope of many projects. Tracking and managing cost information allows the project manager to answer such important questions as
What is the expected total cost of the project based on our task duration and resource estimates?
Are we using expensive resources to do work that less expensive resources could do?
How much money will a specific type of resource or task cost over the life of the project?
How have we allocated a particular type of expense, such as travel, in a project?
Are we spending money at a rate that we can sustain for the planned duration of the project?
For the TV commercial project, you have been entrusted with pay rate information for all people resources used in the project. In the information below, note that the fees for the camcorders and editing lab are rental fees. Because the Southridge Video Company already owns the camera booms, you will not bill yourself for them.
Important
You deal with the per-task cost of a cost resource only when you assign the cost resource to the task. You will do this in Chapter 4.
In this exercise, you enter cost information for each work resource.
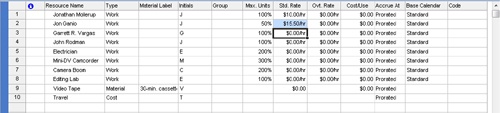
In the Resource Sheet, click the Std. Rate field for Jonathan Mollerup.
Jonathan’s standard hourly rate of $10 appears in the Std. Rate column. Note that the default standard rate is hourly, so you did not need to specify cost per hour.
In the Std. Rate field for Jon Ganio, type 15.50 and press
.Jon’s standard hourly rate appears in the Std. Rate column.
Enter the following standard pay rates for the given resources.
Resource Name
Standard Rate
Garrett R. Vargas
800/w
John Rodman
22
Electrician
22
Mini-DV camcorder
250/w
Camera boom
0
Editing lab
200/d
Video tape
5
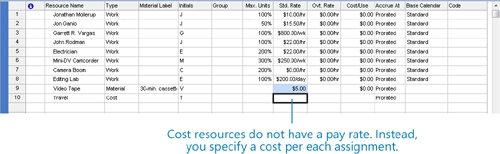
Note that you enter a fixed amount rather than a rate (hourly, daily, or weekly) for the video tape’s cost. For material resources, the standard rate value is per unit of consumption—in our case, 30-minute cassettes.
Note also that you cannot enter a standard pay rate for the Travel cost resource. You specify the cost when you assign the cost resource to a task.
Adjusting Working Time for Individual Resources
Project uses different types of calendars for different purposes. In this exercise, we will focus on the resource calendar. A resource calendar controls the working and nonworking times of a resource. Project uses resource calendars to determine when work for a specific resource can be scheduled. Resource calendars apply only to work resources (people and equipment) and not to material or cost resources.
When you initially create resources in a project plan, Project creates a resource calendar for each work resource. The initial working time settings for resource calendars exactly match those of the Standard base calendar, which is a calendar built into Project that accommodates a default work schedule from 8 A.M. to 5 P.M., Monday through Friday. If all of the working times of your resources match the working time of the Standard base calendar, you do not need to edit any resource calendars. However, chances are that some of your resources will need exceptions to the working time in the Standard base calendar—such as
A flex-time work schedule
Vacation time
Other times when a resource is not available to work on the project, such as time spent training or attending a conference
Any changes that you make to the Standard base calendar are automatically reflected in all resource calendars based on the Standard base calendar. However, any specific changes you have made to the working time of a resource are not changed.
Tip
If you have a resource who is only available to work on your project part-time, you might be tempted to set the working time of the resource in your project to reflect a part-time schedule, such as 8 A.M. to 12 P.M. daily. However, a better approach would be to adjust the availability of the resource as recorded in the Max. Units field to 50%. Changing the unit availability of the resource keeps the focus on the capacity of the resource to work on the project rather than on the specific times of the day when that work might occur. You set the maximum units for a resource in the Resource Sheet view, which you display by clicking Resource Sheet on the View menu. For more information about resource units, see "Setting Up People Resources,”.
In this exercise, you specify the working and nonworking times for individual work resources.
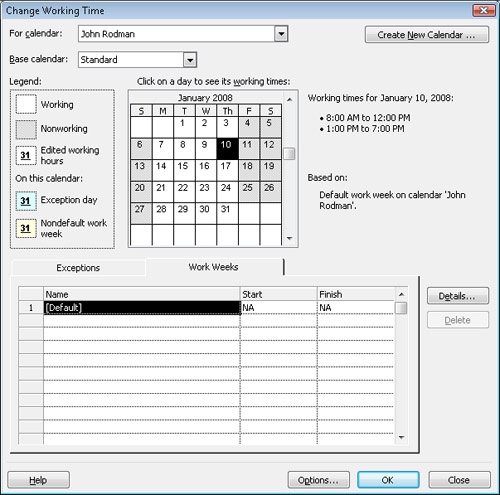
On the Tools menu, click Change Working Time.
The Change Working Time dialog box appears.
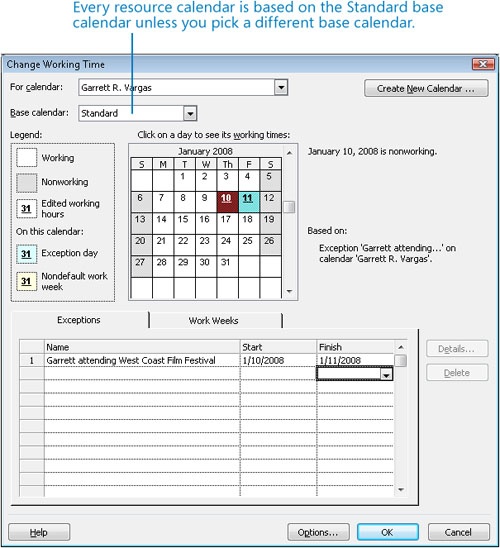
In the For calendar box, click Garrett R. Vargas.
Garrett R. Vargas’s resource calendar appears in the Change Working Time dialog box. Garrett has told you he will not be available to work on Thursday and Friday, January 10 and 11, because he plans to attend a film festival.
On the Exceptions tab in the Change Working Time dialog box, click in the first row directly below the Name column heading and type Garrett attending West Coast Film Festival
The description for the calendar exception is a handy reminder for you and others who may view the project plan later.
Click in the Start field and type or select 1/10/2008.
Click in the Finish field, type or select 1/11/2008, and then press
.Project will not schedule work for Garrett on these dates.
Tip
To set up a partial working time exception for a resource, such as a portion of a day when a resource cannot work, click Details. In the Details dialog box, you can also create recurring exceptions to the resource’s availability.
To conclude this exercise, you will set up a “4 by 10” work schedule (that is, 4 days per week, 10 hours per day) for a resource.
In the For box, click John Rodman.
When prompted to save the resource calendar changes that you made for Garrett, click Yes.
Click the Work Weeks tab in the Change Working Time dialog box.
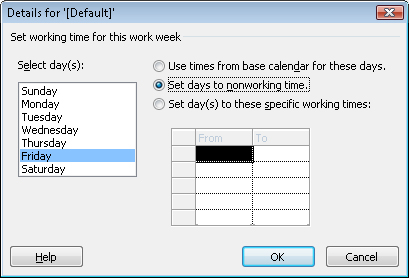
Click [Default], and then click Details.
Under Selected Day(s), select Monday through Thursday.
Click Set day(s) to these specific working times.
In the lower To box, click 5:00 PM and replace it with 7:00 PM, and then press
.Click Friday.
Click Set days to nonworking time.
Now Project can schedule work for John as late as 7 P.M. every Monday through Thursday, but it will not schedule work for him on Fridays.
Click OK to close the Details dialog box.
Now you can see that Fridays are marked as nonworking days for John Rodman.
Click OK to close the Change Working Time dialog box.
Because you have not yet assigned these resources to tasks, you don’t see the scheduling effect of their nonworking time settings. You will observe this later in Chapter 4.
Tip
If you find that you must edit several resource calendars in a similar way (to handle a night shift, for example), it may be easier to assign a different base calendar to a resource or collection of resources. This is more efficient than editing individual calendars, and it allows you to make project-wide adjustments to a single base calendar if needed. For example, if your project includes a day shift and a night shift, you can apply the Night Shift base calendar to those resources who work the night shift. You change a base calendar in the Change Working Time dialog box on the Tools menu. For collections of resources, you can select a specific base calendar directly in the Base Calendar column on the Entry table in the Resource Sheet view.
Documenting Resources
You might recall from Chapter 2, that you can record any additional information about a task, resource, or assignment in a note. For example, if a resource has flexible skills that can help the project, it is a good idea to record this in a note. In that way, the note resides in the project plan and can be easily viewed or printed.
In this exercise, you enter resource notes to document that a resource can assume multiple roles in the TV commercial project.
In the Resource Name column, click Garrett R. Vargas.
On the Project menu, click Resource Notes.
Project displays the Resource Information dialog box with the Notes tab visible.
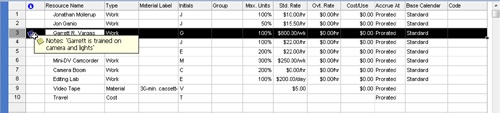
In the Notes box, type Garrett is trained on camera and lights and then click OK.
A note icon appears in the Indicators column.
Point to the note icon.
The note appears in a ScreenTip. For notes that are too long to appear in a ScreenTip, you can double-click the note icon to display the full text of the note.
Key Points
Recording resource information in your project plans helps you better control who does what work when and at what cost.
People and equipment resources perform the work in a project.
Cost resources account for types of expenses across a project.
Material resources are consumed during a project.