
Chapter 8. Fine-Tuning Resource and Assignment Details
Chapter at a Glance
In this chapter, you will learn how to: | |
✓ | Set up different pay rates for resources. |
✓ | Set up pay rates that will change over time for a resource. |
✓ | Set resource availability to change over time. |
✓ | Delay the start of a resource assignment. |
✓ | Control how a resource’s work on a task is scheduled over time by using work contours. |
✓ | Apply different cost rates for a resource assigned to different kinds of tasks. |
✓ | Enter variable consumption rates for material resources. |
Tip
Do you need only a quick refresher on the topics in this chapter? See the Quick Reference entries in Fine-Tuning Resource and Assignment Details.
Because work resources (people and equipment) are often the most expensive part of a project, understanding how to make the best use of resources’ time is an important project planning skill. In this chapter, you examine and use a variety of advanced Microsoft Office Project 2007 features relating to resources and their assignments to tasks.
Important
Before you can use the practice files provided for this chapter, you need to install them from the book’s companion CD to their default locations. See "Using the Book’s CD" for more information.
Entering Multiple Pay Rates for a Resource
Some work resources might perform different tasks with different pay rates. For example, in the short film project, the director of photography could also serve as a camera operator. Because the pay rates for director of photography and camera operator are different, you can enter two cost rate tables for the resource. Then, after you assign the resource to tasks, you specify which rate table should apply. Each resource can have up to five cost rate tables.
In this exercise, you create a second cost rate table for a resource.
Important
If you are running Project Professional, you may need to make a one-time adjustment to use the Computer account and to work offline. This ensures that the practice files you work with in this chapter do not affect your Project Server data. For more information, see "Starting Project Professional“.
Note
OPEN Short Film Project 8a from the DocumentsMicrosoft PressProject 2007 SBSChapter 8 Advanced Resources and Assignments folder. You can also access the practice files for this book by clicking Start, All Programs, Microsoft Press, Project 2007 Step by Step, and then selecting the chapter folder of the file you want to open.
On the File menu, click Save As.
The Save As dialog box appears.
In the File name box, type Short Film Project 8, and then click Save.
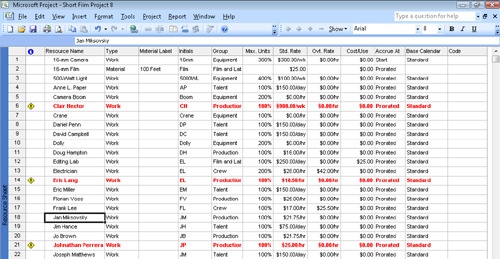
On the View menu, click Resource Sheet.
The Resource Sheet view replaces the Gantt Chart view.
In the Resource Sheet view, click the name of resource 18, Jan Miksovsky.
On the Standard toolbar, click the Resource Information button.
The Resource Information dialog box appears.
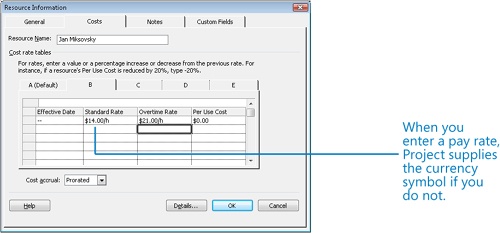
Click the Costs tab.
You see Jan’s default pay rate of $21.75 per hour on rate table A. Each tab (labeled A, B, and so on) corresponds to one of the five pay rates that a resource can have.
Under Cost rate tables, click the B tab.
Select the default entry of $0.00/h in the field directly below the column heading Standard Rate, and then type 14/h.
In the Overtime Rate field in the same row, type 21/h, and then press the
 key.
key.Click OK to close the Resource Information dialog box.
Notice that on the Resource Sheet, Jan’s standard pay rate is still $21.75 per hour. (This is recorded in the Std. Rate column.) This matches the value in her rate table A, the default rate table. This rate table will be used for all of Jan’s task assignments unless you specify a different rate table. You will do this in a later section.
Setting Up Pay Rates to Apply at Different Times
Resources can have both standard and overtime pay rates. By default, Project uses these rates for the duration of the project. However, you can change a resource’s pay rates to be effective as of the date you choose. For example, you could initially set up a resource on January 1 with a standard rate of $16 per hour, planning to raise the resource’s standard rate to $19 per hour on July 1.
Project uses these pay rates when calculating resource costs based on when the resource’s work is scheduled. You can assign up to 25 pay rates to be applied at different times to each of a resource’s five cost rate tables.
In this exercise, you enter different pay rates for a resource to be applied at a later date.
In the Resource Name column, select the name of resource 11, Doug Hampton.
On the Standard toolbar, click Resource Information.
The Resource Information dialog box appears.
Click the Costs tab if it is not already selected.
In the Effective Date cell in the second row of cost rate table A, type or select 6/24/08.
In the Standard Rate cell in the second row, type 20%, and then press the
key.Note that Project calculates the 20% increase to produce a rate of $19.20 per hour. The previous rate of $16 per hour plus 20% equals $19.20 per hour. You can enter a specific value or a percentage increase or decrease from the previous rate. Calculating a new pay rate based on a percentage of the previous pay rate is a one-time calculation. Should you later change Doug’s initial standard pay rate (currently $16.00/ hour), his next pay rate would not be affected.
Tip
In addition to or instead of cost rates, a resource can include a set fee that Project accrues to each task to which the resource is assigned. This is called a cost per use. Unlike cost rates, the cost per use does not vary with the task’s duration or amount of work the resource performs on the task. In the short film project, the Editing Lab resource has a $25 cost per use that covers the cleanup costs of the lab. You specify the cost per use in the Cost/Use field in the Resource Sheet view or in the Per Use Cost field in the Resource Information dialog box.
Click OK to close the Resource Information dialog box.
Note that Doug Hampton’s initial rate, $16.00 per hour, appears in his Std. Rate field (unless the current date is 6/24/08 or later). This field will display $16 per hour until the current date changes to 6/24/08 or later. It will then display his new standard rate of $19.20 per hour.

Setting Up Resource Availability to Apply at Different Times
One of the values that Project stores for each work resource is the resource’s Max. Units value. This is the maximum capacity of a resource to accomplish tasks. A resource’s working time settings (recorded in the individual resource calendars) determine when work assigned to a resource can be scheduled. However, the resource’s capacity to work (measured in units and limited by the resource’s Max. Units value) determines the extent to which the resource can work within those hours without becoming overallocated.
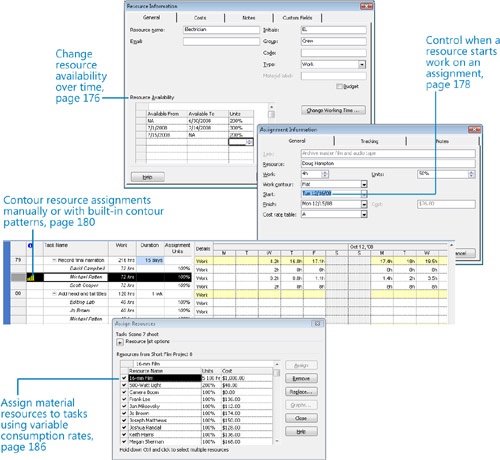
You can specify that different Max. Units values be applied at different time periods for any resource. Setting a resource’s availability over time enables you to control exactly what a resource’s Max. Units value is at any time. For example, you might have two electricians available for the first eight weeks, three for the next six weeks, and then two for the remainder of the project. You set resource availability over time in the Resource Availability grid on the General tab of the Resource Information dialog box. (You can open this dialog box by clicking the Resource Information command on the Project menu when in a resource view.)
Important
Setting the Max. Units values for different times will not prevent a resource from becoming overallocated, but Project will indicate when the resource’s assignments exceed their Max. Units capacity.
In this exercise, you customize a resource’s availability over time.
In the Resource Name column, click the name of resource 13, Electrician.
On the Standard toolbar, click Resource Information.
Click the General tab.
You expect to have two electricians available to work on this project from the start of the project through June 30, 2008, three electricians from July 1 through July 14, and then only two for the remainder of the project.
Under Resource Availability, in the first row of the Available From column, leave NA (for Not Applicable).
In the Available To cell in the first row, type or select 6/30/08.
In the Available From cell in the second row, type or select 7/1/08.
In the Available To cell in the second row, type or select 7/14/08.
In the Units cell in the second row, type or select 300%.
In the Available From cell in the third row, type or select 7/15/08.
Leave the Available To cell in the third row blank. (Project will insert NA for you after you complete the next step.)
In the Units cell in the third row, type or select 200%, and then press the
key.Tip
This tip describes enterprise project management (EPM) functionality. If you have Project Professional, you’ll see additional items in the Resource Information dialog box that relate to enterprise resource features enabled by Project Server. For more information about Project Server, see Part 4.
For the period between July 1 through July 14, you can schedule up to three electricians without overallocating them. Before and after this period, you have just two electricians to schedule.
Click OK to close the Resource Information dialog box.

Delaying the Start of Assignments
If more than one resource is assigned to a task, you might not want all of the resources to start working on the task at the same time. You can delay the start of work for one or more resources assigned to a task.
For example, assume that a task has been assigned four resources. Three of the resources initially work on the task, and the fourth later inspects the quality of the work. The inspector should start work on the task later than the other resources.
Tip
If you need to delay the start of all resources assigned to a task rather than adjusting each resource’s assignment, you should reschedule the start date of the task.
In this exercise, you delay the start of one resource’s assignment on a task.
On the View menu, click Task Usage.
The Task Usage view appears. In this view, the assigned resources are listed under each task.
On the Edit menu, click Go To, enter 84 in the ID box, and then click OK.
Project displays task 84, Archive master film and audio tape.
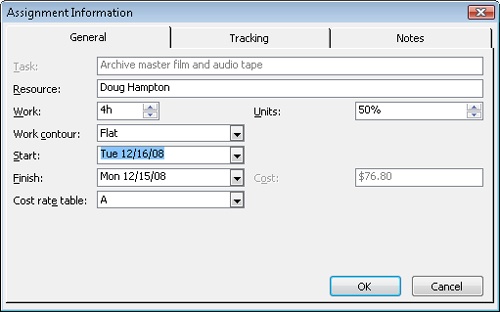
As you can see, this task currently has three resources (two people and the editing lab) assigned to it. You want to delay the start of Doug Hampton’s work on this task until Tuesday, December 16.
Under task 84 in the Task Name column, select the name of the resource, Doug Hampton.
On the Standard toolbar, click the Assignment Information button.
The Assignment Information dialog box appears.
Tip
You may have noticed that the same toolbar button is used for the Resource Information and Assignment Information buttons used in this chapter, as well as the Task Information button. Which Information dialog box you see (Task, Resource, or Assignment) depends on what you have selected when you click the button.
Click the General tab if it is not already selected.
In the Start box, type or select 12/16/08
Click OK to close the Assignment Information dialog box.
Tip
If you want an assignment to start at a specific time as well as on a specific date, you can specify the time in the Start box. For example, if you want Doug Hampton’s assignment to start at 1 P.M. on December 16, type 12/16/08 1:00 PM. Otherwise, Project uses the default start time as specified in the Default Start Time box on the Calendar tab of the Options dialog box.
Project adjusts Doug Hampton’s assignment on this task so that he works no hours on Friday or Monday but four hours on Tuesday. The other resources assigned to the task are not affected. Note that the total work of this task did not change, but its duration did—the work was spread from two working days to three.


Applying Contours to Assignments
In the Resource Usage and Task Usage views, you can see exactly how long each resource is scheduled to work on each task. In addition to viewing assignment details, you can change the amount of time a resource works on a task in any given time period. There are two ways to do this:
Apply a predefined work contour to an assignment. Predefined contours generally describe how work is distributed over time in terms of graphical patterns. For example, the Bell predefined contour distributes less work to the beginning and end of the assignment, and distributes more work toward the middle. If you were to graph the work over time, the graph’s shape would resemble a bell.
Edit the assignment details directly. For example, in the Resource Usage or Task Usage view, you can change the assignment values directly in the timescaled grid.
How you contour or edit an assignment depends on what you need to accomplish. Predefined contours work best for assignments in which you can predict a likely pattern of effort—a task that requires considerable ramp-up time might benefit from a back-loaded contour, for example, to reflect the likelihood that the resource will be most productive toward the end of the assignment.
In this exercise, you apply a predefined contour to one task’s assignments, and you manually edit another assignment.
On the Edit menu, click Go To, enter 79 in the ID box, and then click OK.
Project scrolls to task 79, Record final narration. This task has three resources assigned to it.
As you can see in the timescaled data at the right, all three resources are scheduled to work on this task at a regular rate of eight hours per day (that is, 100 percent of their available working time)—except for the first and last days of the task. These assignments have a flat contour. This is the default work contour type that Project uses when scheduling work.
You want to change Michael Patten’s assignment on this task so that, although the other assigned resources work full-time, he starts with a brief daily assignment and increases his work time as the task progresses. He should continue working on the task after the other resources have finished their assignments. To accomplish this, you will apply a back-loaded contour to the assignment.
In the Task Name column, select Michael Patten, the second resource assigned to task 79.
On the Standard toolbar, click the Assignment Information button.
Project displays the Assignment Information dialog box.
Click the General tab if it is not already selected.
In the Work Contour box, select Back Loaded, and then click OK to close the Assignment Information dialog box.
Project applies the contour to this resource’s assignment and reschedules his work on the task.
If you scroll the timescaled data to the right, you see that in each successive day of the task’s duration, Michael Patten is assigned slightly more time to work on the assignment. Because Michael Patten’s assignment to this task finishes later than the assignments of the other resources, Michael Patten determines the finish date of the task. One common way to phrase this is that Michael Patten is the driving resource of this task; his assignment determines, or drives, the finish date of the task.
You also see a contour indicator in the Indicators column displaying the type of contour that is applied to the assignment.
Point to the contour indicator.
Project displays a ScreenTip describing the type of contour applied to this assignment.
Tip
Applying a contour to this assignment caused the overall duration of the task to be extended. If you do not want a contour to extend a task’s duration, change the task type (on the Advanced tab of the Task Information dialog box) to Fixed Duration before applying the contour. Applying a contour to a fixed-duration task will cause Project to recalculate the resource’s work value so that the resource works less in the same time period.
Next, you will directly edit another task’s assignment values.
On the Edit menu, click Go To, enter 2 in the ID box, and then click OK.
Project scrolls vertically to task 2, Review script.
Note that Clair Hector is currently assigned four hours per day for each day of the assignment’s duration. Why four hours? Clair normally has eight working hours per day on these particular days (as determined by her resource calendar). She was assigned to this task at 50% assignment units, however, so the resulting scheduled work is only four hours per day.
You want to increase Clair Hector’s work on the last two days of this task so that she will work full-time on it. To accomplish this, you will manually edit her assignment values.
In the timescaled grid in the right pane of the Project window, select Clair Hector’s four-hour assignment for Wednesday, March 5.
In Clair’s assignment for Thursday, type 8h, and then press
.Clair is now assigned eight hours per day on these days. Project displays a contour indicator in the Indicators column showing that a manually edited contour has been applied to the assignment.
Tip
If you want to document details about contouring an assignment or anything pertaining to an assignment, you can record the details in an assignment note. In Task Usage or Resource Usage view, select the assignment, and then click the Assignment Notes button on the Standard toolbar. Assignment notes are similar to task and resource notes.
Here are a few more capabilities that you can apply in a usage view:
In addition to manually editing work values at the resource level as you did above, you can also edit work values at the task level. When you change a work value at the task level, Project adjusts the resulting work value per resource in accordance with each resource’s units value on that assignment. For example, assume that on a specific day, two resources were assigned four hours each to a task that had a total work value of eight hours. If you then change the total work on the task for that day to 12 hours, Project will increase the work per resource from four to six hours.
You can split a task in the Gantt Chart view to account for an interruption in the task, as you did in Chapter 7. You can also split a task in the Task Usage view by entering “0” work values in the timephased grid for the date range you want. To preserve the total work on the task, you should add the same amount of work to the end of the task as you subtracted with the split. For example, assume that a task starts on Monday and has eight hours total work per day for four days. Its work pattern (in hours per day) is 8, 8, 8 and 8. You interrupt work on the task on Tuesday and then add those eight hours to the end of the task (in this case, Friday). The new work pattern would be 8, 0, 8, 8, and 8.
When editing values in the timephased grid, you can work with the cells somewhat like you might work in an Excel worksheet—you can drag and drop values and use the AutoFill handle to copy values to the right or downward.


Applying Different Cost Rates to Assignments
You can set as many as five pay rates per resource, which allows you to apply different pay rates to different assignments for a resource; for example, a different pay rate might depend on the skills required for each assignment. For each assignment, Project initially uses rate table A by default, but you can specify that another rate table should be used.
In the "Entering Multiple Pay Rates for a Resource" section, you set up a second rate table for Jan Miksovsky to be applied for any assignments in which she is functioning as a camera operator. Jan is currently assigned to task 27, Scene 7 shoot, as a camera operator, but her assignment still reflects her default pay rate as director of photography. In this exercise, you change the pay rate table to be applied to Jan for her assignment to task 27.
On the Edit menu, click Go To, enter 27 in the ID box, and then click OK.
Project scrolls the Task Usage view to display task 27, Scene 7 shoot.
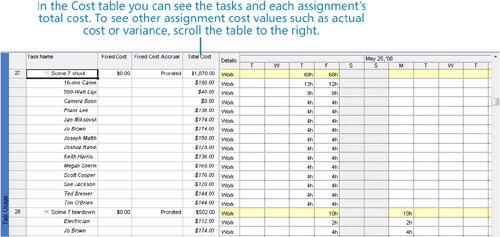
On the View menu, point to Table: Usage, and click Cost.
Project displays the Cost table. Note the current cost of Jan’s assignment to this task: $174.00.
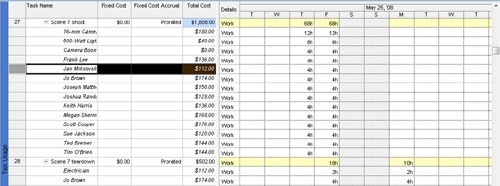
In the Task Name column, select Jan Miksovsky, the fifth resource assigned to task 27.
On the Standard toolbar, click Assignment Information.
The Assignment Information dialog box appears.
Click the General tab if it is not already selected.
In the Cost Rate Table box, type or select B, and then click OK to close the Assignment Information dialog box.
Project applies Jan’s cost rate table B to the assignment. The new cost of the assignment, $112.00, appears in the Total Cost column. Because Jan’s cost change also affected the total cost of the task, Project applied change highlighting to the Total Cost value, $1,808, of task 27.
Tip
If you frequently change cost rate tables for assignments, you will find it quicker to display the Cost Rate Table field directly in the Resource Usage or Task Usage view. Select a column heading and, on the Insert menu, click Column. In the Field Name box, select Cost Rate Table on the drop-down list, and then click OK.
Entering Material Resource Consumption Rates
The short film project includes one material resource: 16-mm film. If you completed Chapter 4, you assigned a material resource with a fixed amount, or fixed consumption rate, to a task. Another way to use material resources is to assign them with a variable consumption rate. The difference between the two rates is as follows:
A fixed consumption rate means that, regardless of the duration of the task to which the material resource is assigned, an absolute quantity of the resource will be used. For example, pouring concrete for a house foundation requires a fixed amount of concrete no matter how long it takes to pour it.
A variable consumption rate means that the quantity of the material resource consumed depends on the duration of the task. When shooting film, for example, you can shoot more film in four hours than in two, and you can determine an hourly rate at which you shoot (or consume) film. After you enter a variable consumption rate for a material resource’s assignment, Project calculates the total quantity of the material resource consumed based on the task’s duration. The advantage of using a variable rate of consumption is that the rate is tied to the task’s duration. If the duration changes, the calculated quantity and cost of the material resource will change as well.
In either case, after you enter a standard pay rate for one unit of the material resource, Project calculates the total cost of the assignment. For example, we will assume that a 100-foot spool of 16-mm film costs $25 to purchase and process.
In this exercise, you enter an hourly variable consumption rate for a task that requires shooting (or consuming) film. You then look at the resulting quantity or number of units of film required by the duration of the task, as well as the cost of the material resource assignment.
On the View menu, click Gantt Chart.
The Gantt Chart view appears.
Task 27 should be selected. If it not, click Go To on the Edit menu and enter 27 in the ID box, and then click OK.
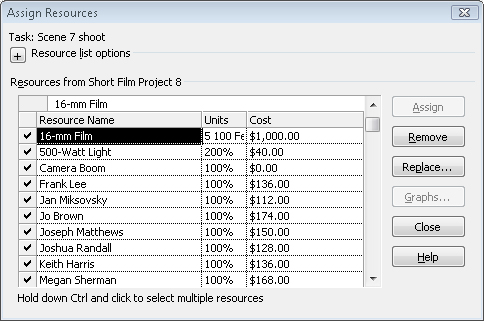
Task 27, Scene 7 shoot, is the first of several tasks that require film to be shot. Next, you will assign the material resource 16-mm Film to this task.
On the Standard toolbar, click the Assign Resources button.
The Assign Resources dialog box appears.
In the Units field for 16-mm Film in the Assign Resources dialog box, type 5/h and then press
.Project assigns the film to the task at a consumption rate of five 100-foot spools per hour.
Because this task currently has a one-day duration, the total film assignment should be 40 spools of film (that is five spools per hour times eight hours). You can see the resulting cost—$1,000—directly in the Assign Resources dialog box. To verify the total number of spools required for this task, you will view the work values of the 16-mm Film assignment to task 27 via the Task Form.
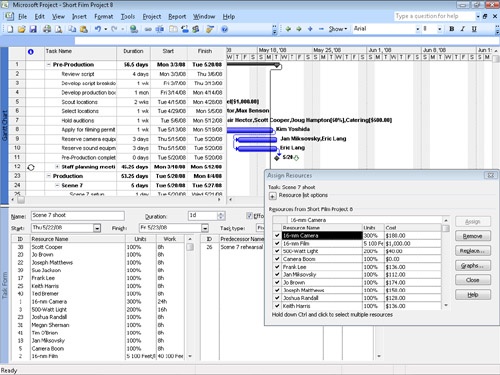
On the Window menu, click Split.
The Task Form appears.
In the Work column of the Task Form, you can see that the 16-mm Film assignment to task 27 is indeed 40 100-foot spools of film. The calculated cost of the assignment, $1,000 (which you also saw in the Assign Resources dialog box), is the 40 units of this material resource for this assignment multiplied by the $25 per-unit cost entered for this material resource. (This value is recorded in the Std. Rate field for the resource.) Should the duration of the task change, the number of units of film consumed and its total cost would change correspondingly.
On the Window menu, click Remove Split to close the Task Form.
In the Assign Resources dialog box, click Close.
Key Points
When working with resource costs, you can specify different cost rates for different assignments and apply different cost rates at different times.
You can account for variable resource availability over time (via a resource’s Max. Units value), which allows you to more finely control when a resource will appear to be overallocated.
In a usage view, you can edit the scheduled work values of resource assignments over time. For example, you can delay the start of one resource on an assignment without affecting the other resources assigned to the same task.
When assigned to a task, material resources can have a fixed or variable consumption rate.