
7.2. Utilizing Command Buttons
Command buttons, or buttons for short, are the way you can tell the form to perform various tasks you want to perform. You have already seen a couple of examples of buttons in looking at the Run Query and New Record buttons created by InfoPath.
To add a command button to the form, click on the Controls task in the Design Tasks task pane, and then click a Button, dragging it to the spot you want it located. Once it is on there you can open the property sheet. The first page of the property sheet is a General tab, and on it you can specify the Action you want the button to perform. If you want to have InfoPath perform a task for you from the Action field, you can choose from the following list:
Run Query: Queries the database, populating fields specified as data fields.
Submit: Saves changes to the database.
New Record: Creates a new blank form to be filled out.
Delete & Submit: Deletes the current record and saves the change to the data source.
Rules & Custom Code: When the four preceding tasks don't do the trick, you can use this task to either create a rule or use custom code to perform your task. This option is discussed in greater detail in Chapter 11, "Working with Code in Your InfoPath Form."
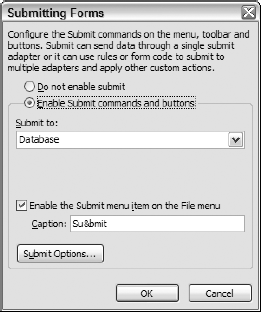
When you specify an Action that includes submitting the form to the database, the Submitting Forms dialog box will appear, enabling you to set up various properties. This dialog box is displayed in Figure 7-6.
The Submitting Forms dialog box is very powerful in that it enables you to submit data not only to the database, as shown in the Submit to field, but also to other entities as well. Following is a complete list of destinations with descriptions:
Database: The default, this option submits data to the database using the data connection.
E-mail: This option enables you to specify a data connection that e-mails completed form information, including To and Subject lines and the body of the text.
Figure 7.6. Figure 7-6
Web service: A Web service can be set up to accept the data that you specify using methods created on the Web service's side.
SharePoint form library: SharePoint is collaborative Web site software, and with InfoPath you can specify a form library where you can store InfoPath forms.
Web server (HTTP): When submitting the form to a Web server, you can submit the XML generated.
Custom submit using form code: This option enables you to use either script or manage .NET code to submit the data where specified.
Custom submit using rules: Rules are used to control how the data is submitted, specifying actions and conditions.
7.2.1.
7.2.1.1. Try It Out: Adding a Delete Button
When you have InfoPath create a form for you, it gives you a means to add a new record as well as to modify and save an existing record, but no way to delete a record. To add this button, open the form you've been working with for this chapter:
Click on the Controls task in the Design Tasks task pane.
Click on the Button task, and holding down the left mouse button, drag and drop it onto the form in the location you want.
Double-click on the button to open the property sheet.
Pick Delete & Submit from the Action list. After you pick this option, the Submitting Forms dialog box will appear, as shown in Figure 7-7.
Figure 7.7. Figure 7-7

This form enables you to specify exactly how you want the submission of the data to be handled. There may some cases in the future where you will want to hold off submitting the data or have the data go to another data connection.
Click OK to accept the properties as they are for submitting forms.
Type Delete in the Label field. The dialog box will then look as shown in Figure 7-8.
Figure 7.8. Figure 7-8
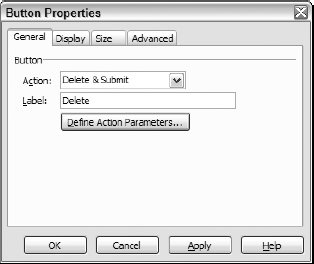
Click OK to accept the button properties.
Click Preview Form.
Pick a record and click the Delete button. The record and its related records in other tables will be deleted provided that Cascade Deletes have been turned on for its relationships.
Should you try to delete a record that contains related tables without having Cascade Deletes turned on, an error will be displayed from Access. For more on table relationships reread Chapter 3, "Understanding Data."