
CHAPTER 31
Working with Procedural Substance Textures
Substance materials are made possible using a Substance map type found in the Material Editor. Although using these Substance materials tends to produce materials that look the same as other material types, the procedural aspect of these materials makes them unique. Most materials with this level of detail require a bitmap texture, and the larger the bitmap, the better the detail. These bitmaps, even when saved using a compressed format, can easily run several megabytes in size. Procedural textures, however, are created using a code, and the result is file sizes that are usually measured in kilobytes instead of megabytes.
So the benefit to using procedural textures is that you can get the detail of an amazing material without the cost in file size. Another huge advantage is that you can easily make changes to the textures by inputting different values into the code. This gives you lots of variety without having to duplicate, reload, and save in memory several different bitmaps. For certain conditions, such as 3d for the Web or for games, these advantages are huge.
Selecting and Applying Substance Textures
The Substance textures feature isn't a whole new way of creating textures with its own interface and rendering engine. Substance textures work with the existing materials in the Material Editor, and unless you were looking for them, you might miss them. Substance textures are available in the Material/Map Browser under the Maps category and can be used with the normal set of default materials.
New Feature
Substance procedural textures are new to 3ds Max 2012.
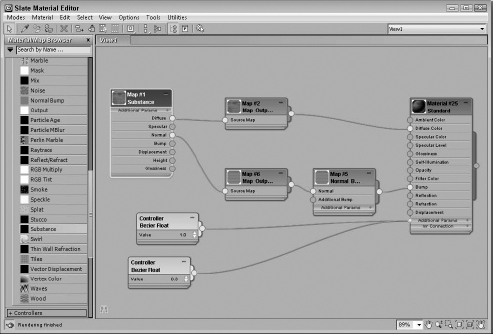
The Substance map node includes output nodes for Diffuse, Specular, Normal, Bump, Displacement, Height, and Glossiness attributes. The material tree, shown in Figure 31.1, uses a Substance map to control the Diffuse and Normal channels of a Standard material.
FIGURE 31.1 Substance materials are made possible using the Substance map node.
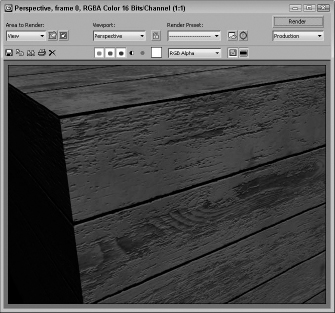
After it's correctly linked, the resulting material is applied to an object in the viewport as usual by selecting the object and clicking the Assign Material to Selection button in the Material Editor or by simply dragging the output for the Standard material node to the object. The applied material is then rendered using the default rendering methods. Figure 31.2 shows the resulting Old Painted Planks Substance material applied to a cube.
Loading Substance textures
The available Substance textures are limited to the included set that ships with Max, but within the Substance Package Browser rollout is a button to Get Substance From Marketplace. This button opens a web browser to the Allegorithmic website where you can browse and purchase additional texture sets. Allegorithmic is the company that created the Substance textures.
3ds Max includes more than 80 preinstalled Substance textures. To choose from the installed texture sets, simply click the Load Substance button in the Substance Package Browser rollout of the Material Editor. This opens to the Maps/Substance folder where Max is installed. The available textures are divided into two folders: Noises and Textures.
FIGURE 31.2 Substance materials have lots of detail despite their small file size.
Linking Substance maps
Because Substance textures are available only as map nodes in the Material Editor, you need to link them to a base material in order to apply them to objects. To do this, simply create a Substance node by selecting and double-clicking it in the Material/Map Browser. A base material node, such as Standard, also must be added to the Slate Material Editor view pane.
After a Substance node is in the Material Editor's view window, select it and use the Load Substance button in the Substance Package Browser rollout to load a specific texture type. Then drag from the Substance node's Diffuse channel to the Diffuse channel on the Standard node. A Map Output node is automatically added to the material tree between the Substance and Standard nodes.
The other channels—Normal, Bump, and Displacement on the Substance node—also can be mapped to the Standard node. If you link the Normal map to the Standard node, you need to go through a Normal Bump map before linking to the Standard node's Bump channel.
Any Substance textures that have a Displacement channel can link directly to the Displacement channel on the Standard material node. The Height channel in Substance textures also can be linked to the Standard node's Displacement channel. The Height channel combines the Bump and Displacement information into a single channel. If a Substance texture is linked to both the Bump and Displacement channels, you can use the Relief Balance setting in the Parameters rollout to change the weighting between these two channels.
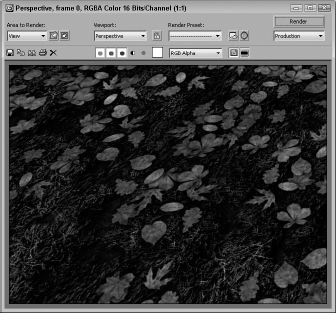
Some Substance textures such as Fencing have an Opacity channel. Connecting this channel to the Opacity channel on the Standard node causes the area between the fence links to show what is behind them. The Autumn Leaves texture has an Opacity channel also. Figure 31.3 shows an autumn leaves texture on top of a grass texture.
FIGURE 31.3 Some textures use the Opacity channel to allow textures beneath to show through.
Several other Substance textures have an Emissive channel. This can be connected to the Self-Illumination channel to create a glow.
After the Substance map node is linked in, you can apply it to a scene object and render to see its results.
Randomizing Substance textures
Although the Substance node has several different rollouts available, including Texture Size, Coordinates, and Noise, each specific texture has its own set of parameters with several options for randomizing the texture. For example, Crumpled Paper has a Crumpled Paper Parameters rollout with settings for Crumple, Dirt, Paper Color, and so on.
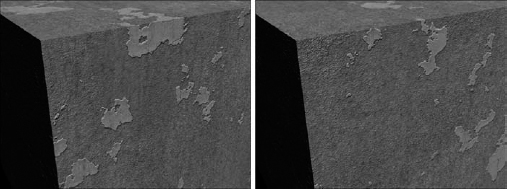
Almost every Substance texture also has a Random Seed setting that controls the randomness of the texture. By changing this value, you can create a uniquely different texture, even though all the other settings are identical. Also, two textures with the same Random Seed value have the same results. Figure 31.4 shows the Cracked Plaster texture with identical settings except for the Random Seed value.
FIGURE 31.4 Substance textures can be made to appear different by changing the Random Seed value.
Tutorial: Applying Substance textures to a scene
The Substance textures are especially good at creating worn, old-looking textures. It is easy to add the randomness of rust and corrosion to surfaces, so we use several Substance textures to create an abandoned city scene.
To create a scene using Substance textures, follow these steps:
- Open the Wall and crates.max file from the Chap 31 directory on the CD.
This file contains several primitive shapes positioned to create a simple scene.
- Select the plane object in front that represents the ground, and open the Slate Material Editor by choosing Rendering
 Material Editor Slate Material Editor (or by pressing the M key).
 - Double-click the Standard material in the Material/Map Browser, and then locate and double-click the Substance and Normal Bump maps in the Maps folder. Double-click the Substance node in the Node View pane, and click the Load Substance button. Select and load the Dry Ground 02 option from the file dialog box.
- Connect the Diffuse channels from the Substance node to the Standard node, and then connect the Normal channel of the Substance node to the Normal Bump map and the output of the Normal Bump map node to the Bump mode of the Standard node. Between nodes, a Map Output node is automatically created. Double-click the Standard material node in the Node View, and click the Assign Material to Selection button in the Material Editor to apply the selected material.
- Select the background wall object in the viewport, and repeat Steps 3 and 4, applying the Brick Wall 03 Substance texture.
- Select the top crate object, and repeat Steps 3 and 4 to apply the Aircraft Metal Substance texture.
- Select all the crate objects in the viewport, and apply the Aircraft Metal Substance texture to it using the method in Steps 3 and 4.
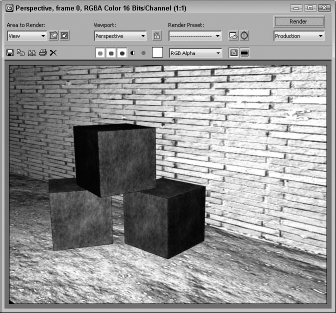
Figure 31.5 shows the resulting scene.
FIGURE 31.5 Substance textures can add lots of detail to a scene.
Summary
This chapter covered the basics of using the Substance map node to create highly detailed textures without the file size overhead. Textures created with Substance can be exported to a game engine using a plug-in tool that is available from Allegorithmic.
In this chapter, you accomplished the following:
- Selecting and applying Substance materials to objects
- Randomizing Substance textures using the Parameter values
The next chapter covers the Viewport Canvas, which lets you paint directly on objects. It also presents a feature for rendering surface maps.