
Chapter 8
Creating Artwork with the Pencil, Curvature, and Blob Tools
IN THIS CHAPTER
![]() Drawing with the Pencil tool
Drawing with the Pencil tool
![]() One-stop-shopping for curves with the Curvature tool
One-stop-shopping for curves with the Curvature tool
![]() Drawing filled paths with the Blob Brush tool
Drawing filled paths with the Blob Brush tool
![]() Erasing with the Eraser tool
Erasing with the Eraser tool
![]() Creating basic and complex shapes with the Shaper and Builder tools
Creating basic and complex shapes with the Shaper and Builder tools
![]() Gracefully transforming artwork with Puppet Warp
Gracefully transforming artwork with Puppet Warp
Ultimately, all vector graphics consist of anchor points and paths. But when you’re on a creative flow, who feels like thinking in terms of underlying technology? Not you, I suspect. Me either. So Illustrator provides other options.
When seized by a creative urge, the fastest way to convey your vision to the screen is often to reach for your mouse, your tablet, or your stylus, and draw with the Pencil tool, the Curvature tool, the Blob Brush tool, or the Shaper tool. I introduce you to these tools and more in this chapter.
Drawing with the Pencil Tool
The Pencil tool is arguably the most intuitive way to draw in Illustrator. It feels as much like drawing with a pencil as can be hoped for in an app. The Pencil tool is even more powerful when you use a drawing tablet. The combination of Pencil tool and tablet enables you to draw strokes with a pressure-sensitive thickness.
The shortcut key for the Pencil tool is the letter N. I remember it by visualizing the word peNcil. You can access the Pencil tool also from the Paintbrush tool flyout, when using the Essential Workspace, as shown in Figure 8-1.

FIGURE 8-1: Accessing the Pencil tool.
Setting pencil curve smoothness
If you’re acclimating to the Pencil tool, a good way to start is to define and experiment with smoothness settings. The trick is to find a comfortable balance between smoothness (which irons out choppy or jagged paths) and accuracy, so that drawing is intuitive.
Maxing out on the accurate end of the scale creates paths that more closely match the path you draw on the screen (or your tablet). At the other end of the scale, smoothness, you get fewer anchors and a less accurate but smoother path with smoother curves.
Follow these steps to experiment and configure the Pencil tool to work for you:
-
With the Pencil tool selected, define a stroke thickness and color in the Control or Properties panel.
Use any stroke thickness settings you want. Need a suggestion? If you're working with print-appropriate units of measurement, start with a 2-point stroke thickness; for web-appropriate units of measurement, start with 2 px.
For details on how to set stroke and fill from the Control or Properties panel, see Chapter 1.
- Set the fill to no fill.
-
Set pencil fidelity to maximum smoothness.
Double-click the Pencil tool in the toolbar to open the Pencil Tool Options dialog, and drag the Fidelity slider to select maximum smoothness, as shown in Figure 8-2. Then click OK.

FIGURE 8-2: Defining smoothness for the Pencil tool.
-
Experiment with the Pencil tool to get a feel for using it with maximum smoothness.
Click and drag on the artboard to draw a path and a few curves (see Figure 8-3). The Pencil tool displays a small * (asterisk) when you're drawing a freeform path.
-
Change the settings to maximum accuracy and experiment with the Pencil tool.
Double-click the Pencil tool in the toolbar to open the Pencil Tool Options dialog, and drag the Fidelity slider all the way to the left to make the tool function with maximum accuracy.
Draw curves similar to the ones you just drew. Note that the faster you draw, the smoother the curve.
- Choose an accuracy setting that works best for your drawing style and project, and draw away!

FIGURE 8-3: Using the Pencil tool to draw smooth curves.
Managing the many modes of the Pencil tool
The Pencil tool is not just good for drawing curves. It’s versatile. You can draw straight lines, including constrained straight lines (at fixed angles at 45 degree increments). You can edit existing paths. And can use the Pencil tool to close open paths by connecting the start and end points.
In addition to setting the degree of smoothness in the Pencil Tool Options dialog, the behavior of the Pencil tool is affected by the following:
- How fast you draw with your mouse or stylus
- What keys you press while you draw
- How much pressure you put on your stylus if you're drawing with a tablet
- Other settings in the Pencil Tool Option dialog
- Keyboard, mouse, or stylus options that change the state of the Pencil tool
The Pencil tool behaves differently depending on its mode, which is indicated by the tool's cursor.
It took the Rosetta Stone to begin to decrypt Egyptian hieroglyphics. Decrypting the different cursors that indicate the modes of the Pencil tool isn’t as challenging but can be complicated. Following is a list of the most common Pencil cursor states:
- The asterisk is the default Pencil tool cursor and is displayed as you draw unconstrained freeform paths. All you need to do to invoke this state is to start drawing with the Pencil tool.
- The path-continuation cursor indicates that you're adding to the path, picking up where you left off in the drawing. You activate this mode when you move your cursor close to the end anchor in a selected path. I explain how to tweak settings for the distance that triggers path-continuation mode in the next section of this chapter.
- The straight-segments cursor means the Pencil tool draws lines, not curves. It's activated when you hold down the Alt (Windows) or Option (Mac) key.
- The constrained straight-segments cursor constrains straight-line angles to increments of 45 degrees. It's activated when you hold down the Shift key.
- The close-path cursor is a small circle that appears with the cursor when you're about to close a path.
Figure 8-4 illustrates all the modes in this list, left to right: default, path-continuation, straight-segments, constrained straight-segments, and close-path cursors.

FIGURE 8-4: Five states of the Pencil tool.
Setting Pencil tool options
To fluently wield the full set of features packed into the Pencil tool, you need to know how settings in the Pencil Tool Options dialog affect the behavior of the pencil in different modes. So let me explain how these options interact with the features of the Pencil tool itemized in the preceding section:
- Fill New Pencil Strokes: Applies a fill as you draw a stroke. However, this option applies only if you have a fill defined (you can do that by using the Control panel or Properties panel).
- Keep Selected: Automatically displays anchors you create when you finish drawing and keep the path selected. This option is useful if you’re drawing a single path and want to work on that path in more detail with the Pen tool as soon you finish drawing. You might find the option distracting if you want to complete an entire sketch before tweaking it.
- Alt (Windows)/Option (Mac) Key Toggles to Smooth Tool: Allows you to use that key to toggle to the Smooth tool. I explain how the Smooth tool works later in this chapter.
- Close Paths When Ends Are Within value: Defines how close the start and end points of a path have to be before the Pencil tool creates a closed path.
- Edit Selected Paths: Allows you to continue editing an existing path (as opposed to creating a new path that starts where the existing one ends). This option is enabled by default for a good reason: It allows you to keep a drawing together as a single object for easier editing later on the workflow road, instead of ending up with a bunch of discrete objects that are supposed to be combined in an object. The value in Edit Selected Paths Within defines how close your cursor has to be to the start or end point of a path before the Pencil tool connects with an existing path and continues editing it.
Ironing Out Wrinkles with the Smooth Tool
The Smooth tool removes jaggies, zig-zags, and unwanted angles in the sometimes too-messy paths generated by the Pencil tool or any other tool.
The Smooth tool didn’t make the cut when Adobe simplified the Basic version of the toolbar, so you have to add it to the Basic toolbar to access it from there. The section on the toolbar in Chapter 1 explains how to add tools to the Basic toolbar.
As noted previously, if you’re using the Pencil tool, the Pencil Tool Options dialog lets you enable the Alt (Windows) or Option (Mac) key to function as a toggle from the Pencil tool to the Smooth tool.
You can double-click the Smooth tool to adjust the Fidelity settings: Accurate makes the tool more subtle, and Smooth makes the smoothing go into effect more radically.
With Fidelity cranked all the way up to maximum smoothness, I clicked three times on the shape on the left in Figure 8-5 to transform it into the smoother oval shown on the right.
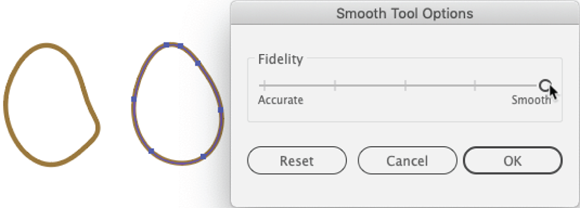
FIGURE 8-5: Applying the Smooth tool.
Drawing and Editing Curves with the Curvature Tool
The Curvature tool (which bears a slight analogous connection to a similarly named chain of gyms) is tightly focused to help you create and edit curves.
You want angles? You have the Pen or Pencil tool. If your mission is creating, editing, adding, or tweaking curves (including turning curves into corners), the Curvature tool provides one-stop shopping in that it works on any path, regardless of how the path was created.
You use the Curvature tool in basically two ways:
- You can draw with it.
- You can transform existing paths with it.
Drawing curves
Here’s how to draw with the Curvature tool:
- Select the Curvature tool.
- Click once to create an anchor.
- Click a second time to create a second anchor.
-
Use your mouse to define the curve of a path between the two anchors:
- To create a corner point instead of a curve, press the Alt key (Windows) or Option key (Mac) when clicking to place a second anchor.
- Continue clicking and defining curves to complete a path.
- Press Esc or select another tool to finish the path.
As you move your cursor, the path appears in Rubber Band preview mode, previewing the curve, as shown in Figure 8-6.

FIGURE 8-6: Previewing a curve with Illustrator’s Rubber Band.
Editing curves
You can add anchors to an existing selected path, change curves to straight anchors, delete anchors, and tweak curves with the Curvature tool.
Can’t you do all those things with the Direct Selection, Pen, and Anchor Point tools? Yes, you can. But again, the Curvature tool provides one-stop shopping for all things curve.
You can do basic editing of a path without having to leave the Curvature tool:
- Click an anchor and drag it to move it.
- Click an anchor and press Delete to delete it (without creating an open path).
- Click a point and then drag it to move it.
Here’s an example of where the Curvature tool earns its money as an editing technique: Double-click the corner or any anchor point of a shape or star to convert the straight anchor to a curve, and then use your mouse to tweak the curve. In Figure 8-7, I transformed the upper-right corner of a rectangle into a curve by double-clicking with the Curvature tool, and tweaked the curve with the Rubber Band preview.
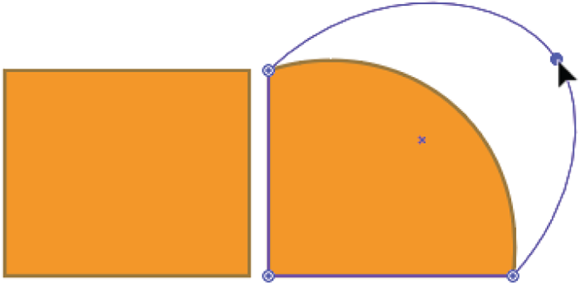
FIGURE 8-7: Transforming a straight anchor into a curve with the Curvature tool.
Drawing Filled Paths with the Blob Brush Tool
The unique thing about the Blob Brush is that it draws filled shapes, not paths. For example, a designer created some of the lettering in the poster in Figure 8-8 by using the Blob Brush. I then pulled lettering out of the poster and added a yellow fill so you could see that the “strokes” that make up the letters e, s, i, and g are actually filled paths.

FIGURE 8-8: The Blob Brush feels like a stroke-drawing tool but creates filled paths.
Creating those letters by “drawing” with a shape would have been unintuitive. The Blob Brush solves the problem by looking and feeling like a tool that draws paths but actually generates shapes.
You access the Blob Brush tool in the Paintbrush tool flyout of the Basic toolbar. You draw with it as if you were drawing with the Pencil tool.
To define how the Blob Brush functions, double-click it to access the Blub Brush Tool Options dialog. The following tips will help you manage settings there:
- Keep Selected: Automatically displays anchors you create when you finish drawing a path (as is the case in the Pencil Tool Options dialog). This option is especially useful because, as emphasized, when you draw “strokes” with the Blob Brush, you’re actually creating filled paths, and displaying anchors as you draw makes it easier to tweak the resulting paths. On the other hand, you might find all those anchors distracting as you draw, in which case you’ll want to deselect this option.
- Merge Only with Selection: Creates discrete blobs, even when they overlap. This option is deselected by default so you can add to a blob with the Blob Brush as you draw. Normally, I find that designers prefer to leave this option deselected so they can return to existing blobs and add to them, maintaining the graphic as a single object. In fact, the ability to merge shapes as you draw is usually an intuitive way to create objects with the Blob Brush. Figure 8-9 shows what happens when I edit two sets of intersecting blob “strokes.” The one on the left was edited with the Merge Only with Selection option selected; the one on the right had that option disabled, creating a single object instead of two intersecting ones.

FIGURE 8-9: Merge Only with Selection enabled (left) and disabled (right).
- Fidelity: Controls how precisely your mouse or drawing pad actions are translated into paths. Settings range from no smoothing (Accurate) to maximum smoothing (Smooth).
-
Size: Defines the diameter of the “stroke” (really the filled path) that you generate as you draw.
 Defining the size of the Blob Brush can be confusing. Even though drawing with the Blob Brush feels like drawing strokes, you are drawing filled paths. That’s why you don’t define a stroke color or weight for the Blob Brush (unless you want to add a stroke to the generated fill, and you usually don’t because the filled path functions like a stroke). And, to emphasize the point, the color of the “stroke” generated by the Blob Brush is defined in the Control or Properties panel by the selected fill color, not stroke color.
 - Angle: Defines how the brush is applied and is only operative if you reduce Roundness.
- Roundness: Reducing below 100% creates an oval-shaped stylus that generates a calligraphic-type “stroke.”
- Random: Varies the associated value. For example, with Random selected, a Variation value of 6, and a stroke Size of 36 points, the “stroke” thickness will vary between 30 and 42.
Figure 8-10 shows the Blob Brush Tool Options dialog configured to apply randomness to the size, angle, and roundness for the generated “stroke.”

FIGURE 8-10: Defining options for the Blob Brush tool.
Erasing with the Eraser Tool
The Eraser tool cuts through shapes quickly, cleanly, and intuitively. The Eraser tool can serve also as a drawing tool, cutting a path, so to speak, out of a shape.
Because the Eraser tool is intuitive (and let’s face it, not everything in Illustrator is!), and because configuring and wielding it is similar to using features in the Blob Brush I just explained, this section is short. But that doesn’t mean the Eraser tool isn’t powerful.
You can configure the Eraser tool by double-clicking it to open the Eraser Tool Options dialog. The settings for Angle, Roundness, and Size, as well as the function of random variation in those settings, is similar to those for the Blob Brush.
Figure 8-11 shows the Eraser tool at work cleaning up text created with the Blob Brush.

FIGURE 8-11: The Eraser tool at work.
Creating Shapes with the Shaper and Shape Builder Tools
Arranging, combining, and transforming basic shapes is a powerful design technique in Illustrator. Chapter 4 explores what you can do with shapes in some depth and focuses on drawing and generating shapes using the Rectangle, Ellipse, Polygon, Star, and Line Segment tools.
But bouncing from one shape tool to another can be tedious. As an alternative, Illustrator’s Shaper tool allows you to generate shapes intuitively and on the fly.
Creating shapes with the Shaper tool
The Shaper tool isn’t part of the Basic toolbar by default, so you have to add it. Do that by clicking the edit toolbar icon (the ellipses) at the bottom of the toolbar, and then dragging the Shaper tool into the toolbar as shown in Figure 8-12. Alternately, you can press Shift+N to select the Shaper tool.

FIGURE 8-12: Adding the Shaper tool to the Basic toolbar.
With the Shaper tool selected, draw something close to an ellipse, a rectangle, or a polygon (such as a triangle or a hexagon). When you release the mouse button, Illustrator meditates for a nanosecond and generates a nice clean shape based on what you drew. So, for example, the crudely drawn rectangle on the left in Figure 8-13 became the nicely drawn triangle on the right. This technique works for rectangles, circles, ellipses, and polygons (including triangles).

FIGURE 8-13: Using the Shaper tool to generate a triangle.
Combining shapes with Shape Builder
The Shape Builder tool is a quick, easy way to combine a bunch of selected, overlapping shapes. Here’s how it works:
- Select the overlapping shapes that you want to combine.
- Select the Shape Builder tool.
- Click and drag across the selected shapes to combine them into a single path, as shown in Figure 8-14.

FIGURE 8-14: Combining shapes with the Shape Builder tool; the result is shown on the right.
The Shape Builder with its default settings is handy for intuitively combining a few intersecting shapes. You can fine-tune how the Shape Builder tool works by double-clicking the tool and adjusting options, but a documentation of those options is beyond the limits of what we can explore here. Instead, when you need more detailed and controlled options for combining intersecting paths, see the section on the Pathfinder panel in Chapter 4.
Animating with Puppet Warp
The Puppet Warp tool helps you gracefully transform artwork so that the changes feel natural. The Puppet Warp tool is particularly effective when used on simple (even stick) figures or cartoon characters.
The process follows:
- Select the artwork you want to transform with the Selection tool.
- Select the Puppet Warp tool.
-
Use the pins that appear to transform the artwork.
Illustrator intuits areas to transform the artwork and adds pins that you can click and drag to transform the art.
A mesh appears that indicates where you can add pins. That mesh can be distracting. It disappears as you're transforming the graphic, but you can hide it when you don’t need it by deselecting the Show Mesh check box in the Properties panel.
Figure 8-15 shows an original graphic on the left being transformed on the right.

FIGURE 8-15: Transforming a dancer with the Puppet Warp tool.
-
Add additional pins by clicking with the Puppet Warp tool:
- For the most fluid results, use three or more pins.
- To select multiple pins, use Shift-click. The selected pins appear with white dots inside the black circles that indicate pins. You can move multiple selected pins together to experiment with the effect that has on your illustration.
- To remove pins, select them and press Delete.
- To constrain the transformation of your graphic around a selected pin, press Alt (Windows) or Option (Mac) while dragging that pin.
In Figure 8-16, I added several pins and made more adjustments to the original artwork.
- Rotate pins for effect:
- Hover your cursor over the circle that appears around a selected pin to display the rotate icon.
- Drag clockwise or counterclockwise, and explore the effect that action has on the artwork, as shown in Figure 8-17.
- To stop editing with the Puppet Warp tool, select any other tool.

FIGURE 8-16: Working with multiple pins and the Puppet Warp tool.

FIGURE 8-17: Using rotation on a pin with the Puppet Warp.
Fine-Tuning beyond Drawing Tools
In this chapter, I introduced many different ways to draw in Illustrator. Many of these techniques overlap or are one of many alternative ways to create artwork. One person’s favorite tool or technique is not necessarily the next person’s. Different strokes for different folks, to quote Sly Stone.
But as varied, intuitive, and helpful as the drawing tools in this chapter are, I have to circle back to the point I opened the chapter with: Drawing simply to generate points and paths. Thus, the Illustrator drawing workflow often involves a cycle of drawing with the tools in this chapter and then returning to the Pen tool and its cousin the Anchor Point tool to tweak the anchors and paths generated when you drew more intuitively with drawing tools.
So, when you run up against the limits of the detail to which you can edit the paths you create with the Pencil and Curvature tools or other tools for creating objects, keep the Pen tool handy for final touch-up techniques.