
C H A P T E R 6
![]()
Post-Installation
After you have installed or upgraded your environment to SQL Server 2008, we recommend spending some time configuring your instance to ensure that SQL Server runs optimally and is secure. There are many configuration options and different post-installation processes and procedures utilized across the globe by various database administrators. We cannot cover every scenario and describe the best configuration setting for all the different types of applications, but we would like to discuss the more important options and describe situations where you can take advantage of the settings.
SQL Server Configuration Manager
SQL Server 2008 Configuration Manager is a tool supplied by Microsoft to set up connection protocols, determine the connectivity from client computers, and to mange the service accounts for the installed instances on a server. This tool allows you to configure all instances of SQL Server 2005 or older installed on your server. Once the tool is launched, it is fairly simple to navigate through the available options and modify any configuration options that need to be altered. Figure 6-1 shows the SQL Server Configuration Manager window.
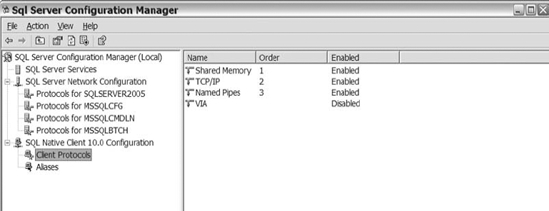
Figure 6-1. SQL Server Configuration Manager after it is launched
As you can see from Figure 6-1, the Configuration Manager allows you to configure multiple instances of SQL Server, including SQL Server 2005. The figure also shows the three major configuration setting categories: SQL Server Services, SQL Server Network Configuration, and SQL Native Client 10.0 Configuration.
SQL Server Services
The SQL Server Services section lists the SQL Server services installed on your server for each instance. The window displays the name of each service, its current state, the start mode, the login name that the service starts as, what type of service it is, and the process ID (see Figure 6-2).
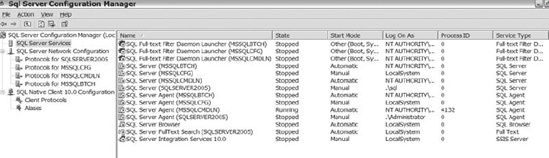
Figure 6-2. A list of SQL Server services in the Configuration Manager
From the SQL Server Services section, you can easily start, stop, and restart any service listed. You can also modify the properties of the services using the SQL Server Properties dialog shown in Figure 6-3. Within the dialog, all services have three tabs: Log On, Service, and Advanced, which contain configurable options that were set up during the install. The database engine service actually has an additional tab, FILESTREAM, which is also configurable from the Properties dialog.
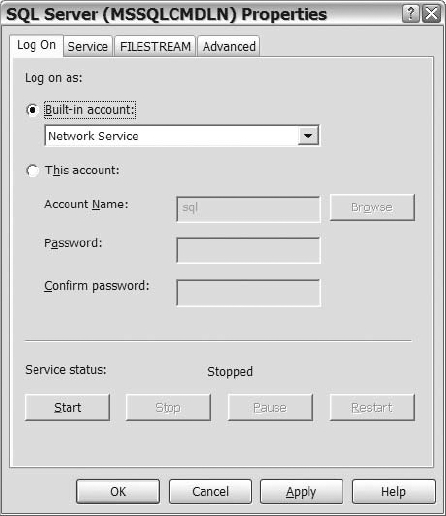
Figure 6-3. Log On tab of the SQL Server Properties dialog
The Log On tab is the location from which you change the user account that a service uses. That login name could be a built-in account or a local or domain account. There is a drop-down list that makes it easy to select any of the system accounts. The process for choosing domain or user accounts works just as it always has. You can type the name in or browse the domain or computer for the username that you are looking for. So if during the install you selected an account that you do not want to use, or you need to change the account for any reason, then navigate to the Log On tab to make that change.
The Service tab (see Figure 6-4) provides information about an instance. The Service tab reminds you of the location in which SQL Server binary files are located, the host name, the instance name, the service type, start mode, and the current state. The only changeable option from this tab is the start mode. The start mode determines the service action after a reboot occurs. The available options for Start Mode are Automatic, Disabled, or Manual. Unless you installed an unutilized service, then you probably want to leave the service in Automatic mode. That way, if the server reboots unexpectedly, the services needed for your environment to run properly will start when the server starts.
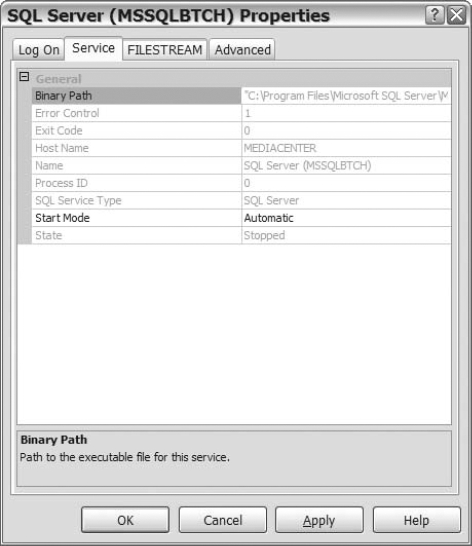
Figure 6-4. The Service tab of the SQL Server Properties dialog
The FILESTREAM tab shown in Figure 6-5 is almost identical to the FILESTREAM tab in the GUI version of the installation process. The FILESTREAM tab allows you to enable or disable FILESTREAM for Transact-SQL access. After you enable FILESTREAM, you have the option to enable FILESTREAM for file input and output (IO) streaming access. If you select the FILESTREAM option for file IO streaming access, then you need to add the Windows share name. The last configuration option that you have to decide is whether to allow remote clients to have streaming access to FILESTREAM data. For those of you who were not ready to enable FILESTREAM data during the installation process, you enable that option in the Configuration Manager after installation.
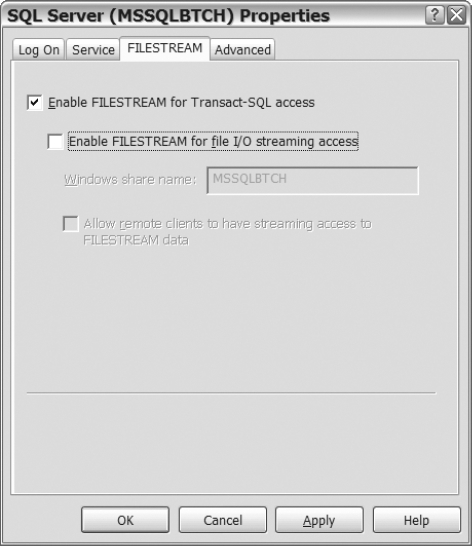
Figure 6-5. The FILESTREAM tab within the SQL Server Properties dialog
The Advanced tab shown in Figure 6-6 is a mixture of information about the instance and configurable options for the instance. This tab provides useful information such as whether the instance is clustered, the data path, version, service pack level, and much more. The tab also allows you to enable reporting, change the startup parameters, and modify the dump directory. When you want to review instance information about the server without logging into SQL Server Management Studio, the Advanced tab within SQL Server Configuration Manager allows you to view many of the common options for an instance.
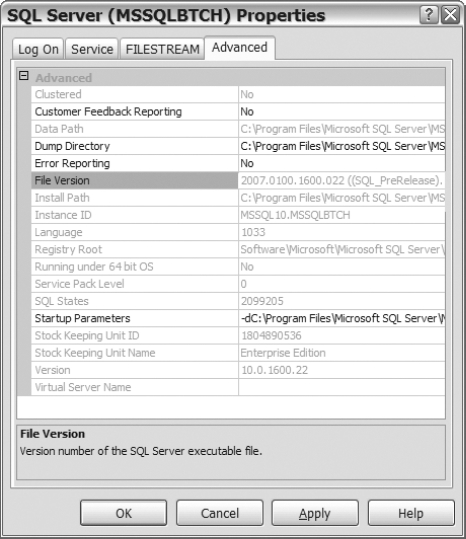
Figure 6-6. The Advanced tab within the SQL Server Properties dialog
SQL Server Network Configuration
The SQL Server Network Configuration section allows you to determine the available protocols for use in connecting to an instance of SQL Server 2008. Before we dive too deep into the different types of protocols, let's go ahead and define the terms that will be used throughout this section:
- Protocol: A method that controls the connection and data transfer between two computer endpoints.
- Shared Memory: Protocol used for connecting to SQL Server from a client on the same server.
- Named Pipes: Protocol used for connecting to SQL Server on local networks.
- TCP/IP (Transmission Control Protocol/Internet Protocol): Most widely used protocol for communicating over the Internet. This protocol is used for connecting to SQL Server on local networks and interconnected networks.
- Virtual Interface Adapter (VIA): Protocol used for communicating with virtual hardware.
SQL Server 2008 allows you to enable four protocols: Shared Memory, Named Pipes, TCP/IP, and VIA. When you select the protocols for an instance, the protocol and its status exist on the right side of the screen (see Figure 6-7).
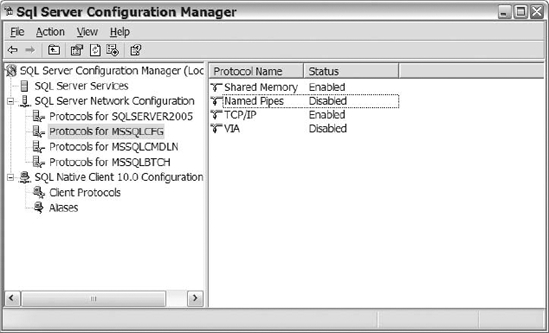
Figure 6-7. Enabled protocols for the MSSQLCFG instance
The Shared Memory protocol is the easiest to utilize because there are no configuration options. From the Properties dialog of the Shared Memory protocol (see Figure 6-8), the only options you have are to enable or disable the protocol. The Shared Memory protocol connects to a SQL Server instance on the same server. If you are unable to connect to SQL Server from other machines across your network, then remote into your server and see if you can connect to SQL Server locally. As long as the Shared Memory protocol is enabled, the client will attempt to connect to SQL Server using that protocol. If you are able to connect to SQL Server locally, then you will know that the problem exists with the configuration of the other protocols, not SQL Server.

Figure 6-8. The Properties dialog for enabling and disabling the Shared Memory protocol
The Named Pipes protocol is easy to enable or disable, but it can be a little trickier to configure when you are not using the default instance or default pipe. SQL Server has a preconfigured named pipes file, which is used by default unless you specify another file name. The default pipe name is sqlquery. In order to connect to a specific named pipe other than the default pipe, you have to either enable the SQL Server Browser service, create an alias for the named pipes connection on the client, or create a custom connection string on the client. Then the client has to utilize that alias name within the connection string when connecting to the database server. Figure 6-9 shows the Properties dialog for the Named Pipes protocol.
![]() Note You can create your own named pipes configuration file and select it from within the Configuration Manager. However, creating named pipe configuration files are outside the scope of this book.
Note You can create your own named pipes configuration file and select it from within the Configuration Manager. However, creating named pipe configuration files are outside the scope of this book.
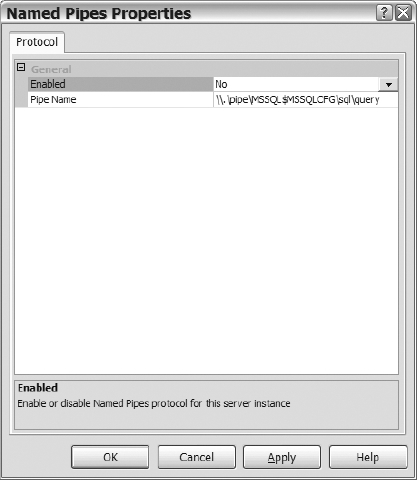
Figure 6-9. Configuration options for the Named Pipes protocol
TCP/IP is a frequently used communication protocol that is easy to enable, but can be complex to configure and set up. Luckily, the SQL Server Configuration Manager only allows you to modify minimal settings—changing the parameters incorrectly can cause SQL Server to be unreachable. Before you alter any of the settings, consult with a network person if you are unfamiliar with the choices presented to you.
The Protocol tab (see Figure 6-10) under the TCP/IP Properties dialog consists of three configurable options: the ability to enable TCP/IP along with the Keep Alive and Listen All properties. Obviously, the enabled option allows you to enable or disable the TCP/IP options. The Listen All choice allows the database engine to accept connections on all the enabled valid IP addresses for the server.
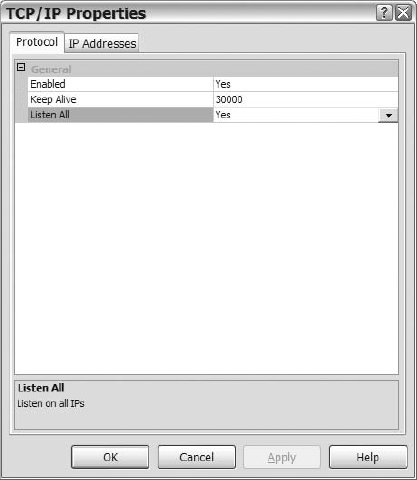
Figure 6-10. The Protocol tab in the TCP/IP Properties dialog
The Keep Alive selection allows you to determine how long SQL Server waits before validating that a connection is still active. How does this process work? At the designated interval, SQL Server will send a Keep Alive packet to the other end of the connection. Upon receiving the acknowledgement packet, SQL Server keeps that connection open. If the acknowledgment packet isn't received, then SQL Server closes that connection, returns, and then frees the resources. The default interval for sending Keep Alive packets is 30,000 milliseconds, or 30 seconds. Before changing the default time or enabling this process, check with the network engineers at your organization to ensure that the choices selected are in line with theirs.
The IP Addresses tab (see Figure 6-11) lists all the IP addresses for your machine, including a loopback (127.0.0.1). The dialog shows you which IP addresses are active or enabled, as well as the TCP port that it uses for connection. The default instance of SQL Server still connects to port 1433. If you have multiple instances of SQL Server on a server and you have not set up the port used to connect to the instance, then the TCP Dynamic Ports option will show 0, indicating that the instance uses dynamic ports. Using dynamic ports simply means that the instance will choose an available port when the service starts. This also implies that the instance does not guarantee to have the same port every time. In an environment where the applications are configured to talk to a certain port, or port-specific firewall rules are in place, you definitely do not want the port changing on you. Consider defining a port for your database instances.
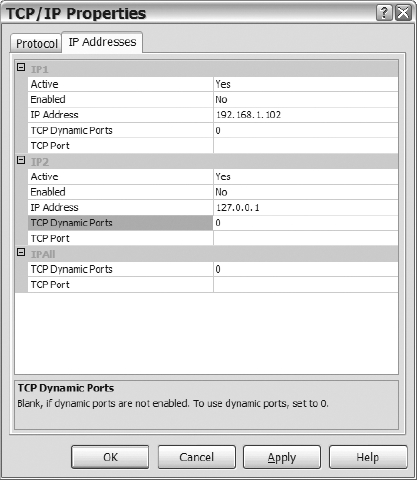
Figure 6-11. The IP Addresses tab in the TCP/IP Properties dialog
One thing to be aware of when configuring TCP/IP is that properties are read once when the SQL Server service starts. Any changes made in the TCP/IP Properties dialog will not take effect until you stop and start the SQL Server service. Figure 6-12 shows the message you will receive after changes to remind you that you need to restart your service for those changes to take effect.

Figure 6-12. The warning message received after changes are made in the TCP/IP Properties dialog
We have supported applications that performed better when using TCP/IP over named pipes. We are not network engineers, so pretending to explain to you why performance was better in those instances would not be beneficial. However, named pipes was comparable to TCP/IP on fast LAN networks. Unfortunately, we haven't always supported databases on the fastest networks, and the bulk of our applications communicated via WAN traffic, where named pipes doesn't compete with TCP/IP in terms of performance. We encourage you to test in your environment the difference between your application connecting to SQL Server via TCP/IP and named pipes, especially if your network has performance problems or the application servers connect to the database server over a WAN. However, don't just disable TCP/IP or named pipes without checking with the application engineers or developers to validate the connection protocol used by the application.
How do you determine if performance is better with one protocol over the other? Utilizing testing tools that simulate user activity has always worked best for us. You can simulate a series of steps or user processes with a number of users and measure response times of the application. If the organization does not own or possess testing tools, then get a stopwatch and a group of people and simulate the work of a testing tool. First, develop a script or a series of steps that you want to execute from the application. Next, run the script measuring the amount of time it takes to execute a command from the application to the amount of time that it takes for the response to complete. Measure the time of each step and store that information as your baseline. Then start running your script, enabling and disabling the different protocols while paying close attention to the amount of time that it takes each step to complete. Feel free to have multiple users running through the script during the baseline period and your future tests in order to simulate multiple users using the application. After the tests are complete, compare the results of each protocol run with the baseline and see which one is best.
Because manual tests are not perfect, we recommend running these types of tests multiple times before making the final change. Pull in your network guys to participate in the tests. Oftentimes, they have tools to measure network traffic and performance that may pinpoint problems or help measure the responses of your tests. We know this method is not perfect and requires effort to pull off. However, when you have no other tools and need a method to measure your application performance, this process works.
SQL Native Client Configuration
The various settings under SQL Native Client Configuration section of the Configuration Manager determines how client applications will connect to SQL Server 2008. Modifications within this section will influence how the client tools on the server or machine connect to SQL Server. Modifying client configuration on the server where the instance resides only modifies the configuration for the local instance, not all instances. The Native Client Configuration section has two subsections: Client Protocols and Aliases.
The Client Protocols section (see Figure 6-13) lists the available protocols that SQL Server Client tools use to connect to the Database Engine. The available protocols are the same that we discussed in the preceding section: Shared Memory, TCP/IP, Named Pipes, and VIA. One important attribute to pay attention to in the Client Protocols section is the Order column—this column specifies the order of the protocols used when trying to connect the Client tools to SQL Server.
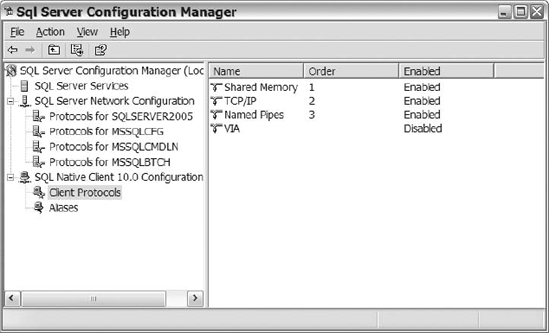
Figure 6-13. Client protocols supported by SQL Native Client Configuration
You can arrange the order of the enabled protocols, except for the Shared Memory protocol. That protocol will always be number 1 when enabled. Figure 6-14 shows the Client Protocols Properties dialog that you use for changing protocol order.
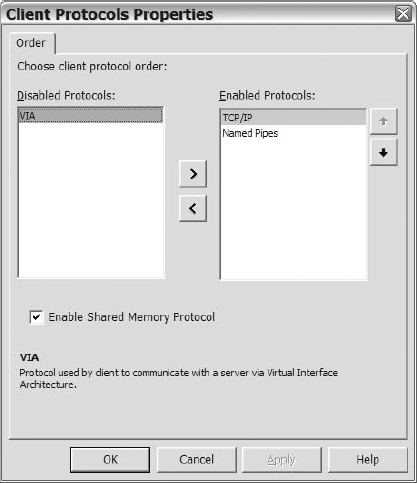
Figure 6-14. The dialog in which the order of protocols is changed
The work of configuring the client protocols is not as involved as that of configuring the network protocols that we discussed earlier. The Shared Memory protocol only has two options again: enabled or disabled. TCP/IP has a couple more options: Default Port, Enabled, Keep Alive, and Keep Alive Interval (see Figure 6-15). The default port is the one that the Client tools will utilize when connecting to SQL Server. If the default instance does not use the default port (port 1433), then modify the setting in the Default Port option.
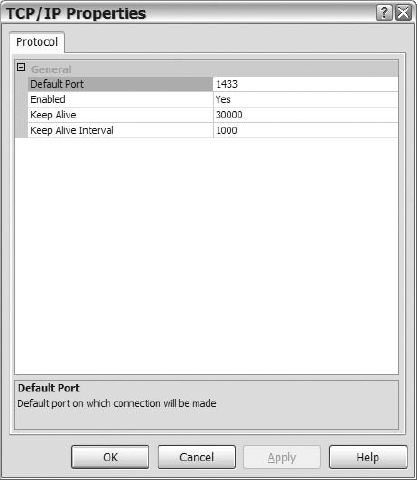
Figure 6-15. The TCP/IP Properties in the Client Configuration section
If you are connecting to a named instance, then the client will query the SQL Server Browser service to determine the port to connect to. If the Browser service is not running, then the port number must exist in the connection string. The Keep Alive option determines how long it will take an idle connection to send the Keep Alive packet to ensure that the connection is still active. The Keep Alive Interval option shows the amount of time between resubmissions of the Keep Alive packet when transmissions are not received from the Client tools.
The Named Pipes and the VIA protocol settings are simple to configure with minimal decision points. In the Named Pipes protocol properties, you have two configurable options (enabled or disabled) and the path to the default path. In VIA properties, you have a couple of options, the default server and default network interface card (NIC).
As you can see, the SQL Server Configuration Manager has a number of configurable options that can affect the way that SQL Server and its components start and are communicated with. From within the Configuration Manager, you have the power to prevent SQL Server or any of its components from starting and from being reachable from applications. So before making modifications to any of the options within the Configuration Manager, ensure you are aware of the impact of the changes that you make.
Configuring the Instance
Another important aspect of post-installation involves configuring the instance(s) of your SQL Server. Configuring SQL Server focuses on modifying settings or options to help SQL Server perform optimally. Throughout this section, our objective is to discuss some of our favorite configurable options. The intention is not to configure your environment; however, we would like to provide you with enough information about the settings so you can make intelligent decisions to meet your application's needs.
Before starting the configuration discussion, we would like to point out that there are generally two methods of modifying configuration options in SQL Server: You can use the SQL Server Management Studio GUI interface, or you can invoke the stored procedure sp_configure in a query window. When both methods of amending a configuration option exist, we will show you both the GUI version and code version for the change.
Viewing Advanced Options
By default, SQL Server does not let you view all of the available configuration options. You are initially limited to the most basic choices. Thus the first command to run in your query window is the following:
sp_configure 'show advanced options', 1;GO reconfigure
This statement allows us to view the advanced options when executing the sp_configure query. That way, we can ensure all the options discussed in subsequent subsections are viewable.
Viewing Configuration Settings
There are three basic methods of viewing the configuration options and their minimum, maximum, and currently configured value:
- Executing the stored procedure
sp_configure - Querying the
sys.configurationssystem view - Right-clicking on the instance name and selecting Properties from the pop-up menu
Figure 6-16 displays the results of executing the sp_configure stored procedure.

Figure 6-16. A snapshot of the results of sp_configure
Figure 6-17 shows the results of querying the sys.configurations system view.

Figure 6-17. The results of the sys.configurations system view
Figure 6-18 shows the Server Properties window.
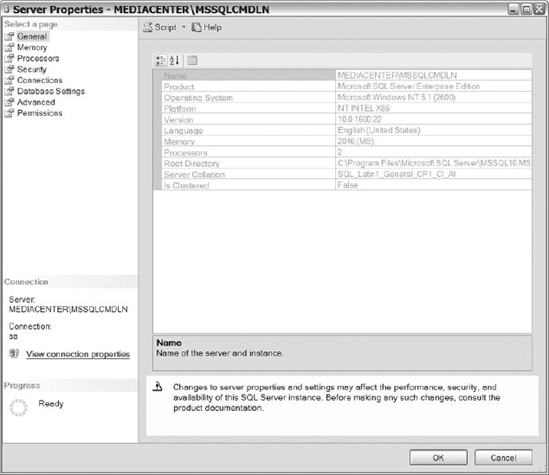
Figure 6-18. A sample of the Server Properties window
Visually, you can easily identify the similarities and differences among the screenshots. We encourage you to review the results of the sys.configuration system view. The system view provides you with similar information as the other views, with the advantage of a description of the configuration option. After reviewing the descriptions, you should have a better understanding of the usages of the option and determine if you need to do more research before enabling or disabling the option.
Specifying Maximum and Minimum Server Memory
Determining the maximum and minimum amounts of memory each instance of SQL Server requires can be easy or complex, depending on the server and what applications are running on it. If you have a single instance of SQL Server on a server without any other applications (excluding applications like virus scan and other essential apps), then you want to dedicate as much memory as possible to SQL Server while still leaving enough memory for the operating system to run effectively. Depending on the amount of memory that server has, we generally like to leave at least 1 or 2 GB for Windows. Figure out the best setting for maximum memory where both SQL Server and the operating system are happy. In Chapter 14, we discuss methods for monitoring your memory. That should help you determine if your instance needs more memory.
You can specify memory allocation from the Memory section of the Server Properties dialog for your instance (see Figure 6-19). You can see that the minimum server memory has been left at 0 MB, whereas the maximum has been set at 8192 MB (which is 8 GB).

Figure 6-19. The Memory section of the Server Properties dialog
You also have the option to invoke a stored procedure to specify memory allocation. The following invocation of sys.sp_configure requests the same 0 to 8192 MB allocation as was shown in Figure 6-19:
Configuring your maximum amount of memory on servers that have multiple instances of SQL Server or other applications will increase the complexity and importance of your task. Do not forget that SQL Server is a memory hog; it allocates as much memory to the buffer as needed to process or handle the workload. If you have multiple instances of SQL Server reserving memory without restrictions or limitations, then one instance will likely be starved or not have as much memory as it needs. To help eliminate that as a potential problem, you should set minimum and maximum memory allocations.
When determining the maximum amount of memory for each instance, we usually revert to the requirements documentation for information about the applications that will be running on each instance. During the pre-installation phase, you gather information about the number of users, the anticipated transaction per second, the size of the databases, and so on. With that information, settle on the amount of maximum memory that you want to allocate to each instance. When the applications are highly similar in terms of transactions per second, database sizes, and the like, you should divide the memory equally among the instances after leaving a couple of gigabytes for the operating system. Once you have set up the maximum memory configuration, you do not have to worry about one instance starving another.
The minimum amount of memory is usually easy to configure and does not require as much consideration. The primary purpose of setting the minimum memory configuration on a server that has multiple instances is to ensure that an instance has enough memory to perform as expected. SQL Server will only use the amount of memory needed to process requests from the applications. When all the memory of one instance is not being utilized, that instance may release memory back to the operating system, and another instance could reserve the memory. If the other instance is using the memory and no available memory remains for the instance that released the memory, then that first instance of SQL Server will perform poorly. Setting the minimum memory option will ensure that an instance does not release too much of its memory.
![]() Note SQL Server does not acquire all of the memory in the maximum or minimum memory configuration settings immediately when the instance starts. The minimum memory setting ensures that an instance, having acquired more than the minimum, does not reduce its memory below the minimum that you specify. However, the minimum memory setting does not force the instance to acquire that much memory at startup.
Note SQL Server does not acquire all of the memory in the maximum or minimum memory configuration settings immediately when the instance starts. The minimum memory setting ensures that an instance, having acquired more than the minimum, does not reduce its memory below the minimum that you specify. However, the minimum memory setting does not force the instance to acquire that much memory at startup.
Enabling Address Windows Extensions
Address Windows Extensions (AWE) is one of the configuration options that you should be aware of if you are running on 32-bit operating systems. Enabling AWE allows a 32-bit SQL Server to use more than 2 or 3 GB of RAM. You can enable AWE from the Server Properties dialog, as previously shown in Figure 6-19.
AWE is not applicable in 64-bit operating systems because 64-bit architecture does not have the same memory restrictions as 32-bit systems. There are additional configurations that you may want to consider prior to enabling AWE. The following list describes some configuration options:
How much memory do you have? If your server only has 4 GB of memory, do you need to enable AWE?
Do you need to enable
/3gb? The/3gbswitch in the boot.ini file allows processes to use more than 3 GB of memory.Is the
/paeswitch enabled on your server? To take advantage of 4 GB of memory, you must enable the/paeswitch.Can you enable the Lock Pages in Memory option? Lock Pages in Memory identifies accounts that use a process to keep data pages in memory. That minimizes the amount of paging to virtual memory on disk. You have to enable Lock Pages in Memory on 32-bit systems in order to turn on AWE.
Unfortunately, those configuration options are system dependent and are difficult to cover in such a small section. So I encourage you to look for AWE in SQL Server Books Online or see the topic “Awe-Enabled Option” at http://msdn.microsoft.com/en-us/library/ms190731.aspx for more details.
Specifying the Backup Compression Default
The Backup Compression Default option enables you to compress backups without specifying the WITH COMPRESSION or WITH NO_COMPRESSION options to your backup statements. By default, SQL Server 2008 Enterprise Edition disables backup compression during the installation process. If you have determined that backup compression is your preferred choice for performing backups, then enable compression by default to remove the requirement of specifying that you want your databases compressed each and every time you initiate a backup.
You can specify backup compression by default from the Database Settings section of the Server Properties dialog, shown in Figure 6-20.
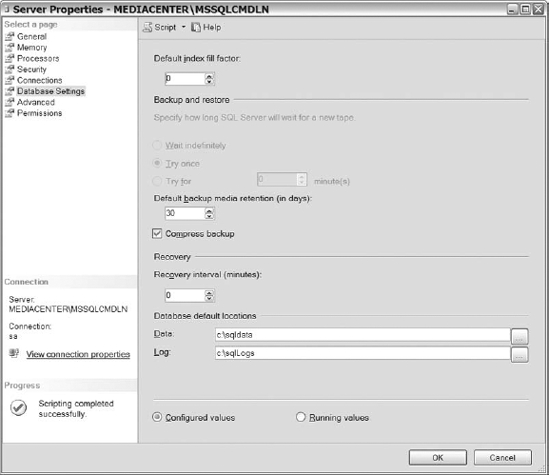
Figure 6-20. The Database Settings section of the Server Properties dialog
And you can specify compression by default through a stored procedure call. For example, the following will enable compression by default:
EXEC sys.sp_configure N'backup compression default', N'1'

GO

RECONFIGURE WITH OVERRIDE

GO
Specifying compression by default can save you time by eliminating one possible avenue for mistake. Imagine yourself on the night when you have to back up the database before applying a major change. You execute the backup command that you have been running for years, and it runs for hours. Too late, you realize that you forgot to include compression as part of that command. What makes matters worse is the fact that your server doesn't have enough space to keep that uncompressed backup on the server. So you have to back up the database again, after having lost time that you dearly need for the major change that your boss wants in place by 8:00 AM. Don't put yourself in the position of having to request compression each and every time you make a backup. Enable compression by default if you prefer to compress your backups.
![]() Note We will discuss backup compression in more detail in Chapter 11.
Note We will discuss backup compression in more detail in Chapter 11.
Enabling Login Failure Auditing
We like to track successful and failed logins on the SQL Server instances that we support. Monitoring the failed login attempts to SQL Server enables you to identify and track down unwanted login activity against it. We also track successful logins to help identify who was logged into the system when unexpected actions occur. You can enable login auditing from the Security section of the Server Properties dialog, as shown in Figure 6-21.
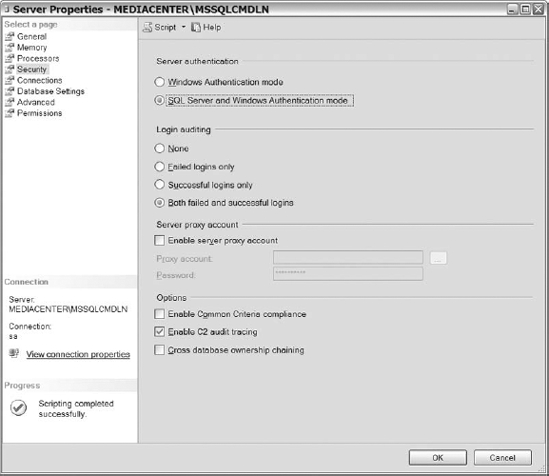
Figure 6-21. The Security section of the Server Properties dialog
You may also invoke auditing via a call to the xp_instance_regwrite stored procedure. (That extended stored procedure allows you to write directly to your system registry.) For example:
USE [master]

GO

EXEC xp_instance_regwrite N'HKEY_LOCAL_MACHINE',_

N'SoftwareMicrosoftMSSQLServerMSSQLServer', N'AuditLevel', _ REG_DWORD, 3

GO
Unfortunately, many of us (myself included) work in environments where we do not get 100% control over who has access to SQL Server. Someone in management has forced you to grant Insert, Update, and Delete permissions to non-DBA personal, and you are terrified about the mistakes that they can make. Logging successful logins to SQL Server allows you to identify when such individuals are in your system and can help you narrow down which individuals to pursue when all the data is deleted from a table and no one owns up to it.
Enabling Dedicated Administrator Connections
SQL Server 2008 provides a method for members of the sysadmin group to connect to an unresponsive instance of SQL Server, even when other connections are failing. This feature improves the database administrator's ability to troubleshoot problems within SQL Server.
By default, in order to utilize a dedicated administrator connection, you must connect on the server itself through SQLCMD or SQL Server Management Studio. Luckily, Microsoft allows you to enable remote dedicated administrator connections, which will allow you to connect to the dedicated administrator connection from across the network. Enable remote dedicated connections for administrators by executing the following code from a query window:
EXEC sys.sp_configure 'remote admin connections' ,1

GO


RECONFIGURE

GO
You should now be able to log in as an administrator, not only locally but across the network as well. This ability is invaluable when your server is in trouble and normal logins are not going through.
Disabling Default Trace
By default, SQL Server 2008 enables a server-side trace to start when the SQL Server service starts for an instance. When you start a SQL Server instance, the trace captures some database options, errors and warnings, full-text information, objects creation, deletion and alters, as well as security and memory changes on the server. The trace is light-weight and should not cause performance problems. However, if for some reason you do not want this trace running, then you can disable it by executing the following commands:
EXEC sys.sp_configure 'default trace enabled' ,0

GO


RECONFIGURE

GO
Think twice before disabling the trace because it can help you capture events when they occur. How many times have you been asked questions about who performed a certain action or at what time the action occurred? If you do not have a trace running at the time the action occurred, you will be unable to provide an adequate answer to such questions. With the default trace, however, such questions may be easily answered.
Enabling Use of the CLR (Common Language Runtime)
The clr enabled option within SQL Server 2008 allows SQL Server to run assemblies. By default, the option is disabled, or set to zero. That means assembly executions aren't allowed or permitted to run within SQL Server 2008. You can enable the use of the CLR as follows:
Changes to the clr enabled option are effective immediately. You do not need to restart your service. Disabling CLR after it has been enabled causes any application domains that include user assemblies to unload immediately following the RECONFIGURE statement.
Choosing Lightweight Pooling
Lightweight pooling is an option available in SQL Server 2008 that can potentially help in multiprocessor environments that experience heavy context switching. Lightweight pooling potentially increases throughput, which can increase performance.
Enable lightweight pooling by executing the following code:
EXEC sys.sp_configure sp_configure 'lightweight pooling', '1'

GO


RECONFIGURE

GO
Unfortunately, you cannot enable common language runtime after the enabling of lightweight pooling. So spend a little time contemplating your need for the CLR prior to enabling lightweight pooling. If you do enable the feature, SQL Server will generate a message to remind you that you also must disable the use of the CLR.
![]() Caution We have experienced problems with our linked server queries failing after our having enabled lightweight pooling. Our particular problems became apparent upon restart of our services. If you are working in an environment with linked servers, then make sure you test thoroughly before enabling lightweight pooling.
Caution We have experienced problems with our linked server queries failing after our having enabled lightweight pooling. Our particular problems became apparent upon restart of our services. If you are working in an environment with linked servers, then make sure you test thoroughly before enabling lightweight pooling.
Enabling a Query Governor Cost Limit
Have you ever identified resource-intensive queries on your system that cause all sorts of performance problems? We especially get annoyed with users who execute queries and forget the where clause and the nolock hint on the largest table in our Very Large Databases (VLDB). To avoid such problems, you can specify a maximum limit in seconds for queries executed against your server. Such a limit is termed a query governor cost limit. Before you can specify a limit in seconds, you must enable the option as follows:
We know this option sounds great, and it can definitely be a method for improving performance. However, we encourage you to consider the consequences of preventing certain processes from running against your server. Believe me, we're on your side—we would love to make developers write better code, and preventing a process from running is one way to force developers to write that code better. Unfortunately, your boss's boss, who really needs the results from a long-running query, may not be as understanding. Make sure you set a query limit decision wisely. The Resource Governor that was added in SQL Server 2008 actually provides much more flexibility when dealing with resource-intensive queries.
xp_cmdshell
xp_cmdshell is a configurable option that allows you to disable or enable the use of the extended stored procedure xp_cmdshell. xp_cmdshell is used to execute command-line statements from within the database engine. If you need it though, you can enable xp_cmdshell by executing the following code:
EXEC sys.sp_configure 'xp_cmdshell' ,1

GO


RECONFIGURE

GO
Be careful! By default, the xp_cmdshell stored procedure is disabled during install and should remain disabled if it is not required by the application. Think about it—once a user gains access to your system, he has the power to cause all sorts of havoc on your server.
Miscellaneous Configuration Options
In this section, we describe a set of configuration options requiring more expertise before enabling on your SQL Server. Most of these setting have a direct impact on how your SQL Server will process queries, and we strongly recommend testing, and hopefully load testing, before enabling these options in your production environment. To be honest, we do not tweak all of the configuration options we describe here, but we think they are important to know about. Here's the list:
- Blocked Process Threshold: Amount of time a process is blocked before a blocked process report is generated. The threshold is measured in seconds, and alerts can be generated when these events are triggered.
EXEC sys.sp_configure 'blocked process threshold' ,1

GO


RECONFIGURE

GO - Cursor Threshold: Threshold used to determine if the cursor will be processed synchronously (wait on all the rows to be returned) or asynchronously (allows users to get data from cursor while it retrieves the data), depending on the amount of rows returned for the result set.
EXEC sys.sp_configure 'cursor threshold' ,1

GO


RECONFIGURE

GO - Cost Threshold for Parallelism: Threshold used to figure out when a query should be executed in parallel versus serially. In other words, when this threshold is surpassed, the query will be executed using parallelism.
EXEC sys.sp_configure 'cost threshold for parallelism' ,1

GO


RECONFIGURE

GO - Maximum Degree of Parallelism: Threshold used to determine the maximum number of processors that can be used to process a single query during a parallel execution.
EXEC sys.sp_configure 'max degree of parallelism' ,1

GO


RECONFIGURE

GO - Query Wait: Threshold in seconds that determines the amount of time a query waits on resources before it times out. By default, the query wait time is set to wait 25 times of the estimated cost of query.
EXEC sys.sp_configure 'query wait' ,60

GO


RECONFIGURE

GO - User Connections: Sets the number of user connections for an instance of SQL Server.
EXEC sys.sp_configure 'user connections' ,1000

GO


RECONFIGURE

GO
Preproduction Tasks
Once you have configured your SQL Server instances, you will want to continue to prepare your server for production. Depending on your environment, configuring SQL Server for production will require various processes and procedures. The following sections will provide you with some of the steps that we go through prior to deployment of our SQL Server instances into production from a server and database perspective.
Server Tasks
Following are some things you should do, or at least consider doing, from a server level prior to placing your server into production:
- Apply Patches: Before your new SQL Server is added to production, ensure that the patch level of the server is at its correct level. We are not recommending that you install a service pack that your environment is not ready for, but consider applying less risky patches like security patches. Applying currently available patches before going live in production should increase the uptime of your new SQL Server because you will only have to bring the server down afterward to apply new patches as they are released by Microsoft.
- Test Your IO Subsystem: In Chapter 2, we discussed the importance of testing your IO subsystem before SQL Server is placed into production. If you have not simulated a workload on your IO subsystem, then we encourage you to go out on the Web and download some free testing tools. Do not wait until SQL Server is running in production to identify problems with the setup and configuration of your IO subsystem. Spend a little time up front, learn how to effectively utilize an IO-testing tool, and make sure that your system is ready for production.
- Run the Best Practices Analyzer: SQL Server 2000 and SQL Server 2005 both had applications published by Microsoft that compared the SQL Server and Windows configuration settings against Microsoft's recommended best practices to determine if there were potential issues. In SQL Server 2008, use some of the predefined policies of Policy Based Management (see Chapter 7) to ensure that your SQL Server instance is in line with Microsoft best practices. You can also review the options checked by SQL Server 2005's Best Practices Analyzer and ensure that you are following the best practice items that you are concerned about. Make the time to validate your server against Microsoft's best practices, even if doing so requires more work than you would prefer. The amount of time that a best practices check can potentially save you in the long run is well worth the effort.
Database Tasks
Following are some tasks that you should perform for each database that you plan to deploy into production. The tasks are not mandatory, but they can prove beneficial and can save you headaches down the road.
- Size data and log files: When creating new databases, options exist to determine the initial size of the database data and log files to the size of your choice. If you have a general idea about the expected size of the database, then take advantage of this option and allocate space for the data and log files, respectively. By initializing the data and log files to a projected size, you will minimize the number of data and log file growths because of the database needing more space. Saving data and log file growths will ultimately save CPU cycles and disk IO, dedicating more resources to processing application requests.
- Enable Autogrowth: Many database administrators argue that you should not set up your database data and log files to autogrow by a certain percentage or fixed size. We have heard many administrators say that you should monitor your files enough so that you can grow them when necessary. Our advice to you is to set up the autogrowth option in whatever way that enables you to keep production running (see Figure 6-22 for an example). If you manage multiple servers and are constantly fighting fires, chances are that you don't have time to monitor data and log files to grow them manually. So set up the autopilot and ensure that your production databases keep running.

Figure 6-22. Autogrowth options for a log file
The flip side of that coin is to periodically review the autogrowth setting that you have set up to ensure that you are not wasting large amounts of space and increasing disk defragmentation. Growing your database and log files by 10% to 20% may have made sense when your database was 10 to 20 GB. Now that your database is 100 GB, you may want to consider revising some of those percentages. Regardless of what option you select, make sure you educate yourself enough to understand what options are available to you in the event that you manage the data growth. Keep in mind, your data drive and log drive may be running out of space because of the autogrowth option selected. Modifying how your database and log files grow may buy you some more time before needing to purchase additional space.
- Disable autoshrink: Shrinking your data or log files is a process that removes any unused free space from those files. Configuring the database to automatically shrink the data and log files is simply a bad idea. The main reason why we do not like to enable this option stems from the lack of control over when the process will start. Unfortunately, we have seen this option cause problems in our environment.
- Set key database options: In SQL Server, options are available that allow you to configure the behavior of a database. Following are some of the options that we frequently specify.
Auto Create Statistics: Automatically creates statistics on columns without indexes that are used in the
whereclause of queries.Auto Update Statistics: Automatically updates statistics needed by queries by the optimizer based on changes within the data.
Cursor Default: Allows cursors created within a single procedure or trigger to be referenced by any process using that connection.
Parameterization: Determines how queries will be parameterized via default rules for the database or all queries in the database.
Recovery: Based on your data recovery requirements, this option determines how the transaction log will be used.
SQL Options: Various options that can be enabled or disabled for the entire database, depending on the requirements you have been supplied with.
Maintenance and Monitoring
Database administrators must ensure that their databases are available to respond to application queries at the required response rate and that data can be recovered in the event of server failure. To that end, you should at least do the following before going into production with a new server and database:
- Create a backup and recovery strategy: Fortunately, Microsoft provides methods for backing up and maintaining your databases. However, at a minimum, before going into production, you definitely want to create a backup strategy that meets the business requirements. (We cover backups, restores, and maintaining your databases in depth in Chapters 11, 12, and 13.)
- Create a plan to maintain indexes and integrity: Commands and features exist to maintain indexes and check the integrity of your databases. You should put together a plan to accomplish these. (See Chapter 13 for more information about ongoing maintenance.)
- Create processes to monitor your server: Setting up processes to monitor and capture SQL Server performance is critical to supporting and base-lining the application. In a perfect world, organizations would purchase software to aid in the monitoring of your server. Unfortunately, purchasing software is not always an option, but expectations still exist for you to proactively monitor your system to identify problems. In Chapter 14, we discuss monitoring your server and the different methods and tactics that can be used if you don't have another application to assist you. Regardless of the method used to monitor your server, strive to have processes in place prior to placing your server into production.
Summary
As we conclude this chapter, we hope that you have a better understanding of the configuration options that we consider prior to putting SQL Server into production. Prior to amending options in the SQL Server Configuration Manager, SQL Server, or the databases, spend some time understanding the impact of the changes on your system. As a database administrator, part of your responsibilities include availability and performance. Modifying configuration options incorrectly will negatively impact the system availability or its performance. Be careful: Test the changes if you can on servers that resemble your own production environment as much as possible.
We encourage you to develop a checklist prior to deploying SQL Server 2008 into production to include the SQL Server Configuration Manager, SQL Server, and database options that you would like reviewed along with the preproduction considerations. That way all database administrators within the organization have a consistent way of ensuring the review and modification of configuration options.