Chapter 20
Working with Photos
While previous versions of the iPhone have included a camera, the camera on the current iPhone is truly incredible. The iPhone 4S comes with not one, but two cameras: an 8.0-megapixel, f/ 2.4 aperture camera on the back with a LED flash; and a 0.3-megapixel VGA camera on the front for video chats and self-portraits. You can learn more about using the front-facing camera in the FaceTime app in Chapter 11: “Video Messaging and Skype.”
Viewing and sharing your pictures on the iPhone is truly a joy, due in large part to its beautiful high-resolution screen. In this chapter, we will discuss the many ways to get pictures onto your iPhone. We will also show you how you to use the touch screen to navigate through your pictures, as well as how to zoom in and out and manipulate your photos.
TIP: Did you know you can take a picture of the entire screen of your iPhone by pressing two keys simultaneously? This is great to show someone a cool app or to prove that you got the high score on Tetris!
Here's how to get it done: press both the Home button and the On/Off/Sleep key on the top-right edge (you can press one key, hold it, and then press the other). This is a little tricky and takes some practice. If you have done this correctly, the screen should flash, and you'll hear a camera sound. The screen capture you have taken will be in your Camera Roll album in the Photos app.
Taking Photos Quickly
Apple has recently added some great shortcuts to help you take photos more quickly and more conveniently. If your child is in the middle of an especially adorable or memorable moment, if you come across a rare bird in the woods, or if you need to grab a fast photo of something suspicious in your neighborhood, then you can use one of the following techniques to snap a picture quickly:
- Double-click the Home button to bring up a Camera icon right on the Lock screen. Tapping the Camera icon will take you right to the Camera app, ready to take a photo. This means you no longer need to unlock your phone, swipe to find the Camera app, and then wait for it to launch.
- Use the Volume Up hardware button to snap your photo. Rather than trying to hit the camera software button on the screen, you can use something more tactile and similar to traditional camera controls.
- Take multiple pictures. Apple claims it has gotten the time it takes to shoot the first photo down to a remarkable 1.1 seconds; however, the second photo—and every photo thereafter—now takes only 0.5 seconds. This is especially handy for sports or any other fast-moving activity. Just keep pressing the volume up key as fast as you can.
- Auto-focus and face detection mean snapshots of your friends and family automatically come out sharper and with better exposure.
Using the Camera App
The Camera app should be on your Home page—usually on the first screen at the top. If you don't see it, then swipe left or right until you find it.

Touch the Camera icon and the shutter of the camera opens with an animation on your screen.
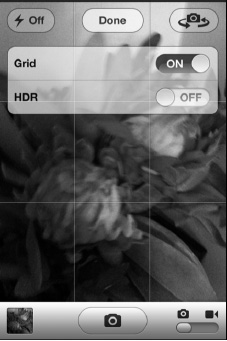
Once the shutter opens, you will find controls along the top to set the Flash to On, Off, or Auto; Options to set the Grid overlay and HDR (high dynamic range) to On or Off; and a toggle to switch between the front-facing and rear-facing cameras. Along the bottom, you'll find a thumbnail to take you to the Camera Roll album, the Camera button to take a picture, and a slider to switch between Still Photography and Video Recording modes.

TIP: You can also take a picture or start a video recording by pressing the Volume Up hardware button.
Geo-Tagging
Geo-tagging is a feature that puts your GPS (geographic positioning system) coordinates into the picture file. If you upload your pictures to programs like Flickr, the coordinates of your picture can be used by your friends to locate you and locate the site where the picture was taken.
NOTE: For Mac users, iPhoto uses geo-tagging to put photos into the Places category of iPhoto.
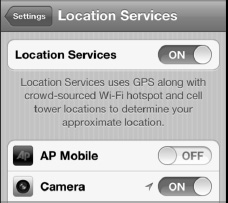
If you have Location Services set to ON when you start the camera (see Chapter 1: “Getting Started”), you will be asked if it is OK to use your current location.
To double-check this setting, do the following:
- Start your Settings app.
- Go to General.
- Touch Location Services. You will see a screen like the one here.
- Make sure the switch next to Camera is toggled to ON.
Taking a Picture
Taking a picture is as simple as pointing and shooting, but there are some adjustments that you can make if you choose.
Once your camera is on, center your subject in the screen of your iPhone.
When you are ready to take a picture, just touch the Camera button along the bottom or press the Volume Up hardware button (the one with the + on it) on the side of your iPhone. You will hear a shutter sound, and the screen will show an animation indicating that the picture is being taken.
![]()

Once the picture is taken, it will drop down into the window in the lower-left corner. Touch that small thumbnail, and the Camera Roll album of your Photos app will load.
Using the Zoom
The iPhone includes a 5x digital zoom..
NOTE: A digital zoom is never as clear as an analog zoom, so be aware that picture quality is usually degraded slightly when using the zoom.
To use the zoom, just touch the screen with two fingers and pinch to zoom in or out. The further you spread your fingers apart, the further you will zoom out. Once the zoom begins, a Zoom slider will also appear to help you change the zoom level.

Using the Flash
Your iPhone has a built-in LED flash. The default flash setting is Auto, but you can also manually turn set it to On or Off:

- Touch the Flash icon in the upper-left corner.
- Touch either On, Off, or Auto.
TIP: We recommend keeping the Flash setting on Auto; however, if you notice that a photo looks over-exposed, just touch the Flash icon to set the flash to Off.
Camera Options
To help you take better pictures, Apple has built in both Grid lines and a version of HDR (high dynamic range) photography.
The Grid option overlays two horizontal and two vertical lines over the screen. This can help you properly compose your shots. It can also help you make sure faces and eyes look great for portraits, items look great for still life images, and the scenery is balanced for landscapes.
HDR takes not only a regular picture, but an underexposed version and an overexposed version. It then merges them together to give you better detail in both shadowy and lit areas.
Switching Cameras
As mentioned previously, the iPhone comes with two cameras: an 8.0 megapixel camera on the back for most photography and a VGA camera (640 x 480) on the front for self-portraits or for use in FaceTime video calls (see Chapter 11: “Video Messaging and Skype”).


To switch between the cameras, do the following:
- Touch the Switch Camera icon from the Camera app.
- Wait for the camera to switch to the front-facing camera and line up the shot.
- Touch the Switch Camera icon again to switch back to the standard camera.
TIP: Because of the placement of the front-facing camera, faces can look somewhat distorted. Try moving your face back a bit and adjusting the camera angle to get a better image.
Viewing Pictures You Have Taken
Your iPhone will store pictures you take on the iPhone in what is called your Camera Roll. You can access the Camera Roll from inside both the Camera and Photos apps. In the Camera app, touch the Pictures icon in the bottom-left corner of the Camera screen.

Once you touch a picture to view, you can swipe through your pictures to see all the pictures in the Camera Roll.

![]() To get back to the Camera Roll, press the Camera Roll button in the upper-left corner.
To get back to the Camera Roll, press the Camera Roll button in the upper-left corner.
 To take another picture, touch the Done button in the upper-right corner.
Editing Photos
With iOS 5 you can now do basic photo editing right on your iPhone. You can rotate your photos; enhance their exposure, contrast, and levels; crop them; and even automatically remove red-eye from pictures of your friends and family.
Follow these steps to edit a photo:
- Browse to the photo you'd like to edit.
- Tap the Edit button at the top right.
Follow these steps to rotate a photo:
- Tap the Rotate arrow
 button at the bottom left to turn your photo 90 degrees counter-clockwise (to the left).
 - Tap the Rotate button again to keep rotating in 90-degree increments.
- When you've rotated the image to the position you want, tap the yellow Save button at the top right.
Similarly, follow these steps to auto-enhance a photo:
- Tap the Auto-Enhance
 magic wand button.
 - If you like the results, tap the yellow Save button at the top right.
- If you don't like the results, tap Auto-Enhance again to set it to Off.
- Tap Cancel to exit Auto-Enhance mode.
Follow these steps to remove red-eye from a photo:
- Tap the Red-Eye
 button to activate red-eye removal.
 - Tap each red eye in your photo to apply reduction (i.e., remove the red color from the eye).
- If you like the results, tap the Apply button at the top left.
- If you don't like the results, tap each red eye again to remove the reduction.
- Tap Cancel to exit this mode.
Finally, follow these steps to crop a photo:
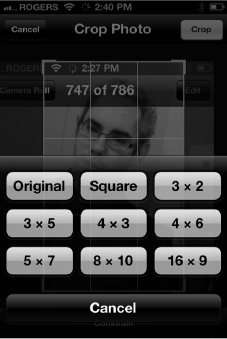
- Tap the Crop
 button on the bottom right. A nine section grid will appear over the photo.
 - Touch an edge or corner of the grid and drag to make the crop area taller, shorter, thinner, or wider.
- Touch inside the grid and drag to move the photo around behind the grid.
- Pinch and zoom to make the photo bigger or smaller inside the grid.
- Tap the Constrain button to choose from a list of standard aspect ratios, including Original;Square; traditional photo ratios like 3 x 2, 4 x 6, and 8 x10; TV ratios like SD 4 x 3 and HD 16 x 9; and so on.
- If you're happy with the crop, tap the yellow Crop button at the top right to apply it.
- If you don't like the crop, tap the Cancel button at the top left to return to the Edit screen.
Getting Photos onto Your iPhone
You have many options for loading photos onto your device:
- Sync using iCloud or iTunes: Probably the simplest way to load photos onto your iPhone is to use iCloud or iTunes to sync photos from your computer (see Figure 20–1). We describe this in detail in Chapter 3: “Sync withiCloud, iTunes and More.”
- Receive as email attachments: While this is not useful for large numbers of pictures, it works well for one or even a few photos. Check out Chapter 17: “Communicate with Email” for more details about how to save attachments. (Once saved, these images show up in the Camera Roll album.)
- Save images from the Web: Sometimes you'll see a great image on a web site. Press and hold it to see the pop-up menu, and then select Save Image. (Like other saved images, these end up in the Camera Roll album.)
- Download images from within an app: A good example of this is the wallpaper image shown in Chapter 8: “Personalize and Secure.”
- Sync with iPhoto (for Mac users): If you use a Mac computer, your iPhone will most likely sync automatically with iPhoto. Here are a few steps to get the sync feature in iPhoto up and running:
- Connect your iPhone and start the iTunes app.
- Go to the Photo tab along the top row of Sync Options.
- Choose the Albums, Events, Faces, or Places you want to keep in sync with the iPhone.
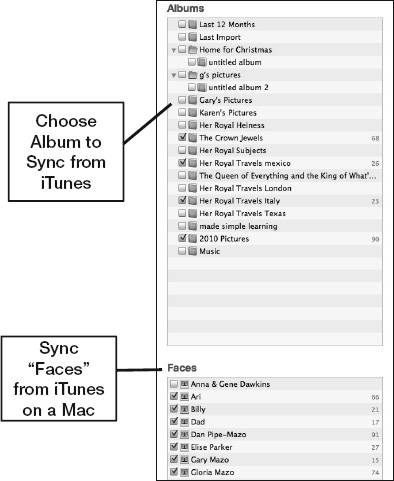
Figure 20–1. Choosing albums, faces, or events from iTunes to sync with the iPhone
- Drag and drop (for Windows users): Once you connect your iPhone to your Windows computer, it will appear in Windows Explorer as a portable device, as shown in Figure 20–2. Follow these steps to drag and drop photos between your iPhone and computer:
1. Double-click the iPhone image under Portable Devices to open it.
2. Double-click Internal Storage to open it.
3. Double-click DCIM to open it.
4. Next, you may see one or more folders with strange names like: 823WGTMA, 860OKMZO, and 965YOKDJ. Try double-clicking to open each one. One of these will have the photos or videos you seek.
5. You will see all the images in the Saved Photos album on your iPhone.
6. To copy images from your iPhone, select and then drag and drop images out of this folder onto your computer. You cannot copy images to your iPhone using this drag-and-drop method. Instead, you can use iTunes or iCloud.
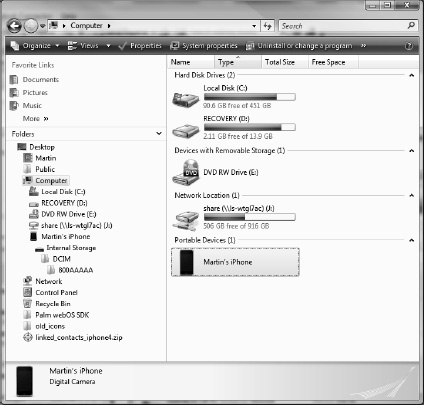
Figure 20–2. Windows Explorer showing the iPhone as a portable device (connected with a USB cable)
TIP:Selecting Multiple Images in Windows
You have several ways to select images in Windows: you can draw a box around the images, click a single image, or press Ctrl+A to select them all. You can also hold down the Ctrl key and click individual pictures to select them. Right-click one of the selected pictures and choose Cut (to move) or Copy (to copy) all of the selected images. To paste the images, press and click any other disk or folder (e.g., My Documents), and then navigate to where you want to move or copy the files. Finally, right-click again and select Paste.
Viewing Your Photos
Now that your photos are on your iPhone, you have a few very cool ways to look through them and show them to others.
Launchingfrom the Photos Icon
If you like using your Photos app, you might want to place its icon in your Bottom Dock for easy access if it's not already there (see Chapter 6: “Icons and Folders”).
To get started with photos, touch the Photos icon.

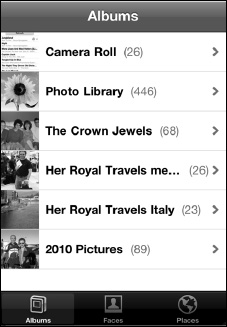
The first screen shows your photo albums, which were created when you set up your iPhone and synced with iCloud or iTunes. In Chapter 3: “Sync with iCloud, iTunes and More,” we showed you how to choose which photos to sync with your iPhone. As you make changes to the library on your computer, they will be automatically updated on your iPhone.
If you're using iCloud's Photo Stream feature, this is also where you'll find your Photo Stream images.
Choosing a Library
From the Photo Albums page, touch one of the library buttons to show the photos in that album. In the image to the right, we touched a photo library, and the screen immediately changed to show us thumbnails of the pictures in this library.
Tap and drag your finger up and down to view all the pictures in a library. You can also flick up or down to quickly move throughout the pictures in a library. You can also flick up or down to quickly move throughout the album.

Managing Libraries
iOS 5 introduces the ability to add new albums, move photos between albums, and delete albums right on your iPhone.
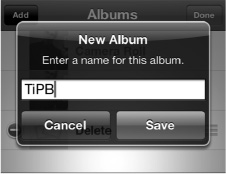
Follow these steps to add a new album:
- Tap the Edit button on the top right.
- Tap the Add button that appears on the top left.
- Enter a name for your new album.
- Tap Done at the top right.
Follow these steps to delete an album:
- Tap the Edit button on the top right.
- Tap the red Circle icon to the left of the album you want to delete.
- Tap the red Delete button to confirm.
Finally, follow these steps to move photos between albums:
- Tap the Action button at the bottom left.
- Tap the pictures you want to move.
- If you tap a picture by accident, just tap it again to deselect it.
- Tap the Add To button on the bottom.
- Choose Add to Existing Album if you already have an album that you want to move the pictures into. Or, you can choose Add to New Album if you want to create a new album now.
Working with Individual Pictures
Once you locate the picture you want to view, just tap it. The picture then loads onto the screen.
NOTE: Your pictures will not usually take up the full screen on your iPhone if they were shot in Landscape mode.
TIP: The picture here was shot in Landscape mode; to see it in full screen, simply turn your iPhone on its side or double-tap

Moving Between Pictures
The swipe gesture is used to move from one picture to the next. Just swipe your finger left or right across the screen, and you can move through your pictures.
TIP: Drag your finger slowly to move more gradually through the picture

When you reach the end of an album, just tap the screen once and you'll see a tab in the upper-left corner that has the name of the photo album. Touch that tab and you'll return to the thumbnail page of that particular album.

To get back to your main photo album page, touch the button that says Albums in the top-left corner.

Zooming in and out of Pictures
As described in the “Getting Started” section of the book, there are two ways to zoom in and out of pictures on your iPhone: double-tapping and pinching.
Double-Tapping
As the name implies, double-tappingis a quick double-tap on the screen to zoom in on the picture (see Figure 20–3). You will zoom in on the spot where you double-tap.To zoom out, just double-tap once more.
See Chapter 1: “Getting Started” for more information on double-tapping.
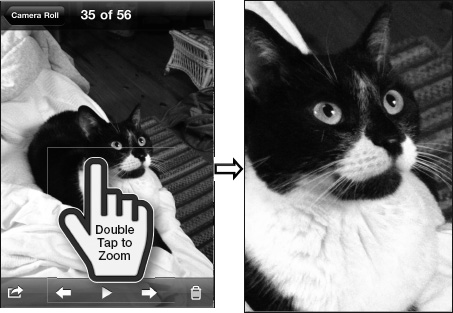
Figure 20–3. Double-tapping a picture to zoom in on it
Pinching
Also as described in Chapter 1: “Getting Started,” pinching is a much more precise form of zooming in.While double-tapping zooms in or out only to one set level, pinching really allows you to zoom in or out just a little bit or quite a lot.
To pinch, hold your thumb and forefinger close together and then slowly (while touching the screen) separate them, making the picture larger. To zoom out, start with your thumb and forefinger apart and move them together.
NOTE: Once you have activated the zoom using either method, you will not be able to swipe easily through your pictures until you return the picture to its standard size.
Viewing a Slideshow
You can view the pictures in your photo album as a slideshow if you so desire. Just tap the screen once to bring up the on-screen soft keys. In the center, you will see a Slideshow Play button—touch it once to start the slideshow. You can start the slideshow from any picture you are viewing.

Selecting Photos in the Settings app lets you adjust how long each picture remains on the screen and other settings such as Repeat and Shuffle (see Figure 20–4). To end the slideshow, just tap the screen.
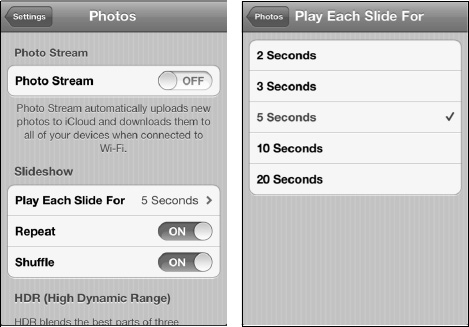
Figure 20–4. Configuring your slideshow
Using a Picture As Your iPhone Wallpaper
We show you how to select and use a picture as your iPhone wallpaper (and other wallpaper options) in Chapter 8: “Personalize and Secure.”
NOTE: You can have different pictures for your Home screen and Lock screen, or you can use the same picture for both.
Emailing or Tweeting a Picture
As long as you have an active Internet connection (Wi-Fi or 3G; see Chapter 4: “Connect to the Network”), you can send any picture in your photo collection via email or post it to Twitter. Tap the Options button on the thumbnail bar—this is the button furthest to the left on the bottom row of soft keys. If you don't see the icons, tap the screen once.

To mail the picture, choose the Email Photo option and the Mail app will automatically launch.
Tap the To field as you did in Chapter 17: “Communicate with Email,” and then select the contact to receive the picture. Tap the blue Plus Sign (+) button to add a contact.
Type in a subject and a message, and then touch Send in the upper-right corner—that's all there is to it.

To tweet the picture, choose the Tweet option and a Twitter sheet will automatically appear. Just fill out the message you want to be shown with your picture and hit the Send button.
NOTE: The Tweet option will only appear if you've entered your Twitter username and password in the Settings app.

Share, Copy, Print, or Delete Several Pictures at Once
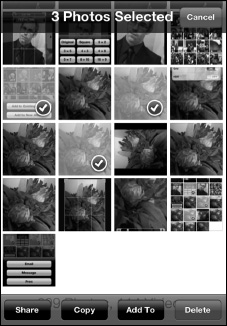
If you have several pictures you want to email, message, copy, print, or delete at the same time, you can do so from the thumbnail view:
- Tap the Action button at the bottom left.

- Tap the pictures you want to select.
- If you tap a picture by accident, just tap it again to deselect it.
- Choose an action from the bottom of the screen: Share (email, message, or print), Copy, Add To (a different photo album), orDelete.
NOTE: The Copy function allows you to copy and paste multiple pictures into an email message or other app. Share renames the image to photo.png, while copy-and-paste adds .png to the DCIM folder filename.
At the time of publishing, you could not share more than one video, nor could you share more than five pictures. This may change in future iterations of the software.
Assigning a Picture to a Contact
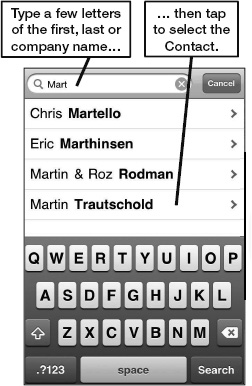
Chapter 18: “Contacts and Notes” shows you how to add a picture when editing a contact. You can also find a picture you like and assign it to a contact. Begin by finding the photo you want to use.
As you did when setting the wallpaper and emailing a photo, tap the Action button—the one furthest to the right of the upper row of soft keys. If you don't see the icons, tap the screen once.
When you touch the Action button, you'll see a drop-down list of choices: Email Photo, Message, Assign to Contact, Use as Wallpaper, Tweet, and Print.
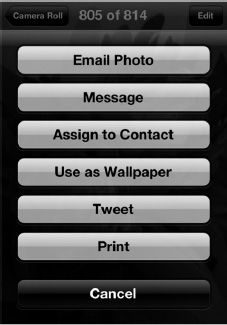
Touch the Assign to Contact button.
You will see your contacts on the screen. You can either perform a search using the Search bar at the top or just scroll through your contacts.
Once you find the contact that you would like to add as a recipient to the picture, touch that name.
You will then see the Move and Scale screen. Tap and drag the picture to move it; use pinch to zoom in or out.
When you have this set just how you want it, touch the Set Photo button to assign the picture to that contact.

NOTE: You will return to your Photo Library, not to the contact. If you want to double-check that the picture was set to your contact,then exit the Photo app, start the Contact app, and search for that contact.
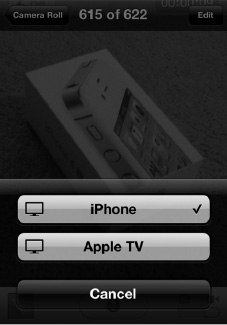
Viewing a Photo on Your Apple TV
Chapter 5: “AirPlay and Bluetooth” shows you how to use Apple's AirPlay feature to stream videos from your iPhone to your Apple TV over your local Wi-Fi network. Apple has built the same functionality into the Photos app, so you can easily beam your pictures to your big screen TV.
Follow these steps to send your photos to your Apple TV:
- Tap the AirPlay button.
- Choose Apple TV from the source list.
To move to the next photo, simply swipe from right to left, just as you would to switch photos on your iPhone. To move to the previous photo, swipe back from left to right.
To go back to viewing photos on your iPhone, tap the AirPlay button again and choose iPhone from the source list.
Deleting a Picture
You might wonder why you can't delete some pictures from your iPhone (the Trash Ca icon is missing).
For example, you'll notice that the Trash Can icon is not visible for any photo that is synced from iTunes. You can delete such pictures only from your computer library. The next time you sync your iPhone, they will be deleted.
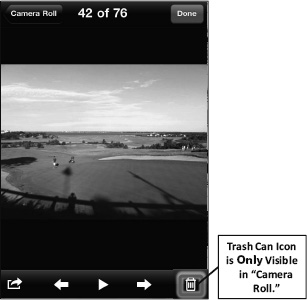
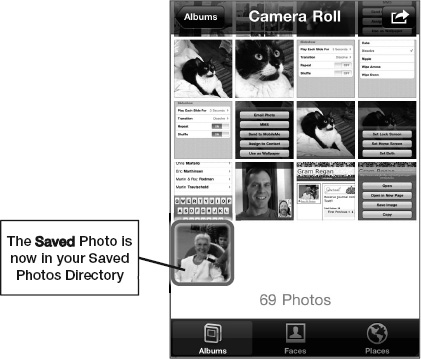
When you are looking through pictures in your Saved Photos (this folder is not synced with iTunes, but is instead comprised of pictures you save from email messages or download from the Web), then you'll see the Trash Can icon in the bottom icon bar. This Trash Can icon does not appear when you are viewing pictures from your Photos Library or other synced albums.
If you don't see the bottom row of icons, tap the photo once to activate them, and then tap the Trash Can icon. You will be prompted with the option to delete the picture.
Touch Delete Photo and the picture will be deleted from your iPhone.

Downloading Pictures from Web Sites
We have shown you how you can transfer pictures from your computer to your iPhone and save them from email messages.You can also download and save pictures right from the Web onto your iPhone.
CAUTION: We strongly encourage you to respect image copyright laws as you download and save images from the Web. Unless the web site indicates an image is free, you should check with the web site owner before downloading and saving any pictures.
Finding a Picture to Download
The iPhone makes it easy to copy and save images from web sites. This can be handy when you are looking for a new image to use as wallpaper on your iPhone.
First, tap the Safari web browser icon and type a search for iPhone wallpaper to locate a few sites that might have some interesting possibilities. (See Chapter 16: “Safari Web Browser” for help with this topic.)

Once you find a picture you want to download and save, tap and hold it to bring up a new menu of options that includes Save Image (among others), as shown in Figure 21–5. Choose this option to save the picture in your Saved Photos album.
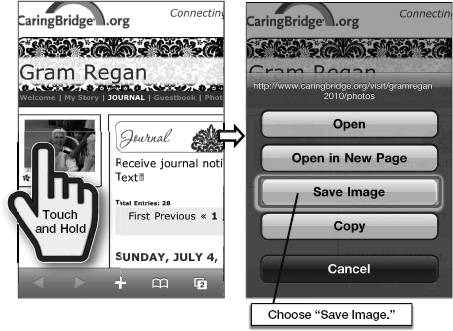
Figure 20–5. Saving an image from a web site
Now touch your Photo icon and you should see the picture in the Camera Roll album.