
Intents and Receivers
You have learned many of the techniques for designing activities. Thanks to the preceding chapter, you now also know about the lifecycle of an activity: when and how it starts, pauses, and ends.
All of the examples presented so far have consisted of just one activity. But if you remember the early part of the book, you will recall that I said Android’s architecture was built around the assumption that activities are cheap, easy to create and destroy, and should be plentiful to help build out the capabilities of any application you might wish to build. Activities, in the plural.
Each of our example applications, from button counters to phone dialers, has used a single activity to display its functionality (with the odd menu or action bar included). The single activity was displayed when you launched the application from the Android launcher. But if we create other activities for applications, how do we launch them? It is clearly too cumbersome to have dozens or hundreds of activities within an application each have their own launcher icon, so what’s a mobile platform to do?
Introducing Intents
The answer is in Android’s equivalent to a messaging and events system, known as intents. Android intents are built around concepts used in other event-based operating systems and environments such as Windows. Yet there are some key differences, which we will cover shortly.
At its heart, an intent is a message sent to the Android system indicating you want to do something. What the something is happens to be the first subtle difference between Android intents and other messaging and event systems. At times you might know exactly what action your application should take in response to a user request, and can pinpoint the precise activity to summon in response. But there are other times when your application won’t have precise control over what a user might want, nor have all the necessary data to directly invoke another activity, but the user is expecting something. Android has both cases covered by using the complementary part of the messaging system, known as the receiver.
Receivers are coded into an application in order to listen for various intents and respond in various ways. Receivers will be covered later in this chapter once intents are fully introduced. Intents and receivers together form the core of how multiple activities are wired together to create seamless applications, and how activities from other applications can be harnessed within your application to do work on your user’s behalf.
The Anatomy of an Intent
An Android intent is composed of two conceptual elements. First is the action desired, and second is the context associated with the desired action. There are a wide variety of actions, which we’ll cover shortly, but they include such straight forward concepts as “view this thing”, “make a new one of these”, and so forth. Context is more variable, but can best be thought of as a range of data to help make sense of the intent, direct the intent, and fuel the resulting activity.
At its simplest, the data takes the form of a Uri, such as content://contacts/people/1, which is the Uri for the first person in Android’s contact storage. If you bundle that Uri with an action like ACTION_VIEW, you have formed an intent. Android is able to interpret the intent, and will find an activity able to show the user a contact. Make the action something like ACTION_PICK on a Uri that points to a collection such as content://contacts/people, and Android looks for an activity that can present multiple contacts and provide the ability to pick from them.
A Uri with an action is not all that can be packaged in the context of an intent. There are four main additional elements you can include to expand the intent payload, and what Android and applications can do with it. These are part of an Intent object.
Specifying an Intent Category
Your intent’s category helps govern what activity can satisfy it. For instance, the activity where you intend your users to begin interacting with your applications should be of category LAUNCHER. This category is what marks an activity as being suitable for placement on the Launcher menu (home screens) for Android. Other activity/intent categories include DEFAULT and ALTERNATIVE.
There are times when you will not have, or will not know, a specific Uri for a collection of items such as contacts or wifi networks. To help Android find a suitable activity that can deal with sets of data in these situations, you can specify a MIME type. For instance, image-jpeg for an image file.
Nominating a Component
There are times when you know exactly which activity you want to invoke with your intent. One method is to specify the class of the activity in the component of the intent. Doing so makes life easier in that you no longer need to include other data elements in your intent. However, the approach is considered risky as it assumes knowledge about the implementation of the component class that violates the encapsulation programming principle.
Including Extras
Sometimes you have a mixed bag of additional data you wish to provide to the receiver for a variety of reasons. Where such data doesn’t fit into a Uri scheme or other part of the Intent object, you can provide a Bundle object that includes arbitrary additional information. There is, however, no way to force your receiver to make use of such a Bundle. The receiver might or might not use the Bundle based on how the activity was written.
Intent Actions for all Kinds of Purposes
There is an exhaustive list of intent actions and categories provided with the Android documentation at developer.android.com. I do not propose to rewrite all of that material here, but I will highlight some notable and interesting actions so have more idea of what is possible as we continue with the rest of the book.
- ACTION_AIRPLANE_MODE_CHANGED: The user of the device has toggled the airplane mode setting from on to off, or vice versa.
- ACTION_CAMERA_BUTTON: The camera button (hard button or soft button) was pressed.
- ACTION_DATE_CHANGED: The date has changed, meaning any application logic you have written that users timers, elapsed time, and so forth might be affected.
- ACTION_HEADSET_PLUG: The user of the device has attached or removed headphones from the headphone socket.
As you can see, intent actions cover not just what happens in your application, but also its environment on the device and even further.
Caution Google adds new actions to the set available for intents with each new release of Android. It also deprecates some older actions it deems no longer useful. As you maintain your application over time, it is prudent to check if any actions on which your application depends have been deprecated.
The component approach is not a reliable nor safe approach with activities from other applications. My point about the encapsulation principle is at the heart of this advice. Just as you wouldn’t want other people relying on your internal class names within your application, you shouldn’t rely on them in others’ applications. They can change in both signature and behavior, and indeed be removed entirely in subsequent versions.
The recommended pattern for targetting the application or service of your choice is to use Uris and MIME types appropriately. How then does one help Android determine which activites or receivers (such as a service) should receive a given intent? Android uses a scheme known as implicit routing to pass an intent on to all of the activities and so forth that should receive it. Implicit routing is based on a set of eligibility rules that must all be met. These rules are:
- The activity must signal its ability to handle the intent through the appropriate manifest entry (which we will discuss shortly)
- If a MIME type is part of the intent context, the activity must support the MIME type
- Every category in the event context must also be supported by the activity.
You can see how these rules helps narrow down the possible set of matching activities that can receive your intent.
Adding Intents to Your Manifest
Android uses a specification of intent filters placed in your AndroidManifest.xml file to indicate which components in a given application are able to be notified and respond appropriately to which intents. If your component’s manifest entry doesn’t list the intent action, it won’t be picked to receive such an intent. Think of it this way: the easiest way to filter-out all of the many intents that you don’t wish to handle is to use a “filter-in” approach to list the intents you do wish to consume.
When you create a new Android project, you actually create (or your IDE creates for you) your first intent filter as part of the base manifest file. For instance, Listing 12-1 is the manifest from your very first application, BeginningAndroid, in Chapter 2. In bold you can see the activity MainActivity and its specified intent file.
There are two key things to note here in the intent filter. We specify the MainActivity activity is of the LAUNCHER category, meaning any intent must also be of that category. We also specify the action android.intent.action.MAIN, which is used to signify that any intent looking for a MAIN-capable activity may be accepted. Your MainActivity could have more possible actions, and more categories, signifying it has more capabilities (assuming you’ve coded for them in the component class logic).
Your other activities for your application would not use the MAIN/LAUNCHER combination for action and category. While there are many actions and categories from which to chose, as mentioned earlier, a very common category is the DEFAULT category. The DEFAULT category is often used with view- and edit-style actions in combination with a <data> element describing the mimeType that an activity can deal with for viewing or editing. For example, Listing 12-2 shows an intent filter for a Notepad-like application.
Here in Listing 12-2 we have defined an activity, and through its intent filter nominated that the activity can be launched to deal with an intent asking to view content using the Uri for content with a vnd.android.cursor.dir/vnd.google.note mimeType. This intent could obviously come from your own application, such as following a user action from your launcher activity. Other applications that can create a well-formed Uri for this activity can also trigger it through an intent using that Uri.
ANDROID VERSION 6.0 MARSHMALLOW AND VERIFIED LINKS
With the launch of Android 6.0, known as Marshmallow, Google have enhanced some of the behavior regarding intents triggered from URLs. Historically, if you included a URL in your application as a link that your user could click, and they had an application installed that identified itself as synonymous with the URL’s website, then they would then see a system dialog asking if they wanted to complete the action with the application or the website. They would also be asked if they wanted this to happen just once, or always for the give application and website. Users became very frustrated at the unpredictable nature of whether they would see this dialog or not, and whether their preference would “stick”.
With Android 6.0, Google has introduced auto-verified links, which is a feature you can add to your code explicitly to make the link between URLs from a specific website and the companion application. This feature includes “smarts” to enable seamless authentication and save the user any extraneous dialogs when Android, the application, and the website team up to deal with the intent. The Android developer documentation is still being updated to cover this feature of auto-verified links.
Seeing Intent-launched Activities in Action
You have now seen enough of the theory and structure of intents to work on an example that should illustrate their power and convenience to you. You know that Android’s design philosophy is to have many activities to support the varied functionality of your application, such as a photo album application having one activity to view a single picture, another activity to view groups or albums (perhaps using the GridView), and maybe more activities for tagging, sharing with friends, and so on.
Before we get to implementation, there’s one last design choice to consider. If you launch an activity via an intent from another activity, how much knowledge about the state of the launched activity should the invoking activity be concerned with? Does your launching activity need to know when the second (or subsequent) activities are completed, and be passed some result?
Deciding on Activity Dependency.
Android answers the dependency-vs-no-dependency issue by providing two main ways to invoke an activity with an intent. The StartActivity() method is used to trigger Android to find the activity that best meets the criteria of the intent (remember the discussion earlier in the chapter, on action, category and mime types). That activity will be started, the intent will be passed to it for possible data processing, and the new and old activity will then continue on their separate lives. The activity from which you call StartActivity() will not be notified about the called activity’s eventual end. No data will be available to inspect, and so forth.
If that just-described approach sounds unappealing, perhaps because you want to mimic a parent-and-child relationship between your activities, there is an alternative. Let’s assume you decide to include a social media sharing option in your photo album application. To achieve this, you might need the user to complete a login process, and then return them to the sharing activity and provide it the details of the successful login (such as a login cookie, token, etc.). To support this closer dependency, Android provides the startActivityForResult() method.
The startActivityForResult() method passes not only the intent to the activity selected as the most appropriate, but also a calling number unique to the activity invocation. Your parent activity is then notified when the called activity ends through the onActivityResult() callback. The callback includes:
- The unique calling number associated with the specific child activity and the original startActivityForResult() method. You would typically use a switch pattern to determine which of your child activities had completed, and continue with your application logic appropriately
- A numeric result code from the stock Android-provide results of RESULT_OK and RESULT_CANCELED, plus any custom results you care to nominate of the form RESULT_FIRST_USER, RESULT_FIRST_USER + 1, etc.
- An optional String object with any data your called activity should return, such as the item chosen from a ListAdapter.
- An optional Bundle containing any additional information not found in the above options.
You should decide at design/coding time when to use either startActivity() or startActivityForResult(). While you can code to dynamically choose either at runtime, it can become quite elaborate to handle all the possible outcomes.
Now that you know how to choose the appropriate activity invocation method, you must first create the Intent object to use as the vessel from which to trigger the launch. If your aim is to launch another activity from within your own application, the most straight-forward technique is to create your intent directly and explicitly state the component you wish to reach. You would create a new Intent object as follows:
new Intent(this, myOtherActivity.class);
Here, you are explicitly referencing that you want to invoke your myOtherActivity activity. You do not need an intent filter in your manifest for this explicit invocation to work. Your myOtherActivity will be started whether it likes it or not! Obviously the onus is on you as the developer to ensure your myOtherActivity can respond accordingly.
Earlier in the chapter I explained how it was far more elegant to use a Uri and criteria-matching approach to have Android find an appropriate activity. You can create a Uri for any of the support schemes in Android. For example, here is a snippet creating a Uri for a contact in the contacts system:
Int myContactNumber = 1;
Uri myUri = Uri.parse("content://contacts/people/"+myContactNumber.toString());
Intent myIntent = new Intent(Intent.ACTION_VIEW, myUri);
We are using the number for the first contact, and then constructing the Uri string for referencing a contact. Finally, we pass the string to the new Intent object.
Starting the Intent-Invoked Activity
With the Intent created, you decide which of startActivity() or startActivityForResult() to call. There are additional, more advanced options here Listing 12-3 shows the example layout from the ch11/IntentExample project. It is a very simple layout with one label, one field, and one button.
The viewContact() method for the button creates a contact Uri as explained above, then creates the Intent object that will use the Uri, and finally starts an activity expecting no follow-up results. You can see the code in listing 12-4.
I have intentionally kept the logic that’s not related to the actual business of intents very simple. That’s so you can focus on what we have discussed in this chapter.
Note Before running Listing 12-4’s activity, be sure to have used an existing virtual device where you have added at least one contact using the built-in contacts application, and do not wipe the AVD state when (re)starting the virtual device. This way, you will have contacts in the contact database for the example to display
When you run the IntentExample project, you should see the IntentExample activity as shown in Figure 12-1.
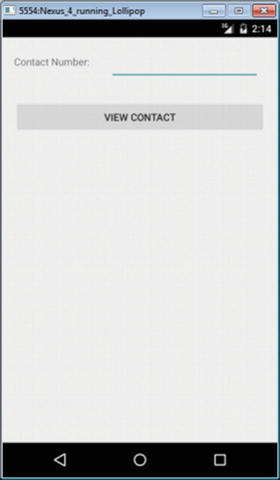
Figure 12-1. Our main activity triggered from launching the application
Remember, you are seeing this activity first, because Android Studio, Eclipse, or your Android project creation tool of choice added it as the LAUNCHER category in your manifest file.
When you attempt to enter a number for a contact, you’ll see the appropriate digit-restricted IME thanks to our layout specification for the EditText widget. This appears as shown in Figure 12-2.
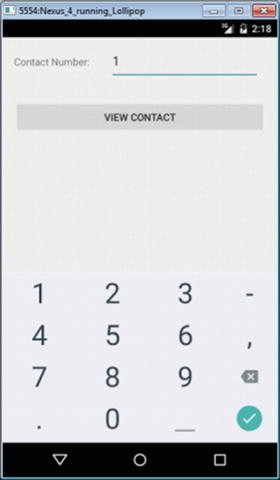
Figure 12-2. Submitting the data for Uri creation and intent triggering
Enter the number for a contact (for example, type in the digit 1 for the first contact in the system) and hit the “View Contact” button. Your contact Uri is parceled up in your Intent, and startActivity() sends Android off on the hunt to find the most appropriate activity to handle the ACTION_VIEW action for your intent. You can see the result in Figure 12-3.
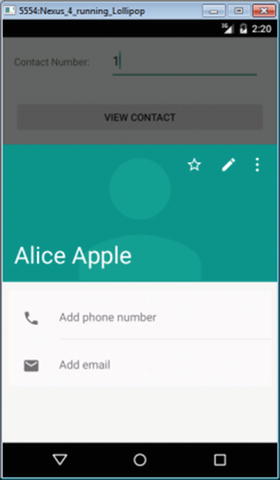
Figure 12-3. The contact activity selected to satisfy our intent
Figure 12-3 shows the built-in contact view activity, and not something included in the IntentExample project. Ours was a “safe” invocation because of our use of the Uri and our trust in Android to find the right activity. We didn’t try to force things by using the explicit, component-naming method.
Introducing Receivers
The bulk of this chapter has covered how to use intents to create and launch multiple activities within your application in order to trigger a wide variety of actions in response to your user’s demands and interaction with your program. But not every response to an intent needs to be within the scope of an activity.
Indeed, there are a number of concrete examples of times when you do not really need the bells and whistles of an activity to complete the desired outcome for an intent. Some examples include performing calculations, data manipulation, and other tasks having no need for any UI. You may also want to drect an intent at an Android service rather than atany end-user-facing application. For instance, you may want to build a photo-sharing service that sends all photos to a cloud storage provider for backup without any UI interaction. There are even times when you will not know until run-time whether or not an activity is required, and need to design for both an activity-related response and one with no activity involved.
Using Receivers When No UI is Needed
To deal with these “activity-less” scenarios, Android provides the BroadcastReceiver interface, and the concept of receivers. Just as activities are described as being light-weight UI screens for quickly dealing with a user’s interactions, receivers are similarly meant to be light-weight objects that are created to receive and process a broadcast intent, and then be thrown away.
If you examine the definition for the BroadcastReceiver in the Android documentation, you will see that it consists of only one method named onReceive(). You can think of the onReceive() method as the “OK, do stuff” method for your receiver. You implement the method using whatever logic you decide needs to happen to deal with the associated intent.
Just as activities are declared in you manifest file, so too are declarations for any implementations of BroadcastReceiver you plan to have in your application. The element name is <receiver>, with an android:name attribute of the class that implements BroadcastReceiver. For example:
<receiver android:name=".MyReceiverClass" />
Your receiver will persist only for the time it takes to actually execute the logic in your implementation of onReceive(), and then will be discarded for garbage collection. There are also limitations in the base form of a receiver that mean you cannot issue callbacks, nor invoke UI elements such as dialog boxes.
The exception to this what I’ve just described comes when you implement a receiver on a service (or even an activity). In that case, the receiver will live for the lifetime of the related object. The receiver will live either until the service stops, which is rare, or until the activity is destroyed.
Receivers cannot be created via the manifest for services or activities. Instead, you’ll need to invoke the registerReceiver() within onResume() to indicate your activity would like to receive intents (again, based on definted actions, categories and mime types), and similarly clean up with a call to unregisterReceiver() during the onPause() callback.
Navigating Receiver Limitations
As well as the limitations noted above for receivers, there is one other important aspect to note about their use in combination with intents. You might be imagining a world where you can use intent definitions and broadcast receivers as a general-purpose messaging system for an application. The one gotcha with that approach is that when activities are paused, as described in the lifecycle in Chapter 10, they will not receive intents.
That paused activities won’t receive intents means that if you care about missed messages via intents, then you will specifically need to avoid activity-bound receivers and declare your receivers in the manifest as outlined at the start of this discussion. You will also need to think about how you can otherwise be re-notified of, or recover, any “messages” that occurred and were lost while activities were paused.
There are alternative approaches to a message bus for Android that rely on the Google Play Services APIs. These are better suited to message bus metaphor, namely Google Cloud Messaging. That product has its own quirks and limitations that are beyond the scope of this book, but interested readers can find out more on the Android developer website.