
Before we end this chapter, we need to do a last thing: add the Game Won and
Game Over screens to the prototype. At this point, our project consists of two screens: the home screen, where the game starts, and level_01, our actual game stage. Now we are going to add two more scenes: a Game Over screen to send the application to if the player loses, and a Game Won scene to be displayed if the player completes the game goals. For each new screen, we need a new scene and a script. In each screen we add, we plan to display a message and a button to send the application back to the Home screen.
Let's get to work!
Save your project and the scenes you built so far, which should be two: the Home screen and level_01.
- From the top menu, create a new scene by navigating to File | New Scene (or press Ctrl + N).
- Name this scene
game_won. - Add 3D Text to the scene as we did before, by going to GameObject | Create Other | 3D Text.
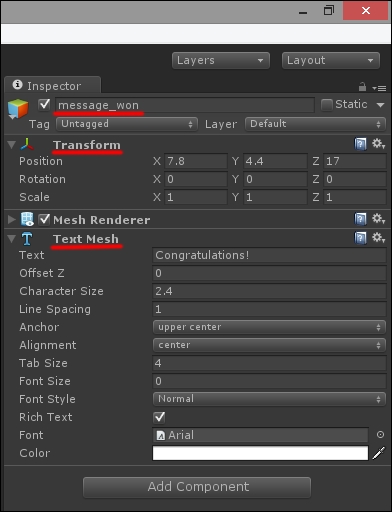
- Select the text in the scene and name it message_won.
- With the text selected in the scene, move to the Inspector to access its properties. Set the values as what you consider fit for your camera and scene settings. The following screenshot shows the settings I used with my game camera:
- If you want more than one text line in the message, you can do so in two ways.
You can duplicate the 3D Text in the scene, change its text (and its font size and style too), set the position for the second line, and then make it a child of the first line, or add a script to the 3D Text game object with a line like this:
  public class Texter : MonoBehaviour {
    private string wonText;
    void Start () {
      wonText = "Congratulations
 Level Complete";
      GetComponent<TextMesh>().text = wonText;
    }
  }
The
- Let's also add to this script the code used to display a button to send the application back to the Home screen.
- Please add the following lines to the
OnGUI()section of the script:void OnGUI() { if(GUI.Button(new Rect (120, 120, 150, 30), "Home")){ Application.loadedLevel("home"); } } - The operations to make the Game Over screen are exactly the same as those required to make the Game Won screen. Create the scene, name it
game_lost, add the 3D Text to it, and drag a script onto the text. The code to be added is as follows:public class Texter : MonoBehaviour { private string lostText; void Start () { lostText = "Too bad, you run out of lives! Play again"; GetComponent<TextMesh>().text = lostText; } void OnGUI() { if(GUI.Button(new Rect (120, 120, 150, 30), "Home")){ Application.loadedLevel("home"); } } }
We keep up with the logic we implemented so far. Each game state sends the application to a different scene. Each scene handles itself autonomously and provides options to send the application to the next state depending on the player's input. Should we need to change anything from any state, our changes won't affect the other states.
The 3D Text game object is a newcomer with the latest Unity version, and it is a welcome addition for many HUD- and interface-related needs. Refer to http://docs.unity3d.com/Manual/class-TextMesh.html for a detailed description of the control parameters of TextMesh.