
Audio in Unity is managed according to the same easy philosophy that is applied to importing and managing graphics. The most common audio formats such as MPEG, WAV, AIFF, and MP3 are supported, and once imported, audio clips can be easily configured in the Inspector panel.
With regard to the file format, the general rule is to use large WAV files for background music and small MP3 files for sound effects.
The compression setting is the other basic configuration of an audio clip in Unity, as Unity allows audio clips to be set as Native or Compressed. By setting a clip as Native, we ensure that the clip won't need to be decoded at runtime. The file will be larger, but it sounds nicer and won't slow down the application once it gets played. The native setting is recommended for short sound effects that are usually imported as MP3 files, and thus not recompressed once they get imported in Unity.
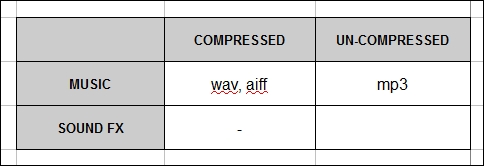
Setting a clip as Compressed results in a smaller project file, but that file must be decoded before playing the sound at runtime. Decompressing audio files many times per frame would impair the performance of an application. To prevent this, it is recommended to use compressed audio files for the game backgrounds and music carpets, which don't change so often while playing. Moreover, to prevent the compression from affecting the quality of audio, it is also recommended that you compress only native file formats such as wav and aiff. Refer to the following diagram to know more about the use of compressed and uncompressed audio files in Unity:
For those of you specifically interested in digital audio, there is a detailed introduction to this subject available at http://www.jiscdigitalmedia.ac.uk/guide/an-introduction-to-digital-audio.
Importing audio works like all other imports we have done so far. We provided selection clips to be used for the recipes. If you like to use yours, just be sure to have a small MP3 file for the sound effect and a larger (possibly looped) WAV or MP3 file for the background music.
Open your project in Unity and load the actual game scene. Then create a new folder in the Project panel and name it Audio. We will use this folder to store the audio clips to be imported.
- Access the Project panel in Unity and right-click on the Audio folder. Select Import New Asset from the menu.
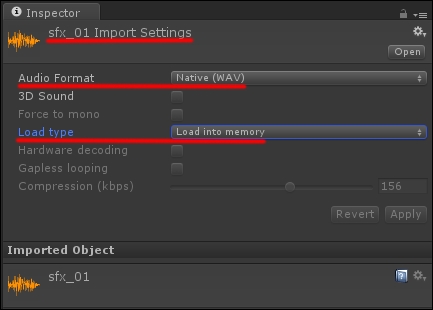
- Select the MP3 file named
sfx_01and click on Import in the Import window. - With the clip selected in the Project panel, move to the Inspector window and check the Audio Format parameter is set to Native. We do this because the audio clip is already a compressed MP3 file, so there's no need to compress it again!.
- We also want to set the sound as a 2D sound. In our prototype, the character can't move on the z axis, and the camera follows the character as it runs left or right. As the distance between the character and the camera doesn't change while playing, there is no point in burdening the CPU with extra calculations to determine the distance between the camera and the game action at runtime.
- We also select the Load into memory option to improve performance. This sound effect will be loaded in the memory when the application starts, and thus won't require any additional loading operation at runtime. Should a project get larger in size (from a memory management perspective), it could make sense saving that amount of memory and letting the file be loaded at runtime when required by setting it as Stream from Disc.
The following screenshot displays the audio clip settings we explained so far.
- Now we import a larger file, and we will compress it in the Inspector window. Import a new asset; this time, pick the file named
bkgd_01. We use a WAV file so that we have a better source to compress. - Set the clip properties in Inspector, as shown in the following screenshot. For better performance, we store the compressed file in the memory so that Unity doesn't need to decompress it at runtime.
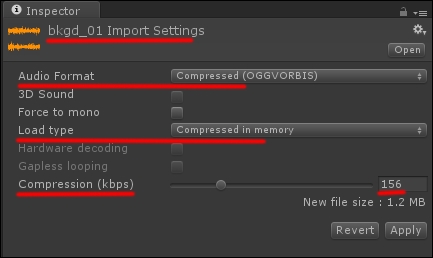
- Don't forget to click on Apply in the Inspector panel to save the settings.
These simple operations are all that's required to import and set up audio clips in Unity. Compressed files are smaller but require a decoding operation at runtime, which could, on the long run, slow down the application. Uncompressed files are larger but perform better at runtime. That said, we used a small, uncompressed MP3 file for the sound effects, and a large, compressed WAV file for the background music. Now that we have audio clips imported in the project, we can move on and add them to our game objects.