
In this recipe, we explore the operations required to set up a 2D image as a Sprite type in Unity.
You can start an entirely new project for this chapter, or open the project we are already working on. In either case, add a new folder to the Assets directory of the project and name it Sprites. As we already did this operation in the previous chapters, we won't repeat the steps here.
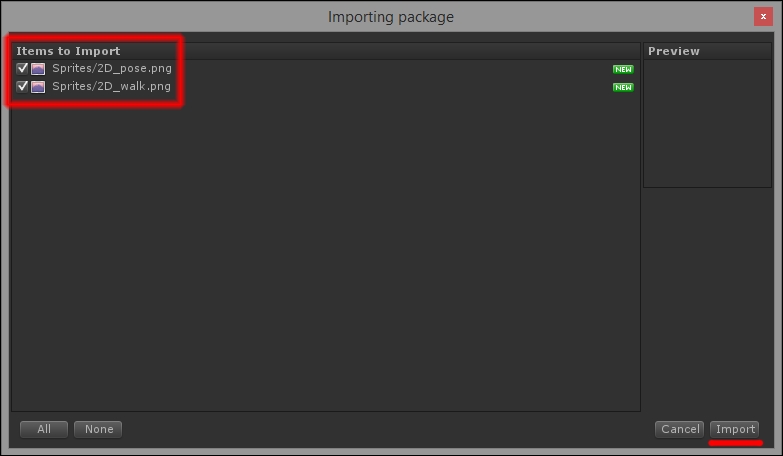
- Import the 2D_Sprites package we have provided with the contents of this book to your project. If you don't remember how to do it, right-click on the Sprites folder you just created and select Import Package/Custom Package... from the menu, as shown in this screenshot:

- The package contains two images named 2D_pose and 2D_walk. Ensure that both are selected in the Import panel and then hit Import, as shown in the following screenshot:
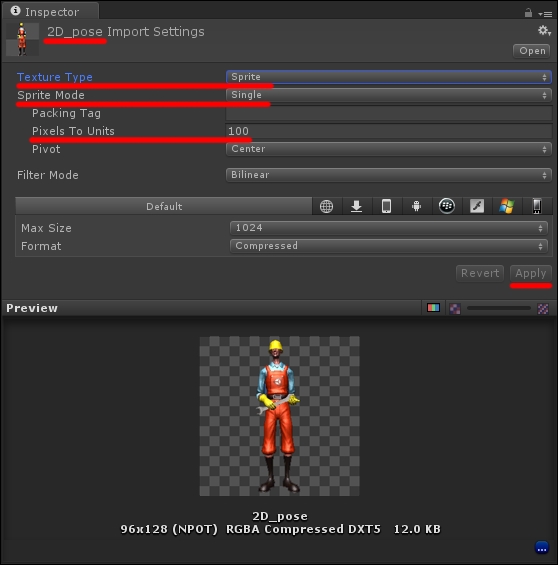
- Once the importing process is complete, access the Sprites folder and select the first picture, 2D_pose.
- Go to the Inspector window and set the Texture Type property to Sprite.
- A Sprite Mode property should appear, right below Texture Type. Select Single from the drop-down menu.
The Pixel to Units property defines how many pixels in the sprite are there in one unit (1 unit is 1 meter in Unity) in the game world. We don't need to edit this property; you can leave it at its default value of 100. Remember, however, that this gets important if you plan to use physics in your game. We recommend the guide at http://answers.unity3d.com/questions/736142/what-is-good-practice-to-set-pixels-to-units-to-an.html for this matter. Click on Apply to save these settings. You can refer to the following screenshot to understand the last steps:
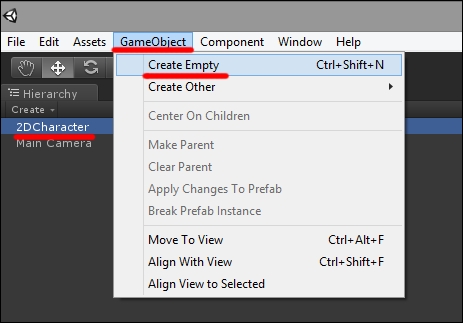
- The base sprite for our 2D character is ready. Create new Empty GameObject in Scene and name it 2DCharacter, as shown in this screenshot:
- Now you can drag the sprite named 2D_pose onto 2DCharacter in the scene. Once you do so, a Sprite Renderer component is automatically attached to 2DCharacter, and a Default-Sprite material is created, with the 2D_pose sprite as the Material entry of the component, as shown in the following screenshot:
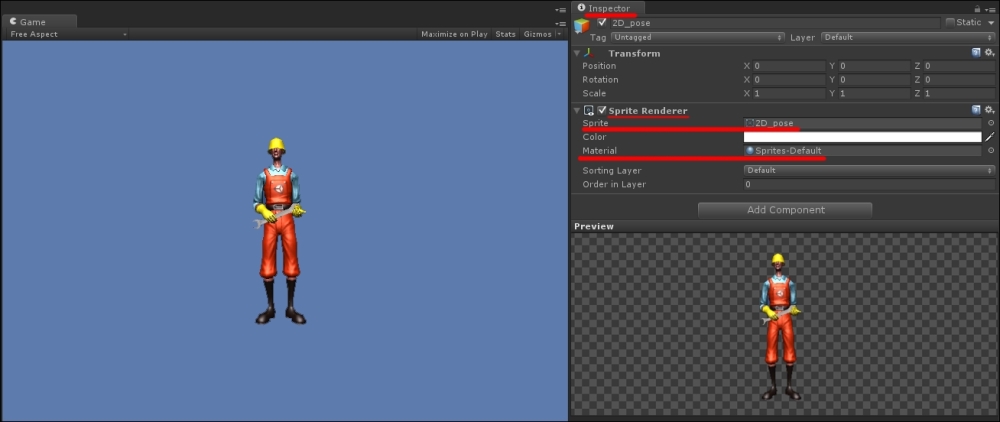
A sprite is a 2D image applied to a flat object on a screen. We set our sprite as Single Mode in the Inspector window, as this sprite contains only one image, representing the static pose of our 2D character. Then we applied the sprite through a material to an empty game object on screen, as we already did with 3D assets.
The Sprite Renderer component, which Unity automatically applied to the game object we dragged the image on, is a default component of Unity, and its task is to display images on the screen. It requires a sprite texture to render and refers to a default sprite material that can be instantiated at will in the game scene, displaying different textures for different game objects. This way you don't have to worry about creating several materials when you have many sprites on screen. They will all use the same material with different textures!
The Sprite Renderer also allows us to define the depth order in which sprites must be rendered on the screen. Though 2D games don't operate in the third dimension (z), it may still come in handy to put different sprites in a specific order if the flat images overlap at some points and you want one specific chunk of the sprite to be rendered above the others. We will discuss these features in the following recipes, but those of you who want to delve more into the Sprite Renderer component right now can check out the manual at http://docs.unity3d.com/Manual/class-SpriteRenderer.html.