
In this recipe, we show you how to create a custom script to control a game object based on physics. It is not the final controller for the character of our prototype: it's a small piece of code that can be used for a classic 2D shooter, based on physics.
In the Scripts folder in the Project panel, create a new C# script and name it PacktController. Then, double-click on it to open it in Monodevelop.
- First we need a bunch of variables to control the forces applied to the GameObject. Add the following lines at the beginning of the script, right below the usual line with the script class declaration:
(public class PacktController : MonoBehaviour {): public float horAcceleration; public float cruiseSpeed; //max speed when not pressing public float maxSpeed; //max speed while pressing public float actualSpeed; //speed at given time public float limY; //limit on y, use as mathf.abs public float expon; //used to smooth vert movement speed public float alpha; //use to tweak the vert movement speed - Now get into the
Start()function and add the following line. We need to initializehorAcceleration:horAcceleration = 4.0f;
- Next we add a function to the script. Whenever you make use of physics, you should always put instructions into the
FixedUpdate()function instead ofUpdate(). The manual states thatFixedUpdateshould be used instead ofUpdatewhen dealing with Rigidbodies. For example, when adding a force to a Rigidbody, you have to apply the force for every fixed frame insideFixedUpdate()instead of every frame insideUpdate. The reason is thatFixedUpdate()is called at fixed time intervals and is not subjected to frame rate, thus providing better reliability with physics control. - These lines provide the actual speed of our character and set a parameter to smooth its movement:
  actualSpeed = Rigidbody.velocity.x
  expon = Time.time * alpha;
- With regard to the
xcomponent of theRigidbody.velocityvector we used, it assumes that the character model has been imported front-faced, as we learned in the first chapter of this book. Should you decide to do otherwise for any reason, just remember to take notice of that. With a character rotated 90 degrees on its Y axis, for example, the z component would affect speed, instead of the x component. - The following lines take care of controlling the left
ight acceleration of the character by using the left and right arrow keys:
/* control left ight acceleration */ if (Input.GetKey (KeyCode.RightArrow) && Mathf.Abs (actualSpeed) < maxSpeed) rigidbody.AddForce (Vector3.right * horAcceleration, ForceMode.VelocityChange); if (Input.GetKey (KeyCode.LeftArrow) && Mathf.Abs (actualSpeed) < maxSpeed) rigidbody.AddForce (Vector3.left * horAcceleration, ForceMode.VelocityChange); if (Input.GetAxis ("Horizontal") != 0 && Mathf.Abs (actualSpeed) > cruiseSpeed) { Vector3 v = rigidbody.velocity; v.x = (-v.x); rigidbody.AddForce (v, ForceMode.Acceleration); } - Now we add the controls to have the game object fly up or down using the input coming from the Left and Right arrow keys. We also implemented a control to prevent the character from getting out of the top and bottom boundaries of the level:
//control updown acceleration if (Input.GetKey (KeyCode.UpArrow)) { Vector3 v=rigidbody.velocity; v.y=(1-(Mathf.Exp(-expon)))*limY; rigidbody.AddForce(v,ForceMode.VelocityChange); } if (Input.GetKey (KeyCode.DownArrow)) { Vector3 v=rigidbody.velocity; v.y=(-1)*(1-(Mathf.Exp(-expon)))*limY; rigidbody.AddForce(v,ForceMode.VelocityChange); } - You can add the script to the character in the scene to apply this control system to it. The following screenshot shows the complete script:
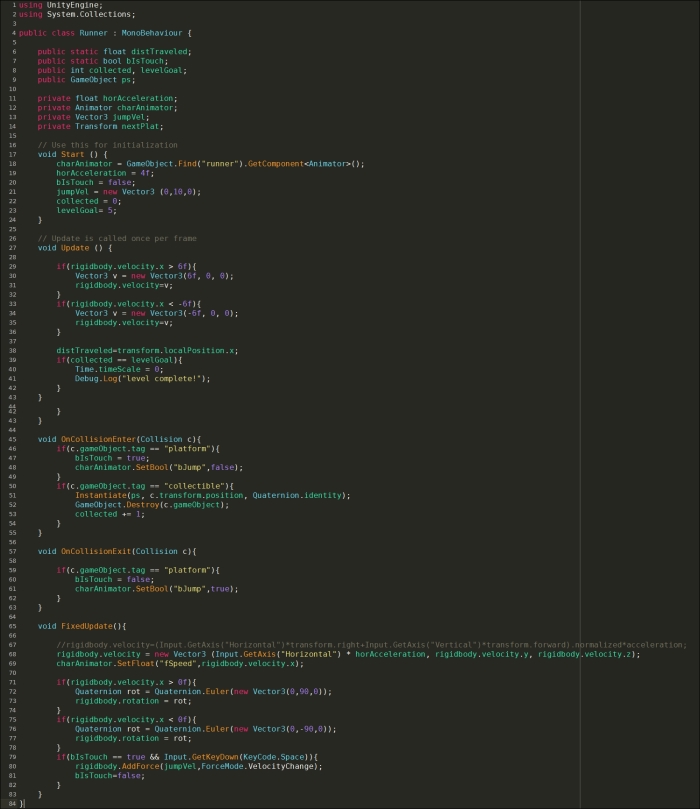
This script basically does two things. With regard to left ight acceleration, it provides a max speed that is reached while pressing the Left or Right arrow keys, whether the player is moving left or right. As the player releases the keys, the character slows down to a cruise speed, regardless of direction.
The script also prevents the character from going too far up or down. It sets a limit on the Y axis and then uses an asymptotic function to smooth down vertical speed upon reaching that limit.
You may have noticed that the function we are using to code our instructions is FixedUpdate(). When using Rigidbody, this is the function you must use, instead of popularUpdate().
The other thing you should notice is that Rigidbody controls are coded as forces applied to the object as a consequence of the player input. In our case, we used the Rigidbody.AddForce method, which requires a vector to set the direction of the force applied to the R component (v) and the type of force applied (ForceMode.VelocityChange). We suggest you check out the manual for a thorough description of this method, available at http://docs.unity3d.com/ScriptReference/Rigidbody.AddForce.html.