
To solve the problem of playing the audio and destroying the game object at the same time, we will use a particle system. A particle system is a complex game object that emits so-called particles in the game scene. Particle effects are largely used in video games for various graphic touches—game object trails, glitter, smoke, explosions, rain, snow, and so on.
Particles, by themselves, are multiple instances of (usually) tiny game objects with a mesh, transparent texture, and direction in the World Space. These particles sprout from a component of the particle system called Emitter.
The Emitter emits a large number of particles over time, and then these particles fly through the scene, according to several user-defined parameters. We can define the size and shape of the area where the particles tend to crowd as they emerge; the lifetime of individual particles before they get destroyed; the change in shape, color, or direction of the particles as they fly through the scene; and much more.
Using particle systems in Unity is not very hard, provided you have the right assets and a clear idea of the result you want to achieve. In the following recipe, we will show you how to add and set up a particle system to be used when the player collects an item.
The particle system we are going to create covers two purposes. The first purpose is to enrich the visuals and the feedback coming from the game. A nice puff that appears when the collectible is gathered by the character helps the player to understand what just happened, and will hopefully make them smile for what they've done!
The other purpose of the particle system is to play the sound we want to be heard by the player when a collectible is gathered, and then destroy itself. To do this, we first need to move Audio Source and its attached clip from the collectible prefab to the the new particle system we are about to create.
Let's begin by editing coll_prefab and removing Audio Source from it. Open the project scene and be ready to follow our instructions.
- To remove a component from a prefab, we begin by dragging the prefab itself into the scene. Drag coll_prefab from the Prefabs folder in the Project panel into the scene.
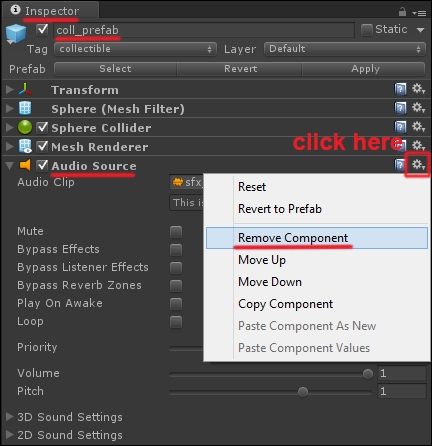
- Select coll_prefab in the scene and move to the Inspector window. Scroll down in the list of components until you find Audio Source. then click on the small wheel icon to open the component menu. Select Remove Component, as shown in this screenshot:
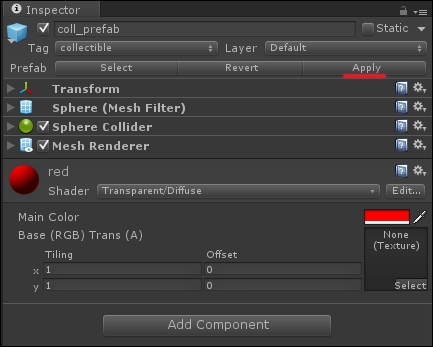
- Click on the Apply button to save the edits as shown in the following screenshot:
- You can now remove coll_prefab from the scene.
- Add a new game object from the scene. From the menu, navigate to GameObject | Create Other | Particle System, as shown in the following screenshot:

- Name the particle system sparkles.
- The particle system in the scene should be already emitting particles. If you now move to the Inspector window, you will see the many submenus that are available to fine-tune the particle system in the scene. Let's just take care of the most relevant submenus here.
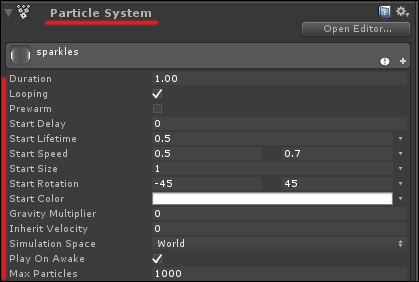
The Particle System menu contains general settings for the particle system and several parameters related to shape, lifetime, color, and speed of the particles when they are first created. You can set this group of parameters as shown in this screenshot:
- The Emission submenu is meant to control the number of particles we want to be emitted per second or the number of particles that must be emitted with each burst. Let's use a value of
1in the Rate settings, for this. - Now click on the small + icon on the right side to add a burst of 15 particles, as shown in the next screenshot.
- The Shape menu is used to set the shape of the emission in the 3D world. There are a number of predefined shapes, and there is also the ability to define a custom mesh to be used as the shape. In our case, we pick a Sphere shape of Radius
0.01.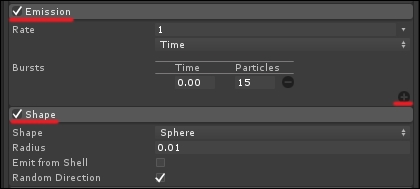
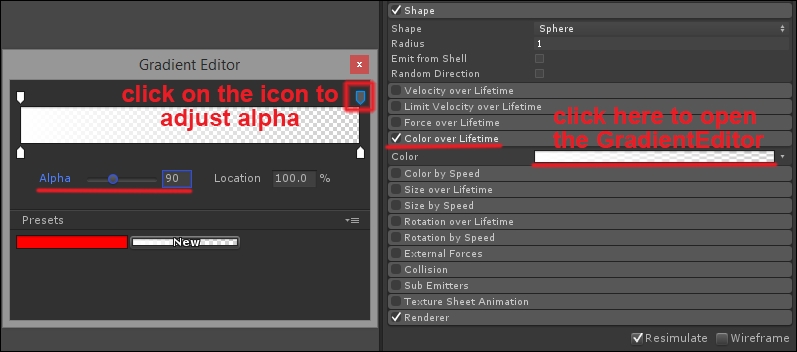
- The Color menu allows us to control the change of the particles' color over time. It also allows us to set color opacity over time. This feature, in particular, is useful for us to create that puff effect we mentioned, because we actually want the puffs to progressively disappear by getting more and more transparent as time passes by.
- Check the Color over Lifetime box. Then click on the white bar to open Gradient Editor, and apply the settings displayed in this screenshot:
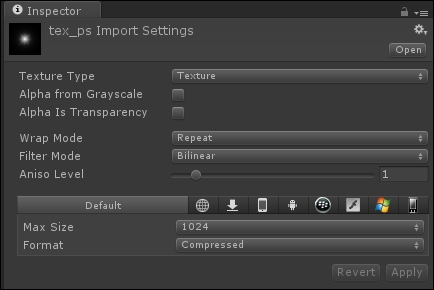
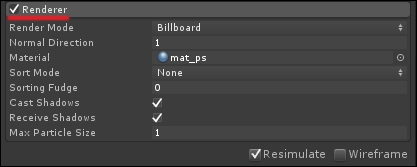
- The Renderer menu allows to customize the shape and material of individual particles and set whether particles should have and receive shadows, among the others. Before we set it up, let's import a texture to make a material for the particle system we are creating.
- In the Project panel, access the Textures folder and import Texture named
tex_psto the project. - Set Texture in the Inspector window, as shown in the following screenshot:
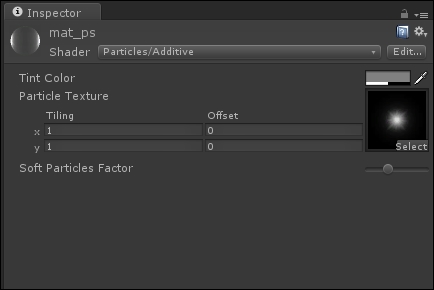
- Now create a new material in the Materials folder and name it mat_ps. Drag tex_ps into the the texture slot of the material and set Shader for this material as ParticlesAdditive, as shown in this screenshot:
- Finally, we can finish editing Renderer of our Particle System by dragging mat_smoke into the material slot in the Renderer menu of the Particle System, as shown in the following screenshot:
- There are a couple of more steps before we end this recipe. The first is to add an Audio Source to the particle system to play the sfx_01 clip. We did this operation in the previous recipe, so we have to repeat those same steps. Add the Audio Source to the particle systems and drag the sfx_01 audio clip into it.
- What we didn't do earlier but need to do now is to select the Play On Awake option in the Audio Source component. This way, the audio will be played the very moment the PS is created in the scene, which is what we want.
A particle system is collection of components that are used to create graphic effects for your game scenes. It consists of a part called Emitter. This part emits tiny, flat meshes with a transparent texture, called particles. Particles fly through the game scene and behave according to a large number of parameters that set their movement, direction, duration, color, opacity, and so on.
Particle systems are an important component of almost any video game, and once you get used to the settings the several submenus, they are very funny to experiment with! A thorough explanation of their many properties and uses goes beyond the scope of this manual, so you can to refer to the guide at http://docs.unity3d.com/Manual/class-ParticleSystem.html and to experiment a lot.