
Well done on reading through till this Chapter. We will be learning how to animate our character using the very powerful animation and sound tools included in UE4. By the time the chapter is through, the character that we have created for Barrel Hopper will be moving around in well-blended articulated motion. UE4 provides an in-depth and easy-to-use animation pipeline that takes your characters from stoic, silent, statues to dynamic living features of the game world. The tools of this pipeline are very similar to Blueprint in nature yet very different in practice. You will learn how to master these tools so that you may bring true justice to the sounds and animations provided to you by artists, thus bringing your game characters to life.
During the course of this chapter, we will also explore the 3D sound functionality provided by Unreal as well as learn how we can utilize the sound system in conjuncture with the animation system to create animation-driven sound effects such as footsteps. These animations and sounds will require information from the game world—this chapter will also teach you how to communicate between the game world and these other components of the engine.
The chapter will cover the following points:
- UE4 animation pipeline and how to export animation assets
- Working with UE4 animation tool
- Creating events and loops with animation montages
- Creating animation graphs and how to apply these graphs to in-game characters
- Receiving queues from the game world/character state to play the correct animation
- Loading and modifying sounds
- Playing sounds in 3D space
- Working with the animation montage tool to create animation-driven sounds
- Advanced blueprint techniques
- Creating and utilizing basic HUD and font objects
We left off with our Barrel Hopper project, having just implemented some respawning logic. In its current state our project is a basic prototype at best. During the course of this chapter we will be refining our previous implementations as well as adding new layers of polish via the inclusion of animation and sound effects. However, before we do this, we should clean up the functionality we already have in place.
As it is now, when our player dies we leave nothing in charge of the main camera. You may have noticed that, upon player collision with a barrel, the camera will disjoint and show a default view of the world's origin. We need to append to the functionality we created as an event delegate so that, when our player is destroyed, the game mode creates a new camera and sets it as our main view target. We can then interpolate from this new camera to our Player camera upon respawn to create a nice, clean respawn effect. Before we do this, I think now is a great time to introduce you to some new concepts that let you organize your Blueprint graphs.
Unreal Engine's Blueprint system features a few nodes whose sole purpose is to control the execution flow of the blueprint. They will divert or navigate the critical execution path to flow in a desired direction or sequence. You have already experienced this at a small level using a branch node that will dictate the execution flow path based on the state of a bool value, and the reroute node that lets you clean up your Blueprint graph lines. The other flow control nodes provided by Unreal are as follows:
- Branch Node: This node will execute one of two paths based on the state of an input
bool. - Do N: Will only allow an execution path to enter a specified number of times. Execution count can be reset by an execution input.
- Do Once/Do Once Multi input: This node only allows a specified execution path to happen once.
- FlipFlop: Will execute one of two paths in an alternating fashion every time execution passes through the node.
- ForLoop: This node will act as a traditional
forloop, a very common iteration structure used across most programming languages. You can specify a first and last index and an execution path for the loop, and one once the loop has completed. - ForLoopWithBreak: As previous, but you may break out of the iteration logic early by navigating the execution flow to a break node.
- While Loop: Will remain in loop until a
boolinput is set tofalse. - Gate: This node will continue the execution flow until it has been flagged to close, at which point the flow will stop at the Gate node.
- MultiGate: Similar to the previous bullet, however allows you to specify multiple execution flow outputs that can be chosen via an integer index.
- Sequence: Allows you to create a sequence of execution paths that will be fired in order.
Before we begin to create the respawn camera functionality, we will implement a sequence to maintain a tidy Blueprint Event graph. As stated previously, the sequence node allows us to create a series of execution paths that will be executed in order. This allows us to associate similar functionality with a given sequence path. In our case we will be creating two groupings of functionality. One to spawn a new camera that can be used while our character is respawning, and another to respawn our character after a certain amount of time has passed. We have already created a basic implementation of the latter in the previous chapter.
Create a sequence node now and ensure that it has two output execution paths. They should be titled Then 0 and Then 1. Place this node directly after the Character_Respawn event and connect the execution path to the input pin, then append the player respawn functionality we created in the last chapter from Delay onwards to the Then 1 output execution path. You should see something similar to this:
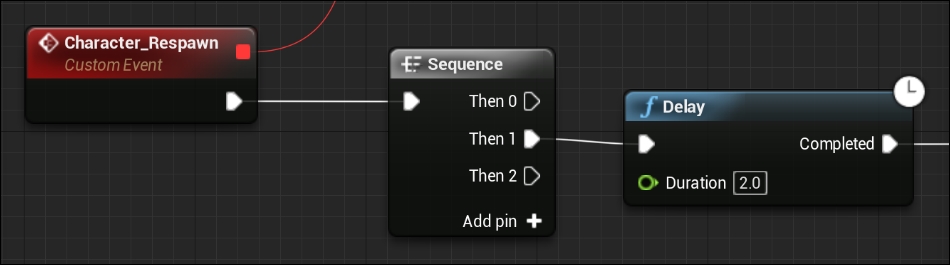
We will now create our camera spawn functionality and append it to the Then 0 output pin. This means that our camera spawn functionality will execute, then our player respawn functionality.
We are going to be creating something called a camera actor then setting this to be our Target View. Camera actors are not cameras in themselves but are an in-world object that owns a camera component. Setting a camera actor as the Target View will use this camera component as the camera through which the player views the game world. You can use any actor that owns a camera component as a target for the view.
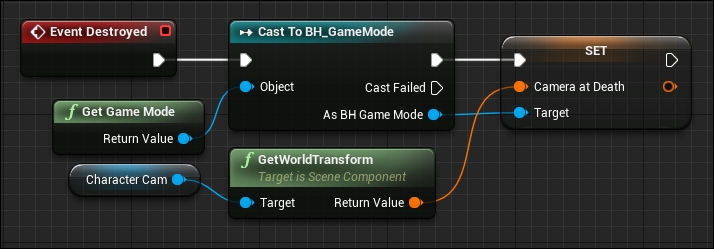
We are going to use the SpawnActorFromClass node to create our camera actor. However, just like in previous instances of using this node, we need to provide a transform for the actor to use at spawn. We need this transform to be that of the character's camera upon his untimely barrel-related demise. To do this we can create a transform variable in BH_GameMode called CameraAtDeath and ensure we set this from our BH_Character when the OnDestroyed event is hit.
Do this now. Summon the Destroyed event in BH_Character, use the GetGameMode function node to return a reference to the current game mode, cast this reference to BH_GameMode, then set the CameraAtDeath transform to that of the player's camera (reference name CharacterCam) via the GetWorldTransform function. The functionality should appear as shown in the BH_Character Blueprint:
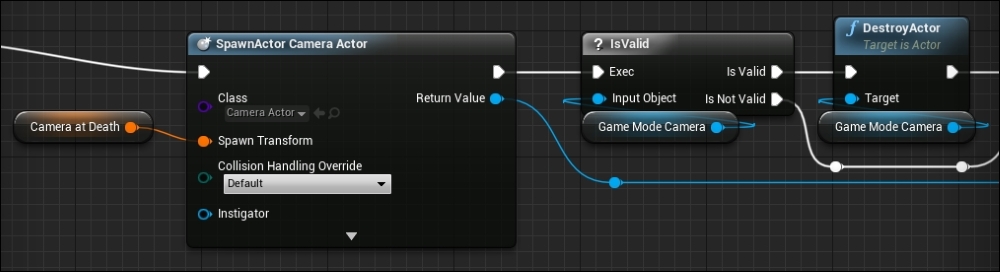
With the transform of the character's camera at death attained, navigate back to the BH_GameMode Blueprint, and we can now create our camera spawn functionality. Do this now by finding a SpawnActorFromClass node and setting the class to CameraActor, then transform to the CameraAtDeath variable and leave the rest as defaults. Be sure to connect this new node to the Then0 execution output from the sequence node.
To save out our camera so we may have a reference to use in future, create a CameraActor reference variable in the MyBlueprint panel called GameModeCamera, and set the value of this reference to the output of the SpawnActorFrom Class node we just created. Before we do this however, we should be sure that we do not leave any floating camera objects around the world and clutter our memory. We need to first check whether there is already an existing game mode camera populating that reference. If there is, we need to destroy it, then assign the newly created camera.
We can do this by using an IsValid node. This node will take in an object reference and output two execution paths, one if the reference is valid, and another if it is not. Spawn one of these nodes now and parse the GameModeCamera to the input labeled InputObject. From the IsValid path, spawn a DestroyActor node and parse the GameModeCamera reference to it. Then connect both the execution output of the DestroyActor node and the IsNotValid path to the Set Node for the GameModeCamera reference. This means that if there is a valid camera actor populating the GameModeCamera reference, then destroy that actor (thus freeing-up memory) and set the new camera actor, otherwise we avoid that functionality and assign the new camera actor to the reference.
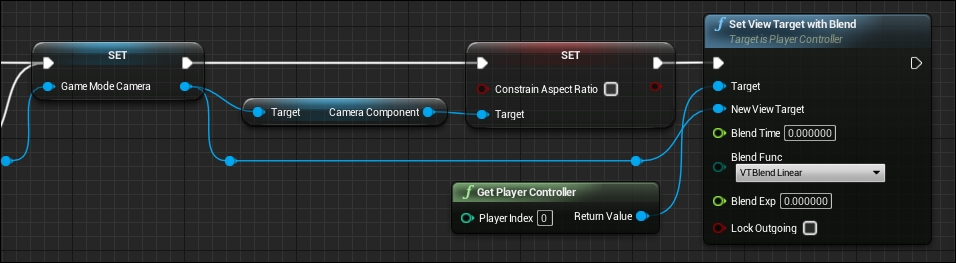
To ensure that our new camera maintains consistent view properties with our previous camera, we are going to need to change one of the new camera's default properties. To do this, drag a line from our GameModeCamera reference and search for GetCameraComponent. Now we need to drag a line off the resultant camera component reference and set the bool ConstrainAspectRatio property to false. This will mean the new camera preserves the aspect ratio of the current viewport.
We need to set this camera actor as the
Target View. Do this via the SetViewTargetWithBlend node. This node takes in a reference to the actor we would like to use as a target, a reference to the player controller who's view we will be changing, a blend time that will dictate how long the blend will take between views, a Blend function type, a Blend Exponential value, and a bool flag that will lock the last frame of the camera when blending.
Plug our new camera actor into the NewViewTarget input and use GetPlayerController with a player index of zero to get a PlayerController reference for the target input. We can leave the rest as default for now as we wish to have the view target swap happen instantaneously. You should see something that looks similar to this:
Now that we have our new view, we want the player to witness the aftermath of their death for a short time before respawning the character and setting the view back. The reason for this will become clear later in the chapter when we cover animation. The delay node we have created will do this for us. Feel free to adjust the respawn time, meaning the delay node length, to your liking. Immediately following the delay node, we have our previously created respawn functionality. We will be modifying this to include some new camera manipulation functionality so we can smoothly translate from the respawn camera back to the player camera.
To keep the functionality following our sequence node tidy, we should create a blueprint function within which we can group the player's respawn functionality. Create the function now by pressing the small white plus next to the Functions category in the MyBlueprint Panel and title it RespawnPlayer. If you wish to rename the function later, simply right-click the function you wish to rename and select rename from the dropdown. With the new function selected, you will see some new fields in the Details panel on the right-hand side of the window.
It is in this panel where you can specify a description for the function, a category for the function to be grouped under, keywords to be used when searching for the function, a compact node title (similar to the AND and XOR nodes), an access specifier that will set the encapsulation level for the function, and a bool representing whether the function is pure (meaning it will not require an execution path, for example GetPlayerController). It is also where you will specify any inputs or outputs for the function node. We can leave these all as defaults for now. Open the new function by double-clicking RespawnPalyer in the Details panel.
You will be presented with a new graph space that represents the work area for this function. Unlike the event graph, you will see only one entry point for the graph. The purple node titled Respawn Player will fire when the function is called. You will also notice you cannot summon event nodes within a function graph, you may call events thus triggering them, but you cannot define the functionality of an event node like you can from within an event graph. This is because function graphs must only contain functionality that specifically pertains to the function itself. What we are going to do is cut our player respawn functionality starting from the SpawnActor BH_Character node and ending at the Respawn event call node that we have in our event graph, and paste it into the RespawnPlayer function graph and reconnect the critical execution path. You should see something similar to this.
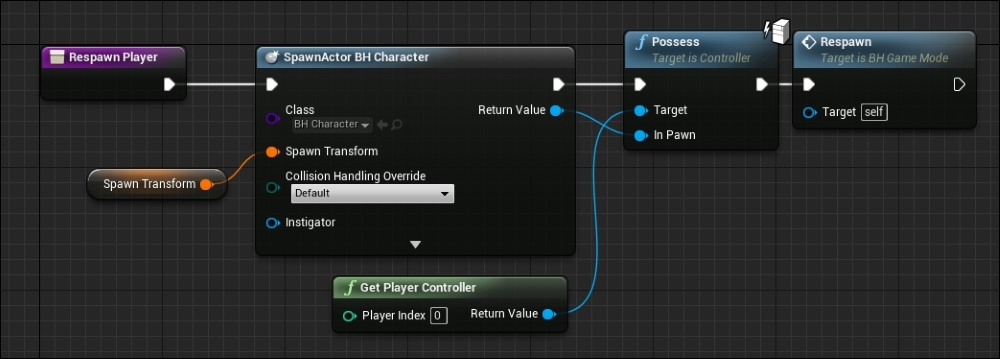
You may have noticed the strange icon located on the top right-hand corner of the Possess node. This simply means this function will only be executed on the server authority, something that we will cover later on in the book when we address networking.
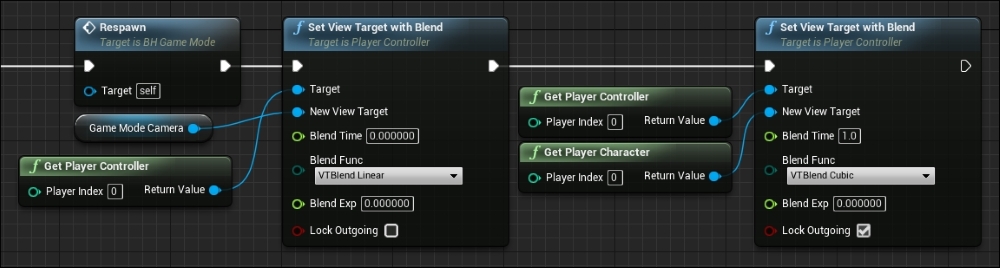
The only issue with this current node set-up is that the moment we possess the newly spawned character, the target view will be overridden and the new character's camera will be used. This removes any possibility for us to do a nice blend between view targets. In our case we would like to have the target view cubically interpolate between the death camera and spawn camera views. To do this we will have to re-set our target view back to the GameModeCamera we made earlier, with a blend time of zero specified, then immediately set the target view back to our character camera again, however this time we specify a 1.0 second blend using VTBlendCubic specified for the blend function. This will produce a smooth transition effect from the camera we created when the player died, to the camera location when the player spawns.
To do this, summon a SetViewTargetWithBlend node and set the current PlayerController as the Target, the GameModeCamera as the New View Target, and leave the rest as defaults. Then summon another SetViewTargetWithBlend node, this time instead of using the GameModeCamera as our New View Target we are going to use the Player Character we just spawned! We can get a reference for this character by using the GetPlayerCharacter node and specifying an input index of zero. Because UCharacter inherits from UActor we are able to specify our new character as a valid input for the SetViewTargetWithBlend node. This time we will not be leaving the rest of the values as default. Specify 1.0 for the Blend Time, VTBlendCubic for the Blend Func, leave Blend Exp as zero, and check the Lock Outgoing bool. You should end up with a node arrangement that looks like this:
Awesome! Now the respawn functionality is complete. We will be making small edits to the BH_GameMode blueprint regarding respawning later on in the chapter. For now, we are going to be looking into Unreal Engine's animation systems.