
Ok, now that we have implemented a purely C++ based object, let's look at the ways we can extend our code classes into Blueprint and utilize specifiers to communicate more information from our code classes to the engine.
The first thing we are going to do is extend a custom class into Blueprint! This is a very powerful feature of the engine as it allows us to write backend functionality for objects in code, but utilize all of the association tools of the Editor for things such as assigning materials, meshes, sounds, and other asset-based functionality. To successfully extend a code class into blueprint you must provide information to the engine about the class through specifiers. These specifiers act as input arguments for macros such as UFUNCITON(), UPROPERTY(), and UCLASS().
Let's see what happens when we attempt to extend our AHelloSphere C++ class we just made, which exists purely in C++. The AHelloSphere has not specified any additional information about itself or any of the functions/properties contained within. Navigate to the Content folder of the Content browser and create a new blueprint class. For the base class, choose HelloSphere under the All Classes section. You will be presented with a new blueprint object that is an abstraction of AHelloSphere! Call this blueprint BrokenBP. Open this blueprint now and you will see the hello sphere we just created in the Blueprint Editor.
The first thing you might notice is that all of the components we added in code can be seen in the Components panel and that they have all been listed as (Inherited), this means that the components are based in C++ code. When you select one of these inherited components, the details panel does not populate! That is because when creating the components, we neither declared the components with the UPROPERTY() macro in the header file of the object, nor specified any additional information about the property that would allow us to edit the component from Blueprint.
The result, none of these components may be changed in the Blueprint and they cannot be referenced in Blueprint graphs. They can't even be seen as variables in the MyBlueprint panel. This may be intended when creating some objects as you might wish to extend the object into Blueprint, but you do not want any of the components specified in C++ to be modified or referenced.
You may also want to view any inherited variables that exist in the C++ base class. To do this you need to select the dropdown next to the small eye icon in the MyBlueprint panel and select Show Inherited Variables.

As you can see, we do not have access to the UTextRenderComponent we declared in the header file of the AHelloSphere object. This is because, as stated previously, we did not specify via a UPROPERTY() macro that we wished it to be visible or changeable in blueprint. We will get to that in a moment but first, let's try dragging an instance of this BrokenBP into our level then run the project. Upon dragging the object into the level, everything seems fine, all of the components translate with the root component and they are all drawn properly. Now let's try running the project.
Oops! We have encountered a break point, the Editor has thrown an assertion.

You can break at this point by pressing the Break button and address the position of the execution arrow. You can see from the target line of code that the reason for the break is a Template mismatch during attachment. Meaning that when the BP version of our code class was constructed and it attempted to attach our components to one another, this assertion was hit! The actual reason this happened is because we have not informed the engine of any of our components that we created and attached at construction. We need to do this by declaring each of the component handles in the header file with the UPROPERTY() macro. Again, we will be making changes like this very soon. First, let's hit the continue button at the top of the IDE as this break is not crucial and the project can continue play. You will notice in the following that no matter where we position our BrokenBP in the level, it is positioned very strangely during play:

The core problem that is causing all of these issues is that we have attempted to extend a C++ class into blueprint without correctly informing the engine of all of the properties that the blueprint object interacts with. The best example of this is the components themselves. It is important to note that our instances of the C++ only code class still work perfectly well in UE. It is simply this Blueprint abstraction that is broken. Fear not however! Extending C++ objects into Blueprint is very welcome and supported by UE. We just have to ensure we write code correctly to allow this to happen. Let's do this now!
Instead of editing our original AHelloSphere, let's create a new object called HybridSphere. Do this now by creating a new C++ class via File | New C++ Class… and choosing Actor as the base class again. This time we are going to be creating an object that is designed specifically to be extended into Blueprint. We are going to achieve the same end result via different methods.
For one, we are not going to be assigning materials and properties to the object in C++, we are only going to be creating and attaching the components. We will leave asset assignment to the designers that work with our object in UE (or us at a later point in time)! We are however still going to be writing our overlap functionality in code, but this time we will again provide functionality so that we may override our overlap functionality in blueprint if we wish.
Let's start by including the appropriate components, macros, and specifiers to AHybridSphere. Usually, when creating objects that are to be extended into blueprint, you must specify that it is BlueprintType in the UCLASS() macro. AActor objects are by default specified as such, we will still include this line for the sake of being explicit. We are also going to have to add a handle to each of the components we wish our AHybridSphere to own and declare them all with UPROPERTY(). The following code does just that:
UCLASS(BlueprintType)
class HELLOCODE_API AHybridSphere : public AActor
{
GENERATED_BODY()

public:
   // Sets default values for this actor's properties
   AHybridSphere();

    // Called when the game starts or when spawned
    virtual void BeginPlay() override;

    // Called every frame
   virtual void Tick( float DeltaSeconds ) override;

protected:

    UPROPERTY(Category = "Components", EditAnywhere)
    class USphereComponent* Sphere;

    UPROPERTY(Category = "Components", EditAnywhere)
    class UStaticMeshComponent* Mesh;

    UPROPERTY(Category = "Components", EditAnywhere, BlueprintReadOnly)
    class UTextRenderComponent* Text;

    UPROPERTY(Category = "Components", EditAnywhere)
    class UParticleSystemComponent* Particles;
};
As you can see, we have specified in the UCLASS() macro that this object is a BlueprintType. We have also included a handle to each component we are going to create as a member variable in our AHybridSphere class definition. The reason for this being that we need to declare each one with the UPROPERTY() macro. We do this to avoid the issues we had before when attempting to extend a code class into blueprint. The inclusion of this macro informs the engine of the existence of this property so it will feature successfully and bug free in any blueprint abstractions. It also provides us with the use of the UPROPERTY() specifiers.
The two that we have used previously are EditAnywhere and BlueprintReadOnly. EditAnywhere affords us the ability to edit the component from within our Blueprint abstractions. This means that when we create our blueprint abstraction of this C++ object, we will have access to the components properties in the Details panel. This is much easier than writing asset assignments and adjusting component properties from within C++. This specifier also allows us to translate, attach, and positon the component within the viewport and components panel of the Blueprint editor.
BlueprintReadOnly is only specified on the UTextRenderComponent. This specifier informs the engine that we would like to be able to read the reference to this component from within Blueprint Graphs. Meaning we can get a reference to the UTextRenderComponent and call the appropriate functions. If we wished to also write to the reference, meaning replace the UTextRenderComponent, we can specify BlueprintReadWrite.
We have also specified a category for the properties via the Category specifier. This simply groups the properties under the Components category and will appear so when featured in variable lists within the engine. These categories are useful for organizing function and variables lists in blueprint abstractions.
The next thing we need to do is create these components in the constructor definition. Navigate to HybridSphere.cpp and add the following code to AHybridSphere::AHybridSphere():
// Create the remaining components and attach to appropriate parents
Sphere = CreateDefaultSubobject<USphereComponent>(TEXT("OverlapSphere"));
RootComponent = Sphere;

Mesh = CreateDefaultSubobject<UStaticMeshComponent>(TEXT("Mesh"));
Mesh->AttachTo(Sphere);

Particles = CreateDefaultSubobject<UParticleSystemComponent>(TEXT("Particles"));
Particles->AttachTo(Mesh);

Text = CreateDefaultSubobject<UTextRenderComponent>(TEXT("Text"));
Text->AttachTo(Mesh);
As you can see, we still create our components using the CreateDefaultSubobject() template function and create our component hierarchy with AttachTo() and by setting the RootComponent. However, this time we aren't writing any code that changes the properties of these components. We are going to do all that in the Blueprint Editor. Compile this code now, we are going to make our working blueprint abstraction.
Navigate to the Content folder of the Content browser again and create another blueprint object, this time specifying the base class as HybridSphere. Call this blueprint FixedBP. Ensure you have deleted the BrokenBP from your level and content browser, we do not wish to have any hazardous objects featured anywhere in our project. Now open FixedBP and you will be presented with something in the viewport that looks like this:

That is because we are yet to define any of the properties of our components. You will notice that again our components have been listed as inherited, however this time when we select them, the details panel populates. You will notice that it looks slightly different to what we are used to. The main thing to notice here is the new layout of the code component details panel. Select the Sphere(inherited) component now and address the Details panel, you will see the following:

Click the small drop-down arrow next to Sphere and you will see all of the Details Panel sections you are familiar with when working with Sphere Collision components, even though they may appear different. This is how details appear when working with code-based objects within Blueprint. Alright, let's set up our sphere. Under the Shape section of the details panel, change the Sphere radius property to 220.0f.
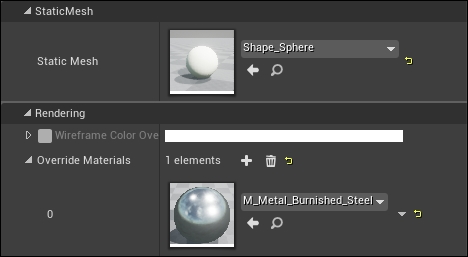
Next we must scrutinize the Mesh (Inherited) component. We need to set the mesh asset to the sphere we used earlier and the material to M_Metal_Burnished_Steel. We will also have to translate the Sphere as we did before so it sits in the middle of the Sphere Collision Volume. Select the mesh component and, under the details panel, expand the Mesh section. Under the StaticMesh section you will find the StaticMesh property dropdown, set this to Shape_Sphere. Changing the material will be a little different as this time we are going to utilize a property called Override Materials. What this will do is override a material of the given static mesh. Under the Rendering section you will find the Override Materials property list, click the small white plus (+) to add an element, then with this element search for the M_Metal_Burnished_Steel material. You should see something similar to this in your Details panel:
Next, to center our sphere, navigate to the Transform section and change the Z element of the Relative Location transform property to -50.0.
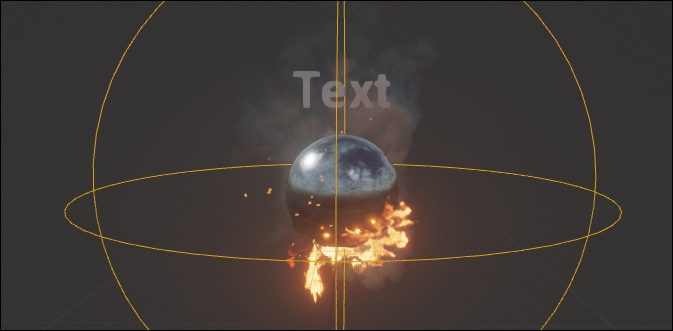
Next we must set the Particle component to the fire particle system we used before. With the Particles (Inherited) component selected, expand the Particles section of the Details panel and set the Template property to P_Fire via the dropdown. Finally, we have to set the properties of the Text (Inherited) component. Match the settings in the following screenshot then adjust the Relative Location property of the Transform section so that the Z element is 110.0f:

You should now see something that looks like this in the viewport:
Ok, let's see how this looks in a level! Drag and drop our new FixedBP into the level somewhere and press Play. No crash! And our Blueprint object is translated to exactly where it is supposed to be.