
Animation is a very effective way to establish the traits of a character. From the sleek movements of an assassin to the lumbering gait of a giant, the way the character moves and gestures is a core feature of that character's identity. UE4 offers a robust and easy-to-use workflow for animating characters. The following sections will illustrate how to set up a rudimentary animation implementation for the BH_Character. As it stands, our character is frozen in one pose. By the end of this section the BH_Character will be running, jumping, and falling in articulated motion.
Before we begin to break down the workflow of animation within UE4, it is important to establish a few animation conventions. These conventions are relevant among all animation workflows. In video games, animations are essentially a series of frames that are interpolated at real time to create the illusion of motion. Game developers have implemented multiple techniques to mask this interpolation so that there is no discernible skip between poses, leaving us with what appears to be smooth and natural motion.
If you think of a stop motion movie, animators will move figures within the scene a very small amount every frame to make it seem as though the characters are moving. A similar thing is happening during game animations. An animator will have created a series of animation key frames using a third-party tool. These frames will then be interpolated between at real time and a resultant pose will be calculated.
The way an animator articulates this motion is through the use of a skeleton. A skeleton is a collection of bones the animator can move to create the motion of a character. Each bone in a skeleton is bound to a section of geometry of the character mesh. When a certain bone moves, the bound geometry will also move. This means the animator can bring an otherwise static object to life. If the categories were to be broken down, it would look like this:
- Animation: A collection of frames that contain a character at varying stages of a given motion that will be played in sequence.
- Skeleton: The rig/frame the animator used to create the animation. This skeleton must be present in-engine for the animations to work as intended.
- Frame: A key frame or single frame of time within the animation.
- Pose: The resultant stance of the character given the amount of real time that has passed since the animation has begun play. Poses may be the result of two frames of animation that have been interpolated between to compensate for real-time precision, for example a pose between Frame 30 and Frame 31.
- Blend: A Blend is the transition between animations. You can swap from one animation to another via a Blend. The Blend will dictate how this transition takes place over time. You may want the transition to be instantaneous or you may want the character to blend between two animations smoothly over time.
Much like our standard Blueprints, UE4 offers another workflow tool called Animation Blueprints. It is with these Animation Blueprints that we establish the state machine for the character's animation, set up our animation graph, and create an animation event graph. These core features are responsible for the following:
- State Machine: Animation state machines are a visual representation of the logic behind a character's animation state. It is from these state machines that you will determine what animation to play given the character's current physical state, for example is the character moving? Play the running animation. Is the character falling? Play the falling animation.
- Animation Graph: This animation graph utilizes the same node-based visual scripting system that is implemented in Blueprint. These graphs are responsible for the blending and merging of poses. A great example is blending the state machine pose for a character, such as the running or idle pose, with a hit reaction animation pose. The result will be the original running or idle pose influenced by the hit reaction pose, this will have that hit reaction animation look different for each character state, saving our animator a lot of time.
- Event Graph: Very similar to a Blueprint Event graph, this will be used to create blueprint functionality for animation-related events. This graph will have access to the owning character Blueprint. This means we can call functionality in our character blueprint based off of events that take place in our animations, and attain variable information from the character to dictate animation logics.
When creating animation flows for a character, you first need to obtain some animation assets. Loading and exporting animations into UE projects is very easy. Simply navigate to the animation asset that your artist has provided (.fbx file format is ideal) and either import this asset or click and drag from your file explorer into the content browser panel. During this process the animation asset creation wizard will open. This will ask you to choose a skeletal mesh to associate these animations with, plus some other import options. To export animations, simply right-click on the animation you wish to export within the UE content browser and hit export.
Thankfully the mannequin assets we borrowed included a set of animations that we can use to articulate our character. Navigate back to the content folder you migrated these assets to (Content | Mannequin) and open the animation folder. Inside you will find an animation blueprint, a
Blendspace, and seven animation assets denoted by a green border. Select only the animation assets and move them to the BH_Character folder, we will be recreating our own versions of the animation Blueprint and Blendspace.
When creating any animation asset within Unreal, the skeleton is the asset that creates a common association. This is important as our animation blueprint needs to know of this association so all of the assets we reference within the Blueprint are relevant to the target skeleton. Let's create the animation Blueprint for our character now by right-clicking in the content browser. Choose the parent class to be AnimInstance (this is the base class from which all animation blueprints inherit). For the target skeleton, select UE4_Manniquin_Skeleton. This will ensure that any assets that we are able to reference from within the animation blueprint also use the same skeleton. Name this new animation blueprint BH_Character_AnimBP.
Open this new animation blueprint; you will be presented with the Animation Blueprint window. There are a few new panels here that you will not have seen before, a new toolbar layout, and a new type of graph. The elements of this new window are detailed as follows:
- Toolbar: Located at the top of the panel, this toolbar functions in a similar way to the toolbar featured in blueprints. There are some new buttons and features to the toolbar that will be detailed in the following.
- Viewport: Located on the left-hand side of the window the viewport is a key feature of the window, it is through this Viewport that you can see the resultant output pose/animation with your given animation functionality. This allows you to see real-time previews of your animation logics.
- Anim Preview Editor: Located below the viewport, this panel is where you will find any variables that have been used to influence the output of the anim graph. This means you can preview the resultant animation given a certain set of variable states.
- MyBlueprint: Located in the bottom-center of the window, this panel acts in exactly the same way as the MyBlueprint panel featured in standard blueprints. It is here that you can find any technical features of the Animation Blueprint.
- Asset Browser: The asset browser occupies the same space as the MyBlueprint panel and can be accessed via a tab by default. In the asset browser you will find any animation assets that are associated with the target skeleton of this Animation Blueprint.
- Details: This time, the details are located in the bottom-right of the window. It is here that you will be able to change any exposed settings of the selected element.
- Anim Graph: This is a new type of graph that is unique to Animation Blueprints and can be found in the center of the window. This graph is responsible for all of the animation flow logic. It is here that you will be performing animation blends and summoning various nodes that dictate how the character will animate.
- Event Graph: Event graphs featured in Animation Blueprints allows you to create and receive animation-specific events. It is also here that you can update variables contained within the Animation Blueprint that may dictate the animation of the character.
As stated previously, Animation Blueprints boast a few new buttons in the toolbar. These new buttons are specifically related to animation. The first are the options Preview and RefPose, which allow you to choose what you would like to occupy the Viewport. Preview will show you the output pose of your given animation functionality, RefPose will show you the base pose the animation will be blending from. The third option is titled Record. This allows you to record an animation sequence based on what is playing in your preview viewport. There is also a new navigation tool on the right-hand side of the toolbar panel that looks like this:

This section allows you to easily navigate between all of the assets that are relevant to this Animation Blueprint. They have been listed in a hierarchical order. The Skeleton is the base from which many animation assets will stem from. The Mesh is the skeletal mesh that you are using to preview the output from this Animation Blueprint. The Animation is the currently active animation asset associated with the given skeletal mesh, and the Graph is the Animation Blueprint itself.
The order of this hierarchy represents the polymorphic order of the animation pipeline. You can have multiple skeletal meshes that are based off of one skeleton. You can have multiple Animations based off of one skeletal mesh. This means that you can have one Animation Blueprint that can be used for multiple skeletal meshes and Animations, given that they use the same target skeleton.
Currently in our new BH_Character_AnimBP there will be no functionality present in the anim graph apart from the FinalAnimationPose node. This node takes in a new pin type that we haven't seen before. The pin is represented by the outline of a standing person. This pin is of type pose. Animation nodes will take in one or more poses and output a pose to then be fed into subsequent animation nodes. FinalAnimationPose itself is the end of the animation chain. The pose that is parsed into this node will be the pose that is used for this frame. Currently your anim graph will look like this:

What we need to do is create some functionality that outputs a pose to this node. We are going to be creating a state machine. As stated previously, a state machine will determine an output animation based on various state variables that are related to the character in some way. We need to create a state machine that will handle outputting the correct animation based on the character's current movement state.
To create a new state machine, right-click in the anim graph and search for add new state machine. Selecting this option will create a state machine node. With the node highlighted, you will notice that the Details panel in the bottom right-hand side of the window has updated to provide the appropriate fields. Rename this node to Character_Locomotion now, as this node will handle the animation based on the character's current locomotion. Drag from the output pose pin and connect it to the input pin on the FinalAnimationPose.
If you compile the blueprint, the compiler will output some warnings. They are all associated with the state machine currently being empty; we need to fill this state machine with relevant functionality. Double-click the state machine node now.
With the Character_Locomotion state machine open you will now see another nearly blank graph with only a small node titled Entry in the center. State machine graphs are different to Blueprint graphs as the nodes that are created and the connections between them are represented differently. This is because, as opposed to the visual plotting of functionality, this is the visual plotting of logic flow.
State machine graphs are made up of State Nodes and Transition Lines. A State Node is a node the represents a logic state that can be assumed, they are usually responsible for playing an animation associated with the state. A Transition Line is an association between states that represents the ability for one state to transition to another based on a rule.
The Entry node present does exactly as is titled. This node will be the entry point when this state machine is queried for the output pose. What we need to do is create a new State Node and connect it to this entry node. The first state that we should create when working with a locomotion state machine is an Idle State. That is because, by default, the first state node that is connected to the entry node will be responsible for the default pose of that state machine. In other words, if none of the other transition rules resolve to be true, this state will be the one that is responsible for playing the animation. In the case of locomotion, if a character is doing nothing, we wish them to play an idle animation.
To create new state nodes, simply right-click on the graph and select Add State. This will create a new state node titled State by default. If you select this state it will be bordered by an orange outline and the Details panel will update. If you look at the Details panel now you will see that you can rename the state node, change this now to Idle. You will also notice that, in the Details panel under the Animation State section, you can also specify event names that you wish to trigger when that state is entered. This is a very powerful tool as you can have other functionalities execute upon an animation state change. If you specify any non-null names in these fields, an AnimNotify event will be created with the entered name that can be summoned in the Animation Blueprints event graph.
The next thing we need to do is create a transition between the entry node and the new Idle state node. Do this now by clicking and dragging from the small arrow present in the Entry node to the Idle node we just created. This will create a white arrow. As this is the transition from the entry node to this first state node, we will not be creating any transition rules, meaning this transition will take place every time. Usually transitions also include a rule that must evaluate to true before the transition takes place. Create another state node now and title it JumpBegin. Click and drag from the outside edge of the Idle node onto the JumpBegin node, another arrow will be created but there will also be a small white circle with a bi-directional arrow within. Your graph should look similar to this:

The small white circle represents a transition rule. Select this transition rule now so that it is highlighted, then address the Details panel. You will notice that this transition rule has many properties that can be changed to affect not only how the transition takes place, but also how the blend between the two state animations takes place. Double-click on the circle now. You will be presented with a new graph that has a single result node that takes in a bool titled CanEnterTransition. Simply, if the bool value that is parsed to this node resolves to true, the transition will take place. We want this value to be true when the character is jumping, and false when it is not.
We need to receive information from our character. We can do this from the Animation Blueprint Event Graph. Save this information in a relevant variable then check the state of this variable from within this transition. How do we do that? Member variables. Within the MyBlueprint panel, add a new bool variable and name it IsInAir?. Then drag a visual reference to this variable into the transition rule graph and plug it into the CanEnterTransition input pin. Alternatively, a much easier way to create variables on the fly is to drag a line from the CanEnterTransition input pin and then select Promote To Variable from the suggested list. This will create a new member variable automatically, saving the hassle of having to do it through the My Blueprint Panel. With the new variable created we can change the state of this bool value in the event graph for this AnimBP and it will affect this transition rule.
An important thing to note is the navigation bar at the top of the graph; it looks like this:
The purpose of this bar is to show you how nested you are within the animation graph. Currently we are looking at the JumpBegin state, which is in our Character_Locomotion state machine, which is in our AnimGraph! This is very useful as it allows us to easily transition back to any of the other graphs by clicking on the option in the navigational bar. There are also backwards and forwards arrows on the left-hand side of the bar.
Playing animations from within state nodes is very easy, simply double-click the state node and you will be presented with another FinalAnimationPose node. This node will output the final pose for this state to the state machine that will then be outputting that pose to the anim graph. Double-click the Idle State node now. The animation we want to play here is the ThirdPersonIdle animation. You can summon this animation into the graph by one of two ways. The first is by right-clicking in the graph and searching for play ThirdPersonIdle. The second is by looking in the asset browser for the correct animation then clicking and dragging the correct item into the graph. With the play ThirdPersonIdle node in the graph, click the output pose pin and drag it to the FinalAnimationPose input pin. Compile the blueprint now. With this connection made, you will see that the preview pose within the viewport has updated to the idle animation! You will also notice in the AnimPreviewEditor panel we can now see the IsInAir? variable we created earlier. We can now check and uncheck this variable to preview how our state machine will function.
To finish our state machine, we simply need to add two more states and three more transitions. The main purpose of these states is to complete our jump loop. We have our jump loop in three different animations: we have a jump begin animation, a jump in air loop animation, and a jump land animation. The reason for this is we do not know how long the character will be in the air for, therefore the number of times in the air loop plays depends on the amount of time the character is in the air while jumping. Once the character has landed again we can then finish our jump loop and play the jump end animation.
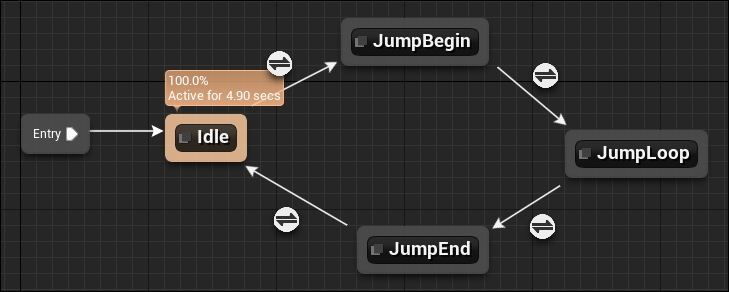
Add two new states to our machine now, call them JumpLoop and JumpEnd. Also create transitions between JumpBegin and JumpLoop, JumpLoop and JumpEnd, and then JumpEnd and Idle. This has now created our closed state machine loop. If the character is not jumping it will be in an idle pose. Your state machine should look similar to this:
Now that we have the shell of our state machine, let's begin filling our states with the appropriate animations and our transitions with the appropriate conditional checks. Start by adding and connecting the play ThirdPersonJump_Start node to the JumpBegin state graph. The rule we will create between JumpBegin and Jumploop will be using information that utilizes the current animation that is playing. What we will be doing is checking whether the ThirdPersonJump_Start animation is 80% of the way through playing. If it is, we wish to transition to the JumpLoop state, initiating a blend between the jump begin and the jump loop animations.
Double-click the transition node between JumpBegin and JumpLoop. Within this transition graph we can utilize the context sensitive search to find the function we need. Right-click inside the graph and search for the function Time Remaining (ratio) (ThirdPersonJump_Start). You can simply search for the keyword ratio to find this node. As we are in the transition between a state that plays the ThirdPersonJump_Start and another, the ratio function found will automatically observe the appropriate animation.
This node will return the time remaining in the animation as a fraction. This value will be of type float. Take the result of this node and then search for a float less than float node (<). Plug this value into the top input then in the bottom input type 0.2. This less than node will return true when the animation has less than 20% of the animation play time remaining. Your node arrangement should appear as follows:

The next step is to play the jump loop animation from within the JumpLoop state. Do this now by adding and connecting the Play ThridPersonJump_Loop node to the state graph. Now go back out into the state machine graph and under the AnimPreviewEditor, tick the IsInAir? checkbox. You should see the character transition from an idle pose to the jump begin animation, then to the jump loop!
There is a small problem though, the transition between the jump begin and jump loop animations looks a little janky. The issue here is the jump begin animation is looping and starting the second loop before the transition blend begins with the jump loop animation. Even though we specified that the animation should transition before the animation ends, when you specify an animation to loop (which is set to true by default), the engine will blend the last few frames of the animation with the first few frames of the animation to create a smooth loop.
To fix this, open the JumpBegin state and select the Play ThirdPersonJump_Start node. Selecting this node will populate the Details panel with properties that are associated with this animation node. Under the settings category there is a Loop Animation checkbox. Uncheck this now and re-preview our animation sequence by checking the IsInAir? variable, you will see the transition is now much smoother! However, when you uncheck the variable, nothing happens, the character remains in the jump loop. That is because we have yet to specify our JumpLoop to JumpEnd transition rule.
Do this now by opening the transition between the two states. This time, instead of checking the IsInAir? variable directly, parse the value of this variable to a NOT node. This node will return true when the provided input is false. Plug the output from this NOT node into the CanEnterTransition input pin. You also need to provide the JumpEnd state the play ThirdPersonJump_End node, do this now. Also ensure that the play ThirdPersonJump_End node has the loop animation property (found in the Details panel) unchecked.
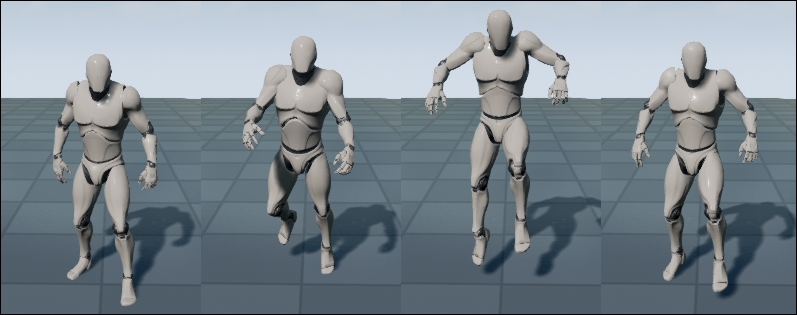
The last thing you need to do is specify the transition between the JumpEnd state and the Idle state. Use the same ratio node transition rule we used when specifying the transition rule between JumpBegin and JumpLoop. Now compile the Animation Blueprint and test our state machine using the IsInAir? checkbox in the AnimPreviewEditor panel. You should see a transition similar to this:
Despite our preview viewport showing a correct sequence, if we are to run the game, our character will still not animate at all. There are two reasons for this. This first is that we have not assigned the IsInAir? variable to anything relevant yet, the other is that we have not informed our BH_Character to use the BH_Character_AnimBP. We can do this now by opening the BH_Character blueprint, selecting the Mesh component from within the Components panel, and changing the Anim Blueprint Generate Class field under the Animation section of the Details panel to BH_Character_AnimBP.
Now that we have associated our character with our custom Animation Blueprint, we can retrieve data from the owning character in the Animation Blueprint event graph and set our IsInAir? variable. Navigate back to the BH_Character_AnimBP and open the EventGraph. By default, you should see two translucent nodes, one is Event Blueprint Update animation. This event will be called every frame (similar to Event Tick in standard blueprints). This node will also provide the current delta time (time since last frame).
The other node is a pure node called TryGetPawnOwner. This will try and get the pawn that owns this animation instance. As our BH_Character inherits from UCharacter, which in turn inherits from UPawn, and our BH_Character_AnimBP inherits from anim instance, this node will work perfectly, we will just have to do some casting if we want access to BH_Character-specific functionality.
The first thing we are going to do is ensure that our TryGetPawnOwner node returns a valid reference. This is similar to checking the validity of pointers in C++. We can do this easily by finding the node IsValid. This node takes in a reference to a UObject, if the reference is valid one execution path will be fired, if it is not, the other will. This is a very powerful tool as it allows us to ensure that we only carry out object-dependent functionality if that object is valid.
Click and drag from the TryGetPawnOwner output pin and search for IsValid?. This will summon the node and automatically assign the output reference to the input of the new node. From the IsValid path summon a set node for our IsInAir? variable. We only want to do this if our Pawn reference is valid, otherwise we will try and access data that has yet to be created and we will either see an in-game crash or runtime error.
As the UPawn class is responsible for the movement objects of any given pawn or pawn child class, we don't require a cast of this reference. From the TryGetPawnOwner reference, click and drag a line and search for the function GetMovementComponent. This will return the movement component that is associated with the owning pawn. As you have seen with our BH_Character, the movement component is responsible for all movement variables and parameters. We can query whether the character is currently falling by dragging a reference from the GetMovementComponent output pin and searching for the function IsFalling. This function will return a bool representing the falling state of the character. Set our IsInAir? value to the output bool. Your graph should look similar to this:

Now we can run our project and our character will idle and jump accordingly!
Despite being able to stand still and jump properly, our character is currently having a hard time running. When we move across our map, he simply slides. What we want to do is have our character run instead. Not only do we want the character to run but we also want the character to transition from standing to walking to running, smoothly. One of the best ways to do this is by using a BlendSpace.
A Blendspace allows you to set up a graph of animations you wish to transition between. The axis of this graph will represent a value that you provide to the Blendspace. When plotting the animations along the axis, you are saying that, when the provided value is X, I would like the animation at position X to be of full weighting, meaning that you want that animation to entirely dictate the motion of the character's mesh. This also means that you can have an animation A at value X on the graph and an animation B at value Y on the graph. Let's say that X is 100 and Y is 200. If the value you provide to the Blendspace is at 150, the output pose will be influenced 50% by animation A and 50% by animation B.
This is perfect for our running example. We use the character's speed as the value we will be parsing to the Blendspace. We can have an idle animation at value 0 (we won't be moving in this case), a walk animation at value 90, and a run animation at value 375. This means that, as our character increases in speed, the weighting of the output pose will transition smoothly between these three animations, resulting in a gradual change of the stance and running intensity of the character.
Blendspaces are another animation asset, however unlike Animation Blueprints, they themselves are classified as animations, meaning that you will be introduced to a new workspace, The animation workspace. As we are only concerned with one axis (speed), we need to create a one-dimensional Blendspace. Do this now by right-clicking in the content browser and creating a Blendspace 1D object, it can be found under the animation field. Name this BH_Idle_Run_BS1D. Double-click the Blendspace now to open it.
You will be presented with the animation window. There are a few new panels to work with here, they are detailed as follows:
- Skeleton Tree: Located in the top left-hand corner of the window, this panel shows you the current skeleton hierarchy of the animation asset you are working with.
- Anim Asset Details: Located underneath the Skeleton Tree panel. This panel is similar to the details panel in Blueprints and allows you to modify specific parameters of the current animation asset you are working with.
- BH_Idle_Run_BS (Blendspace name): Located in the bottom-center of the window this area shows the workspace for the Blendspace itself. It is here where you will be establishing your axis values and plotting your animation points. Note that the name for this section will change depending on the animation asset.
- Asset Browser: Located in the bottom-right corner of the window this panel shows you the animation assets associated with the same skeleton that you can reference in this asset.
- Details Panel: Though unpopulated at the moment, this panel is used predominantly when setting up
animnotifies in standard animation assets. This will be covered later in the chapter. - Viewport: This panel shows the current output of the animation asset and some other statistical information about the skeletal mesh.
The toolbar at the top of the window has also changed slightly. You can now import and export animations directly from the toolbar. You can also create another animation assets from here.
The first thing we need to do is set up our workspace. Under the BH_Idle_Run_BS panel there is a checkbox titled display editor vertically. Check this now if you wish. I prefer to have the display appear this way so I can maximize visible information in the panel. The next thing we need to do is set up our axis. Right now our single axis has no label and the range is from 0 to 100. We need to rescale our axis so that it goes from 0 to 370 and label it Speed. We can keep the number of divisions the same as we wish to have our walk animation play when our character is moving at roughly ¼ of its maximum speed. Do this now by filling in the corresponding fields within the panel then press the apply parameter changes button. Your parameters field should look like this:

Now that our axis has been set up, the next thing we need to do is provide the graph with animations. You can only plot animations at division points. This is so that the Blendspace can correctly interpolate between animations based on the current value and the difference between divisions. Click and drag the ThirdPersonIdle animation from the Asset Browser onto the bottom of the graph. You should be presented with a small node on the axis at the very bottom of the graph. This means that when our speed value is zero, the idle animation will play.
Do the same for the ThirdPersonWalk animation but drop this animation node at the first division. You can preview the output animation of a Blendspace by clicking in the Blendspace graph and hovering your mouse over the axis between these two nodes. This will use the value your mouse is currently at on the axis for the Blendspace weighting.
The next thing we need to do is drag and drop the ThirdPersonRun animation onto the top of the Blendspace graph. This means that at speed 0, the character will idle, at speed ~90, the character will walk, and at speed 375, the character will run. The Blendspace itself will handle the interpolation between these animations when the speed value deviates from these axis points. Your final Blendspace graph should look like this:

Now, where do we call this Blendspace so we can get its output pose to influence our character animation? We are going to replace the play Idle animation in our idle state of the locomotion state machine with this Blendspace! This is a great example of combining animation assets within the UE4 animation pipeline to achieve polished results. We can use the state machine to dictate which animation asset we will be utilizing, then use the specific functionality of the Blendspace1D to add another level of polish to our character movement.
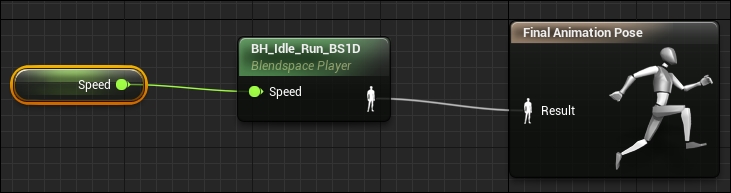
Open the BH_Character_AnimBP now and navigate to the Idle state node. Delete the play animation node that is there currently and search for the BH_Idle_Run_BS1D node, (keyword Blendspace). This will summon a node that takes in a float value representing the speed value we have specified in our Blendspace axis, and outputs a pose. Plug the pose output into the FinalAnimationPose node of this state graph. We do not currently have a value we can plug into the speed input pin. However do the same thing we did with our IsInAir? variable and create a member variable of type float called Speed, we will later assign a value to this variable in the Anim Blueprint Event Graph. Create this member variable now and assign it to the input pin of the Blendspace node. Your functionality should appear as follows:
Navigate back to the Animation Blueprint Event Graph. Drag another line off the TryGetPawnOwner node and search for a function called GetVelocity. This will return the Velocity Vector of the player. From the output of this node, search for a function called VectorLength. This will output the length of the vector as a float. As the character's velocity vector is un-normalized, it means we can use the length of this vector to get the speed of the character in cm/s. Summon a set node and plug this float value into the input pin. Your event graph should appear as follows:

Now, when you run the project, our character will animate when we jump and run! Great work!